[ This is a content summary only. Visit our website http://ift.tt/1b4YgHQ for full links, other content, and more! ]


by Web Desk via Digital Information World


Should I choose Angular, or React? Today's bipolar landscape of JavaScript frameworks has left many of developers struggling to pick a side in this debate. Whether you're a newcomer trying to figure out where to start, a freelancer picking a framework for your next project or an enterprise-grade architect planning a strategic vision for your company, you're likely to benefit from having an educated view on this topic.
To save you some time, let me tell you something up front: this article won't give a clear answer on which framework is better. But neither will hundreds of other articles with similar titles. I can't tell you that because the answer depends on a wide range of factors which make a particular technology more or less suitable for your environment and use case.
Since we can't answer the question directly, we'll attempt something else. We'll compare Angular (2+, not the old AngularJS) and React to demonstrate how you can approach the problem of comparing any two frameworks in a structured manner on your own and tailor it to your environment. You know, the old "teach a man to fish" approach. That way, when both are replaced by a BetterFramework.js in a year's time, you will be able to re-create the same train of thought once more.
Before you pick any tool you need to answer two simple questions: "Is this a good tool per se?" and "Will it work well for my use case?" None of them mean anything on their own, so you always need to keep both of them in mind. All right, the questions might not be that simple, so we'll try to break them down into smaller ones.
Questions on the tool itself:
Questions for self-reflection:
Using this set of questions you can start your assessment of any tool and we'll base our comparison of React and Angular on them as well.
There's another thing we need to take into account. Strictly speaking, it's not exactly fair to compare Angular to React, since Angular is a full-blown feature-rich framework, and React just a UI component library. To even the odds, we'll talk about React in conjunction with some of the libraries often used with it.
An important part of being a skilled developer is being able to keep the balance between established, time-proven approaches and evaluating new bleeding-edge tech. As a general rule, you should be careful when adopting tools which have not yet matured due to certain risks:
Both React and Angular come from good families, so it seems that we can be confident in this regard.
React is developed and maintained by Facebook and used in their own products, including Instagram and WhatsApp. It has been around for roughly three and a half years now, so it's not exactly new. It's also one of the most popular projects on GitHub with about 60,000 stars at the time of writing. Sounds good to me.
Angular (version 2 and above) has been around less then React, but if you count in the history of its predecessor, AngularJS, the picture evens out. It's maintained by Google and used in AdWords and Google Fiber. Since AdWords is one of the key projects in Google, it is clear they have made a big bet on it and is unlikely to disappear anytime soon.
Like I mentioned earlier, Angular has more features out of the box than React. This can be both a good and a bad thing, depending on how you look at it.
Both frameworks share some key features in common: components, data binding, and platform-agnostic rendering.
Angular provides a lot of the features required for a modern web application out of the box. Some of the standard features are:
Having all of these features available out of the box is highly convenient when you don't want to spend time picking the libraries yourself. However, it also means that you're stuck with some of them, even if you don't need them. And replacing them will usually require additional effort. For instance, we believe that for small projects having a DI system creates more overhead than benefit, considering it can be effectively replaced by imports.
With React, you're starting off with a more minimalistic approach. If we're looking at just React, here's what we have:
Not much. And this can be a good thing. It means that you have the freedom to choose whatever additional libraries to add based on your needs. The bad thing is that you actually have to make those choices yourself. Some of the popular libraries that are often used together with React are:
We've found the freedom of choosing your own libraries liberating. This gives us the ability to tailor our stack to particular requirements of each project and we didn't find the cost of learning new libraries that high.
Taking a step back from the features of each framework, let's see what kind higher-level concepts are popular with both frameworks.
There are several important things that come to mind when thinking about React: JSX, Flow, and Redux.
JSX is a controversial topic for many developers: some enjoy it, and others think that it's a huge step back. Instead of following a classical approach of separating markup and logic, React decided to combine them within components using an XML-like language that allows you to write markup directly in your JavaScript code.
While the topic of mixing markup with JavaScript might be debatable, it has an indisputable benefit: static analysis. If you make an error in your JSX markup, the compiler will emit an error instead of continuing in silence. This helps by instantly catching typos and other silly errors. This is something we really miss in Angular.
Continue reading %React vs Angular: An In-depth Comparison%

Download Page from the good people at Yummygum. This is a site they did for Atom & Visual Studio Code. As a coder, I always love the design with coding languages. Nice use of the dark color scheme, monospaced font, and icons!
City Lights is a collection of beautiful goodies for Atom or Visual Studio Code. As a design studio that also does some coding, we always want our software to look great. That’s why we created City Lights: to make your code editor look really good.
The post City Lights appeared first on One Page Mania.
Forms are an essential part of many web applications, being the most common way to enter and edit text-based data. Front-end JavaScript frameworks such as Angular, often have their own idiomatic ways of creating and validating forms that you need to get to grips with to be productive.
Angular allows you to streamline this common task by providing two types of forms that you can create:
In this article, we'll make a simple example form with each method to see how it's done.
You do not need to know all the details of how to create an Angular application to understand the framework's usefulness when it comes to forms. However, if you want to get a better grasp of Angular, you can take a look at this SitePoint article series on building a CRUD app with Angular.
We will use Bootstrap in this tutorial. It is not an integral part of an Angular application, but it will help us streamline our efforts even further by providing ready-made styles.
This is how you can add it to your application:
Open the command prompt and navigate to the folder of your project
Type npm install bootstrap@next. This will add the latest version of bootstrap to the project
Edit the .angular-cli.json file and add a link to the Bootstrap CSS file
"apps": [
"styles": [
    "../node_modules/bootstrap/dist/css/bootstrap.css"
 ]
]
We will not use the Bootstrap JavaScript file in this application.
Both template-driven Forms and Reactive Forms require the FormsModule. It should be added to the application in app.module:
import { FormsModule } from '@angular/forms';
@NgModule({
imports: [
  BrowserModule,
  FormsModule
]
})
With that out of the way, we can proceed with the forms themselves.
Let us assume you want to create a simple form as quickly as possible. For example, you need a company registration form. How can you create the form?
The first step is to create the <form> tag in your view.
<form #companyForm="ngForm">
We need to modify this tag in two ways in order to submit the form and use the information from the input fields in our component:
ngForm directive.ngSubmit event to a method we will create in our component
<form #companyForm="ngForm" (ngSubmit)="submitCompany(companyForm.form);">
We will create the submitCompany method in the component a bit later. It will be called when the form is submitted and we will pass it the data from the form via companyForm.form.
We also need a submit button, regardless of the content of the form. We will use a few Bootstrap classes to style the button. It is good practice to disable the button before all the data validation requirements are met. We can use the template variable we created for the form to achieve this. We will bind the disabled property to the valid property of the companyForm object. This way the button will be disabled if the form is not valid.
<button class="btn btn-primary" [disabled]="!companyForm.valid">Submit</button>
Let us assume our simple form will have two fields - an input field for the name of the company and a drop-down field for the company's industry.
First, we create an input field for the name:
<input type="text"
       class="form-control"
       name="company-name">
Right now we have a standard input with the type, name and class attributes. What do we need to do to use the Angular approach on our input?
We need to apply the ngModel directive to it. Angular will create a control object and associate it with the field. Essentially, Angular does some of the work for you behind the scenes.
This is a good time to mention that ngModel requires the input field to have a name or the form control must be defined as standalone in ngModelOptions. This is not a problem because our form already has a name. Angular will use the name attribute to distinguish between the control objects.
In addition, we should specify a template variable for the input: #nameField in this case. Angular will set nameField to the ngModel directive that is applied to the input field. We will use this later for the input field's validation. This variable will also allow us to perform an action based on the value of the field while we are typing in it.
Now our input looks like this:
<input type="text"
       class="form-control"
       name="company-name"
       ngModel
       #nameField="ngModel">
It is almost the same, but with a few key changes.
Let us assume we want the company name field to be required and to have a minimum length of 3 characters. This means we have to add the required and minlength attributes to our input:
<input type="text"
       class="form-control"
       name="company-name"
       ngModel
       #nameField="ngModel"
       required
       minlength="3">
Sounds simple enough, right? We will also need to display an error message if any of these two requirements are not met. Angular allows us to check the input's value and display the appropriate error message before the form is submitted.
We can perform such a check while the user is typing in the form. First of all, it is a good idea to display an error only after the user has started to interact with the form. There is no use in displaying an error message right after we load the page. This is why we will insert all the error messages for this input inside the following div:
<div *ngIf="nameField.touched && nameField.errors"></div>
The ngIf directive allows us to show the div only when a specific condition is true. We will use the nameField template variable again here because it is associated with the input. In our case, the div will be visible only, if the input has been touched and there is a problem with it. Alright, what about the error messages themselves?
We will place another div inside the aforementioned one for each error message we want. We will create a new div for the error message and use the nameField template variable again:
<div class="alert alert-danger"
     *ngIf="nameField.errors.required">
     The company name is required
</div>
We are using the "alert alert-danger" bootstrap classes to style the text field. The nameField variable has the property errors, which contains an object with key-value pairs for all the current errors. The ngIf directive allows us to show this error message only when the 'required' condition is not met. We will use the same approach for the error message about the minimum length.
Continue reading %Quickly Create Simple Yet Powerful Angular Forms%
TOAST UI Chart is an open source JavaScript library to draw various and essential charts on your web service.
TOAST UI Chart provides many kind of charts as: Bar, Column, Line, Area, Pie, Bubble, Scatter, Map, Heatmap, Treemap, Radial, Boxplot.
This article was sponsored by Tumult. Thank you for supporting the partners who make SitePoint possible.
Animation can roughly be defined as showing successive images or frames to give the illusion of smooth changes. Instead of producing every frame by hand, modern web animation tools like Tumult Hype let an animator create keyframes (generally start and stop points) and the computer dynamically fills in all the inbetween frames. How the computer decides to generate these frames can affect a viewer’s attention and emotional connection. This article explores a critical piece of generated animations, the Timing Function, and how to make best use of Tumult Hype’s advanced timing function editor for your animations.
Before reading, the first step is to download Tumult Hype. The trial is fully functional for 14 days. Tumult Hype has two flavor modes: Standard and Professional. For making custom timing functions (and following along with this article!), you’ll want to use Hype Professional.
Let’s say you want to animate a box moving across the screen. Over the course of two seconds you will have it move 300 pixels to the left. In generating an animation, the computer needs to determine the position of the box in time, and this is the role of the timing function. The most basic of these is linear interpolation, which divides evenly the distance by the number of frames. Thus a 30 frames-per-second animation would have each step move the box 5 pixels, as 300px / (2s * 30fps) = 5px. This successfully creates an animation:

To be subjective, this animation is bland! It moves without any natural physicality or weight. A viewer’s eyes must catch up to the speed the box is moving and then will likely overshoot their gaze when the animation abruptly ends. The most common solution is to apply a basic acceleration and deceleration to the box. This timing function is called Ease In Out:

This looks better, and is the most common choice for animations. It is the default timing function in Tumult Hype and most other animation tools for good reason.
To be more precise, a timing function inputs the value of time (x) and outputs a value of the animated property (y). Recalling back to middle school algebra, f(x) = y-style functions are a form that can be represented on a 2D graph. The basic linear timing function looks as one might expect, a line:
Ease In Out is a gentle curve which shows how it will start and end at slower speeds:
This timing function is created with the mathematics of a cubic Bézier curve. By changing the control points affecting curvature, different acceleration and decelerations can be achieved:
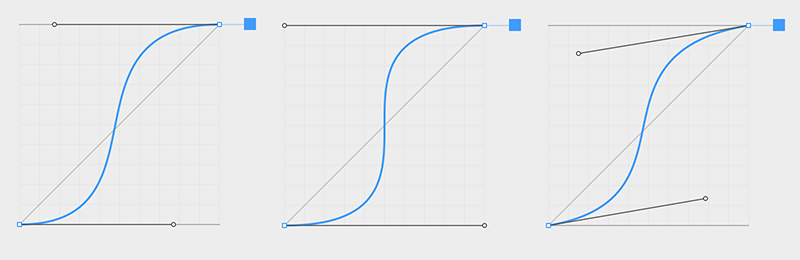
The property values can even dip below the minimum value or above the maximum value, creating anticipation and overshoot timing functions:
Tumult Hype offers more power yet: several bézier curves can be combined to form multi-curve paths. These can be used for a variety of effects such as bouncing or elasticity:
Nature does not move mechanically like the linear timing function above. Timing functions like easing therefore serve a critical role in humanizing the elements you are animating. This helps present information cleanly and clearly. It directs focus.
Good timing helps give meaning to animations. It turns lifeless shapes into reality. Some can help convey emotion which is critical to branding. Other timings can entertain and engage.
The movement of “inanimate” objects is governed more by physics. “Animate” objects are governed by their own thoughts and emotions. Both styles can be modeled with timing functions.
Continue reading %Advanced Timing Functions and Easing for Web Animations with Tumult Hype%