[ This is a content summary only. Visit our website http://ift.tt/1b4YgHQ for full links, other content, and more! ]


by Web Desk via Digital Information World
|
In part one or this series, we learned how to get our Todo application up and running and deploy it to GitHub pages. This worked just fine, but unfortunately the whole app was crammed into a single component. In this article, we’ll examine a more modular component architecture. We’ll look at how to break this single component into a structured tree of smaller components that are easier to understand, re-use and maintain.
This article is part 2 of the SitePoint Angular 2+ Tutorial on how to create a CRUD App with the Angular CLI.
You don't need to have followed part one of this tutorial, for part two to make sense. You can simply grab a copy of our repo, checkout the code from part one, and use that as a starting point. This is explained in more detail below.

So let's look at what we covered in part one in slightly more detail. We learned how to:
Todo class to represent individual todosTodoDataService service to create, update and remove todosAppComponent component to display the user interfaceThe application architecture of part 1 looked like this:
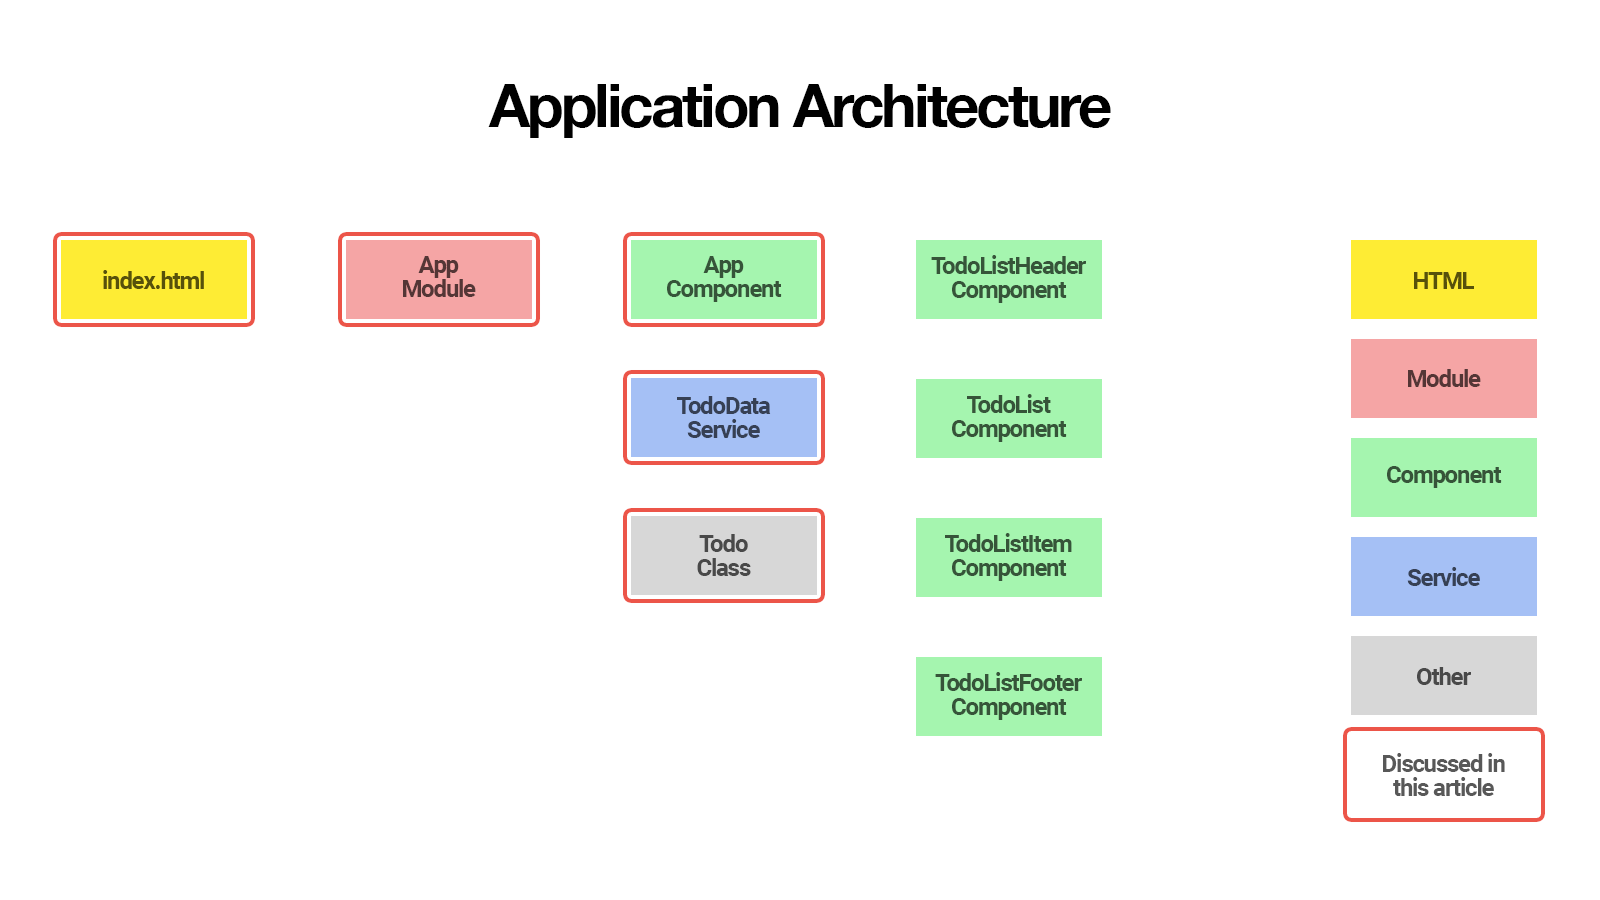
The components we discussed are marked with a red border.
In this second article, we’ll delegate some of the work that AppComponent is doing to smaller components that are easier to understand, re-use and maintain.
We’ll create:
TodoListComponent to display a list of todosTodoListItemComponent to display a single todoTodoListHeaderComponent to create a new todoTodoListFooterComponent to show how many todos are left.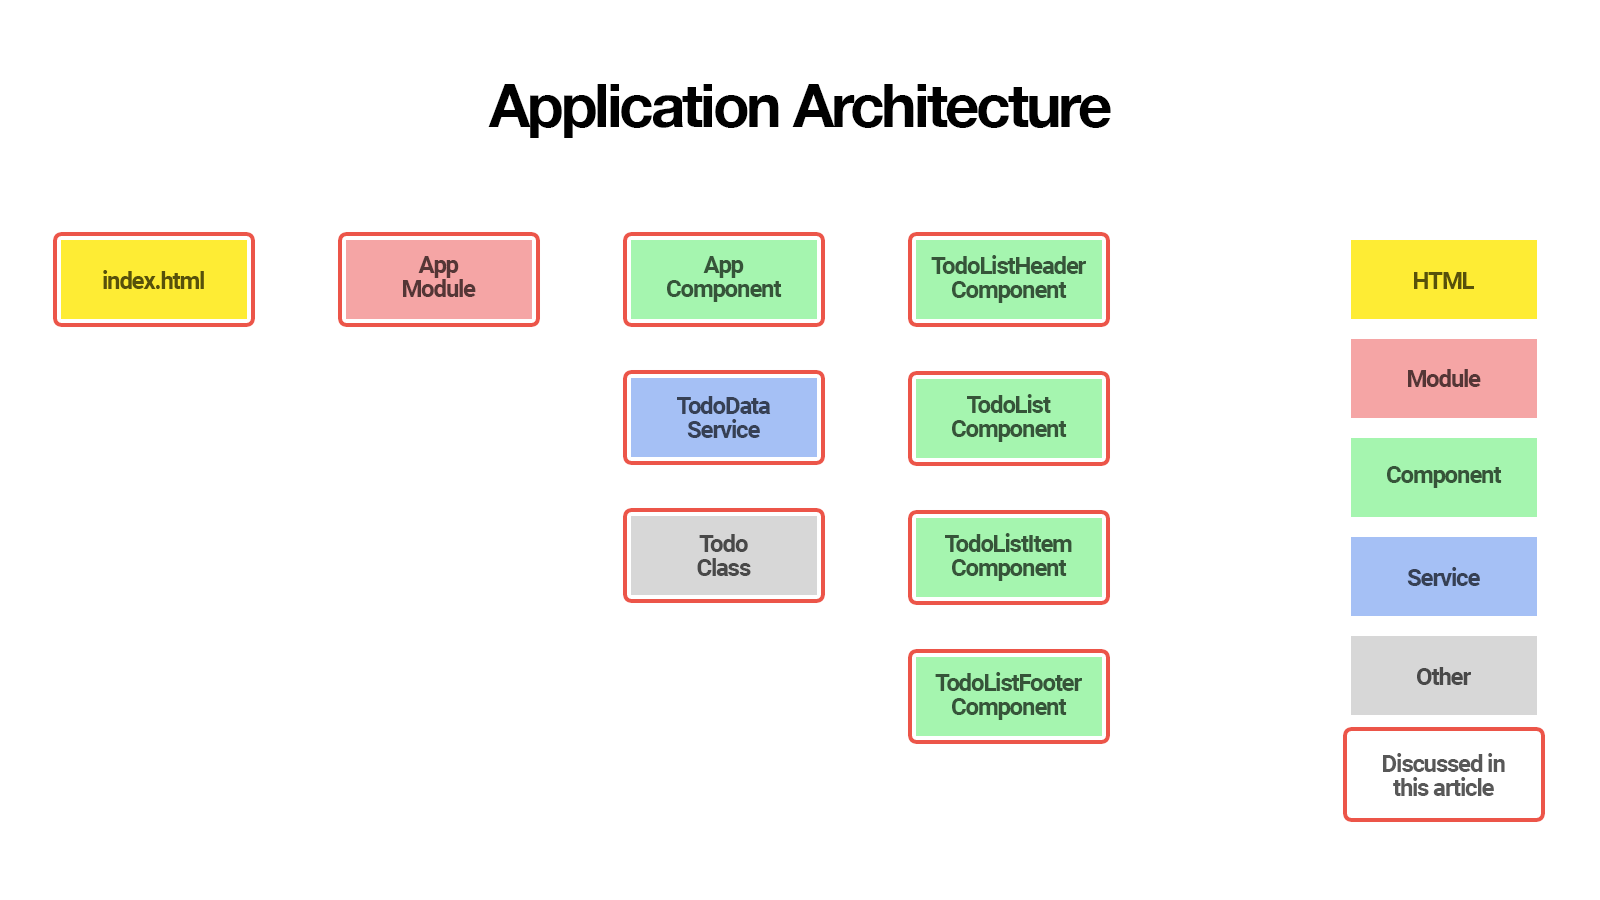
By the end of this article, you’ll understand:
So let's get started!
The first thing you’ll need to follow along with this article is the latest version of the Angular CLI. You can install this with the following command:
npm install -g @angular/cli@latest
If you need to remove a previous version of of the Angular CLI, here's how:
npm uninstall -g @angular/cli angular-cli
npm cache clean
npm install -g @angular/cli@latest
After that you'll need a copy of the code from part one. This is available at https://github.com/sitepoint-editors/angular-todo-app. Each article in this series has a corresponding tag in the repository so you can switch back and forth between the different states of the application.
The code that we ended with in part one and that we start with in this article is tagged as part-1. The code that we end this article with is tagged as part-2.
You can think of tags like an alias to a specific commit id. You can switch between them using git checkout. You can read more on that here.
So, to get up and running (the the latest version of the Angular CLI installed) we would do:
git clone git@github.com:sitepoint-editors/angular-todo-app.git
cd angular-todo-app
npm install
git checkout part-1
ng serve
Then visit http://localhost:4200/. If all’s well, you should see the working Todo app.
Let's open src/app/app.component.html and have a look at the AppComponent that we finished with in part one:
<section class="todoapp">
  <header class="header">
    <h1>Todos</h1>
    <input class="new-todo" placeholder="What needs to be done?" autofocus="" [(ngModel)]="newTodo.title" (keyup.enter)="addTodo()">
  </header>
  <section class="main" *ngIf="todos.length > 0">
    <ul class="todo-list">
      <li *ngFor="let todo of todos" [class.completed]="todo.complete">
        <div class="view">
          <input class="toggle" type="checkbox" (click)="toggleTodoComplete(todo)" [checked]="todo.complete">
          <label></label>
          <button class="destroy" (click)="removeTodo(todo)"></button>
        </div>
      </li>
    </ul>
  </section>
  <footer class="footer" *ngIf="todos.length > 0">
    <span class="todo-count"><strong></strong>  left</span>
  </footer>
</section>
Here's its corresponding class in src/app/app.component.ts:
import {Component} from '@angular/core';
import {Todo} from './todo';
import {TodoDataService} from './todo-data.service';

@Component({
  selector: 'app-root',
  templateUrl: './app.component.html',
  styleUrls: ['./app.component.css'],
  providers: [TodoDataService]
})
export class AppComponent {

  newTodo: Todo = new Todo();

  constructor(private todoDataService: TodoDataService) {
  }

  addTodo() {
    this.todoDataService.addTodo(this.newTodo);
    this.newTodo = new Todo();
  }

  toggleTodoComplete(todo: Todo) {
    this.todoDataService.toggleTodoComplete(todo);
  }

  removeTodo(todo: Todo) {
    this.todoDataService.deleteTodoById(todo.id);
  }

  get todos() {
    return this.todoDataService.getAllTodos();
  }

}
Although our AppComponent works fine technically, keeping all code in one big component does not scale well and is not recommended.
Adding more features to our Todo application would make the AppComponent larger and more complex, making it harder to understand and maintain.
Therefore, it’s recommended to delegate functionality to smaller components. Ideally the smaller components should be configurable so that we don't have to rewrite their code when the business logic changes.
For example, in part three of this series we’ll update the TodoDataService to communicate with a REST API, and we want to make sure that we won’t have to change any of the smaller components when we refactor the TodoDataService.
If we look at the AppComponent template, we can extract its underlying structure as:
<!-- header that lets us create new todo -->
<header></header>

<!-- list that displays todos -->
<ul class="todo-list">

    <!-- list item that displays single todo -->
    <li>Todo 1</li>

    <!-- list item that displays single todo -->
    <li>Todo 2</li>
</ul>

<!-- footer that displays statistics -->
<footer></footer>
If we translate this structure to Angular component names, we get:
<!-- TodoListHeaderComponent that lets us create new todo -->
<app-todo-list-header></app-todo-list-header>

<!-- TodoListComponent that displays todos -->
<app-todo-list>

    <!-- TodoListItemComponent that displays single todo -->
    <app-todo-list-item></app-todo-list-item>

    <!-- TodoListItemComponent that displays single todo -->
    <app-todo-list-item></app-todo-list-item>
</app-todo-list>

<!-- TodoListFooterComponent that displays statistics -->
<app-todo-list-footer></app-todo-list-footer>
Let's see how we can use the power of Angular's component-driven development to make this happen.
Let's start by creating the TodoListHeader component.
From the root of our project, we use Angular CLI to generate the component for us:
$ ng generate component todo-list-header
This generates the following files for us:
create src/app/todo-list-header/todo-list-header.component.css
create src/app/todo-list-header/todo-list-header.component.html
create src/app/todo-list-header/todo-list-header.component.spec.ts
create src/app/todo-list-header/todo-list-header.component.ts
It automatically adds TodoListHeaderComponent to the AppModule declarations:
import { BrowserModule } from '@angular/platform-browser';
import { NgModule } from '@angular/core';
import { FormsModule } from '@angular/forms';
import { HttpModule } from '@angular/http';

import { AppComponent } from './app.component';

// Automatically imported by Angular CLI
import { TodoListHeaderComponent } from './todo-list-header/todo-list-header.component';

@NgModule({
  declarations: [
    AppComponent,

    // Automatically added by Angular CLI
    TodoListHeaderComponent
  ],
  imports: [
    BrowserModule,
    FormsModule,
    HttpModule
  ],
  providers: [],
  bootstrap: [AppComponent]
})
export class AppModule { }
Adding a component to the module declarations is required to make sure that all view templates in the module can use it the component. Angular CLI conveniently added TodoListHeaderComponent for us so we don't have to add it manually.
If TodoListHeaderComponent was not in the declarations and we used it in a view template, Angular would throw the following error:
Error: Uncaught (in promise): Error: Template parse errors:
'app-todo-list-header' is not a known element:
1. If 'app-todo-list-header' is an Angular component, then verify that it is part of this module.
2. If 'app-todo-list-header' is a Web Component then add "CUSTOM_ELEMENTS_SCHEMA" to the '@NgModule.schemas' of this component to suppress this message.
To learn more about module declarations, make sure to check out the Angular Module FAQ.
Now that we have all files generated for our new TodoListHeaderComponent, we can move the <header> element from src/app/app.component.html to src/app/todo-list-header/todo-list-header.component.html:
<header class="header">
  <h1>Todos</h1>
  <input class="new-todo" placeholder="What needs to be done?" autofocus="" [(ngModel)]="newTodo.title"
         (keyup.enter)="addTodo()">
</header>
Also add the corresponding logic to src/app/todo-list-header/todo-list-header.component.ts:
import { Component, Output, EventEmitter } from '@angular/core';
import { Todo } from '../todo';

@Component({
  selector: 'app-todo-list-header',
  templateUrl: './todo-list-header.component.html',
  styleUrls: ['./todo-list-header.component.css']
})
export class TodoListHeaderComponent {

  newTodo: Todo = new Todo();

  @Output()
  add: EventEmitter<Todo> = new EventEmitter();

  constructor() {
  }

  addTodo() {
    this.add.emit(this.newTodo);
    this.newTodo = new Todo();
  }

}
Instead of injecting the TodoDataService in our new TodoListHeaderComponent to save the new todo, we emit an add event and pass the new todo as an argument.
We already learned that the Angular template syntax allows us to attach a handler to an event. For example, consider the following code:
<input (keyup.enter)="addTodo()">
This tells Angular to run the addTodo() method when the enter key was pressed inside the input. This works because the keyup.enter event is an event that is defined by the Angular framework.
However, we can also let a component emit its own custom events, by creating an EventEmitter and decorating it with the @Output() decorator:
import { Component, Output, EventEmitter } from '@angular/core';
import { Todo } from '../todo';

@Component({
  // ...
})
export class TodoListHeaderComponent {

  // ...

  @Output()
  add: EventEmitter<Todo> = new EventEmitter();

  addTodo() {
    this.add.emit(this.newTodo);
    this.newTodo = new Todo();
  }

}
So we can now assign an event handler in the view template using Angular's event binding syntax:
<app-todo-list-header (add)="onAddTodo($event)"></app-todo-list-header>
Every time we call add.emit(value) in TodoListHeaderComponent, the onAddTodo($event) handler will be called and $event will be equal to value.
This decouples our TodoListHeaderComponent from the TodoDataService and allows the parent component to decide what needs to happen when a new todo is created.
When we update the TodoDataService to communicate with a REST API in part three, we won't have to worry about the TodoListHeaderComponent because it’s not even aware that the TodoDataService exists.
Continue reading %Understanding Component Architecture: Refactoring an Angular App%
This week in Yo! I cover Canada’s Vertical $10 Note, Google’s “Flutter” Mobile UI Framework, User Flow Diagramming Tool – Overflow, freebies, a failed “vlog” attempt, beautiful websites, great UX, beats and more 

Lemonly have combined their 2017 Annual Report with an interactive survey to create their own 2017 Lemonly Awards – voted by you. Fun touch adding the ballon popping footer animation. Great effort!
Long-scrolling One Pager featuring a neat customization material slider for Romanian shirt tailors Cachet.