[ This is a content summary only. Visit our website http://ift.tt/1b4YgHQ for full links, other content, and more! ]


by Zubair Ahmed via Digital Information World


|
This article was sponsored by Tumult. Thank you for supporting the partners who make SitePoint possible.
In this post, I’d like to introduce a new WordPress plugin for embedding interactive and animated content in WordPress: Tumult Hype Animations for WordPress.
Tumult Hype is a powerful tool for building advanced interactive and animated content that works on any device. When you open Tumult Hype for the first time, you’re greeted by a blank canvas with a timeline below. Content you add to your scene can easily be animated using the record button and manipulating the timeline. As you explore the program you’ll find powerful features for a range of interactive production: motion curves, custom easing transitions, touch gestures, web font support, audio actions, a powerful physics engine, and responsive layout features.
The Hype Animations plugin for WordPress makes integrating your HTML5 animations in your blog a painless drag & drop process. The plugin can be installed and activated in a minute from the Wordpress Plugin repository by searching for “Tumult Hype Animations.” Installing the plugin allows you to add exported Tumult Hype animations to posts and pages using simple textual shortcodes. You can update previously-uploaded animations from the plugin’s adminstration page and copy the full embed code to place your animation elsewhere (outside of WordPress, even). This allows you optionally leverage your WordPress site as a simple hosting platform for your Hype animations.
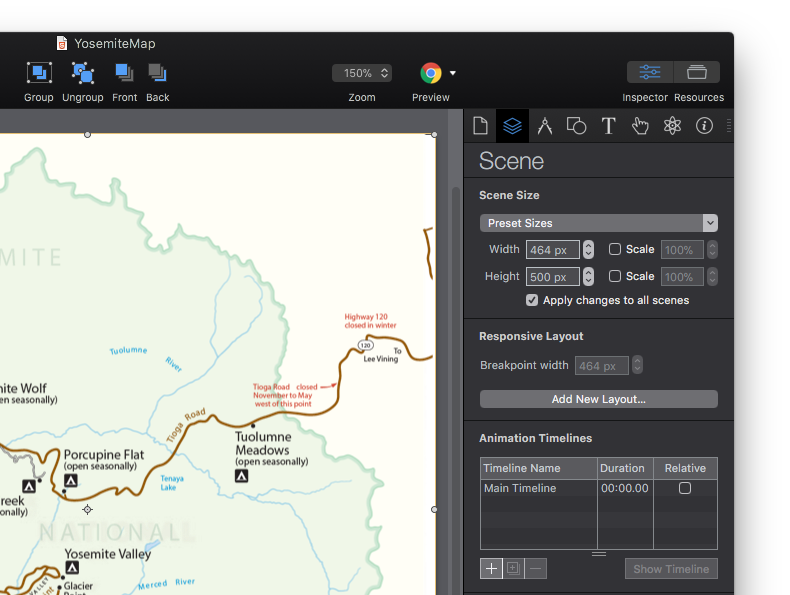
Let’s say you’re building an interactive map you want to keep updated on a regular WordPress page. Instead of just re-uploading a static PDF, you can quickly create an interactive map in Tumult Hype. To start, create a Tumult Hype document with a width as the maximum size of your blog’s width. If you have a responsive theme, you can even have your animation expand and contact with your theme. If you’d like to test this process out, download an unrestricted (14 day trial here). In the example below, our maximum blog post width is 463 pixels wide, so our scene size is set to that number:
Next, you can build out interactivte features in your document: setup your document to respond to mouse hovers, update any road closures, and create any type of interactivity to make the map more interesting and useful. Once you’re happy with your document and you’ve previewed it using the built-in browser preview and the free mobile preview app Hype Reflect, the next step is to prepare it for the WordPress plugin.
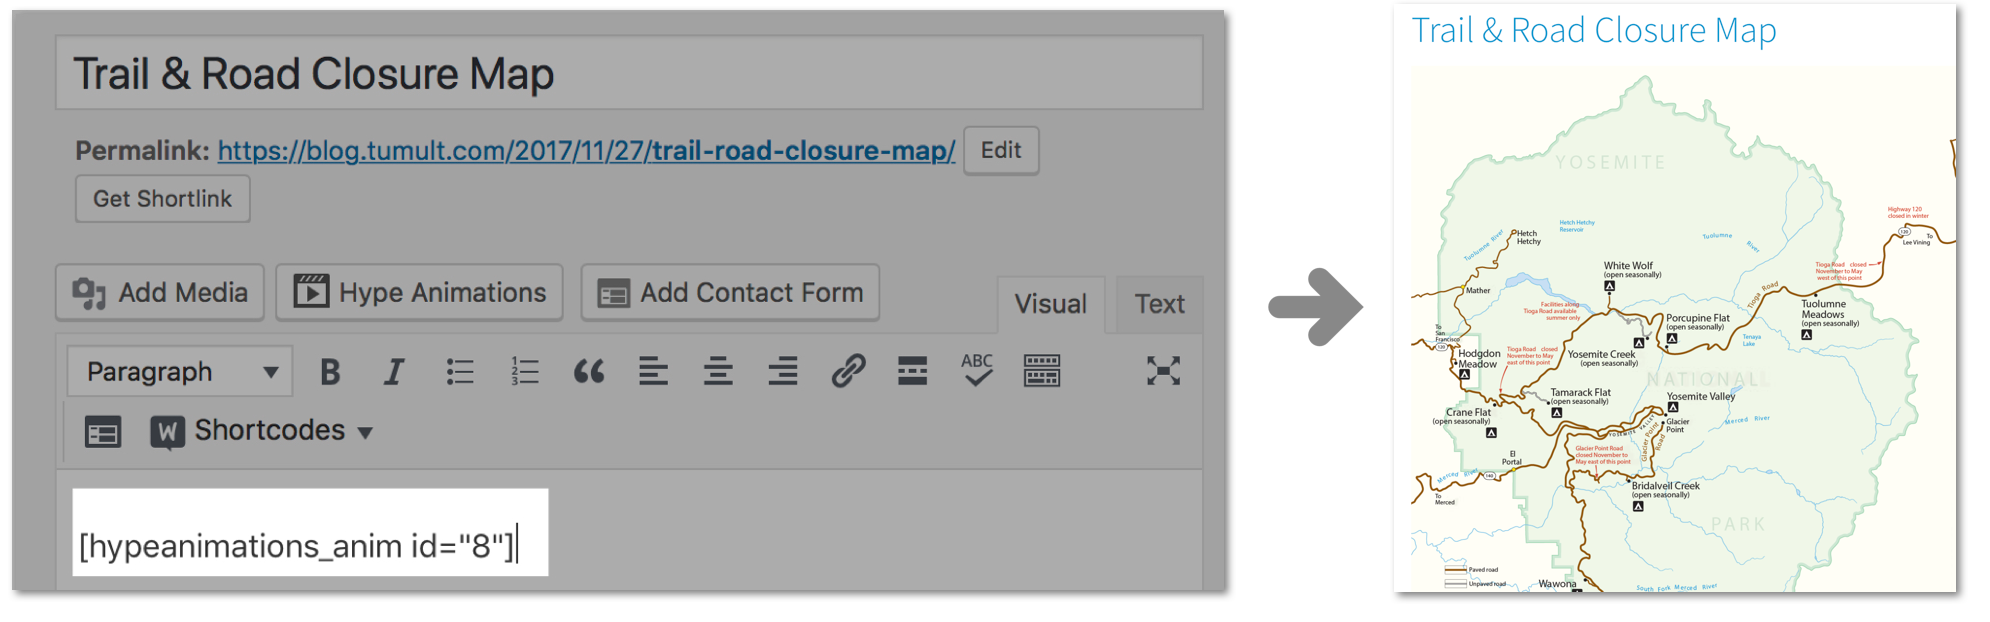
Packing up a Hype animation for the plugin is simple. The plugin requires animations are first exported in the OAM format, which creates a zipped package containing all JavaScript, media, and code required to display your animation. This is the same format for embedding in applications like Adobe Muse. To export in this format, select File > Export as HTML5 > Export as OAM file. Switching over to your WordPress site, start a new Page or Post. With the plugin installed, click the new ’Hype Animations’ button to the right of the Add Media button:

Drag and drop your OAM file on the resulting overlay, and your animation will upload, and the plugin will generate a shortcode and automatically add it your post or page:
When embedding your animation, the plugin uploads the Hype JavaScript runtime, resources, and animation data and creates a reference to it with JavaScript on the page as a standard DIV element. Since the embed is on the same page as your WordPress theme, you can access any CSS styles or fonts you currently use in your WordPress theme to seamlessly incorporate design elements in your animations. This allows you to leverage any web fonts or CSS components you’ve already setup in your site. You may need to uncheck Protect from External Styles in the document inspector to leverage external CSS styles.
For your responsive WordPress theme, you can also mirror your theme’s breakpoints in Tumult Hype so your animation adapts to all device sizes you wish to support:
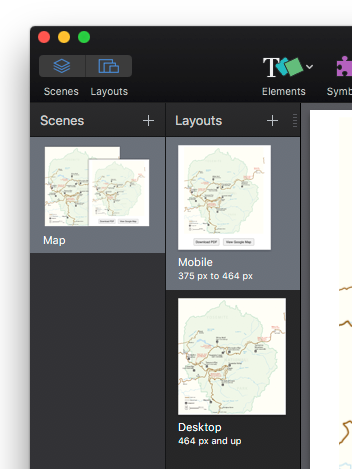
In the Scene Inspector, you can easily set the desired breakpoint for your individual layouts. For more informatiomn about setting up responsive layouts in Hype, visit the documentation.
Continue reading %Adding Animations for Effective Blog Posts with WordPress and Tumult Hype%
This is part 4 of the SitePoint Angular 2+ Tutorial on how to create a CRUD App with the Angular CLI. In this article, we’ll introduce Angular router and learn how it can update our application when the browser URL changes and vice versa. We’ll also learn how we can update our application to resolve data from our back-end API using the router.
In part one we learned how to get our Todo application up and running and deploy it to GitHub pages. This worked just fine but, unfortunately, the whole app was crammed into a single component.
In part two we examined a more modular component architecture and learned how to break this single component into a structured tree of smaller components that are easier to understand, reuse and maintain.
In part three we updated our application to communicate with a REST API back end using RxJS and Angular's HTTP service.
Don't worry! You don't need to have followed part one, two or three of this tutorial, for four to make sense. You can simply grab a copy of our repo, checkout the code from part three, and use that as a starting point. This is explained in more detail below.
Make sure you have the latest version of the Angular CLI installed. If you don't, you can install it with the following command:
npm install -g @angular/cli@latest
If you need to remove a previous version of the Angular CLI, you can do this:
npm uninstall -g @angular/cli angular-cli
npm cache clean
npm install -g @angular/cli@latest
After that, you'll need a copy of the code from part three. This is available at GitHub. Each article in this series has a corresponding tag in the repository so you can switch back and forth between the different states of the application.
The code that we ended with in part three and that we start with in this article is tagged as part-3. The code that we end this article with is tagged as part-4.
You can think of tags like an alias to a specific commit id. You can switch between them using git checkout. You can read more on that here.
So, to get up and running (the latest version of the Angular CLI installed) we would do this:
git clone git@github.com:sitepoint-editors/angular-todo-app.git
cd angular-todo-app
git checkout part-3
npm install
ng serve
Then visit http://localhost:4200/. If all’s well, you should see the working Todo app.
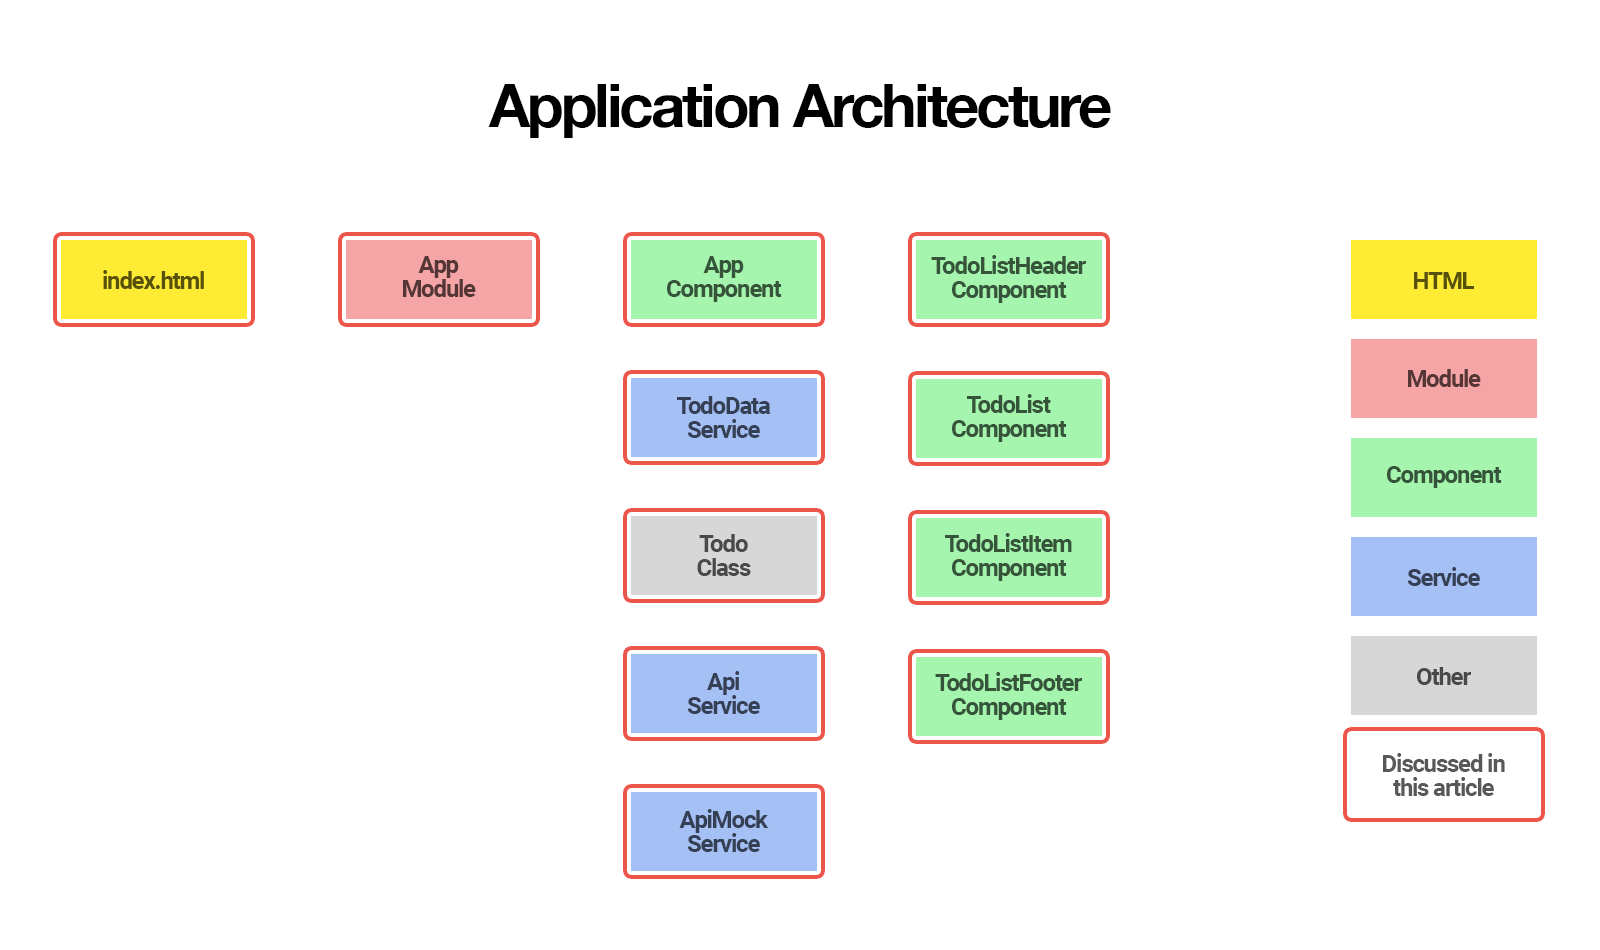
Here’s what our application architecture looked like at the end of part 3:
In this article we will:
By the end of this article, you’ll understand:
So, let's get started!
In its current state, our web application does not take the browser URL into account.
We access our application through one URL such as http://localhost:4200 and our application is not aware of any other URLs such as http://localhost:4200/todos.
Most web applications need to support different URLs to navigate users to different pages in the application. That’s where a router comes in.
In traditional websites, routing is handled by a router on the server:
In modern JavaScript web applications, routing is often handled by a JavaScript router in the browser.
In essence, a JavaScript router does two things:
JavaScript routers make it possible for us to develop single-page applications (SPAs).
An SPA is a web application that provides a user experience similar to a desktop application. In an SPA, all communication with a back end occurs behind the scenes.
When a user navigates from one page to another, the page is updated dynamically without reload, even if the URL changes.
There are many different JavaScript router implementations available.
Some of them are specifically written for a certain JavaScript framework such as Angular, Ember, React, Vue.js and Aurelia, etc. Other implementations are built for generic purposes and aren’t tied to a specific framework.
Angular router is an official Angular routing library, written and maintained by the Angular Core Team.
It’s a JavaScript router implementation that’s designed to work with Angular and is packaged as @angular/router.
First of all, Angular router takes care of the duties of a JavaScript router:
In addition, Angular router allows us to:
In this article, we’ll learn how to set up and configure Angular router, how to redirect a URL and how to use Angular router to resolve todos from our back-end API.
In the next article, we’ll add authentication to our application and use the router to make sure some of the pages can only be accessed when the user is signed in.
Before we dive into the code, it’s important to understand how Angular router operates and the terminology it introduces.
When a user navigates to a page, Angular router performs the following steps in order:
To accomplish its tasks, Angular router introduces the following terms and concepts:
Don't worry if the terminology sounds overwhelming. You’ll get used to the terms as we tackle them gradually in this series and as you gain more experience with Angular router.
An Angular application that uses Angular router only has one router service instance: It’s a singleton. Whenever and wherever you inject the Router service in your application, you’ll get access to the same Angular router service instance.
For a more in-depth look at Angular routing process, make sure to check out the 7-step routing process of Angular router navigation.
Continue reading %An Introduction to Component Routing with Angular Router%