Wednesday, March 21, 2018

Build User Registration with Node, React, and Okta

This article was originally published on OKTA Blog. Thank you for supporting the partners who make SitePoint possible.

Today’s internet users expect a personalized experience. Developers must learn to develop websites that provide that personalized experience while keeping their user’s information private. Modern web applications also tend to have a server-side API and a client-side user interface. it can be challenging to get make both ends aware of the currently logged in user. In this tutorial, I will walk you through setting up a Node API that feeds a React UI, and build a user registration that keeps the user’s information private and personal.

In this tutorial, I won’t use any state management libraries like Redux or ReduxThunk. In a more robust application, you’ll probably want to do that, but it will be easy to wire up Redux and ReduxThunk and then add the fetch statements used here as your thunks. For the sake of simplicity, and to keep this article focused on adding user management, I’ll be adding fetch statements into componentDidMount functions.

Install the Node and React Prerequisites

To set up the base application, make sure you have these basic tools installed:

  • Node (8+)
  • npm (5+)
  • create-react-app (npm package)
  • express-generator (npm package)

You’ll also need an Okta developer account.

To install Node and npm, you can follow the instructions for your operating system at https://nodejs.org/en/.

Then just install the two npm packages with the npm command line:

npm i -g create-react-app express-generator

Now you’re ready to set up the basic application structure.

Scaffold the Base Application

Go to the folder where you want your application to live and create a new folder for it:

mkdir MembershipSample
cd MembershipSample
express api
create-react-app client

This will create two folders in the MembershipSample folder called api and client, with a NodeJS and Express application in the api folder and a base React application in the client folder. So your folder structure will look like:

  • MembershipSample
    • api
    • client

To make this next part easier, open two terminals or terminal tabs; one to the express app folder api and the other to the React app folder client.

By default, the React app and the Node app will both run on port 3000 in development, so you’ll need to get the API to run on a different port and then proxy it in the client app.

In the api folder, open the /bin/www file and change the port the API will be running on to 3001.

/**
 * Get port from environment and store in Express.
 */

var port = normalizePort(process.env.PORT || '3001');
app.set('port', port);

Then set up the proxy for the API in the client application so that you can still call /api/{resource} and have it proxied from port 3000 to port 3001. In the client/package.json file, add the proxy setting below name:

"name": "client",
"proxy": "http://localhost:3001"

Lastly, don’t forget to run npm install or yarn install for each subfolder (api and client) to ensure that the dependencies are installed.

You can now run both applications by running npm start or yarn start in the appropriate folders for the API and the client application.

Add an Okta Application

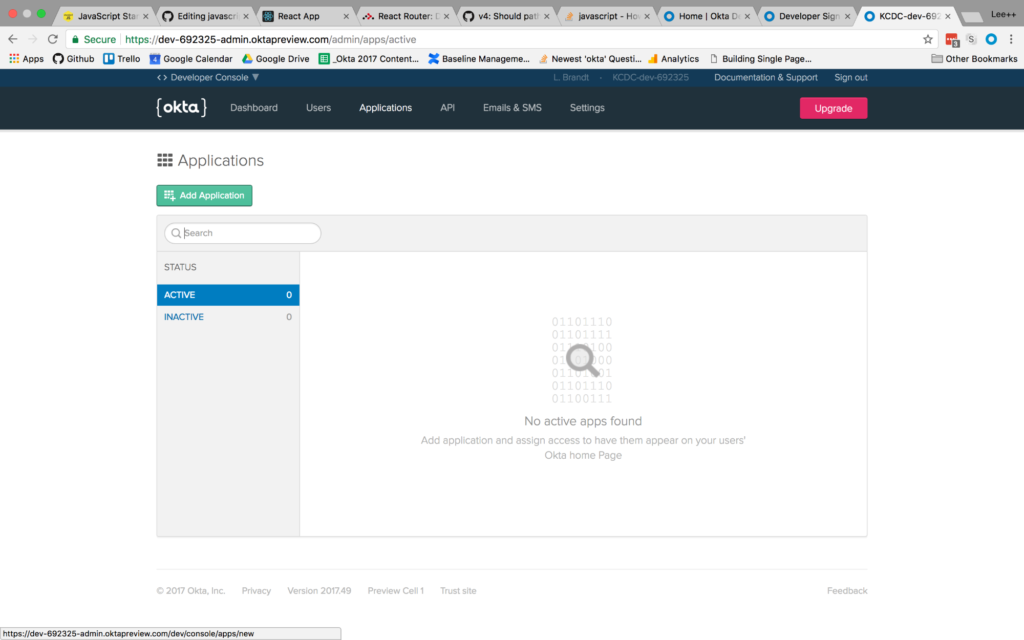
If you haven’t already done so, create a free forever developer account at https://developer.okta.com/signup/.

Once you’ve registered, click on Applications in the top menu. Then click the Add Application button.

application listing screen

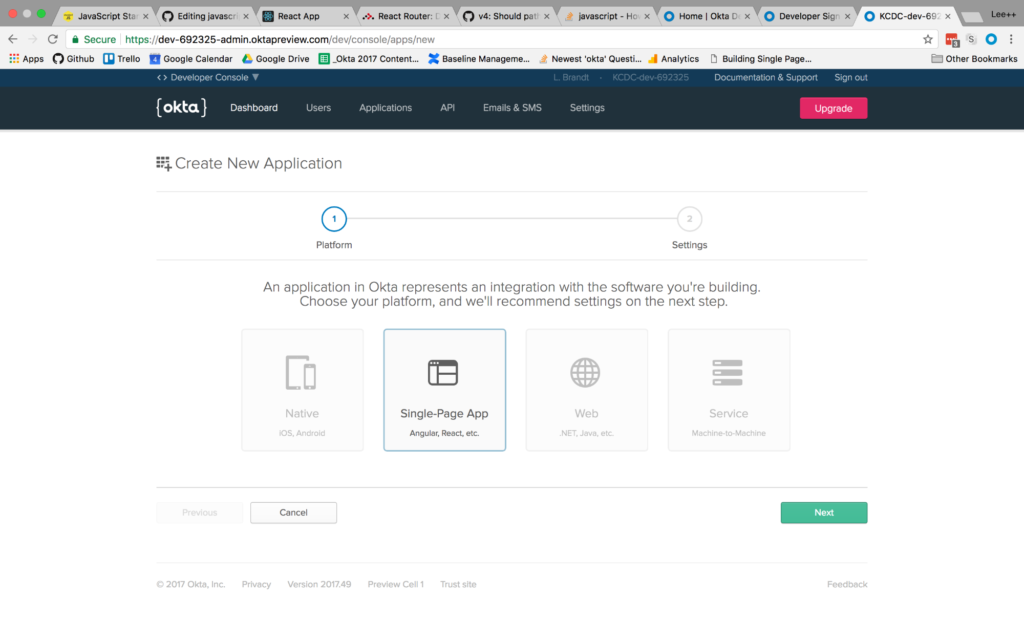
You will then be taken to the application creation wizard. Choose the Single-Page App button and click Next at the bottom.

single page app screen

On the next screen, you will see the default settings provided by the single-page application template. Change the name of the application to something more descriptive, like “Membership Application”. Also, change the base URIs and the login redirect URIs settings to use port 3000 because that is where your application will be running. The rest of the default settings are fine.

single page app settings screen

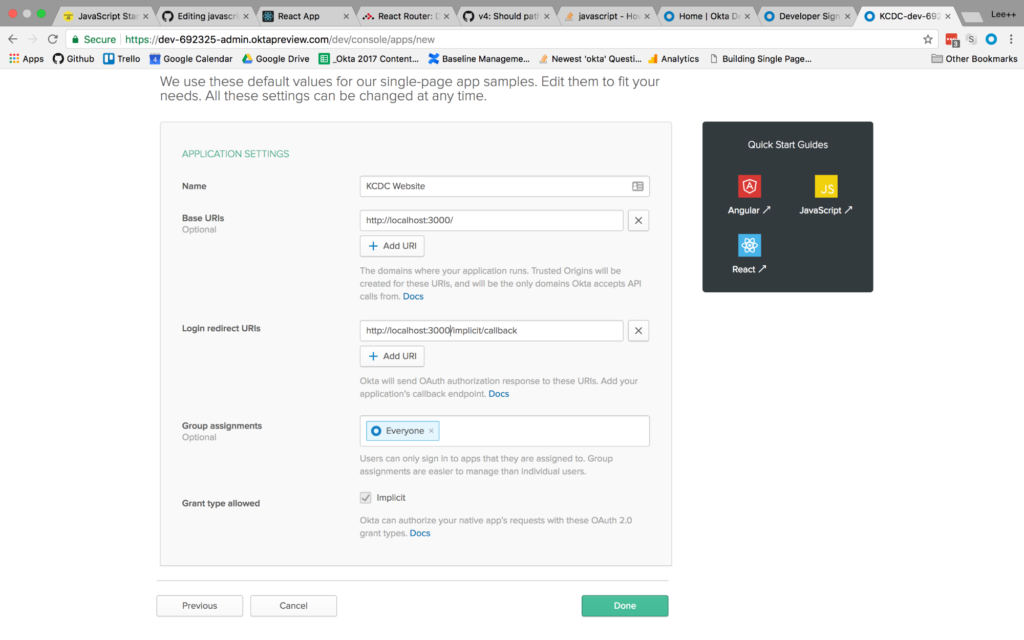
Then click the Done button at the bottom.

Once the application has been created, select it from the applications listing, and click on the General tab to view the general settings for your application.

general settings tab

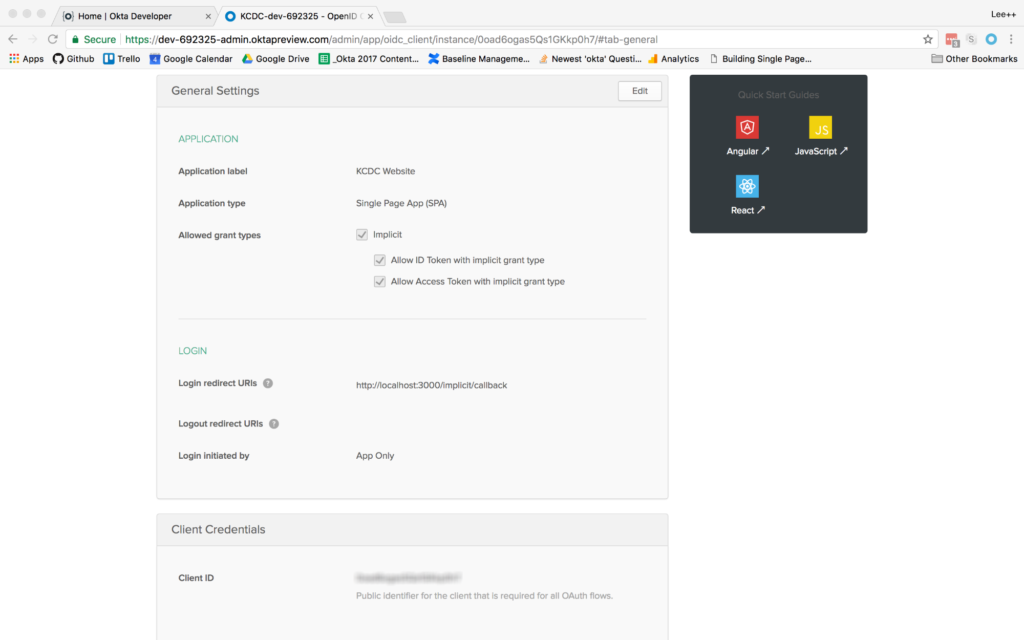
At the bottom, you will see a Client ID setting (yours won’t be blurred out, obviously). Copy this to use in your React application. You will also need your Okta organization URL, which you can find at the top left of the dashboard page. It will probably look something like “https://dev-XXXXXX.oktapreview.com”.

Add Authentication to the ReactJS Application

Now that the application is created, add authentication using Okta by adding a couple of npm dependencies. From the client folder run:

npm install @okta/okta-react react-router-dom --save

Or, if you’re using the yarn package manager:

yarn add @okta/okta-react react-router-dom

Add a file to the client/src folder called app.config.js. The contents of the file are:

export default {
  url: '{yourOktaDomain}',
  issuer: '{yourOktaOrgUrl}/oauth2/default',
  redirect_uri: window.location.origin + '/implicit/callback',
  client_id: '{yourClientID}'
}

Then, setup the index.js file to use the React Router and Okta’s React SDK. When the index.js file is complete, it will look like this:

import React from 'react';
import ReactDOM from 'react-dom';
import { BrowserRouter as Router } from 'react-router-dom';
import { Security } from '@okta/okta-react';

import './index.css';
import config from './app.config';
import App from './App';
import registerServiceWorker from './registerServiceWorker';

function onAuthRequired({ history }) {
  history.push('/login');
}

ReactDOM.render(
  <Router>
    <Security issuer={config.issuer}
      client_id={config.client_id}
      redirect_uri={config.redirect_uri}
      onAuthRequired={onAuthRequired}>
      <App />
    </Security>
  </Router>,
  document.getElementById('root')
);
registerServiceWorker();

Once complete, you will have added the BrowserRouter component (aliased as “Router”) from the React Router, and the Security component from Okta’s React SDK. Also that the app.config.js file is imported as “config” so that you can use the config values in the properties required by the Security component.

You will also have surrounded the App component with the Router and Security components, passing in the values specified. The onAuthRequired method, simply tells Okta’s React SDK that when somebody tries to access a secure route and they are not logged in, redirect them to the login page.

Everything else will have come from the create-react-app command you ran previously.

Add Pages to the ReactJS App

Before adding any routes to the React app, create some components to handle the routes you want to add.

Add a components folder to the client/src folder. This is where all your components will live and the easiest way to organize them. Then create a home folder for your home page components. For now there will be just one, but there may be more components used only for the home page later. Add a HomePage.js file to the folder with the following contents:

import React from 'react';

export default class HomePage extends React.Component{
  render(){
    return(
      <h1>Home Page</h1>
    );
  }
}

This is all you really need for the home page at the moment. The most important point is to make the HomePage component a class type. Even though right now it only contains a single h1 tag, it is meant to be a “page”, meaning it will likely contain other components, so it’s important that it be a container component.

Next, create an auth folder in components. This is where all components that have to do with authentication will live. In that folder, create a LoginForm.js file.

The first thing to note is that you’ll be using the withAuth higher-order component from Okta’s React SDK to wrap the entire login form. This adds a prop to the component called auth, making it possible to access things like the isAuthenticated and redirect functions on that higher-order component.

The code for the LoginForm component is as follows:

import React from 'react';
import OktaAuth from '@okta/okta-auth-js';
import { withAuth } from '@okta/okta-react';

export default withAuth(class LoginForm extends React.Component {
  constructor(props) {
    super(props);
    this.state = {
      sessionToken: null,
      error: null,
      username: '',
      password: ''
    }

    this.oktaAuth = new OktaAuth({ url: props.baseUrl });

    this.handleSubmit = this.handleSubmit.bind(this);
    this.handleUsernameChange = this.handleUsernameChange.bind(this);
    this.handlePasswordChange = this.handlePasswordChange.bind(this);
  }

  handleSubmit(e) {
    e.preventDefault();
    this.oktaAuth.signIn({
      username: this.state.username,
      password: this.state.password
    })
      .then(res => this.setState({
        sessionToken: res.sessionToken
      }))
      .catch(err => {
        this.setState({error: err.message});
        console.log(err.statusCode + ' error', err)
      });
  }

  handleUsernameChange(e) {
    this.setState({ username: e.target.value });
  }

  handlePasswordChange(e) {
    this.setState({ password: e.target.value });
  }

  render() {
    if (this.state.sessionToken) {
      this.props.auth.redirect({ sessionToken: this.state.sessionToken });
      return null;
    }

    const errorMessage = this.state.error ? 
    <span className="error-message">{this.state.error}</span> : 
    null;

    return (
      <form onSubmit={this.handleSubmit}>
        {errorMessage}
        <div className="form-element">
          <label>Username:</label>
          <input
            id="username" type="text"
            value={this.state.username}
            onChange={this.handleUsernameChange} />
        </div>

        <div className="form-element">
          <label>Password:</label>
          <input
            id="password" type="password"
            value={this.state.password}
            onChange={this.handlePasswordChange} />
        </div>
        <input id="submit" type="submit" value="Submit" />
      </form>
    );
  }
});

The other thing of note here is the OktaAuth library being imported. This is the base library for doing things like signing in using the Okta application you created previously. You’ll notice an OktaAuth object being created in the constructor that gets a property of baseUrl passed to it. This is the URL for the issuer that is in your app.config.js file. The LoginForm component is meant to be contained in another component, so you’ll have to create a LoginPage.js file to contain this component. You’ll use the withAuth higher-order component again, to get access to the isAuthenticated function. The contents of LoginPage.js will be:

Continue reading %Build User Registration with Node, React, and Okta%


by Lee Brandt via SitePoint

The Ultimate Angular CLI Reference Guide

In this article, we’ll have a look at what Angular CLI is, what it can do for you, and how it performs some of its magic behind the scenes. Even if you already use Angular CLI, this article can serve as a reference to better understand its inner workings.

Technically, you’re not required to use Angular CLI to develop an Angular application, but its many features can highly improve the quality of your code and save you a lot of time along the way.

A large, bible-like Angular CLI reference book on a stand

This is the preliminary article in a 4-part series on how to write a Todo application in Angular.

  1. Part 0 — The Ultimate Angular CLI Reference Guide
  2. Part 1 — Getting our first version of the Todo application up and running
  3. Part 2 — Creating separate components to display a list of todos and a single todo
  4. Part 3 — Update the Todo service to communicate with a REST API
  5. Part 4 — Use Angular router to resolve data.

Some History

On September 15, 2016, Angular Final was released.

Where AngularJS 1.x was limited to a framework, Angular has grown into an ambitious platform that allows you to develop fast and scalable applications across all platforms such as web, mobile web, native mobile and even native desktop.

With this transition to a platform, tooling has become more important than ever. However, setting up and configuring tooling is not always easy. To make sure Angular developers can focus on building applications with as little friction as possible, the Angular team is putting a lot of effort into providing developers with a high-quality development toolset.

Part of that toolset are close integrations with a wide array of IDEs and editors. Another part of that toolset is Angular CLI.

So let’s get started!


2017.04.25: As of March 24, Angular CLI v1.0 was released. This article has been updated to reflect the latest changes. If you want to add the latest features of Angular CLI v1.0 to your existing Angular project that was generated with an earlier version of Angular CLI, check out the Angular CLI v1.0 migration guide.

2017.02.17: As of February 9, 2017, the ng deploy command has been removed from the core of Angular CLI. Read more here.

2017.01.27: As of January 27, 2017, the official recommendation is to use the name AngularJS for any 1.x release and the name Angular for any 2+ release. This article has been updated to reflect the official branding guidelines.


What Is Angular CLI?

Angular CLI is a command-line interface (CLI) to automate your development workflow. It allows you to:

  • create a new Angular application
  • run a development server with LiveReload support to preview your application during development
  • add features to your existing Angular application
  • run your application’s unit tests
  • run your application’s end-to-end (E2E) tests
  • build your application for deployment to production.

Before we have a look at each of the above in detail, let’s first see how you can install Angular CLI.

Prerequisites

Before you can use Angular CLI, you must have Node.js 6.9.0 and npm 3.0.0 or higher installed on your system.

You can download the latest version of Node.js for your operating system and consult the latest installation instructions on the official Node.js website.

If you already have Node.js and npm installed, you can verify their version by running:

$ node -v # => displays your Node.js version
$ npm -v # => displays your npm version

Once you have Node.js installed, you can use the npm command to install TypeScript:

$ npm install -g typescript@2.2.0

Although TypeScript is technically not an absolute requirement, it’s highly recommended by the Angular team, so I recommend you install it to make working with Angular as comfortable as possible.

Now that you have Node.js and TypeScript installed, you can install Angular CLI.

Installing Angular CLI

To install Angular CLI, run:

$ npm install -g @angular/cli

This will install the ng command globally on your system.

To verify whether your installation completed successfully, you can run this:

$ ng version

This displays the version you have installed:

@angular/cli: 1.0.0
node: 6.10.0
os: darwin x64

Now that you have Angular CLI installed, let’s use it to create a new application.

Creating a New Angular Application

There are two ways to create a new application using Angular CLI:

  • ng init: create a new application in the current directory
  • ng new: create a new directory and run ng init inside the new directory.

So ng new is similar to ng init, except that it also creates a directory for you.

Assuming you haven’t created a directory yet, let’s use ng new to create a new project:

$ ng new my-app

Behind the scenes, the following happens:

  • a new directory my-app is created
  • all source files and directories for your new Angular application are created based on the name you specified (my-app) and best-practices from the official Angular Style Guide
  • npm dependencies are installed
  • TypeScript is configured for you
  • the Karma unit test runner is configured for you
  • the Protractor end-to-end test framework is configured for you
  • environment files with default settings are created.

You’ll learn more about each of these aspects in the following sections.

At this point you have a working Angular application and your new directory my-app looks like this:

.
├── README.md
├── e2e
│   ├── app.e2e-spec.ts
│   ├── app.po.ts
│   └── tsconfig.e2e.json
├── karma.conf.js
├── package.json
├── protractor.conf.js
├── src
│   ├── app
│   │   ├── app.component.css
│   │   ├── app.component.html
│   │   ├── app.component.spec.ts
│   │   ├── app.component.ts
│   │   └── app.module.ts
│   ├── assets
│   ├── environments
│   │   ├── environment.prod.ts
│   │   └── environment.ts
│   ├── favicon.ico
│   ├── index.html
│   ├── main.ts
│   ├── polyfills.ts
│   ├── styles.css
│   ├── test.ts
│   ├── tsconfig.app.json
│   ├── tsconfig.spec.json
│   └── typings.d.ts
├── tsconfig.json
└── tslint.json

Available Options

  • --dry-run: boolean, default false, perform dry-run so no changes are written to filesystem
  • --verbose: boolean, default false
  • --link-cli: boolean, default false, automatically link the @angular/cli package (more info)
  • --skip-install: boolean, default false, skip npm install
  • --skip-git: boolean, default false, don’t initialize git repository
  • --skip-tests: boolean, default false, skip creating tests
  • --skip-commit: boolean, default false, skip committing the first git commit
  • --directory: string, name of directory to create, by default this is the same as the application name
  • --source-dir: string, default 'src', name of source directory
  • --style: string, default 'css', the style language to use ('css', 'less' or 'scss')
  • --prefix: string, default 'app', the prefix to use when generating new components
  • --mobile: boolean, default false, generate a Progressive Web App application (see section on upcoming features)
  • --routing: boolean, default false, add module with routing information and import it in main app module
  • --inline-style: boolean, default false, use inline styles when generating the new application
  • --inline-template: boolean, default false, use inline templates when generating the new application.

Run $ ng generate --help to see all available options of your locally installed Angular CLI.

Let’s see how you can start your application so you can see it in action.

Running Your Application

To preview your new application in your browser, navigate to its directory:

$ cd my-app

and run:

$ ng serve

to start the built-in development server on port 4200:

** NG Live Development Server is running on http://localhost:4200 **
Hash: 09fb2ad840c1472e5885
Time: 6230ms
chunk    {0} polyfills.bundle.js, polyfills.bundle.js.map (polyfills) 158 kB {4} [initial] [rendered]
chunk    {1} main.bundle.js, main.bundle.js.map (main) 3.62 kB {3} [initial] [rendered]
chunk    {2} styles.bundle.js, styles.bundle.js.map (styles) 9.77 kB {4} [initial] [rendered]
chunk    {3} vendor.bundle.js, vendor.bundle.js.map (vendor) 2.37 MB [initial] [rendered]
chunk    {4} inline.bundle.js, inline.bundle.js.map (inline) 0 bytes [entry] [rendered]
webpack: Compiled successfully.

You can now navigate your favorite browser to http://localhost:4200/ to see your application in action:

Angular CLI: Screenshot of the app running in the browser, displaying the text 'app works!'

Behind the scenes, the following happens:

  1. Angular CLI loads its configuration from .angular-cli.json
  2. Angular CLI runs Webpack to build and bundle all JavaScript and CSS code
  3. Angular CLI starts Webpack dev server to preview the result on localhost:4200.

Notice that the ng serve command doesn’t exit and return to your terminal prompt after step 3.

Instead, because it includes LiveReload support, the process actively watches your src directory for file changes. When a file change is detected, step 2 is repeated and a notification is sent to your browser so it can refresh automatically.

To stop the process and return to your prompt, press ctrl-c.

Continue reading %The Ultimate Angular CLI Reference Guide%


by Jurgen Van de Moere via SitePoint

Vue.js Live: Code a Front-End App

WhatsApp co-founder tells everyone to delete Facebook [video]

Many people have turned against Facebook after the recent revelation that data of 50M Facebook users was breached in the US Presidential Election, this data played an important role in the outcome of the election. The most recent of the lot who has turned against Facebook is WhatsApp cofounder,...

[ This is a content summary only. Visit our website http://ift.tt/1b4YgHQ for full links, other content, and more! ]

by Web Desk via Digital Information World

How to Deal with Office Politics - #infographic

If you work in an office, you’ve likely had to deal with office politics—they’re unavoidable. Even the most well-run businesses involve some level of politics, no matter how strong the company culture. The nature of corporations, and teams in general, leads to politicking and jockeying for...

[ This is a content summary only. Visit our website http://ift.tt/1b4YgHQ for full links, other content, and more! ]

by Web Desk via Digital Information World

Video Creators Can Now ‘Go Live’ On YouTube Without Downloading Encoding Software

YouTube has decided to roll out a new feature of ‘Go Live’ today as video creators will now be able to begin a live stream without the need of encoding software. This is what live streamers need to do in order to use this feature: 1- Click on ‘Go Live’ button in the YouTube header OR 2- ...

[ This is a content summary only. Visit our website http://ift.tt/1b4YgHQ for full links, other content, and more! ]

by Zubair Ahmed via Digital Information World

How to Use a Facebook Messenger Bot for Lead Scoring Prospects

Are you using Facebook Messenger bots in your marketing? Wondering how scoring leads can help you deliver more effective messaging to your subscribers? In this article, you’ll learn how to add an automatic lead score system to your Facebook Messenger bot. What Is a Lead Score? Messenger bots are a great tool to capture new [...]

This post How to Use a Facebook Messenger Bot for Lead Scoring Prospects first appeared on .
- Your Guide to the Social Media Jungle


by Dana Tran via