Saturday, August 25, 2018

Twitter API Changes and LinkedIn Groups Relaunching

Welcome to this week’s edition of the Social Media Marketing Talk Show, a news show for marketers who want to stay on the leading edge of social media. On this week’s Social Media Marketing Talk Show, we explore Twitter API changes and LinkedIn Groups relaunching. Our special guests include Madalyn Sklar and Michael Stelzner. Watch [...]

The post Twitter API Changes and LinkedIn Groups Relaunching appeared first on Social Media Examiner.


by Grace Duffy via Social Media Examiner

TRACK

A musical experience built with WebGL and WebVR.
by via Awwwards - Sites of the day

Friday, August 24, 2018

Johnny Five is alive, Ghost 2.0, and Stimulus

#400 — August 24, 2018

Read on the Web

JavaScript Weekly

Due to unforeseen circumstances, this 400th issue of JavaScript Weekly comes to you from a tent in the middle of a freezing cold field in Yorkshire! Apologies if it's a few hours late, but we were also waiting for Babel 7.0 to drop (update: it's not, it's now next week).

A huge thanks to you for being a subscriber, and an extra special thanks if you're one of the few hundred subscribers who has stayed with us since issue 1 almost 8 years ago :-)
— Peter Cooper, editor

Johnny-Five 1.0: A JS Robotics and IoT Platform — Now at some six years old, Johnny Five has reached its 1.0 release in an announcement at JSConf. The examples page is packed with source code examples of what it can be used to achieve.

Johnny Five Team

A Complete GraphQL Server Tutorial — An epic tutorial covering the full GraphQL server experience using Apollo Server and Express including authentication, roles/permissions, subscriptions, error handling, pagination..

Robin Wieruch

Whitepaper: Choosing Web App Libraries in an Open Source World — OS frameworks lack a single, comprehensive component library for developers to build standardized UIs. In many cases commercial component libraries used in conjunction with OS frameworks can offer the best of both worlds. Read on to learn more.

Sencha, Inc. sponsor

Liftoff: A Look at the New Baseline Compiler for WebAssembly in V8 — Very technical but exciting news if you’re planning to lean heavily on WebAssembly. V8 6.9 (and hence Chrome 69) and above will start WebAssembly code much faster.

Clemens Hammacher

Introducing Ghost 2.0: The JavaScript Blogging Platform — Want a fully JavaScript powered blog? 2.0 takes big steps forward with a new editor, multi-language support, custom routes, custom site structures, and more.

John O'Nolan

Behind The Scenes of Dr. Axel's Latest JavaScript Book — Last week, we interviewed Dr. Axel about his new book, JavaScript for Impatient Programmers. Here, he shows just what went into the process of creating it.

Dr. Axel Rauschmayer

Stimulus 1.1 Released: A JS Framework for the HTML You Already Have — An interesting framework from Basecamp (formerly 37signals). Here's the full origin story including why it's useful. 1.1 includes new reference documentation and ordered actions.

Basecamp

💻 Jobs

Senior Software Engineer (NYC) — Learn from the best and lead by example. Do your finest work, with purpose, freedom, and a great community.

Reaktor

Senior Front End Engineer at External Data Systems, Netflix — Help build a world class user interface for the platform that collects data to drive business insights for our teams.

Netflix

Find A JavaScript Job Through Vettery — Vettery specializes in dev roles and is completely free for job seekers. Create a profile to get started.

Vettery

📘 Tutorials and Stories

Complex Numbers in JavaScript — I hope you like math! This is a neat walkthrough of calculating the dot product of two complex vectors with JS.

Mateo Gianolio

The Solo JavaScript Developer Challenging Google and Facebook — It’s a short, high level piece, but it’s nice to see Vue getting more mainstream attention which is basically what the article is about too :-)

Klint Finley (WIRED)

How to Do Functional Programming with JavaScript? — A handy cheat sheet used by JavaScript developers interested in writing functional style code. Check it out.

Progress Kendo UI sponsor

Level Up Your '.filter' Game — The filter array method creates a new array of elements that pass a test defined in a given function. This tutorial will help you feel confident with it.

Adam Giese

Taking Your First Steps with TensorFlow.js — Want to dig into a little machine learning with JavaScript? This introduces some basic concepts.

Aral Roca

New npm Registry Features to Help npm Users Protect Themselves

The npm Blog

Creating a Chrome Browser Extension: Screencast — Try 'The Frontier' free for 14-days. Short tutorials from the instructors and authors you trust.

Big Nerd Ranch sponsor

What Do The Three Dots '...' Mean in JavaScript?

Adrian Oprea

Build A Live Graph with D3.js and Pusher

Ayooluwa Isaiah (Pusher)

🔧 Code and Tools

Puppeteer Recorder: A Chrome Extension That Turns Browser Interactions into Puppeteer Scripts

Checkly

Git Tutor: Generate Step-by-Step Markdown Tutorials from Git History — An interesting idea. Well suited for projects where the git commits act as logical steps of growth. See an example of the end result.

Andrei Volchenko

Real-Time Error Monitoring, Alerting, and Analytics for JavaScript 🚀

ROLLBAR sponsor

Immer: Create The Next Immutable State Tree by Mutating The Current Tree — If you want to work with immutable state, this is worth looking at.

Michel Weststrate

Pyodide: A Python Scientific Stack, Compiled to WebAssembly — The interesting outcome being seamless interactivity between Python and JS/browser. Demo here.

iodide

ajax: A Vanilla JS Module for Ajax Requests — Don’t want to use fetch but still want to make simple jQuery-style Ajax requests? This is an option.

Fernando Daciuk

Windows 2000 in the Browser via WebAssembly — Don’t click if you aren’t ready to use a fair bit of bandwidth, but this example of emulating Windows 2000 in the browser (at high performance, too) is certainly compelling.

Fabrice Bellard

📅 Upcoming JavaScript Events


by via JavaScript Weekly

Lazy.js – Functional JavaScript Utility Library Similar to Underscore and Lodash

Lazy.js is a functional utility library for JavaScript, similar to Underscore and Lodash, but with a lazy engine under the hood that strives to do as little work as possible while being as flexible as possible.


by via jQuery-Plugins.net RSS Feed

Build a Health Tracking App with React, GraphQL, and User Authentication

This article was originally published on the Okta developer blog. Thank you for supporting the partners who make SitePoint possible.

I think you’ll like the story I’m about to tell you. I’m going to show you how to build a GraphQL API with Vesper framework, TypeORM, and MySQL. These are Node frameworks, and I’ll use TypeScript for the language. For the client, I’ll use React, reactstrap, and Apollo Client to talk to the API. Once you have this environment working, and you add secure user authentication, I believe you’ll love the experience!

Why focus on secure authentication? Well, aside from the fact that I work for Okta, I think we can all agree that pretty much every application depends upon a secure identity management system. For most developers who are building React apps, there’s a decision to be made between rolling your own authentication/authorization or plugging in a service like Okta. Before I dive into building a React app, I want to tell you a bit about Okta, and why I think it’s an excellent solution for all JavaScript developers.

What Is Okta?

In short, we make identity management a lot easier, more secure, and more scalable than what you’re used to. Okta is a cloud service that allows developers to create, edit, and securely store user accounts and user account data, and connect them with one or multiple applications. Our API enables you to:

Are you sold? Register for a forever-free developer account, and when you’re done, come on back so we can learn more about building secure apps in React!

Why a Health Tracking App?

In late September through mid-October 2014, I’d done a 21-Day Sugar Detox during which I stopped eating sugar, started exercising regularly, and stopped drinking alcohol. I’d had high blood pressure for over ten years and was on blood pressure medication at the time. During the first week of the detox, I ran out of blood pressure medication. Since a new prescription required a doctor visit, I decided I’d wait until after the detox to get it. After three weeks, not only did I lose 15 pounds, but my blood pressure was at normal levels!

Before I started the detox, I came up with a 21-point system to see how healthy I was each week. Its rules were simple: you can earn up to three points per day for the following reasons:

  1. If you eat healthy, you get a point. Otherwise, zero.
  2. If you exercise, you get a point.
  3. If you don’t drink alcohol, you get a point.

I was surprised to find I got eight points the first week I used this system. During the detox, I got 16 points the first week, 20 the second, and 21 the third. Before the detox, I thought eating healthy meant eating anything except fast food. After the detox, I realized that eating healthy for me meant eating no sugar. I’m also a big lover of craft beer, so I modified the alcohol rule to allow two healthier alcohol drinks (like a greyhound or red wine) per day.

My goal is to earn 15 points per week. I find that if I get more, I’ll likely lose weight and have good blood pressure. If I get fewer than 15, I risk getting sick. I’ve been tracking my health like this since September 2014. I’ve lost weight, and my blood pressure has returned to and maintained normal levels. I haven’t had good blood pressure since my early 20s, so this has been a life-changer for me.

I built 21-Points Health to track my health. I figured it’d be fun to recreate a small slice of that app, just tracking daily points.

Building an API with TypeORM, GraphQL, and Vesper

TypeORM is a nifty ORM (object-relational mapper) framework that can run in most JavaScript platforms, including Node, a browser, Cordova, React Native, and Electron. It’s heavily influenced by Hibernate, Doctrine, and Entity Framework. Install TypeORM globally to begin creating your API.

npm i -g typeorm@0.2.7

Create a directory to hold the React client and GraphQL API.

mkdir health-tracker
cd health-tracker

Create a new project with MySQL using the following command:

typeorm init --name graphql-api --database mysql

Edit graphql-api/ormconfig.json to customize the username, password, and database.

{
    ...
    "username": "health",
    "password": "pointstest",
    "database": "healthpoints",
    ...
}

TIP: To see the queries being executed against MySQL, change the “logging” value in this file to be “all”. Many other logging options are available too.

Install MySQL

Install MySQL if you don’t already have it installed. On Ubuntu, you can use sudo apt-get install mysql-server. On macOS, you can use Homebrew and brew install mysql. For Windows, you can use the MySQL Installer.

Once you’ve got MySQL installed and configured with a root password, login and create a healthpoints database.

mysql -u root -p
create database healthpoints;
use healthpoints;
grant all privileges on *.* to 'health'@'localhost' identified by 'points';

Navigate to your graphql-api project in a terminal window, install the project’s dependencies, then start it to ensure you can connect to MySQL.

cd graphql-api
npm i
npm start

You should see the following output:

Inserting a new user into the database...
Saved a new user with id: 1
Loading users from the database...
Loaded users:  [ User { id: 1, firstName: 'Timber', lastName: 'Saw', age: 25 } ]
Here you can setup and run express/koa/any other framework.

Install Vesper to Integrate TypeORM and GraphQL

Vesper is a Node framework that integrates TypeORM and GraphQL. To install it, use good ol’ npm.

npm i vesper@0.1.9

Now it’s time to create some GraphQL models (that define what your data looks like) and some controllers (that explain how to interact with your data).

Create graphql-api/src/schema/model/Points.graphql:

type Points {
  id: Int
  date: Date
  exercise: Int
  diet: Int
  alcohol: Int
  notes: String
  user: User
}

Create graphql-api/src/schema/model/User.graphql:

type User {
  id: String
  firstName: String
  lastName: String
  points: [Points]
}

Next, create a graphql-api/src/schema/controller/PointsController.graphql with queries and mutations:

type Query {
  points: [Points]
  pointsGet(id: Int): Points
  users: [User]
}

type Mutation {
  pointsSave(id: Int, date: Date, exercise: Int, diet: Int, alcohol: Int, notes: String): Points
  pointsDelete(id: Int): Boolean
}

Now that your data has GraphQL metadata create entities that will be managed by TypeORM. Change src/entity/User.ts to have the following code that allows points to be associated with a user.

import { Column, Entity, OneToMany, PrimaryColumn } from 'typeorm';
import { Points } from './Points';

@Entity()
export class User {

  @PrimaryColumn()
  id: string;

  @Column()
  firstName: string;

  @Column()
  lastName: string;

  @OneToMany(() => Points, points => points.user)
  points: Points[];
}

In the same src/entity directory, create a Points.ts class with the following code.

import { Entity, PrimaryGeneratedColumn, Column, ManyToOne } from 'typeorm';
import { User } from './User';

@Entity()
export class Points {

  @PrimaryGeneratedColumn()
  id: number;

  @Column({ type: 'timestamp', default: () => 'CURRENT_TIMESTAMP'})
  date: Date;

  @Column()
  exercise: number;

  @Column()
  diet: number;

  @Column()
  alcohol: number;

  @Column()
  notes: string;

  @ManyToOne(() => User, user => user.points, { cascade: ["insert"] })
  user: User|null;
}

Note the cascade: ["insert"] option on the @ManyToOne annotation above. This option will automatically insert a user if it’s present on the entity. Create src/controller/PointsController.ts to handle converting the data from your GraphQL queries and mutations.

import { Controller, Mutation, Query } from 'vesper';
import { EntityManager } from 'typeorm';
import { Points } from '../entity/Points';

@Controller()
export class PointsController {

  constructor(private entityManager: EntityManager) {
  }

  // serves "points: [Points]" requests
  @Query()
  points() {
    return this.entityManager.find(Points);
  }

  // serves "pointsGet(id: Int): Points" requests
  @Query()
  pointsGet({id}) {
    return this.entityManager.findOne(Points, id);
  }

  // serves "pointsSave(id: Int, date: Date, exercise: Int, diet: Int, alcohol: Int, notes: String): Points" requests
  @Mutation()
  pointsSave(args) {
    const points = this.entityManager.create(Points, args);
    return this.entityManager.save(Points, points);
  }

  // serves "pointsDelete(id: Int): Boolean" requests
  @Mutation()
  async pointsDelete({id}) {
    await this.entityManager.remove(Points, {id: id});
    return true;
  }
}

Change src/index.ts to use Vesper’s bootstrap() to configure everything.

import { bootstrap } from 'vesper';
import { PointsController } from './controller/PointsController';
import { Points } from './entity/Points';
import { User } from './entity/User';

bootstrap({
  port: 4000,
  controllers: [
    PointsController
  ],
  entities: [
    Points,
    User
  ],
  schemas: [
    __dirname + '/schema/**/*.graphql'
  ],
  cors: true
}).then(() => {
  console.log('Your app is up and running on http://localhost:4000. ' +
    'You can use playground in development mode on http://localhost:4000/playground');
}).catch(error => {
  console.error(error.stack ? error.stack : error);
});

This code tells Vesper to register controllers, entities, GraphQL schemas, to run on port 4000, and to enable CORS (cross-origin resource sharing).

Start your API using npm start and navigate to http://localhost:4000/playground. In the left pane, enter the following mutation and press the play button. You might try typing the code below so you can experience the code completion that GraphQL provides you.

mutation {
  pointsSave(exercise:1, diet:1, alcohol:1, notes:"Hello World") {
    id
    date
    exercise
    diet
    alcohol
    notes
  }
}

Your result should look similar to mine.

GraphQL Playground

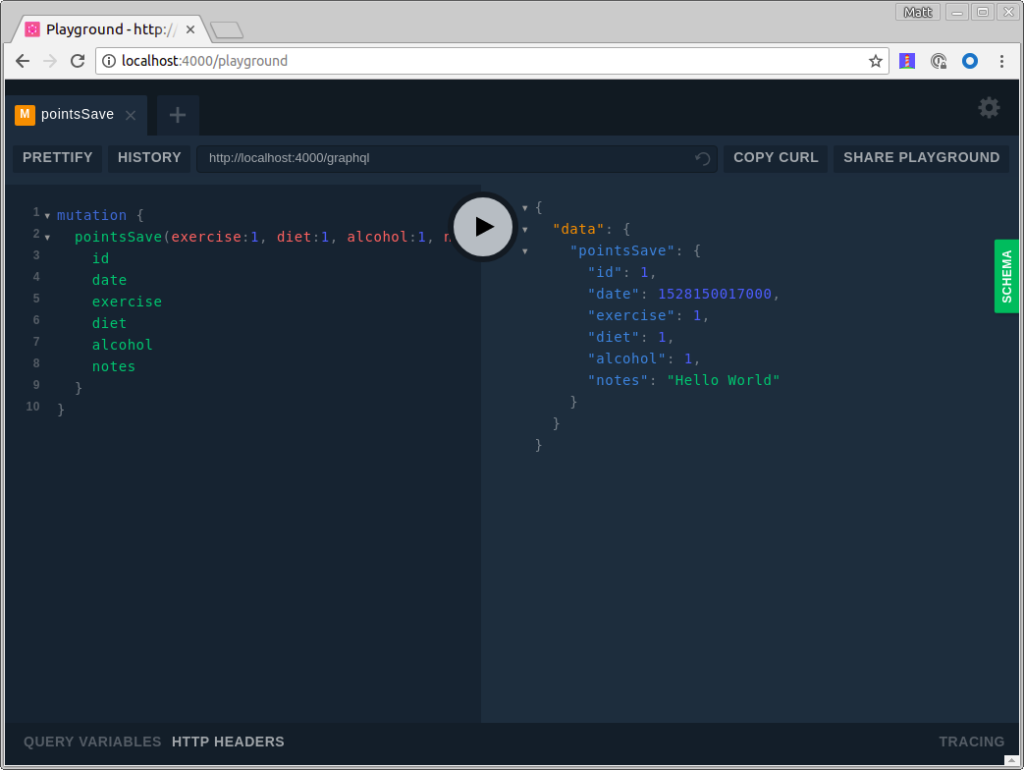
You can click the “SCHEMA” tab on the right to see the available queries and mutations. Pretty slick, eh?!

You can use the following points query to verify that data is in your database.

query {
  points {id date exercise diet notes}
}

Fix Dates

You might notice that the date returned from pointsSave and the points query is in a format the might be difficult for a JavaScript client to understand. You can fix that, install graphql-iso-date.

npm i graphql-iso-date@3.5.0

Then, add an import in src/index.ts and configure custom resolvers for the various date types. This example only uses Date, but it’s helpful to know the other options.

import { GraphQLDate, GraphQLDateTime, GraphQLTime } from 'graphql-iso-date';

bootstrap({
  ...
  // https://github.com/vesper-framework/vesper/issues/4
  customResolvers: {
    Date: GraphQLDate,
    Time: GraphQLTime,
    DateTime: GraphQLDateTime
  },
  ...
});

Now running the points query will return a more client-friendly result.

{
  "data": {
    "points": [
      {
        "id": 1,
        "date": "2018-06-04",
        "exercise": 1,
        "diet": 1,
        "notes": "Hello World"
      }
    ]
  }
}

You’ve written an API with GraphQL and TypeScript in about 20 minutes. How cool is that?! There’s still work to do though. In the next sections, you’ll create a React client for this API and add authentication with OIDC. Adding authentication will give you the ability to get the user’s information and associate a user with their points.

Get Started with React

One of the quickest ways to get started with React is to use Create React App. Install the latest release using the command below.

npm i -g create-react-app@1.1.4

Navigate to the directory where you created your GraphQL API and create a React client.

cd health-tracker
create-react-app react-client

Install the dependencies you’ll need to talk to integrate Apollo Client with React, as well as Bootstrap and reactstrap.

npm i apollo-boost@0.1.7 react-apollo@2.1.4 graphql-tag@2.9.2 graphql@0.13.2

Configure Apollo Client for Your API

Open react-client/src/App.js and import ApolloClient from apollo-boost and add the endpoint to your GraphQL API.

import ApolloClient from 'apollo-boost';

const client = new ApolloClient({
  uri: "http://localhost:4000/graphql"
});

That’s it! With only three lines of code, your app is ready to start fetching data. You can prove it by importing the gql function from graphql-tag. This will parse your query string and turn it into a query document.

import gql from 'graphql-tag';

class App extends Component {

  componentDidMount() {
    client.query({
      query: gql`
        {
          points {
            id date exercise diet alcohol notes
          }
        }
      `
    })
    .then(result => console.log(result));
  }
...
}

Make sure to open your browser’s developer tools so you can see the data after making this change. You could modify the console.log() to use this.setState({points: results.data.points}), but then you’d have to initialize the default state in the constructor. But there’s an easier way: you can use ApolloProvider and Query components from react-apollo!

Below is a modified version of react-client/src/App.js that uses these components.

import React, { Component } from 'react';
import logo from './logo.svg';
import './App.css';
import ApolloClient from 'apollo-boost';
import gql from 'graphql-tag';
import { ApolloProvider, Query } from 'react-apollo';
const client = new ApolloClient({
  uri: "http://localhost:4000/graphql"
});

class App extends Component {

  render() {
    return (
      <ApolloProvider client={client}>
        <div className="App">
          <header className="App-header">
            <img src={logo} className="App-logo" alt="logo" />
            <h1 className="App-title">Welcome to React</h1>
          </header>
          <p className="App-intro">
            To get started, edit <code>src/App.js</code> and save to reload.
          </p>
          <Query query={gql`
            {
              points {id date exercise diet alcohol notes}
            }
          `}>
            {({loading, error, data}) => {
              if (loading) return <p>Loading...</p>;
              if (error) return <p>Error: {error}</p>;
              return data.points.map(p => {
                return <div key={p.id}>
                  <p>Date: {p.date}</p>
                  <p>Points: {p.exercise + p.diet + p.alcohol}</p>
                  <p>Notes: {p.notes}</p>
                </div>
              })
            }}
          </Query>
        </div>
      </ApolloProvider>
    );
  }
}

export default App;

You’ve built a GraphQL API and a React UI that talks to it - excellent work! However, there’s still more to do. In the next sections, I’ll show you how to add authentication to React, verify JWTs with Vesper, and add CRUD functionality to the UI. CRUD functionality already exists in the API thanks to the mutations you wrote earlier.

Add Authentication for React with OpenID Connect

You’ll need to configure React to use Okta for authentication. You’ll need to create an OIDC app in Okta for that.

Log in to your Okta Developer account (or sign up if you don’t have an account) and navigate to Applications > Add Application. Click Single-Page App, click Next, and give the app a name you’ll remember. Change all instances of localhost:8080 to localhost:3000 and click Done. Your settings should be similar to the screenshot below.

OIDC App Settings

Okta’s React SDK allows you to integrate OIDC into a React application. To install, run the following commands:

npm i @okta/okta-react@1.0.2 react-router-dom@4.2.2

Okta’s React SDK depends on react-router, hence the reason for installing react-router-dom. Configuring routing in client/src/App.tsx is a common practice, so replace its code with the JavaScript below that sets up authentication with Okta.

import React, { Component } from 'react';
import { BrowserRouter as Router, Route } from 'react-router-dom';
import { ImplicitCallback, SecureRoute, Security } from '@okta/okta-react';
import Home from './Home';
import Login from './Login';
import Points from './Points';

function onAuthRequired({history}) {
  history.push('/login');
}

class App extends Component {
  render() {
    return (
      <Router>
        <Security issuer='https://{yourOktaDomain}/oauth2/default'
                  client_id='{clientId}'
                  redirect_uri={window.location.origin + '/implicit/callback'}
                  onAuthRequired={onAuthRequired}>
          <Route path='/' exact={true} component={Home}/>
          <SecureRoute path='/points' component={Points}/>
          <Route path='/login' render={() => <Login baseUrl='https://{yourOktaDomain}'/>}/>
          <Route path='/implicit/callback' component={ImplicitCallback}/>
        </Security>
      </Router>
    );
  }
}

export default App;

Make sure to replace {yourOktaDomain} and {clientId} in the code above. You can find both values in the Okta Developer Console.

The code in App.js references two components that don’t exist yet: Home, Login, and Points. Create src/Home.js with the following code. This component renders the default route, provides a Login button, and links to your points and logout after you’ve logged in.

import React, { Component } from 'react';
import { withAuth } from '@okta/okta-react';
import { Button, Container } from 'reactstrap';
import AppNavbar from './AppNavbar';
import { Link } from 'react-router-dom';

export default withAuth(class Home extends Component {
  constructor(props) {
    super(props);
    this.state = {authenticated: null, userinfo: null, isOpen: false};
    this.checkAuthentication = this.checkAuthentication.bind(this);
    this.checkAuthentication();
    this.login = this.login.bind(this);
    this.logout = this.logout.bind(this);
  }

  async checkAuthentication() {
    const authenticated = await this.props.auth.isAuthenticated();
    if (authenticated !== this.state.authenticated) {
      if (authenticated && !this.state.userinfo) {
        const userinfo = await this.props.auth.getUser();
        this.setState({authenticated, userinfo});
      } else {
        this.setState({authenticated});
      }
    }
  }

  async componentDidMount() {
    this.checkAuthentication();
  }

  async componentDidUpdate() {
    this.checkAuthentication();
  }

  async login() {
    this.props.auth.login('/');
  }

  async logout() {
    this.props.auth.logout('/');
    this.setState({authenticated: null, userinfo: null});
  }

  render() {
    if (this.state.authenticated === null) return null;
    const button = this.state.authenticated ?
        <div>
          <Button color="link"><Link to="/points">Manage Points</Link></Button><br/>
          <Button color="link" onClick={this.logout}>Logout</Button>
        </div>:
      <Button color="primary" onClick={this.login}>Login</Button>;

    const message = this.state.userinfo ?
      <p>Hello, {this.state.userinfo.given_name}!</p> :
      <p>Please log in to manage your points.</p>;

    return (
      <div>
        <AppNavbar/>
        <Container fluid>
          {message}
          {button}
        </Container>
      </div>
    );
  }
});

This component uses <Container/> and <Button/> from reactstrap. Install reactstrap, so everything compiles. It depends on Bootstrap, so include it too.

npm i reactstrap@6.1.0 bootstrap@4.1.1

Add Bootstrap’s CSS file as an import in src/index.js.

The post Build a Health Tracking App with React, GraphQL, and User Authentication appeared first on SitePoint.


by Matt Raible via SitePoint

The Benefits of Using CSS Grid for Web Form Layout

Form layout and design is a fundamental yet frustrating part of web design and development. Ask anyone who's ever tried to style a <select> box or align a label consistently in all browsers.

In 2016 I wrote “Make Forms Fun with Flexbox”, which identified how several form difficulties could be solved with Flexbox. A key benefit was HTML source order consistency, with the <label> always following its associated field tag in a container:

<div>
  <input id="name" name="name" type="text" />
  <label for="name">name</label>
</div>

<div>
  <select id="experience" name="experience"><!-- options --></select>
  <label for="experience">experience</label>
</div>

<div>
  <input id="html" name="html" type="checkbox" />
  <label for="html">HTML</label>
</div>

Flexbox could then be used to:

  • reposition the label if necessary — that is, move it to the left of the field on text inputs, select boxes, and textareas
  • vertically align the label and field.

It also became possible to style labels based on the state of their field using adjacent sibling selectors — for example, applying bold to a label when its associated checkbox is checked:

input:checked + label {
  font-weight: bold;
}

Flawed Flexboxed Forms

Unfortunately, there are a number of problems using Flexbox to lay out a form. Flexbox creates a one-dimensional layout where each item follows another and wraps to a new line when necessary. Field/label pairs must be placed in container elements with display: flex; applied to guarantee each appears on a new row.

It was also necessary to define a fixed label width, such as 10em. If a long label required more room, its text would either overflow or resize the element and push the field out of alignment with others.

Finally, forms are normally laid out in a grid. Shouldn't we be using CSS Grid now that it's fully supported in all mainstream browsers? Absolutely!

Development Approach

Most CSS Grid articles demonstrate the concepts and may provide graceful degradation fallbacks for older browsers. That approach is ideal when the layout is mostly decorative — for example, positioning page content, headers, footers and menus. It rarely matters when oldBrowserX shows linear blocks in an unusual order because the page content remains usable.

Form layout is more critical: a misaligned label could lead the user to enter information in the wrong box. For this reason, this tutorial takes a progressive enhancement approach:

  1. An initial floated layout will work in all browsers including IE8+ (which doesn’t support Flexbox either). It will not be perfect, but floats never were!
  2. Enhance the layout using CSS Grid in all modern browsers.

The examples below contain very few CSS classes, and styling is applied directly to HTML elements. That’s not the BEM way, but it is intentional to keep the code clean and understandable without distractions.

You could consider using similar code as the base for all forms on your site.

The HTML

A typical HTML form can be kept clean, since there’s no need for containing (<div>) elements around field/label pairs:

<form action="get">
  <fieldset>
    <legend>Your web development skillset</legend>

    <div class="formgrid">

      <input id="name" name="name" type="text" />
      <label for="name">name</label>

      <select id="experience" name="experience">
        <option value="1">1 year or less</option>
        <option value="2">2 years</option>
        <option value="3">3 - 4 years</option>
        <option value="5">5 years or more</option>
      </select>
      <label for="experience">experience</label>

      <input id="html" name="html" type="checkbox" />
      <label for="html">HTML</label>

      <input id="css" name="css" type="checkbox" />
      <label for="css">CSS</label>

      <input id="javascript" name="javascript" type="checkbox" />
      <label for="javascript">JavaScript</label>

      <textarea id="skills" name="skills" rows="5" cols="20"></textarea>
      <label for="skills">other skills</label>

      <button type="submit">SUBMIT</button>

    </div>

  </fieldset>
</form>

The only additional element is <div class="formgrid">. Browsers can’t apply display: grid or display: flex to fieldset elements. That may eventually be fixed, but an outer container is currently required.

The post The Benefits of Using CSS Grid for Web Form Layout appeared first on SitePoint.


by Craig Buckler via SitePoint

A Beginner's Guide to Drawing 2D Graphics With Two.js

Two.js an API that makes it easy to create 2D shapes with code. Follow along and you'll learn how to create and animate shapes from JavaScript.

Two.js is renderer agnostic, so you can rely on the same API to draw with Canvas, SVG, or WebGL. The library has a lot of methods which can be used to control how different shapes appear on the screen or how they are animated.

Installation

The uncompressed version of the library has a size of around 128 KB, while the compressed version is 50 KB. If you are using the latest version, you can further reduce the size of the library using a custom build.

You can either download the minified version of the library from GitHub or you can link directly to the CDN hosted version. Once you have added the library to your webpage, you can start drawing and animating different shapes or objects.

Creating Basic Shapes

First, you need to tell Two.js about the element on which you want to draw and animate your shapes. You can pass some parameters to the Two constructor to set things up.

Set the type of renderer using the type property. You can specify a value like svg, webgl, canvas, etc. The type is set to svg by default. The width and height of the drawing space can be specified using the width and height parameters. You can also set the drawing space to the full available screen using the fullscreen parameter. When fullscreen is set to true, the values of width and height will be disregarded.

Finally, you can tell Two.js to automatically start an animation with the help of the Boolean autostart parameter.

After passing all the desired parameters to the constructor, you can start drawing lines, rectangles, circles, and ellipses.

You can draw a line using two.makeLine(x1, y1, x2, y2). Here, (x1, y1) are the coordinates of the first end point, and (x2, y2) are the coordinates of the second end point. This function will return a Two.Line object, which can be stored in a variable for further manipulation at a later point.

In a similar manner, you can draw normal and rounded rectangles using two.makeRectangle(x, y, width, height) and two.makeRoundedRectangle(x, y, width, height, radius) respectively. Remember that x and y determine the center of the rectangle, instead of its top left coordinates like many other libraries. The width and height parameters will determine the size of the rectangle. The radius parameter is used to specify the value of the radius for the rounded corner.

You can also render circles and ellipses on a webpage using two.makeCircle(x, y, radius) and two.makeEllipse(x, y, width, height) respectively. Just like the rectangles, the x and y parameters specify the center of the circle or ellipse. Setting the width and height to the same value in the case of an ellipse will render it like a circle.

One useful method in Two.js that you will use frequently is two.makeGroup(objects). You can either pass a list of different objects or pass an array of objects, paths or groups as the parameter to this method. It will also return a Two.Group object.

Manipulating Objects in a Group

After you have created a group, you can manipulate all its children at once using properties that the group makes available to you.

The stroke and fill properties can be used to set the stroke and fill color for all children in a group. They will accept all valid forms in which you can represent a color in CSS. This means that you are free to use RGB, HSL, or hex notation. You can also simply use the name of the color, like orange, red, or blue. Similarly, you can set values for all other properties like linewidth, opacity, miter, and cap. It is possible to remove the fill and stroke from all children in a group using the noFill() and noStroke() methods.

You can also apply other physical transformations like scale, rotation, and translation. These transformations will be applied on individual objects. Adding new objects to a group and removing them is easy with methods like add() and remove().

Defining Gradients and Writing Text

You can define both linear and radial gradients in Two.js. Defining a gradient does not mean that it will be rendered automatically on the screen, but it will be available for you to use when setting the fill or stroke values of various objects.

You can define a linear gradient using two.makeLinearGradient(x1, y1, x2, y2, stops). The values x1 and y1 determine the coordinates of the start of the gradient. Similarly, the values x2 and y2 determine the coordinates of the end of the gradient. The stops parameter is an array of Two.Stop instances. These define the colors of each part of the array and where each color transitions into the next. They can be defined using new Two.Stop(offset, color, opacity), where offset determines the point on the gradient where that particular color has to be fully rendered. The color parameter determines the color of the gradient at the particular point. You can use any valid CSS color representations as its value. Finally, the opacity parameter determines the opacity of the color. The opacity is optional, and it can have any value between 0 and 1.

You can define radial gradients in a similar manner using two.makeRadialGradient(x, y, radius, stops, fx, fy). In this case, the values x and y determine the center of the gradient. The radius parameter specifies how far the gradient should extend. You can also pass an array of stops to this method in order to set the color composition of the gradients. The parameters fx and fy are optional, and they can be used to specify the focal position for the gradient.

Check out some of the types of gradient and their code in the CodePen below.

Remember that the x and y position of the gradients are with respect to the origin of the shape they are trying to fill. For instance, a radial gradient which is supposed to fill a shape from the center will always have x and y set to zero.

Two.js also allows you to write text on the drawing area and update it later according to your needs. This requires the use of the method two.makeText(message, x, y, styles). It might be evident from the name of the parameters that message is the actual text that you want to write. The parameters x and y are the coordinates of the point which will act as the center for writing the text. The styles parameter is an object which can be used to set the values of a large set of properties.

You can use styles to set the values of properties like font family, size, and alignment. You can also specify the value of properties like fill, stroke, opacity, rotation, scale, and translation.

Creating a Two.js Project

After learning about all these methods and properties, it is time to apply them to a project. In this tutorial, I will show you how we can use Two.js to render the first ten elements of the periodic table with electrons rotating around the nucleus. The nucleus will also have some slight movement to improve the visual appeal of our representation.

We begin by defining some variables and functions which will be used later.

The above code stores the coordinates of the center of our window in the variables centerX and centerY. These will be used later to place our atom in the center. The elementNames array contains the names of the first ten elements of the periodic table. The index of each name corresponds to the number of electrons and protons of that element, and it begins with an empty string. The styles object contains properties for styling the text object.

We have also defined a function intRange() to get a random integer value within given extremes.

This creates an instance of Two and defines two radial gradients. The red/black radial gradients will represent protons, and blue/black gradients will represent neutrons.

We have used the intRange() function to place all these neutrons and protons within 20 pixels of each other. The makeCircle() method also sets the radius of these protons and neutrons to 10 pixels. After that, we iterate over nucleusArray and fill each circle with a different gradient alternately.

Placing neutrons and protons inside the nucleus was easy. However, properly placing the electrons at a uniform distance will require a little maths. We use the shellRadius variable to specify the distance of different electron shells from the nucleus. A whole circle covers an angle equal to 2 PI radians. We can place different electrons uniformly by distributing the 2 PI radians between them equally.

The Math.cos() and Math.sin() functions are used to separate the vertical and horizontal components of the position vector of different electrons based on their angle.

This part of the code puts electrons from different shells as well as neutrons and protons in their own separate groups. It also sets the fill colors for all electrons in a specific orbit at once.

This part of the code sets the opacity of individual electrons and protons to zero. It also tells Two.js to rotate the electrons and protons at specific speeds.

The final part of the code allows us to iterate through the elements by clicking the mouse or tapping. To load the next element, we make one more electron and one more proton or neutron visible and update the element name. After clicking on the last element, all the particles are hidden again so we can start over. The visible variable keeps track of the number of atomic particles that are currently visible so that we can show or hide them accordingly.

Try clicking or tapping in the following CodePen demo to see the first ten elements of the periodic table.

Final Thoughts

We began this tutorial with a brief introduction to the Two.js library and how it can be used to draw shapes like rectangles, circles, and ellipses. After that, we discussed how we can group different objects together to manipulate them all at once. We used this ability to group elements to translate and rotate them in synchronization. These tools all came together in our animation of the atoms of the first ten elements in the periodic table.

As you can see, creating animated 2D graphics is very easy using Two.js. The focus of this post was to help you get started quickly, so we only covered the basics. However, you should read the official documentation to learn more about the library!


by Monty Shokeen via Envato Tuts+ Code