"Mr Branding" is a blog based on RSS for everything related to website branding and website design, it collects its posts from many sites in order to facilitate the updating to the latest technology.
To suggest any source, please contact me: Taha.baba@consultant.com
Microsoft Proves The Critics Right: We’re Heading Toward a Chrome-Only Web — “if there’s not much point in taking the time and effort to support browsers that have a small audience .. this creates a negative feedback loop for those browsers, discouraging their use and pushing developers toward a world in which Chrome is the only browser that developers think about.”
The Third Party Web of Excessive JavaScript Execution — Research shows that across the top 1 million Web sites, just 800 origins account for 65% of all script execution time. Which 3rd party scripts are slowing the Web?
Jumps: The New Steps() in Web Animation — A look at using step timing functions (part of the easing spec) in CSS animation. You’ll need to view the demos in Firefox 65+.
Building a Plasma Canvas Effect with Rust and WebAssembly — Yes, the actual effect is coded in Rust, but JavaScript is used to bring everything together and may be of interest to you if you want to bring other languages into your frontend development via WebAssembly.
The key to marketing on the internet is understanding the various trends that are taking place on any platform that you might be interested in utilizing for the purpose of gaining access to as many potential consumers as possible. The important thing to note here is that a lot of things that happen...
[ This is a content summary only. Visit our website https://ift.tt/1b4YgHQ for full links, other content, and more! ]
On an impulse just before Christmas, I bought myself an NBA "over-the-door" mini basketball hoop. I wasn't sure what I'd do with it, but having a basketball hoop for my office seemed like a good move. In the end I decided to experiment and bring some connectivity to it by hooking it up to a Raspberry Pi to give it a scoreboard display. Here's how that went, with step-by-step instructions if you'd like to try to adapt and improve upon it!
This tutorial isn't intended to be used as a step-by-step "do exactly as I did" style guide — my hope is that you'll take this concept and use it for all sorts of other ideas. Add a virtual scoreboard that counts how often people come into your office. Or go with a different sport (maybe a mini soccer goal tracker?). Or use an entirely different sensor but track hits on it visually with a Raspberry Pi! There are so many potential applications of this technique. Try stuff and let me know how you go!
What You'll Need
In order to be able to follow along and make something similar, here's a list of the parts I used (or their equivalent for the things I had around my lab already):
Raspberry Pi 3 B+ — I used an older version of this from 2015, if you're going to buy one, get a newer version like this!
Raspberry Pi 3.3190G 7" Touchscreen Display — This is my favourite display for the Raspberry Pi, it is a touchscreen, so you can interact with the UI without needing to connect up a mouse.
HC-SR04 Ultrasonic Distance Measuring Sensor Module — I had a spare cheap clone HC-SR04 sensor around, but I'd recommend buying a good quality one. My one has occasional odd readings and is a bit temperamental.
One thing to note — if you don't have a 7 inch display for your Pi, you could display the score on a nearby computer monitor too. Any device on your local network with a web browser and a screen would work!
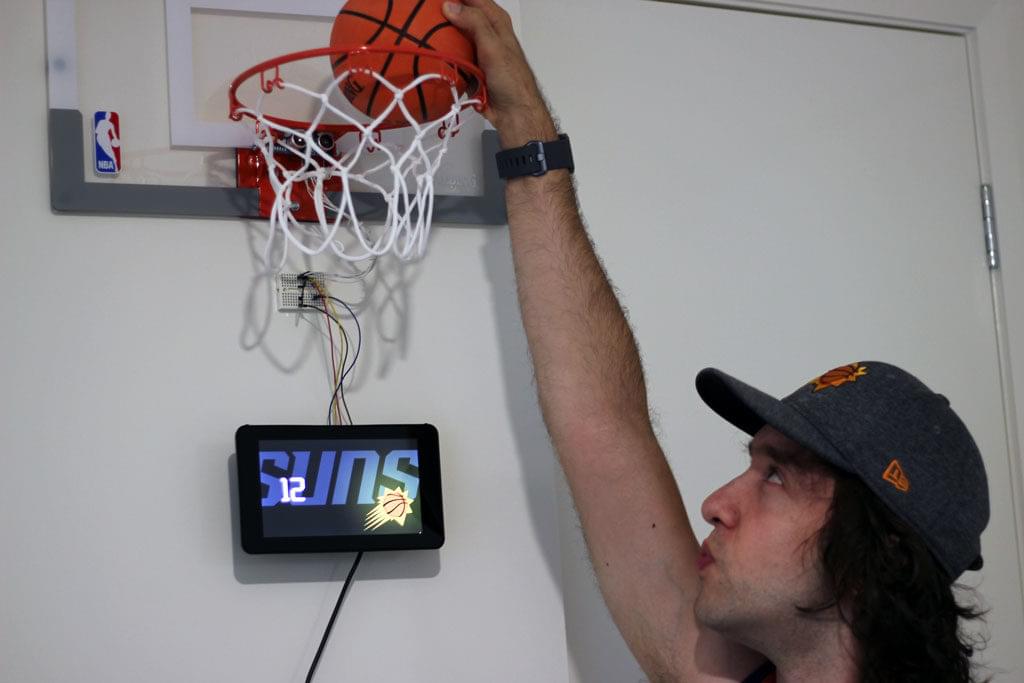
I hung my new basketball hoop up on a door with an ultrasonic sensor attached to the hoop to track when a ball goes into the hoop. Underneath is a Raspberry Pi powered scoreboard — I'd actually recommend finding longer cables so you can connect it outside of basketball falling range.
[caption id="attachment_171361" align="aligncenter" width="1024"] Me testing out my connected scoreboard — with a customised Suns themed interface![/caption]
I'll go over why everything is as it is below — along with some suggestions for those who might want to improve upon this base!
Languages we'll be using
JavaScript - In order to follow along, you'll need a knowledge of the basics, but we won't have lines upon lines of code, things are actually pretty simple in the JS side of things.
Node.js - A basic knowledge of how to run npm and Node is needed to run our scoreboard server.
Setting up our Raspberry Pi
If you are completely new to the Raspberry Pi and haven't set anything up yet, never fear! There are many guides out there for setting things up and it's nice and straightforward. The Raspberry Pi foundation have a step by step guide for installing the Raspbian operating system using the NOOBS operating system manager. You'll want to make sure the operating system is running before you get onto any of the other steps.
Touchscreen setup
I put together my connected scoreboard using a Raspberry Pi 3 with touchscreen. My touchscreen and case were already put together and screwed down tight as I've used this Pi 3 before for other projects, however if you are starting from scratch — it isn't too hard to connect up. Newer shipments (like mine) actually have a bunch of it already assembled, with the adapter board already screwed onto the LCD screen, if that's the case, half the steps are already complete! Instructions on how to assemble the screen are available online:
Official instructions — these are the instructions which come with the screen in case you lose them!
When it comes to putting the case around the LCD screen and Raspberry Pi, that process is also quite easy with the case I have. I already had mine together, however the general steps for this are:
Make sure you've already got your microUSB card inside the Raspberry Pi and are happy with how it's running! Annoyingly with a lot of cases, you can't get the card out once the case is in place. My case linked above is one of those... so make sure the card is all good before you lose access to it!
Place the Pi with screen into place inside the case
Arrange the ribbon cables and cables coming from the GPIO so they aren't in the way
Make sure the holes for your USB ports and such are on the correct side of the bulkier part of the case and line up nicely.
Once everything is lined up nicely, screw in the four screws to put it all together!
Turn it on! If you find that the screen comes up upside down, don't worry, it's a side effect of the case manufacturers lining up the power to come out of the top. When I mounted my scoreboard though, I mounted it with the power coming out of the bottom, so this wasn't an issue for me. If it is an issue for you:
Run sudo nano /boot/config.txt to open the config for the Pi
Then add lcd_rotate=2 to the end, this will rotate the screen around.
Press Ctrl X and the Ctrl Y to save your changes.
Restart your Pi and when it loads back up it should be the right way around!
Running Node.js on our Raspberry Pi
Conveniently, Raspbian has Node installed by default! However, it is a rather old version of Node. You can check which version is installed on your Pi by opening up the Terminal and typing in:
node -v
I've got version 8.15.0 installed on my Pi. You can upgrade by running the following commands:
One of the biggest trends among social media platforms these days involves the coveted Stories feature that Snapchat came up with. Pretty much any platform out there that has a social element to it is adding some kind of stories feature into the mix, but the problem with this is that the market is...
[ This is a content summary only. Visit our website https://ift.tt/1b4YgHQ for full links, other content, and more! ]
Most of the marketers struggle to take advantage of Twitter when it comes to promoting their brands in the social media world. The platform has always been considered unique to make voices heard online and with a limit of 280 characters (started with 140), it provides you the unique opportunity to...
[ This is a content summary only. Visit our website https://ift.tt/1b4YgHQ for full links, other content, and more! ]
According to the Cyber Media Research (CMR), eighty-nine percent of smartphone buyers prefer a phone with a good camera. Additionally, 87% give priority to battery life, 79% to RAM, and 72% to the internal memory of a new device. The survey also observed that buyers prefer experimentation to...
[ This is a content summary only. Visit our website https://ift.tt/1b4YgHQ for full links, other content, and more! ]
In January at CES, Twitter announced the launch of its prototype application, called “twttr”, named on the company’s original name. The application has now been finally rolled out to the first group of testers. This would let the social media giant try out new experiments without bringing many...
[ This is a content summary only. Visit our website https://ift.tt/1b4YgHQ for full links, other content, and more! ]


 Me testing out my connected scoreboard — with a customised Suns themed interface![/caption]


