[ This is a content summary only. Visit our website https://ift.tt/1b4YgHQ for full links, other content, and more! ]


by Zia Zaidi via Digital Information World


In 2012, Facebook engineer Nick Schrock started work on a small prototype to facilitate moving away from an old, unsupported partner API that powered the current Facebook News Feed. At the time, this was called “SuperGraph”. Fast forward to today and SuperGraph has helped shape the open-source query language GraphQL, which has been much of the buzzword in recent times.
Facebook describes GraphQL as a “query language for APIs and a runtime for fulfilling those queries with your existing data”. Put simply, GraphQL is an alternative to REST that has been steadily gaining popularity since its release. Whereas with REST a developer would usually collate data from a series of endpoint requests, GraphQL allows the developer to send a single query to the server that describes the exact data requirement.
For this tutorial, you’ll need a basic knowledge of React Native and some familiarity with the Expo environment. You’ll also need the Expo client installed on your mobile device or a compatible simulator installed on your computer. Instructions on how to do this can be found here.
In this tutorial, we’re going to demostrate the power of GraphQL in a React Native setting by creating a simple coffee bean comparison app. So that you can focus on all of the great things GraphQL has to offer, I’ve put together the base template for the application using Expo.
To get started, you can clone this repo and navigate to the “getting-started” branch, which includes all of our basic views to start adding our GraphQL data to, as well as all of our initial dependencies, which at this stage are:
{
    "expo": "^32.0.0",
    "react": "16.5.0",
    "react-native": "https://github.com/expo/react-native/archive/sdk-32.0.0.tar.gz",
    "react-navigation": "^3.6.1"
}
To clone this branch, you’ll need to open up terminal and run this command:
git clone https://github.com/jamiemaison/graphql-coffee-comparison.git
To then navigate to the getting-started branch, you move into the newly cloned repo with cd graphql-coffee-comparison and run git checkout getting-started.
The next stage is to install our dependencies. To do this, make sure you’re on Node v11.10.1 and run npm install in the root directory of the project. This will add all of the dependencies listed above to your node_modules folder.
To start adding GraphQL to our React Native app, we’re going to need to install a few more dependencies that help us perform a few simple GraphQL functions. As is common with modern JavaScript development, you don’t need all of these dependencies to complete the data request, but they certainly help in giving the developer a better chance of structuring some clean, easy-to-read code. The dependencies you’ll need can be installed by running npm install --save apollo-boost react-apollo graphql-tag graphql.
Here’s an overview of what these dependencies are:
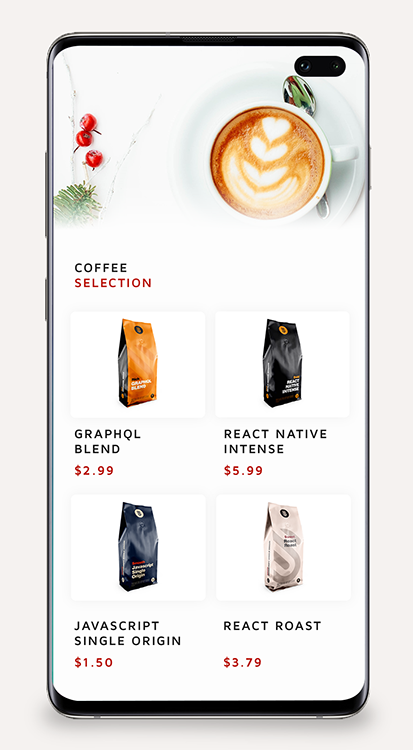
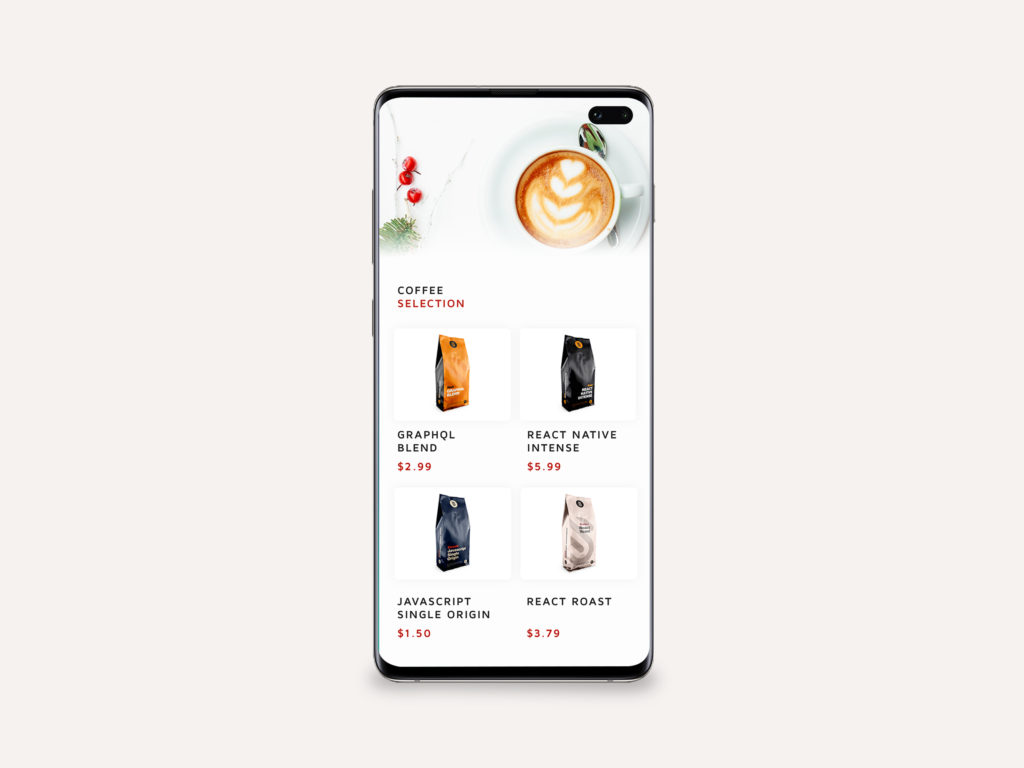
apollo-boost: a zero-configuration way of getting started with GraphQL in React/React Nativereact-apollo: this provides an integration between GraphQL and the Apollo clientgraphql-tag: a template literal tag that parses GraphQL queriesgraphql: the JavaScript reference implementation for GraphQLOnce all of the necessary dependencies have finished installing, run npm start. You should now see your familiar Expo window, and if you launch the app (either via a simulator or on a device) then you should see a screen similar to this:
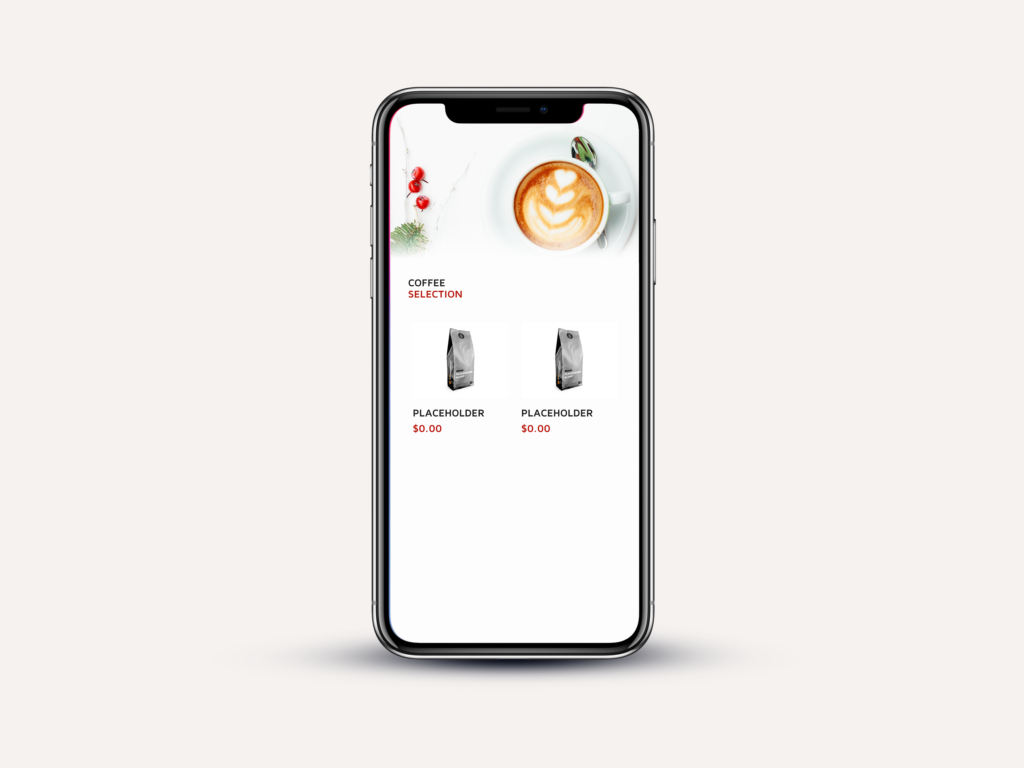
In basic terms, this application has two screens that are managed by react-navigation, Home.js and CoffeePage.js. The Home screen contains a simple FlatList that renders all of the coffee beans supplied to its data field. When clicked on, the user is navigated to the CoffeePage for that item, which displays more information about the product. It’s our job to now populate these views with interesting data from GraphQL.
There are two main elements to any successful GraphQL transaction: the server holding the data, and the front-end query making the request. For the purposes of this tutorial, we aren’t going to start delving into the wonderful world of server-side code, so I’ve created our server for us ready to go. All you need to do is navigate to yq42lj36m9.sse.codesandbox.io in your favorite browser and leave it running throughout the course of development. For those interested, the server itself is running using apollo-server and contains just enough code to hold the data we need and serve it upon receiving an appropriate query. For further reading, you can head over to apollographql.com to read more about apollo-server.
Before we get into writing the actual code that’s going to request the data we need for our coffee bean comparison app, we should understand just how GraphQL queries work. If you already know how queries work or just want to get started with coding, you can skip ahead to the next section.
Note: these queries won’t work with our codesandbox server, but feel free to create your own at codesandbox.io if you’d like to test out the queries.
At its simplest level, we can use a flat structure for our queries when we know the shape of the data we’re requesting:
QUERY:                                RESPONSE:
{                                     {
  coffee {                              "coffee": {
    blend                                 "blend": "rich"
  }                                     }
}                                     }
On the left, we see the GraphQL query requesting the blend field from coffee. This works well when we know exactly what our data structure is, but what about when things are less transparent? In this example, blend returns us a string, but queries can be used to request objects as well:
QUERY:                                RESPONSE:
{                                     {
  coffee {                              "coffee": {
    beans {                               "beans": [
        blend                               {
    }                                         blend: "rich"
  }                                         },
}                                           {
                                              blend: "smooth"
                                            }
                                          ]
                                        }
                                      }
Here you can see we are simply requesting the beans object, with only the field blend being returned from that object. Each object in the beans array may very well contain other data other than blend, but GraphQL queries help us request only the data we need, cutting out any extra information that’s not necessary for our application.
So what about when we need to be more specific than this? GraphQL provides the capability for many things, but something that allows for extremely powerful data requests is the ability to pass arguments in your query. Take the following example:
QUERY:                                RESPONSE:
{                                     {
  coffee(companyId: "2") {              "coffee": {
    beans {                               "beans": [
        blend                               {
    }                                         blend: "rich"
  }                                         },
}                                           {
                                              blend: "smooth"
                                            }
                                          ]
                                        }
                                      }
What we see is that we can pass an argument — in this case, the companyId — which ensures that we are only returned beans from one particular company. With REST, you can pass a single set of arguments via query params and URL segments, but with GraphQL querying every single field, it can get its own set of arguments. This allows GraphQL to be a dynamic solution for making multiple API fetches per request.
The post Getting Started with GraphQL and React Native appeared first on SitePoint.


In this tutorial you will learn how to make your WooCommerce store a little more stylish by organizing the product archive with tabs. We’ll create tabs with a multi-column layout, a multi-row carousel, and a grid layout.
Over the coming steps we will create a WordPress plugin, inside which we will setup the required shortcodes. Should you wish to take your WooCommerce product archive further, you could convert it to a Gutenberg block, use it with Elementor as a widget, or integrate it with Visual Composer.
This tabbed product archive will be perfect for showing recent, featured, sale, and best selling products, like this:

So let’s get started!
In your WordPress site under wp-content/plugins create a folder called (perhaps not the most original name) “woocommerce-products”, then inside that folder create a php file with the same name. Open the file and paste into it the code below (change the details to fit your own):
/*
    Plugin Name: WooCommerce products
    Plugin URI: https://www.enovathemes.com
    Description: Better product grouping presentation for your WooCommerce shop
    Author: Enovathemes
    Version: 1.0
    Author URI: http://enovathemes.com
*/

if ( ! defined( 'ABSPATH' ) ) {
    exit; // Exit if accessed directly
}
Here we’ve done nothing more than define our plugin name and provided some meta info.
For our WooCommerce product archive plugin we will next need to enqueue the required scripts and styles, so add the following code snippet:
// Enqueue/register styles and scripts
function plugin_scripts_styles(){

    wp_enqueue_style( 'style', plugins_url('/css/style.css', __FILE__ ), array(), '1.0.0' );

    // Required Plugins
    wp_enqueue_script( 'imagesloaded');
    wp_enqueue_script( 'owl-carousel', plugins_url('/js/owl.carousel.js', __FILE__ ), array('jquery'), '', true);
    // Main js file
    wp_enqueue_script( 'main', plugins_url('/js/main.js', __FILE__ ), array('jquery'), '', true);
}
add_action( 'wp_enqueue_scripts', 'plugin_scripts_styles' );
First, we’ve added a basic CSS file to store our styles. Next we loaded the built-in imageLoaded plugin (which comes with the WordPress core), and to create the carousel we will use the wildly popular jQuery plugin owlCarousel. And, of course, the main js file.
Note: Make sure these files are added to your plugin folder in the relevant subfolders.
For more on WordPress plugin and shortcode creation, or further information on using owl.js, here are some recommended tutorials on Tuts+:


In this step we will create a tab shortcode. It will consist of two shortcodes actually; the parent tab container, and then child tab items. For the first parent container add this code to the PHP file:
// Create tab shortcode
function et_tab($atts, $content = null) {

    extract(shortcode_atts(array(), $atts));

        $output = '';

        static $id_counter = 1;

        $class   = array();
        $class[] = 'et-tab';
        $class[] = 'et-clearfix';

        $output .='<div id="et-tab-'.$id_counter.'" class="'.implode(" ", $class).'">';
                $output .= do_shortcode($content);
        $output .= '</div>';

        $id_counter++;

        return $output;

}
add_shortcode('et_tab', 'et_tab');
This shortcode doesn’t require any attributes, it just wraps the tab items inside it.
Speaking of tab items, next add the code below to create the child tab item element:
function et_tab_item($atts, $content = null) {

    extract(shortcode_atts(array(
                'title'  => '',
                'active' => 'false',
        ), $atts));

        $output = '';

        static $id_counter = 1;

    $class   = array();
        $class[] = 'tab-item';
    $class[] = 'et-clearfix';
        $class[] = 'active-'.esc_attr($active);

        $output .= '<div data-target="tab-'. sanitize_title( $title ) .'" class="'.implode(' ',$class).'">';
                if (isset($title) && !empty($title)) {
                        $output .= esc_attr($title);
                }
        $output .= '</div> ';
        $output .= '<div id="tab-'.sanitize_title($title).'-'.$id_counter.'" class="tab-content et-clearfix">';
            $output .= do_shortcode($content);
        $output .= '</div>';

        $id_counter++;

        return $output;
}
add_shortcode('et_tab_item', 'et_tab_item');
This shortcode has two attributes; the title and the active indicator, in case you want to make the targeted tab active on first load.
When used in the WordPress editor the two shortcodes together will look like this:
[et_tab] [et_tab_item title="Your title"] …content here[/et_tab_item][/et_tab]
At this point, if you were to add them to your front-page, then view the result in your browser, you would see unstyled and non-functional HTML output. So let’s fix it.
Go to the main.js file and paste the code
(function($){

        "use strict";

                $('.et-tab').each(function(){

                        var $this    = $(this),
                                tabs     = $this.find('.tab-item'),
                                tabsQ    = tabs.length,
                                tabsContent = $this.find('.tab-content');

                        tabs.wrapAll('<div class="tabset et-clearfix"></div>');
                        tabsContent.wrapAll('<div class="tabs-container et-clearfix"></div>');

                        var tabSet = $this.find('.tabset');

                                if(!tabs.hasClass('active')){
                                        tabs.first().addClass('active');
                                }

                                tabs.each(function(){

                                        var $thiz = $(this);

                                        if ($thiz.hasClass('active')) {
                                                $thiz.siblings()
                                                .removeClass("active");
                                                tabsContent.hide(0).removeClass('active');
                                                tabsContent.eq($thiz.index()).show(0).addClass('active');
                                        }
                                });

                                if(tabsQ >= 2){

                                        tabs.on('click', function(){
                                                var $self = $(this);

                                                if(!$self.hasClass("active")){

                                                        $self.addClass("active");

                                                        $self.siblings()
                                                        .removeClass("active");

                                                        tabsContent.hide(0).removeClass('active');
                                                        tabsContent.eq($self.index()).show(0).addClass('active');

                                                }

                                        });
                                }

                });

        })(jQuery);
I won’t describe all this code in great detail, but the logic here powers the tab functionality. If you are not familiar with JavaScript or jQuery, I highly recommend this amazing free course for beginners:
Now the tabs work, but they still appear ugly, so let’s add some basic CSS:
.tabset {
    margin-bottom: 24px;
}

.tabset > * {
    display: inline-block;
    vertical-align: middle;
    padding: 8px 16px;
    line-height: 1em;
    background: #f5f5f5;
    margin-right: 8px;
    cursor: pointer;
}

.tabset > .active {
    background: #000000;
    color: #ffffff;
}

.tabset > :last-child {
    margin-right: 0;
}
We’re making great progress; our tabbed WooCommerce product archive is nearly there! The time has come to create a shortcode for the products. This will fetch the products with a query, then from those results create a series of arrays: featured, sale, and best-selling products. It will then output the contents of those arrays to give us our tabs of products.
Add this code to the PHP file:
function et_products($atts, $content = null) {
    extract(shortcode_atts(
        array(
            'layout'                    => 'grid',  // grid OR carousel
            'autoplay'              => 'false', // true OR false
            'columns'                   => '1', // 1 | 2 | 3 | 4
            'rows'                  => '1',     // 1 | 2 | 3 | 4 - carousel only
            'quantity'                  => '12',
            'type'                              => 'recent', // recent | featured | sale | best_selling
        ), $atts)
    );

    static $id_counter = 1;

    if (class_exists('Woocommerce')) {

        $output = '';

        global $post;

        $query_options = array(
            'post_type'           => 'product',
            'post_status'         => 'publish',
            'meta_query'          => WC()->query->get_meta_query(),
            'tax_query'           => WC()->query->get_tax_query(),
            'ignore_sticky_posts' => 1,
            'posts_per_page'      => absint($quantity),
        );

        if ($type == "featured"){
                        $query_options = array(
                                'post_type'           => 'product',
                                'post_status'         => 'publish',
                                'meta_query'          => WC()->query->get_meta_query(),
                                'ignore_sticky_posts' => 1,
                                'posts_per_page'          => absint($quantity),
                                'tax_query'           => array(
                                        array(
                                                'taxonomy' => 'product_visibility',
                                                'field'    => 'name',
                                                'terms'    => 'featured',
                                                'operator' => 'IN',
                                        )
                                ),
                        );
                }

        if ($type == "sale"){
                        $query_options = array(
                                'post_type'           => 'product',
                                'post_status'         => 'publish',
                                'meta_query'          => WC()->query->get_meta_query(),
                                'ignore_sticky_posts' => 1,
                                'posts_per_page'          => absint($quantity),
                                'post__in'            => array_merge( array( 0 ), wc_get_product_ids_on_sale() ),
                        );
                }

                if ($type == "best_selling"){

                        $query_options = array(
                                'post_type'           => 'product',
                                'post_status'         => 'publish',
                                'meta_query'          => WC()->query->get_meta_query(),
                                'tax_query'           => WC()->query->get_tax_query(),
                                'ignore_sticky_posts' => 1,
                                'posts_per_page'          => absint($quantity),
                                'orderby'             => 'meta_value_num',
                                'meta_key'            => 'total_sales',
                        );
                }

        $products = new WP_Query($query_options);

        if($products->have_posts()){

            $counter    = 1;

            $class      = array();
            $attributes = array();

            $class[] = 'products';
            $class[] = esc_attr($layout);

            if ($layout == 'carousel') {
                $class[] = 'owl-carousel';
            }

            $attributes[] = 'data-columns="'.esc_attr($columns).'"';
            $attributes[] = 'data-autoplay="'.esc_attr($autoplay).'"';

            $output .= '<ul class="'.esc_attr(implode(' ', $class)).'" '.implode(' ', $attributes).'>';

                while ($products->have_posts() ) {

                    $products->the_post();

                    global $product;

                    if ($layout == "carousel" && $rows != 1) {

                        $product_wrapper_start = '';
                        $product_wrapper_end   = '';

                        if (($counter % 2 == 1 && $rows == 2) || ($counter % 3 == 1 && $rows == 3) || ($counter % 4 == 1 && $rows == 4)){
                            $product_wrapper_start = '<li class="product-wrapper">';
                        }

                        if (($counter % 2 == 0 && $rows == 2) || ($counter % 3 == 0 && $rows == 3) || ($counter % 4 == 0 && $rows == 4)){
                            $product_wrapper_end   = '</li>';
                        }

                        $output .= $product_wrapper_start;
                            $output .= '<div class="product" id="product-'.esc_attr($product->get_id()).'">';
                                ob_start();
                                    do_action( 'woocommerce_before_shop_loop_item' );
                                    do_action( 'woocommerce_before_shop_loop_item_title' );
                                    do_action( 'woocommerce_shop_loop_item_title' );
                                    do_action( 'woocommerce_after_shop_loop_item_title' );
                                    do_action( 'woocommerce_after_shop_loop_item' );
                                $output .= ob_get_clean();
                            $output .= '</div>';
                        $output .= $product_wrapper_end;

                        $counter++;

                    } else {
                        $output .= '<li class="product" id="product-'.esc_attr($product->get_id()).'">';
                            ob_start();
                                do_action( 'woocommerce_before_shop_loop_item' );
                                do_action( 'woocommerce_before_shop_loop_item_title' );
                                do_action( 'woocommerce_shop_loop_item_title' );
                                do_action( 'woocommerce_after_shop_loop_item_title' );
                                do_action( 'woocommerce_after_shop_loop_item' );
                            $output .= ob_get_clean();
                        $output .= '</li>';
                    }

                }

                wp_reset_postdata();

            $output .= '</ul>';

            $id_counter++;

            return $output;

        }

    } else {
        echo "Please install/activate Woocommerce plugin";
    }
}
add_shortcode('et_products', 'et_products');
The shortcode we’ve created here has several attributes:
When you have a carousel, each product becomes a carousel item–normal behavior when you have one row. However, what happens if you want two, three, or four rows per carousel item?
In this case you would need to wrap each of these possibilities inside a wrapper that would act as the carousel item. And you have the question: do you do this with JavaScript or with PHP? I prefer the second option, as JS has some delay on execution. So if you examine the shortcode you will find the following:
$product_wrapper_start = '';
$product_wrapper_end   = '';

if (($counter % 2 == 1 && $rows == 2) || ($counter % 3 == 1 && $rows == 3) || ($counter % 4 == 1 && $rows == 4)){
    $product_wrapper_start = '<li class="product-wrapper">';
}

if (($counter % 2 == 0 && $rows == 2) || ($counter % 3 == 0 && $rows == 3) || ($counter % 4 == 0 && $rows == 4)){
    $product_wrapper_end   = '</li>';
}
Note the
$counter = 1;
right after the
if($products->have_posts()){
This is very similar to a for loop, we need an increment to loop through our query and wrap each two, each three, and each four product items inside the carousel item wrapper markup.
You’ll notice the %, which is the modulo operator. It gives the remainder of a division; 0 when the number is exactly divisible by 2/3/4, and 1 when not. And with each loop we will need to increment the counter with:
$counter++;
This happens right after the code:
$output .= $product_wrapper_start;
    $output .= '<div class="product" id="product-'.esc_attr($product->get_id()).'">';
        ob_start();
            do_action( 'woocommerce_before_shop_loop_item' );
            do_action( 'woocommerce_before_shop_loop_item_title' );
            do_action( 'woocommerce_shop_loop_item_title' );
            do_action( 'woocommerce_after_shop_loop_item_title' );
            do_action( 'woocommerce_after_shop_loop_item' );
        $output .= ob_get_clean();
    $output .= '</div>';
$output .= $product_wrapper_end;
We’re almost ready, but first let’s add some owl carousel styles and some additional styling to our products.
Open the style.css file and paste the owl carousel styles (you should find these in your owlCarousel plugin download .zip file). And some additional style for carousel navigation and our products:
ul.products {
    list-style: none;
    margin: 0;
    padding: 0;
}

ul.products.grid {
    display: grid;
    grid-row-gap: 24px;
    grid-column-gap: 24px;
}

ul.products.grid[data-columns="2"]{grid-template-columns: repeat(2, 2fr);}
ul.products.grid[data-columns="3"]{grid-template-columns: repeat(3, 3fr);}
ul.products.grid[data-columns="4"]{grid-template-columns: repeat(4, 4fr);}

ul li {
    display: block;
    padding: 0;
    margin: 0
}

.product {
    position: relative;
    text-align: center;
}

.woocommerce-loop-product__title  {
    margin-top: 16px !important;
    font-size: 1em !important;
}

.product a {
    display: block;
    text-decoration: none;
    border-bottom: none !important;
}

.product .onsale {
    position: absolute;
    left: 0;
    padding: 4px;
    background: red;
    color: #ffffff;
}
.et-tab .owl-nav {
    position: absolute;
    top: -60px;
    right: 0;
}

.et-tab .owl-nav > * {
    display: inline-block;
    vertical-align: middle;
    width: 40px;
    height: 40px;
    text-align: center;
    line-height: 40px;
    background: #f5f5f5 !important;
}

.et-tab .owl-nav > :last-child {
    margin-left: 8px;
}

.et-tab .owl-nav > *:hover {
    background: #000000 !important;
    color: #ffffff !important;
}
But wait a minute, we haven’t yet called the carousel plugin, so let’s now go to the main.js file, and right after the tab code add the following:
// Initialize carousel for the first load

$('.products.carousel').each(function(){

        var $this = $(this);
    $this.imagesLoaded(function(){
        $this.owlCarousel({
                margin:24,
                nav:true,
                            autoplay:$this.data('autoplay'),
                                items:$this.data('columns'),
                            responsive:{
                                320 : {items:1},
                                768 : {items:2},
                                1024 : {items:3},
                                1280 : {items:$this.data('columns')}
                            },
                        });
    });

});
Here we use two plugins at the same time: first we make sure that our images are loaded to avoid any kind of content overlapping, and then we call the plugin for our carousel products layout.
One thing remains to be done: if you now go to the tabs and state that you want a carousel based layout you will see it working on the active tab for the first page load, but if you start switching from tab to tab your carousel layout will break. On the tab change event our carousel needs to updated. So at the very beginning of the file add the function:
function refreshCarousel(tab){
    tab.find('.products.carousel').each(function(){
        jQuery(this).trigger('refresh.owl.carousel');
    });
}
This function refreshes the carousel layout each time the tab is changed. And now inside tab function right after the code:
tabsContent.eq($self.index()).show(0).addClass('active');
call the function:
refreshCarousel(tabsContent.eq($self.index()));
Now, clear the browser cache and add the following shortcode content to your page:
<!-- wp:shortcode -->
[et_tab][et_tab_item title="recent"][et_products layout="grid" autoplay="false" columns="3" rows="1" quantity="6" type="recent" /][/et_tab_item][et_tab_item title="featured"][et_products layout="grid" autoplay="false" columns="3" rows="1" quantity="6" type="featured" /][/et_tab_item][et_tab_item title="sale"][et_products layout="grid" autoplay="false" columns="3" rows="1" quantity="6" type="sale" /][/et_tab_item][et_tab_item title="best selling"][et_products layout="grid" autoplay="false" columns="3" rows="1" quantity="6" type="best_selling" /][/et_tab_item][/et_tab]
<!-- /wp:shortcode -->

<!-- wp:separator -->
<hr class="wp-block-separator"/>
<!-- /wp:separator -->

<!-- wp:shortcode -->
[et_tab][et_tab_item title="recent"][et_products layout="grid" autoplay="false" columns="4" rows="1" quantity="8" type="recent" /][/et_tab_item][et_tab_item title="featured"][et_products layout="grid" autoplay="false" columns="4" rows="1" quantity="8" type="featured" /][/et_tab_item][et_tab_item title="sale"][et_products layout="grid" autoplay="false" columns="4" rows="1" quantity="8" type="sale" /][/et_tab_item][et_tab_item title="best selling"][et_products layout="grid" autoplay="false" columns="4" rows="1" quantity="8" type="best_selling" /][/et_tab_item][/et_tab]
<!-- /wp:shortcode -->

<!-- wp:separator -->
<hr class="wp-block-separator"/>
<!-- /wp:separator -->

<!-- wp:shortcode -->
[et_tab][et_tab_item title="recent"][et_products layout="carousel" autoplay="false" columns="3" rows="1" quantity="12" type="recent" /][/et_tab_item][et_tab_item title="featured"][et_products layout="carousel" autoplay="false" columns="3" rows="1" quantity="12" type="featured" /][/et_tab_item][et_tab_item title="sale"][et_products layout="carousel" autoplay="false" columns="3" rows="1" quantity="12" type="sale" /][/et_tab_item][et_tab_item title="best selling"][et_products layout="carousel" autoplay="false" columns="3" rows="1" quantity="12" type="best_selling" /][/et_tab_item][/et_tab]
<!-- /wp:shortcode -->

<!-- wp:separator -->
<hr class="wp-block-separator"/>
<!-- /wp:separator -->

<!-- wp:shortcode -->
[et_tab][et_tab_item title="recent"][et_products layout="carousel" autoplay="false" columns="4" rows="2" quantity="12" type="recent" /][/et_tab_item][et_tab_item title="featured"][et_products layout="carousel" autoplay="false" columns="2" rows="2" quantity="12" type="featured" /][/et_tab_item][et_tab_item title="sale"][et_products layout="carousel" autoplay="false" columns="3" rows="2" quantity="12" type="sale" /][/et_tab_item][et_tab_item title="best selling"][et_products layout="carousel" autoplay="false" columns="3" rows="1" quantity="12" type="best_selling" /][/et_tab_item][/et_tab]
<!-- /wp:shortcode -->
In this case I am using the default WordPress theme with Gutenberg editor (hence the Gutenberg comments <!-- wp:separator -->), if you have the classic editor, just copy the shortcodes.
And now if you have done everything right you will see a beautiful layout like this!
You are free to use and modify this plugin in your projects, both commercial and non-commercial. Visit the repo on Github to grab the source code in full. I hope you find it useful, thanks for reading!


|

