Friday, November 15, 2019

How to Create a Nature Photography Gallery With a WordPress Grid Plugin

Today’s internet culture is driven by images and videos. Studies have proven that adding visual content to your website will attract and hold the attention of your audience longer than if you did not have any visual content. This makes it necessary for you to prioritize images and videos on your website. 

When it comes to displaying visual content on your WordPress website, you have a myriad of choices. There are many free and paid gallery plugins that are available for you to add to your website to display your content. However, many of the free and paid WordPress plugins lack the customizability needed to display visual content on your website. Often times these plugins lack the customizability to allow you to blend in the gallery with your website’s theme and are missing important features that are needed for the gallery to work the way you would like it too. 

The Essential Grid WordPress gallery plugin is an all in one solution for your gallery needs. This feature-rich plugin allows you to build a stunning looking gallery that can display image, video and audio galleries. You can not only create these galleries from your site's posts and pages, but you can create them from your social media feeds and create a completely custom gallery. In this article, I am going to go over how to create a custom gallery for your WordPress website with the Essential Grid plugin. 

What We Will Be Building 

We will be building an eye-catching gallery for our nature photography website. We want to customize the gallery so that it invites our audience to spend time interacting with the gallery and gets them interested in hiring us for our photography services. 

The gallery that we will build will feature a customized grid, lightbox, filters, and animation. This customization will allow us to display our gallery in a way that blends in with our website's theme and functions in a way that encourages users to keep stay engaged with the gallery.

Below is an image of what our final essential grid gallery will look like.

Nature Photography

Creating the Gallery

To begin creating the gallery, head on over to Essential Grid > Ess. Grid after you have installed the plugin. You will now be brought to the grid creator menu where we will click the Create New Ess. Grid button. This will take us to the main essential grid editor for our newly created grid. In the Naming section, type in "Nature Photography" for Title and Alias.  This will create the title for our grid and give create a custom shortcode for us to use to add the grid to our website. 

Now it is time to add in our nature photographs to the grid. Click on the Source tab on the top of the Essential Grid editor. We will now select the source that will provide the images for our grid. In our case, we will be selecting the Custom Grid option as we want to add individual images to the grid. The other sources available to you allow you to create the grid from your site's pages and posts as well as through your social media accounts. 

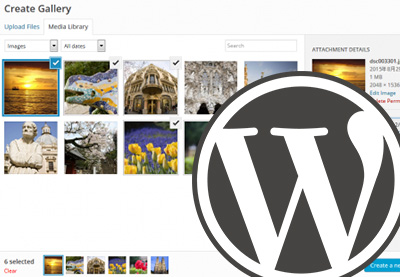
After you have selected the Custom Grid option, scroll all the way down to the Editor / Preview. Hover your cursor over the grey square and click the circle that has an image icon in it. Since we would like to add multiple photos at once to our grid, we will click the Bulk button. We will be taken to the WordPress media library where we will select all of the nature images and then click the Choose Images button at the bottom right-hand corner of the media library. We have now added the images we would like to the gallery, but the look and function of the gallery need to be altered to fit our photography website's needs. 

To change the look of the grid, we will go to the Grid Setting tab. Under the Layout section, we will choose the Fullwidth option as we would like to have our eye-catching nature photographs take up as much of the screen as possible. The full-width display will also help make the photos seem more important. Next, we will change the number of columns that will appear on each webpage for specific screen sizes. Again, we would like to attract the attention of our audience and make the images seem important. The smaller the image is, the less important it will seem. Having a maximum of three columns on the grid will keep the photos at a desirable size. We will adjust the number of Desktop Large, Desktop Medium, and Desktop Small columns to three.

Changing Amount Of Columns Essential Grid

If we scroll down to the bottom of the page, we can now see a preview of how our gallery looks. The nature photos look great, but there is no space in between each photo making the grid look very crowded. To fix this issue, we will head to the Item Spacing option which is in the Grid Settings tab and type in "10”. Click on the blue cycle icon button with two arrows on the middle right-hand side of your screen to see the 10 pixel item spacing that you just added to the grid. 

In addition to the item spacing, we would also like to add in padding on the right and left-hand side of the screen. While we do want the images to be full screen, we would like there to be some padding so they fit better with the design of our website. In the Whole Grid Padding section, type in "20" on the Right and Left fields. Again, click the cycle icon button and you can view these padding changes in the Editor/Preview. The grid looks much less crowded now. 

Fixed Padding Essential Grid

Next, we need to add a navigation filter to allow the viewers of the gallery to scroll through all of our photos. Click on the Nav-Filter-Sort tab and you will be brought to the navigation editor. Under the Available Module section, drag and drop, the Pagination button in the DROPZONE Bottom 1 section under the Controls Inside Grid section. This will add the pagination control to the bottom of your grid. The pagination control is now displayed on the bottom of the grid but there is no space between the pagination and grid. To add in spacing in the margin to make it seem less crowded, type in "10" in the Margin Bottom in the Dropzone Bottom 1 section.

Finally, we are going to make some minor adjustments to the construction of each individual grid. When a user hovers over a specific photo, we would like there to only be a magnifying glass icon that opens up a lightbox to the specific image. For our website's theme, this will look much better. To adjust the contents of each grid we will click on the Skins setting tab.  We will be brought to a screen that displays all the skins available for grid. We just want to edit the current grid we are using called Washington. To do this, click on the water drop icon on the upper right-hand corner of the Washington skin. This will bring us to the skin editor. Again, we would just like to have the magnifying glass icon that links to the lightbox. We want to remove the link icon and title element. To do this, click on each icon in the Item Layout section on the right-hand side of your screen and click the red Remove button. Finally, click the green Save button on the right-hand side of your screen to save the skin. 

Skin Editor

Finally, to add the plugin to your website, all you have to do is go back to the Essn. Grid page on your WP Dashboard and copy the shortcode next to the Nature Photography grid. Then simply create a new page or post and add paste the shortcode to this page or post. There you have it! You can now view our nature photography gallery. Watch the video below to watch the creation of the grid.


Getting The Most Out Of The Plugin

In this article, we only scratched the surface of what this feature-rich plugin can do. Below is a list of a few of the features that can be utilized to improve the functionality and look of your essential grid.

Grid Filters 

In the Nav-Filter-Sort settings, you can add in filter buttons for your post and page and custom grids. If the grid you are showing has different types of content that need to be categorized, adding in filters is a must. This allows your users to easily browse through your visual or audio content for a more enjoyable website experience. Simply drag the filter button down to into one of the four dropzones to display these filters and the filters will be displayed. 

Animation

Another great feature in Essential Grid is the animation that you can set for each grid. Changing around the animation of your specific grid may seem like a feature that will not have a big impact on user experience, but it absolutely does. Users subconsciously pick up on the animation that is used on pages and this animation can create a more polished and professional presentation of the content on your website. In the Animations settings tab, you can change the start animation, filter and pagination animation and the hover animations. Experiment with different combinations of animations and survey your audience to see which animations perform the best.

Skin Editor

In the article, we only briefly went over the skin editor. The skin editor is a very complex editor that allows you to change all aspects of the skin. You can edit the layout of the skin, the cover, spacing, shadows, animation and even add in links or groups of links to each grid you create. Also, each element that you add onto the skin can be styled, animated, and have links added to it. The specific styling and functionality will depend on your specific website's needs. 

It would be best to come up with a basic idea of what your website grids will need and what you want them to look like before you dive into all the skin features available. This way you will have a goal in mind to help you from getting lost in all the available features. 

Conclusion

When displaying visual content to your audience, you need to ensure that the gallery plugin you use allows you to customize your gallery to your website. Without this customization, you will not be able to create a gallery that attracts the attention of your audience. 

By using the Essential Grid plugin, you can easily customize any grid that you create and give it that professional look and feel. To give this plugin a try, head over to CodeCanyon and check out the Essential Grid live preview. And while you're here, check out some of the other great WordPress plugins available from CodeCanyon.


by Daniel Strongin via Envato Tuts+ Code

How to Sell Tickets With a WordPress Event Calendar and Tickets Plugin

In this post, I'll show you how to use the WordPress Events Calendar Registration and Tickets plugin to create different types of events for your website. Most importantly, I'll show you how to keep track of all attendees and sell tickets for your events.

No matter what kind of event you’re organizing, you want people to be able to participate in it easily. That means you need to have a way for users to register for your events and confirm their booking through your website. And if it’s a paid event, users should be able to pay for it online without much hassle.

That might sound like a lot of work to set up: registration forms, displaying events in a calendar, accepting different payment methods, and allowing users to purchase event tickets. It would be a lot of work if you had to start from scratch, but fortunately there are WordPress plugins that already provide all the necessary features.

When it comes to setting up events in WordPress, there are hundreds of extensions and plugins available online. You'll find free options and also premium plugins that provide ready-to-use features and extended support. In the case of commercial options, you should also expect quality code, bug fixes, and new enhancements.

In this post, we’re going to explore the WordPress Events Calendar Registration & Tickets plugin, which is one of the most popular all-in-one plugins in the event management category. It allows you to create different types of events, be they seminars, workshops, conferences, or any other kind of event. From the front-end, users can register for the event and pay for it if it’s a paid event.

Let’s have a look at some of the important features this plugin brings:

  • online event booking and payment
  • single event support
  • event list and grid layouts
  • event calendar view
  • Google map integration
  • statistics dashboard
  • and many more

In fact, this plugin provides a plethora of useful features, all at a reasonable price, allowing you to set up a complete event booking flow on your WordPress website.

What We'll Be Building

There are different types of events you could create with this plugin. In this post, I’ll demonstrate how you could allow users to register for a seminar event and pay for it online.

In this case, let's assume that you’re an expert WordPress developer and you would like to arrange a one-day seminar to teach different aspects of WordPress to participants. And thus, you’re planning to open online registration for your seminar with a certain fee.

In the front-end, you’re setting up a calendar so that users can see the available dates of your seminar. Interested users should be able to register for the seminar by filling in the registration form. And finally, they should be able to pay for it to confirm their registration.

Throughout this tutorial, we’ll explore different aspects of this plugin while moving closer to our goal. In the next section, I'll show you how to download and install this plugin.

If you want to try the plugin free of charge, you can visit the WordPress Events Calendar Registration & Tickets live demo.

Download and Installation

In this section, we’ll see how to install and configure the WordPress Events Calendar Registration & Tickets plugin once you’ve purchased and downloaded it from CodeCanyon. For this post, I’ve used WordPress 5.2.3, and the WordPress Events Calendar Registration & Tickets plugin version is 2.4.9. I would recommend that you install it if you want to follow along with this post.

As soon as you purchase this plugin, you’ll be able to download the plugin zip file. This is a  WordPress plugin file which you can install from the WordPress admin. So go ahead and follow the standard WordPress plugin installation process.

Important Back-End Configurations

In this section, we’ll go through a couple of important back-end configuration settings that we need to do for this plugin to work properly.

Head over to the WordPress admin side and access the Events+ > General Settings section. Under the Contact tab, fill in all the information and make sure that you fill in the Your Company Name field as shown in the following screenshot.

Setting up the plugin

Under the Payment tab, enable payment methods that you would like to enable during the registration. At the moment, there are four payment methods supported: Authorize.net, PayPal, Stripe, and Offline Payment.

During the installation, the WordPress Events Calendar Registration & Tickets plugin creates a couple of important pages in your website. One of them is the Registration page, and we need to edit it.

Go ahead to the Pages section and edit the page titled Registration. You just need to add the {EVRREGIS} code on that page, as shown in the following screenshot, and save that page.

Registration Page

With that done, we’re ready to continue with the global settings. Navigate to the Events+ > Page Config section. You need to make sure that the Main registration page field contains the Registration page that you just edited. Refer to the following screenshot for clarification. Click on the Update Configuration Settings button to save the settings. 

This is the most important step in the plugin configuration, so please ask me if you have any doubts. If you don’t configure this properly, the plugin won’t work at all.

Setting up the main registration page

Finally, navigate to the Confirmation tab, which allows you to enable different email notifications and templates. It’s pretty self-explanatory, so we won’t go through that in detail.

Apart from these settings, there are a few other settings that you could configure as per your requirements. However, we’ve covered all the critical settings that are required for this plugin to work. From the section onwards, we’ll start working on the WordPress developer seminar example which we discussed earlier.

How to Create Paid Events

In the previous section, we fine-tuned the plugin configuration in the back-end. In this section, we’ll move closer to our goal by creating the event category and event itself.

Create a Category

Access the Events+ > Event Categories menu, which takes you to the event category page. Click on the Add New Category link, and that should allow you to add a new category. Go ahead and create the Workshop category, as shown in the following screenshot.

Create an event category

Click on the Add Category button to save the category settings.

Create an Event

Once you have created the category, it’s time to create a new event! Navigate to the Events+ > Add Event link, and that should open the following UI to add a new event.

Create an event UI

There are different sections here that allow you to enter information about the event. We’ll go through the important sections since the rest of the stuff is self-explanatory.

Under the Description tab, enter the basic event information as shown in the following screenshot. Make sure that you select the Workshop category in the Event Categories field.

Create the event description

Next, there’s the Event Venue tab, which allows you to enter the venue of your event. Enter your event venue details and you’re done. Set the Use Google Maps On Registration Page field to Yes if you want to show the Google map on the event registration page.

Further along is the most important section of all: Event Date/Time. There are two types of events you could add: one-off events and recurring events. In our use case, we are creating a one-off event, and thus the settings look like this.

Setting the event date and time for a one-off event

Finally, there’s the Event Options section, which allows you to enable a couple of extra fields that you might like to add into your event registration form. In our case, I've enabled the Phone Number field.

Enable extra fields for event registration

Click on the Add Event button, and that should save your event and take you to the event listing page.

Add Event Fee

If you want to set up a fee for your event, you'll need to configure it for your event first. On the event listing page, click on the Fees/Items link, as shown in the following screenshot.

Manage event fees

When you click on the Fees / Items link, it takes you to the Event Items / Cost Management page. Click on the Add Cost / Item button to set up your event fee as shown in the following screenshot.

Set up the event fee

It’s important to note that you need to select the REG - Registration Attendee in the Type of Item / Cost field, otherwise the registration won’t work properly. 

Next, enter the name and description of the item. You can also select the maximum number of seats that can be booked during registration.

Let’s make the event paid as well, along with setting the event registration price per attendee. 

Finally, enter the Start Date and End Date during which period you want to enable event registration.

And with that, we are almost done, and we’re ready to display the calendar on the front-end. In the next section, we’ll explore it and demonstrate the front-end registration process.

How to Display an Event Calendar on the Front-End

Event calendars are displayed by category, so let’s go to the Events+ > Event Categories page, which lists all the categories along with their shortcodes, as shown in the following screenshot.

Categories Shortcodes

The [eventsplus_list event_category_id="1"] shortcode is used to display events in a list view. On the other hand, the [PLUS_CALENDAR:Workshop] shortcode is used to display events in a calendar view. In our case, we’ll use the latter, so go ahead and add the [PLUS_CALENDAR:Workshop] shortcode in a page or post and publish it. And it looks like this:

The event calendar view

As you can see, it displays events in the calendar view nicely. Click on any event and you'll be taken to the event detail page, as shown in the following screenshot.

The event detail and registration page

Click on the Register button, and it will open the event registration form:

Event registration form

Fill in the registration form and click on the Submit button to initiate the event registration process. On the next step, you’ll be shown registration confirmation along with the payment options that you could use to pay for the event.

Event registration payment options

In our case, we’ve enabled the PayPal and offline payment methods, and thus you can see two payment methods to choose from. Once users pay for the event, their registration is confirmed. As per the settings, notifications will be sent about the new registration.

So that’s the complete flow of setting up paid events on your WordPress website by using the WordPress Events Calendar Registration & Tickets plugin. This plugin is capable of doing a lot of amazing things, and what we’ve discussed is just one of the use cases you could implement.

Conclusion

Today, we discussed one of the most popular plugins in the event management category in WordPress: the WordPress Events Calendar Registration & Tickets plugin. It’s a commercial plugin available at CodeCanyon at a very reasonable price. 

Try it free today with the WordPress Events Calendar Registration & Tickets live demo!

I hope that you’re convinced that the WordPress Events Calendar Registration & Tickets plugin is useful enough to fulfill your requirements. Although it’s a commercial plugin, I believe it’s reasonably priced considering the plethora of features it provides.

If you have any suggestions or comments, feel free to use the feed below and I’ll be happy to answer your queries!


by Sajal Soni via Envato Tuts+ Code

5G Connection Is Not As Secure As You Might Think, Researchers Reveal A Dozen Vulnerabilities

Many praise 5G for comparatively being newer, faster and more secure than 4G. However, some of the security researchers from University of Lowa and Purdue University discovered that there are around 12 vulnerabilities in the new 5G technology. Researchers were able to use these vulnerabilities to...

[ This is a content summary only. Visit our website https://ift.tt/1b4YgHQ for full links, other content, and more! ]

by Aqsa Rasool via Digital Information World

Front end tooling, building your own React, and getting started with AssemblyScript

#463 — November 15, 2019

Read on the Web

JavaScript Weekly

Build Your Own React — An interestingly presented walkthrough of creating your own React-a-like from scratch. You’ll need some time (and be gentle with the scrolling) but this is an interesting way to present such a walkthrough.

Rodrigo Pombo

The Bytecode Alliance: Building A Secure-by-Default, Composable Future for WebAssembly — The Bytecode Alliance is a new industry partnership (originally between Mozilla, Fastly, Intel, and Red Hat) designed to forge WebAssembly’s ‘outside-the-browser’ future. If you’re not yet in sync with why WebAssembly outside the browser makes sense, this announcement should give you a good idea.

Mozilla Hacks

Hone Your JavaScript Skills in Just One Week — Catch up on all the JavaScript advancements and in just one week you’ll be prepared to pick up and apply whatever the web ecosystem throws at you for years to come.

Big Nerd Ranch sponsor

The Introductory Guide to AssemblyScript — AssemblyScript, a TypeScript-to-WebAssembly compiler, provides a way to get around the steep learning curve for WebAssembly and makes it easier to integrate features that need WebAssembly into typical JS projects.

Danny Guo

Results of the 2019 Front-End Tooling Survey 2019 — Over 3,000 developers took part in this front-end tooling survey, answering a wide range of questions on things such as tooling and methodologies. React and Vue leapt up in popularity since last year with jQuery and Lodash dropping. Webpack dominates in the bundler space, Jest dominates the testing space, and most of us are using ESLint.

Ashley Nolan

Brendan Eich, Inventor of JavaScript, Did a Reddit AMA — He also helped co-found Mozilla and has just launched version 1.0 of Brave, a privacy-focused browser. Several of the questions are about Brendan’s work on JavaScript and may be of interest.

Reddit

30 Seconds of Code: A Curated Collection of Useful JS Snippets — We’ve linked this project a couple of times over the years, but it has continued to get lots of updates, so if you want to do lots of interesting things with arrays, math, strings, vectors, and more, check it out. A handy resource.

30 Seconds

⚡️ Quick Releases

💻 Jobs

Frontend Developer - React (Remote or UK) — Work from anywhere. Build the next generation analytic platform serving the world's leading brands.

RethinkXSocial

Senior Software Engineer at Getty (Los Angeles, CA) — Build fantastic tools and interfaces at one of the world's most prestigious cultural heritage orgs using Linked-Open-Data, Python, Structured-CMS, Vue.js.

J. Paul Getty Trust

Find a Job Through Vettery — Make a profile, name your salary, and connect with hiring managers from top employers. Vettery is completely free for job seekers.

Vettery

📘 Articles & Tutorials

Handling null and undefined in JavaScript — What are the best strategies to minimize errors caused by values that could be null, undefined, or otherwise uninitialized at runtime?

Eric Elliott

An Early Look at the Vue 3 Composition API in the Wild — A good way to see some of the benefits of the new API.

Mateusz Rybczonek

Making an Audio Waveform Visualizer with Vanilla JavaScript — A really neat tutorial that breaks down the problem well.

Matthew Ström

Why Unit Tests Aren’t ‘Tests’

Gauge sponsor

A console Cheat Sheet — An illustrated tour of the most popular console methods for debugging code from the dev tools.

Javascript Jeep

How to Add Testing to An Existing Project — Because test-driven development is often more a dream than the reality.

Kent C Dodds

Understanding Client Side Routing by Implementing a Router in Vanilla JS

Will Taylor

How Discord Achieves Native iOS Performance with React Native — Discord, the popular gamer-aimed chat system, chose React Native very early on as the basis for their iOS app, but they’ve had to invest a lot of effort in keeping it performant.

Miguel Gaeta

Top CI Pipeline Best Practices - A Developer's Guide

Datree.io sponsor

Making Instagram.com Faster: Code Size and Execution Optimizations — The latest in a series of JavaScript performance posts from the Instagram team.

Glenn Conner

How TypeScript 3.7 Helps Quality — A look at TypeScript 3.7 through the lens of how its new features impact code quality.

Matt Eland

🔧 Code & Tools

JSON Generator: A Tool for Generating Random Data — Generate any random data you want online with agile JavaScript-powered templates. (Possibly stick with the 'old' version for now, though, the 'new' beta doesn't seem to work properly for me.)

Vazha Omanashvili

pm2 4.2 Released: The Node Production Process Manager — A very mature and widely used process manager that includes a load balancer for keeping Node apps alive forever and to reload them without downtime.

Alexandre Strzelewicz

A Much Faster Way to Debug Code Than with Breakpoints or console.log — Wallaby catches errors in your tests and code and displays them right in your editor as you type, making your development feedback loop more productive.

Wallaby.js sponsor

Ky: Tiny, Elegant Fetch-Based HTTP Client for Browsers — Makes the Fetch API tidier to use as shown here.

Sindre Sorhus

Ajv: A Fast JSON Schema Validator — Supports v5, v6, and v7 proposals and claims to be both the fastest validator for both Node and browser.

Evgeny Poberezkin

Fabric.js 3.5: A SVG-to-Canvas and Canvas-to-SVG Library — Essentially provides an interactive object model on top of an HTML5 canvas.

Fabric.js

progress-estimator: A Progress Bar and Time Estimate for Promises — Tracks time between responses to make the completion time estimates more accurate.

Brian Vaughn

vue-spotify: A Spotify Client Built with Vue.js and Vuex

gk4m


by via JavaScript Weekly

Is Artificial Intelligence Ready to Replace Humans in the Facebook Content Moderation Challenge?

Facebook has found itself in hot water numerous times for allowing offensive content on its platform. Regardless of how hard the social media giant works to tackle this issue, moderating billions of comments and posts is not an easy task for the people in charge. Artificial Intelligence was thought...

[ This is a content summary only. Visit our website https://ift.tt/1b4YgHQ for full links, other content, and more! ]

by Ali Siddiqui via Digital Information World

Google Tests a New Button On Its Desktop Web Version

Google has been one of the pioneers when it comes to introducing new features and running tests to make their products as effective as possible. Multiple times Google has implemented various features and then designed special products according to the feedback of the users. In a recent attempt to...

[ This is a content summary only. Visit our website https://ift.tt/1b4YgHQ for full links, other content, and more! ]

by Aabroo Saeed via Digital Information World