This article was originally published on the Auth0.com blog, and is republished here with permission.
In this tutorial, we’re going to build an Angular application and add login functionality using token-based authentication with Auth0.
You can check out the completed code example from our GitHub repo.
The Angular Ecosystem
AngularJS 1.x was highly regarded as a robust framework for building single-page applications (SPAs). It did a lot of things well, fell short on some, but overall allowed developers to quickly build powerful applications.
While AngularJS (1.x) is a framework, Angular is an entire platform for building modern applications. Alongside the core Angular library, the platform ships with a powerful command line interface (CLI) called Angular CLI that allows developers to easily scaffold their applications as well as control the build system. Angular Platform Server brings server-side rendering to Angular applications. Angular Material is the official implementation of Google’s Material Design, which allows developers to build beautiful applications with ease.
Our App: Daily Deals
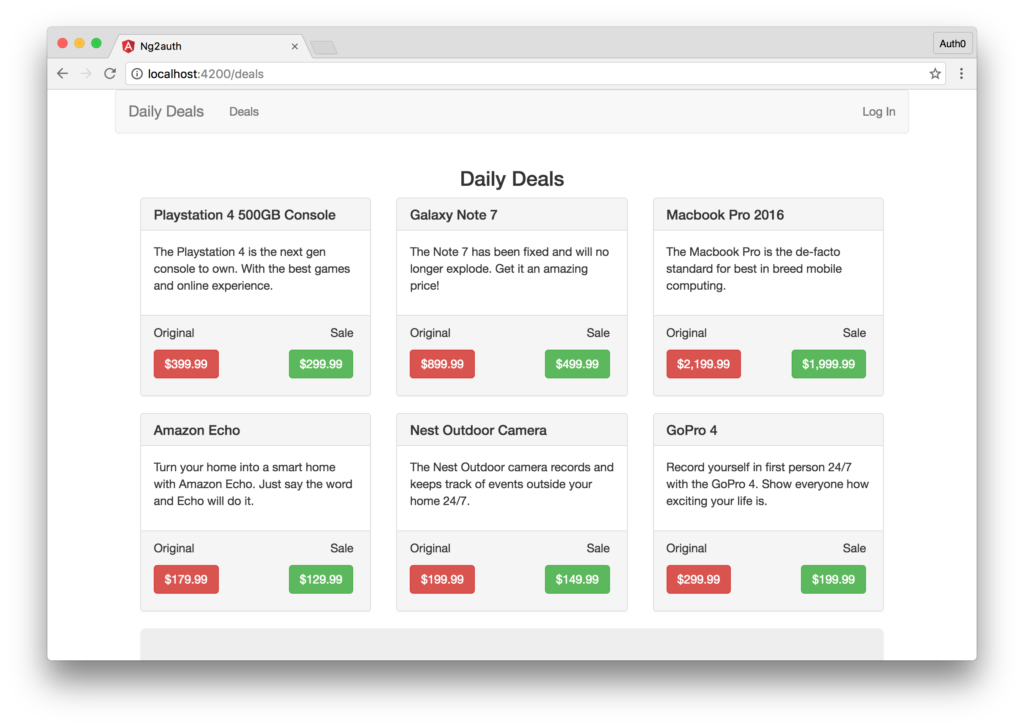
The app we’re building today is called Daily Deals. The Daily Deals app displays a list of deals and discounts on various products. We'll have a list of publicly available deals that anyone can see and a list of private deals available only to registered members. The private deals are exclusive to registered members, and should hopefully be better.
Serving the Daily Deals
We'll have to get our daily deals from somewhere. Let's build a very simple Node.js back end to serve the deals. We'll have a publicly accessible route serving public deals and a protected route that can only be called by authenticated users. For now, we'll make both of the routes public and worry about the authentication piece later. Take a look at our implementation below:
'use strict';
// Load dependencies
const express = require('express');
const app = express();
const cors = require('cors');
const bodyParser = require('body-parser');

app.use(bodyParser.json());
app.use(bodyParser.urlencoded({ extended: true }));
app.use(cors());

// Public route
app.get('/api/deals/public', (req, res)=>{
  let deals = [
    // Array of public deals here
  ];
  res.json(deals);
})

// Private route
app.get('/api/deals/private', (req,res)=>{
  let deals = [
    // Array of Private Deals here
  ];
  res.json(deals);
})

app.listen(3001);
console.log('Serving deals on localhost:3001');
Both our server and the Angular app we are building will require Node.js and NPM, so be sure to have those installed before continuing. Check out the GitHub repo to get our list of daily deals or create your own. The model for each deal will be as follows:
 {
    id: 1234,
    name: 'Name of Product',
    description: 'Description of Product',
    originalPrice: 19.99, // Original price of product
    salePrice: 9.99 // Sale price of product
}
When you’re happy with the public and private deals, launch the server by running node server and navigate to both localhost:3001/api/deals/public and localhost:3001/api/deals/private to make sure you can see the list of deals you added. Next, let's set up our Angular front end.
Angular Front End Setup
One of the best ways to start building a new Angular app is with the official Angular CLI. The CLI can take care of scaffolding the initial app, adding additional components, takes care of the build system and much more. In this tutorial, we’ll scaffold our initial app with the CLI.
If you don't already have it installed, run:
npm install @angular/cli -g
This installs the Angular CLI globally. We'll interact with the CLI using the ng command. To create a new application, choose a directory and run:
ng new ng2auth --routing --skip-tests
This will create a new Angular application with routing and no initial test files for the root component. The app will be created in its own folder in the current directory, and the CLI will download all of the required npm packages and basically set everything up for us.
Once ng new is finished, enter the new directory and run the ng serve command and the Webpack based build system will take care of compiling our app from TypeScript to JavaScript and will serve our app on localhost:4200. The ng serve command will also kick off a live sync process, so any time we make a change our app will automatically recompile.
Let's head over the localhost:4200 for now to make sure that everything is working as expected so far. If you see a message saying “app works!”, you’re golden. Next, let's examine how our Angular app is scaffolded.
The ng new command scaffolded our Angular app and added a lot of files. Many of these we can ignore for now like the e2e folder, which would contain our end-to-end tests. Open up the src directory. In the src directory, we can see some familiar files like index.html, styles.css, and so on. Open up the app directory.
The app directory contains the bulk of our application. By default, we’re presented with the following files:
app.component.css- Holds the CSS styles for our root componentapp.component.html- Holds the HTML view for our root componentapp.component.ts- Holds the TypeScript logic for our root component classapp.module.ts- Defines our global app dependenciesapp-routing.module.ts- Defines our app's routes.
Each Angular component we write will have at a minimum the *.component.ts file, the others are optional. Our application is going to have three components. The main or root component, a component to display the public deals, and a component to display private deals. For our root component, we'll inline the template and styles. Let's make the following edits and run the following CLI commands:
- Delete
app.component.cssandapp.component.htmlfiles. We'll define all we need for our root component in theapp.component.tsfile. - Create a
public-dealscomponent by runningng g c public-deals --no-spec. This component will take care of getting and displaying the public deals data. - Create a
private-dealscomponent by runningng g c private-deals --no-spec. This component will take care of getting and displaying the private deals data. - Create a
callback.component.tsfile by runningng g c callback --it --is --flat --no-spec. - Create a
dealfile by runningng g class deal --no-spec. This file will hold ourdealclass, which will let Angular know the structure of adeal. - Create a
deal.service.tsfile by runningng g s deal --no-spec. Here we'll add the functionality to get and retrieve the deal data from our API.
Note: g is a shortcut for generate, and c and s are shortcuts for component and service, respectively. Therefore, ng g c is equivalent to ng generate component. The --no-spec flag indicates that *.spec.ts files should not be generated. The --it and --is flags stand for “inline template” and “inline styles” and --flat indicates that a containing folder should not be created.
Adding HTTP Client Module
We're going to be making HTTP requests to our API in our Angular app. To do so, we need to add the correct module to our app.module.ts file. Let's do so now by importing the HttpClientModule and adding it to our @NgModule's imports array like so:
// app.module.ts
...
import { HttpClientModule } from '@angular/common/http';

@NgModule({
  declarations: [
    ...
  ],
  imports: [
    ...,
    HttpClientModule
  ],
  providers: [],
  bootstrap: [AppComponent]
})
export class AppModule { }
Adding Bootstrap CSS
We're going to use Bootstrap to style our application, so let's include the CSS in the <head> of our index.html file like so:
<!-- src/index.html -->
...
<link href="https://maxcdn.bootstrapcdn.com/bootstrap/3.3.7/css/bootstrap.min.css" rel="stylesheet">
...
Building the Root Component
Every Angular application must have a root component. We can name it whatever we want, but the important thing is that we have one. In our application, the app.component.ts file will be our root component. Let's take a look at our implementation of this component.
// app.component.ts
import { Component } from '@angular/core';

@Component({
  selector: 'app-root',
  template: `
    <div class="container">
      <nav class="navbar navbar-default">
        <div class="navbar-header">
          <a class="navbar-brand" routerLink="/dashboard"></a>
        </div>
        <ul class="nav navbar-nav">
          <li>
            <a routerLink="/deals" routerLinkActive="active">Deals</a>
          </li>
          <li>
            <a routerLink="/special" routerLinkActive="active">Private Deals</a>
          </li>
        </ul>
        <ul class="nav navbar-nav navbar-right">
          <li>
            <a>Log In</a>
          </li>
          <li>
            <a>Log Out</a>
          </li>
        </ul>
      </nav>
      <div class="col-sm-12">
        <router-outlet></router-outlet>
      </div>
    </div>
  `,
  styles: [
    `.navbar-right { margin-right: 0px !important}`
  ]
})
export class AppComponent {
  title = 'Daily Deals';

  constructor() {}
}
We've created our root component. We added an inline template and some inline styles. We haven't added all the functionality yet, so every user will be able to see all the links and the login and logout buttons. We'll wait to implement those a little bit. We're also displaying the <router-outlet> element. This is where our routed components will show.
Routing
Since we initialized our app with the --routing flag, the architecture for routing is already set up for us. Let's update it so that our Deals component shows by default. We'll also set up all the routes necessary for our app.
Open the app-routing.module.ts file and add the following:
// app-routing.module.ts
import { NgModule } from '@angular/core';
import { Routes, RouterModule } from '@angular/router';
import { CallbackComponent } from './callback.component';
import { PublicDealsComponent } from './public-deals/public-deals.component';
import { PrivateDealsComponent } from './private-deals/private-deals.component';

const routes: Routes = [
  {
    path: '',
    redirectTo: 'deals',
    pathMatch: 'full'
  },
  {
    path: 'deals',
    component: PublicDealsComponent
  },
  {
    path: 'special',
    component: PrivateDealsComponent
  },
  {
    path: 'callback',
    component: CallbackComponent
  }
];

@NgModule({
  imports: [RouterModule.forRoot(routes)],
  exports: [RouterModule]
})
export class AppRoutingModule { }
We can just navigate to localhost:4200 in the browser and see our app displayed. We won't see much yet, just the top navbar and a message saying that the deals component works.
The Deal Type
TypeScript allows us to define the structure or type of our objects. This serves a bunch of useful purposes. For one, if we define the structure of an object, we'll be able to get all of the object's data via IntelliSense. We can additionally test our components easier by knowing the data structure or type of object we are dealing with.
For our app, we'll create one such type. In the deal.ts file, we'll define a type of Deal. Let's see how we'll accomplish this.
// deal.ts
export class Deal {
  id: number;
  name: string;
  description: string;
  originalPrice: number;
  salePrice: number;
}
Now we can declare objects in our Angular application to be a type of deal. These objects will gain all of the properties and methods of the deal type. We’re only defining properties here; we won't have any methods.
Continue reading %Authentication with Angular and Auth0%
by Ado Kukic via SitePoint