When you start working with SVG, one of the most important things is to learn how to create, export, and optimize your graphic files for the Web correctly. Coding SVG by hand can be slow and tedious process, so it’s much better to create your graphic in a visual manner with program like Illustrator (Inkscape, Sketch, SVG-Edit, etc.) and then to export the generated code.
Before we start you need to understand one thing clearly. The optimization of an SVG file begins with its creation and continues all the way to export. As is the case with an HTML web page, it’s difficult to fix a poorly built file after its finished.
Of course, you can use optimization tools after export, but this automated approach can be unsafe as it you can break your file in unexpected ways. That’s why I'd advise you to use manual optimization wherever you can. And this is exactly what you will learn today.
Creating SVGs in Illustrator
When you create a graphic in Illustrator—which is intended for SVG export—you need to perform some steps and considerations required to make the final output properly optimized for web. Let’s explore them now.
Set the Correct Color Space
- Illustrator — as most vector illustration software — was originally designed for print production, and therefore its color space is set to CMYK by default. RGB is much more appropriate for web and screen use, and has a wider gamut (range of colors) than CMYK. So, when you create new document make sure the color mode is set to RGB as you can see in the image below.
Give your drawing a proper structure
An SVG file is not like a regular bitmap image — a grid of pixels. It’s a text document that has a specific structure.
Like an HTML document, you can select and manipulate individual elements separately. To do this, you'll need to use their names as a reference. I've found it’s always much easier to create these labels during visual editing in Illustrator, rather than later.
For that reason, it’s important to give a meaningful name to each graphic element as you make it. Here is what you need to know when you create a graphic in Illustrator:
-
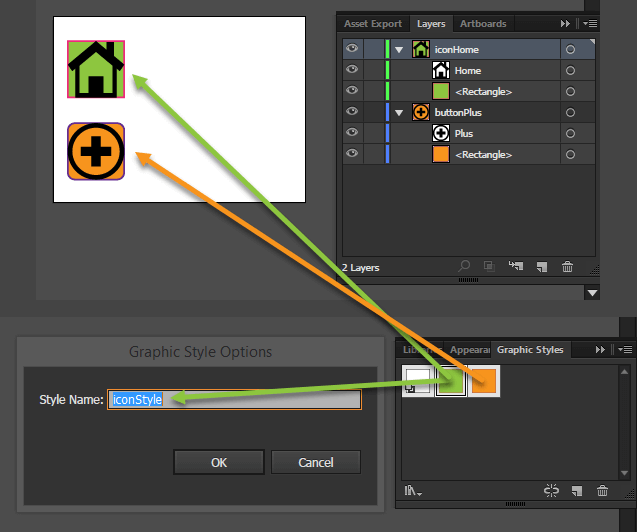
Layers and Layers Groups names are used as IDs for SVG groups
-
Symbols names are used as IDs for SVG symbols
-
Graphic Styles names are used as CSS classes
In the images below, you can see in action how names from an Illustrator file reflect to the exported SVG.

e shapes in an SVG drawing are described with coordinate points. More points means larger file size and harder editing and maintaining. To solve this issues, you need to use the fewest possible number of points to create the shapes. This can be achieved in several ways.
- Use simple shape elements instead of paths, when it’s possible. Using simple elements like
line,rect,circle, etc. have some significant advantages. They are much more readable. They produce smaller file sizes and less code, which make them easier for maintain and edit. You can control them a lot easier with their direct attributes such asx,y,cx,cy, instead of point coordinates as it is with paths.
In the image below, you can see one and the same shape defined as a shape and as a path. It’s obvious that the shape is much easier for edit.
m>. A path is just an array of coordinate points. To simplify a path means to cut out some of its points, which will lead to less path data and smaller file size. To do so you can use Object > Path > Simplify… command or Warp Tool. In both cases the main point is to reduce the path’s points maximally without loosing the quality of visual appearance.
In the images below you can see how simplifying process reduces path’s points from 32 to 23—which is about 25%—and how this reflects to the path’s data. Its length is decreased while the visual quality still remains at a good level.
and easily editable. This is great, but to keep it looking the way you designed on the web you need to be sure that the end user has the correct fonts. You can use only common fonts—which limits your creativity—or provide web fonts.
If precise text rendering is more important than editability—for example, in a logo—you can convert it into paths by using Type > Create Outlines command or by setting this option in the export panel as you’ll see later on.
Bear in mind that when convert to paths a lot of text the file size can increase drastically.
Continue reading %Crash Course: Optimizing and Exporting SVGs in Adobe Illustrator%
by Alex Walker via SitePoint
No comments:
Post a Comment