|


by via JavaScript Weekly
|

Starting a new React project isn’t that simple. Instead of diving straight into code and bringing your application to life, you have to spend time configuring the right build tools to set up a local development environment, unit testing, and a production build. Luckily, help is at hand in the form of Create React App.
Create-React-App is a command-line tool from Facebook that allows you to generate a new React project and use a pre-configured webpack build for development. It has long since become an integral part of the React ecosystem that removes the need to maintain complex build pipelines in your project, letting you focus on the application itself.
Create React App is a standalone tool that can be run using either npm or Yarn.
You can generate and run a new project using npm just with a couple of commands:
npx create-react-app new-app
cd new-app
npm start
If you prefer Yarn, you can do it like this:
yarn create react-app new-app
cd new app
yarn start
Create React App will set up the following project structure:
new-app
├── .gitignore
├── node_modules
├── package.json
├── public
│   ├── favicon.ico
│   ├── index.html
│   ├── logo192.png
│   ├── logo512.png
│   ├── manifest.json
│   └── robots.txt
├── README.md
├── src
│   ├── App.css
│   ├── App.js
│   ├── App.test.js
│   ├── index.css
│   ├── index.js
│   ├── logo.svg
│   ├── reportWebVitals.js
│   └── setupTests.js
└── yarn.lock
It will also add a react-scripts package to your project that will contain all of the configuration and build scripts. In other words, your project depends on react-scripts, not on create-react-app itself. Once the installation is complete, you can fire up the dev server and start working on your project.
The first thing you’ll need is a local development environment. Running npm start will fire up a webpack development server with a watcher that will automatically reload the application once you change something. Starting from v4, Create React App supports React’s fast refresh as an alternative to Hot Module Replacement. Like its predecessor, this allows us to quickly refresh parts of the application after making changes in the codebase, but has some new features as well. Fast Reload will try to reload only the modified part of the application, preserve the state of functional components and hooks, and automatically reload the application after correcting a syntax error.
You can also serve your application over HTTPS, by setting the HTTPS variable to true before running the server.
The application will be generated with many features built in.
The application comes with its own Babel preset — babel-preset-react-app — to support a set of ES6 and ES7 features. Some of the supported features are:
Note that Create React App does not provide any polyfills for runtime features, so if you need any of these, you need to include them yourself.
You can import CSS files, images, or fonts from your JavaScript modules that allow you to bundle files used in your application. Once the application is built, Create React App will copy these files into the build folder. Here’s an example of importing an image:
import image from './image.png';

console.log(image); // image will contain the public URL of the image
You can also use this feature in CSS:
.image {
  background-image: url(./image.png);
}
As mentioned in the previous section, Create React App allows you to add styles by just importing the required CSS files. When building the application, all of the CSS files will be concatenated into a single bundle and added to the build folder.
Create React App also supports CSS modules. By convention, files named as *.module.css are treated as CSS modules. This technique allows us to avoid conflicts of CSS selectors, since Create React App will create unique class selectors in the resulting CSS files.
Alternatively, if you prefer to use CSS preprocessors, you can import Sass .scss files. However, you’ll need to install the node-sass package separately.
Additionally, Create React App provides a way to add CSS Resets by adding @import-normalize; anywhere in your CSS files. Styles also undergo post-processing, which minifies them, adds vendor prefixes using Autoprefixer, and polyfills unsupported features, such as the all property, custom properties, and media query ranges.
Executing npm test will run tests using Jest and start a watcher to re-run them whenever you change something:
 PASS  src/App.test.js
  ✓ renders learn react link (19 ms)

Test Suites: 1 passed, 1 total
Tests:       1 passed, 1 total
Snapshots:   0 total
Time:        0.995 s
Ran all test suites.

Watch Usage
 › Press f to run only failed tests.
 › Press o to only run tests related to changed files.
 › Press q to quit watch mode.
 › Press p to filter by a filename regex pattern.
 › Press t to filter by a test name regex pattern.
 › Press Enter to trigger a test run.
Jest is a test runner also developed by Facebook as an alternative to Mocha or Karma. It runs the tests in a Node environment instead of a real browser, but provides some of the browser-specific globals using jsdom.
Jest also comes integrated with your version control system and by default will only run tests on files changed since your last commit. For more on this, refer to “How to Test React Components Using Jest”.
During development, your code will also be run through ESLint, a static code analyzer that will help you spot errors during development.
Continue reading Create React App: Get React Projects Ready Fast on SitePoint.
Web application development is difficult. There is no other type of application that is as involved, or requires you to understand multiple languages, frameworks, and platforms, as web applications. The most basic web application is comprised of two separate applications:
The simplest application is written in two languages—one for the server, and HTML for the client. But that's not all: modern applications require you to understand many languages, frameworks, and development tools. At best, an application is developed by multiple teams that can individually focus on smaller pieces of the larger whole. At worst, a team as small as one person develops the entire application.
But the story doesn’t end when an application is “finished”. After a lengthy and involved development processes, there are countless hours of testing for bugs, security issues, integration, performance, and user experience. Although many developers won't admit it, performance and the user experience are often overlooked. The result, of course, is that slow, unrefined applications are released into production.
That’s exactly why tools like Raygun’s Application Performance Monitoring (APM) and Real User Monitoring (RUM) exist. They provide developers the means to quickly analyze not only how your application performs in production, but it pinpoints the exact performance issues down to the method or database query, as well as visualizing your visitors’ experiences.
In this article, I will walk you through my experience using Raygun’s APM and RUM to pinpoint issues in a live, in-production website and the steps I took to fix them.
I work in a fast-paced environment where quantity is more important than quality. That’s not to suggest the software I or my co-workers write is subpar; our applications work well. But the demand on our time requires us to focus more on bugs and security than performance and the user experience.
I recently used Raygun’s APM and RUM to monitor our main public web application: an informational website for the company’s investors. It is written in C# and runs on the .NET 4.6.x runtime.
This application started as multiple small projects written by a team of three people with minimal communication. The projects shared a “core” library that quickly grew into a massive, unwieldy behemoth with a lot of duplicated functionality (as I said, there wasn’t a lot of communication).
Over the years, the multiple projects morphed into a single large application. It pulls information from multiple MSSQL databases and an IBM DB2 machine to provide visitors with a wide array of economic and industry information. It interacts with other systems on the network, ranging from mail and file servers and other RESTful API services to perform other tasks.
I should also mention that I am somewhat unique in that I have a heavy IT background. My job title is “Programmer/Analyst”, but my actual duties consist of network and systems admin, programmer, and analyst. So when it comes to analyzing any issue, I'm equipped to examine both the code and the systems it runs on and interacts with.
I know that my application has several performance issues; one of them is the authentication experience. Visitors must first authenticate using their credentials and then provide their OTP (one-time passcode) for two-factor authentication. Some visitors use a separate authenticator app on their mobile device to generate their OTPs, but most visitors receive their code via email. For the latter group, the authentication experience can take anywhere from 1 to 30 seconds, with most visitors experiencing longer waits.
After installing and configuring Raygun’s APM agent (a very simple process), I started seeing trace data in the dashboard within a minute. The dashboard gives you a glimpse of your application’s performance issues, providing tables and graphs showing the slowest requests, class methods, traces, SQL commands, and external API calls. Sure enough, some of the immediate offenders were related to the authentication process.

The top two slow URLs are used during the authentication process for visitors with emailed OTPs. Both are concerning (holy cow! 31 seconds for one request for /resend2fa). I certainly want to fix all the issues, but my time is limited. Therefore, fixing some of the issues with the /login endpoint is my priority.
Judging from the data provided by the “Slowest requests” table, I already suspect that the culprit is related to the process of sending emails. To be sure, I click the /login link to view the data that APM collected on that URL.
APM collects a lot of information for every request, and it is extremely helpful because it can break down a request into its smaller parts—the methods that execute to provide the visitor with a response. The following screenshot shows the methods, ranked slowest to fastest, for the /login URL:

As expected, the main issue has something to do with the email process. It’s also interesting that the IBM DB2 ADO.NET provider is used during authentication. It shouldn’t be, and it's taking a rather significant amount of time to clear error info (as denoted by the call to IBM.Data.DB2.iSeries.MPConnection.clearErrorInfo()) that shouldn’t even be there. But that’s an issue for another day.
Apart from daily notifications, all emails sent by the website are dispatched on demand. The code that sends these emails is used in a variety of other applications that does not exhibit any performance issues. So in my mind, neither the code or the email server is at fault—there's something wrong on the machine that runs our public site.
There are so many things on a computer system that can cause performance issues. So, after viewing the logs and not seeing any apparent causes, I decide to spin up a new virtual machine and test the website on it. After installing the APM agent on the new machine and testing the login process, I notice a tremendous improvement.
.PNG)
The above screenshot shows the breakdown of where the application calls the SendMessage() method. Simply transferring the application to another machine cut the login process down by 26 seconds! While that's certainly a huge improvement, it still takes an average of 4-5 seconds for the initial login process.
Examining the flamechart for a single /login request (shown below), I can clearly see that sending an email is still an issue because SendMessage() still takes at least 3 seconds to completely execute.

I can solve this problem by submitting the email message to a queue or batch, and let a separate process send the message. But that feels like a work-around to me. I'd rather find and fix the issue, but I also need to manage my time. There are other, arguably more important projects that I need to complete.
Raygun's APM gives you clear performance data for your server, but that's only half of your application. What happens in the browser is just as important as what happens on the server, and Raygun's Real User Monitoring (RUM) gives you insight into how your users experience your application. Not only can it track your users' individual sessions and provide usage statistics (such as number of page visits, durations, and browsers), but it can also give you an accurate picture of their experience as they navigate from page to page.
RUM also displays each requested page and breaks down a its load time into different factors, as shown here:

The /cico URL in this screenshot has a rather high server time of 5 seconds, which is understandable because that page calculates a lot of data gathered from multiple sources on the fly. But now that I see that working with live data greatly slows down the page load, I need to implement a caching/summarizing solution.
Notice that the /takepay URL has a rather small server time (it works with cached/summarized data), but it has a large render time due to rendering interactive graphs with many data points. So, I can easily solve the slow server response for /cico by daily caching or summarizing the data it works with in a separate process.
But there's more to performance and a user's experience than just response times; when properly configured, RUM catalogs all requests—including XHR, as shown below:

The first thing that caught my eye were the 30+ requests for the /settings/email-alerts URL. Either 30+ people viewed/changed their email alert settings, or that XHR is automatically executed on one of the pages. Unfortunately, RUM didn't give me an immediate idea of what page made the XHR, but I did eventually find the culprits when viewing the performance reports for various pages:

Those needless XHRs do contribute to the load time, and eliminating them can make a big difference..
Raygun provides an invaluable service. As my experience shows, by using APM and Real User Monitoring, you can easily monitor your application's performance.
They automatically pinpoint the performance issues on both the server and client, which is vital in a fast-paced environment. They truly are fantastic services and you can try them free today!

Spacetime lets you figure-out what time it is, all-over the world:
 API (but immutable!)
The post Spacetime : Calculate Time in Remote Timezones appeared first on Best jQuery.
Skeletabs is an open source jQuery plugin that provides tabbed browsing feature to your web contents. It is focused on accessibility and scalability above all else, and is designed to support convenience of screen readers and keyboard users, as well as to encourage developers’ creative uses.
The post Skeletabs : jQuery Accessible Responsive Tab Plugin appeared first on Best jQuery.

With the ever-increasing popularity of smartphones, developers are looking into solutions for building mobile applications. For developers with a web background, frameworks such as Cordova and Ionic, React Native, NativeScript, and Flutter allow us to create mobile apps with languages we’re already familiar with: HTML, XML, CSS, and JavaScript.
In this guide, we’ll take a closer look at React Native. You’ll learn the absolute basics of getting started with it. Specifically, we’ll cover the following:
This tutorial assumes that you’re coming from a web development background. The minimum requirement for you to be able to confidently follow this tutorial is to know HTML, CSS, and JavaScript. You should also know how to install software on your operating system and work with the command line. We’ll also be using some ES6 syntax, so it would help if you know basic ES6 syntax as well. Knowledge of React is helpful but not required.
React Native is a framework for building apps that work on both Android and iOS. It allows you to create real native apps using JavaScript and React. This differs from frameworks like Cordova, where you use HTML to build the UI, which will then just be displayed within the device’s integrated mobile browser (WebView). React Native has built-in components which are compiled to native UI components, while your JavaScript code is executed through a virtual machine. This makes React Native more performant than Cordova.
Another advantage of React Native is its ability to access native device features. There are many plugins which you can use to access native device features, such as the camera and various device sensors. If you’re in need of a platform-specific feature that hasn’t been implemented yet, you can also build your own native modules — although that will require you to have considerable knowledge of the native platform you want to support (Java or Kotlin for Android, and Objective C or Swift for iOS).
If you’re coming here and you’re new to React, you might be wondering what it is. React is a JavaScript library for the Web for building user interfaces. If you’re familiar with MVC, it’s basically the View in MVC. React’s main purpose is to allow developers to build reusable UI components. Examples of these components include buttons, sliders, and cards. React Native took the idea of building reusable UI components and brought it into mobile app development.
Before coming here, you might have heard of Expo. It’s even mentioned in the official React Native docs, so you might be wondering what it is.
In simple terms, Expo allows you to build React Native apps without the initial headache that comes with setting up your development environment. It only requires you to have Node installed on your machine, and the Expo client app on your device or emulator.
But that’s just how Expo is initially sold. In reality, it’s much more than that. Expo is actually a platform that gives you access to tools, libraries and services for building Android and iOS apps faster with React Native. Expo comes with an SDK which includes most of the APIs you can ask for in a mobile app development platform:
Those are just few of the APIs you get access to out of the box if you start building React Native apps with Expo. Of course, these APIs are available to you as well via native modules if you develop your app using the standard React Native setup.
The real question is which one to pick — plain React Native or Expo? There’s really no right or wrong answer. It all depends on the context and what your needs are. But I guess it’s safe to assume that you’re reading this tutorial because you want to quickly get started with React Native. So I’ll go ahead and recommend that you start out with Expo. It’s fast, simple, and easy to set up. You can dive right into tinkering with React Native code and get a feel of what it has to offer in just a couple of hours.
But as you begin to grasp the different concepts, and as the need for different native features arises, you might find that Expo is kind of limiting. Yes, it has a lot of native features available, but not all the native modules that are available to standard React Native projects are supported.
Note: projects like unimodules are beginning to close the gap between standard React Native projects and Expo projects, as it allows developers to create native modules that work for both React Native and ExpoKit.
To quickly get started with React Native, the recommended method is to set up Expo.
The only prerequisite of setting up Expo is that you need to have Node.js installed in your machine. To do this, you can either head to the official Node download page and grab the relevant binaries for your system, or you can use a version manager, which allows you to install multiple versions of Node and switch between them at will.
Once you have Node.js installed, install the Expo CLI. This is used for creating, serving, packaging, and publishing projects:
npm install -g expo-cli
Next, install Yarn, the preferred package manager for Expo:
npm install -g yarn
That’s really all there is to it! The next step is to download the Expo client App for Android or iOS. Note that this is the only way you can run Expo apps while you’re still in development. When you’re ready to ship the app, you can follow this guide to create standalone binaries for iOS and Android which can be submitted to the Apple App Store and Google Play Store.
Now that your development environment is set up, we can look at the app we’re going to create — a Pokémon search app. It will allow the user to type the name of a Pokémon into an input box, before fetching the Pokémon’s details from an external API and displaying them to the user.
Here’s what the finished thing will look like:
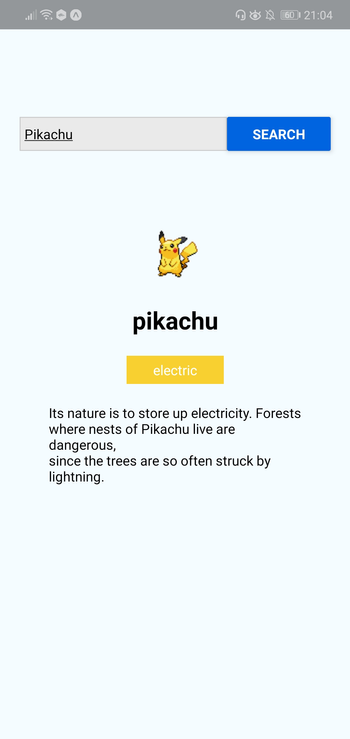
As ever, you can find the source code for this in our GitHub repo.
On your terminal, execute the following command to create a new React Native project using Expo:
expo init RNPokeSearch
Under Managed Workflow, select blank. By default, this will install the dependencies using Yarn.
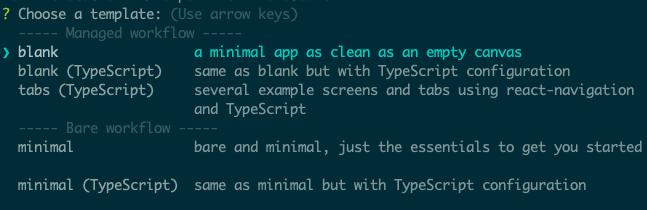
You might be asking what this Managed workflow and Bare workflow is. These are the two types of workflows that Expo supports. With a managed workflow, you only have to deal with JavaScript and Expo manages everything for you. While in Bare workflow, you have full control over the native code. It gives you the same freedom as the React Native CLI, but with the added bonus of Expo’s libraries and services. You can visit this managed vs bare intro page if you want to learn more about workflows in Expo.
Just like in a web environment, you can install libraries to easily implement different kinds of functionality in React Native. Once the project is created, we need to install a couple of dependencies: pokemon and axios. The former is used for verifying if the text entered in the search box is a real Pokémon name, while axios is used to make an HTTP request to the API that we’re using, namely the PokeAPI:
yarn add pokemon axios
Before we proceed to coding, let’s first take a look at the directory structure of a React Native project created with Expo:
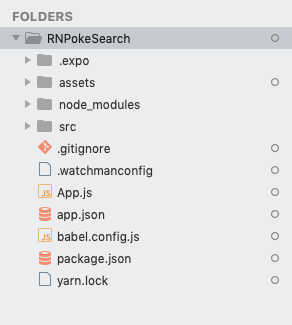
Here’s a breakdown of the most important files and folders that you need to remember:
App.js: the main project file. This is where you’ll start developing your app. Any changes you make to this file will be reflected on the screen.src: acts as the main folder which stores all the source code related to the app itself. Note that this isn’t included in the default project created by Expo CLI. The name of this folder can be anything. Some people use app as well.assets: this is where the app assets such as icons and splash screens are stored.package.json: where the name and versions of the libraries you installed for this project are added.node_modules: where the libraries you installed are stored. Note that this already contains a lot of folders before you installed the two libraries earlier. This is because React Native also has its own dependencies. The same is true for all the other libraries you install.Don’t mind the rest of the folders and files for now, as we won’t be needing them when just getting started.
At this point, you can now run the app by executing the command below. Make sure that you’ve already installed the corresponding Expo client (Android or iOS) for your phone and that it’s connected to the same network as your computer before doing so. If you don’t have an Android or iOS device you can test with, you can use the Android Studio Emulator or the iOS simulator so you can run the app on your machine:
yarn start
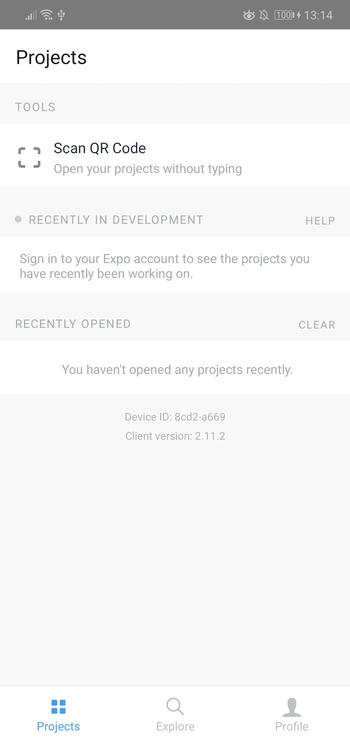
Once it’s running, it will display a QR code:
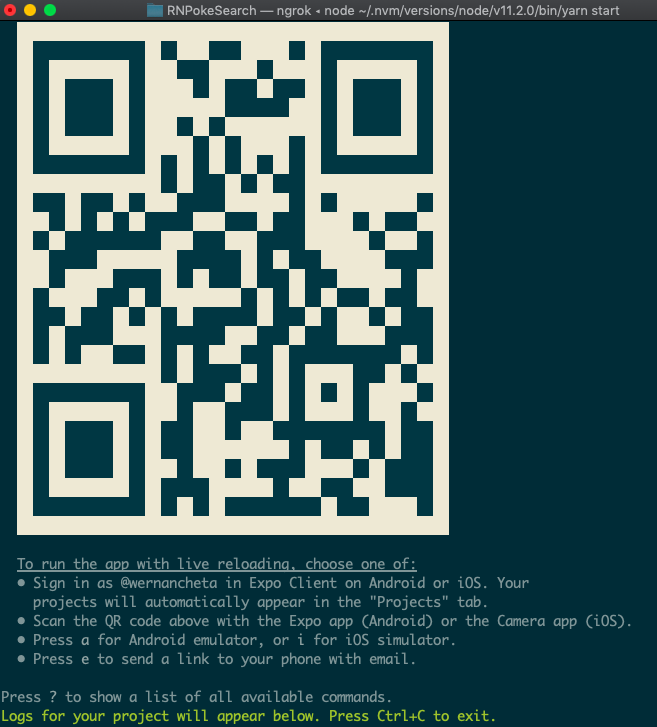
Open your Expo client app, and in the projects tab click on Scan QR Code. This will open the app on your Android or iOS device. If you have an emulator running, you can either press i to run it on the iOS simulator or a to run it on the Android emulator.
If you’re testing on a real device, shake it so the developer menu will show up.
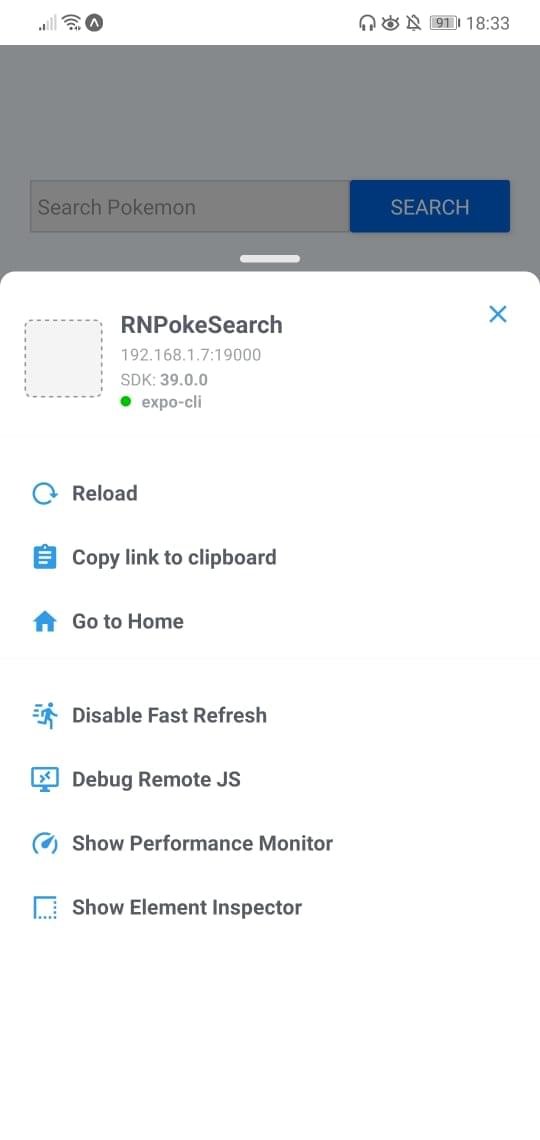
Make sure that Fast Refresh is enabled. This allows you to automatically reload the changes that you make on your components.
Continue reading Getting Started with React Native on SitePoint.
jbvalidator is a fresh new jQuery based form validation plugin that is created for the latest Bootstrap 5 framework and supports both client side and server-side validation.
The post HTML 5 & Bootstrap Jquery Form Validation Plugin : jbvalidator appeared first on Best jQuery.
Cuttr is a zero dependency, easy to use JS/jQuery library that truncates multiple line text content (Line Clampin’) to fit within given specifications. It adds an ending string like a ellipsis (…) to indicate that there is more text available than currently visible.
The post Cuttr.js : jQuery Plugin to Truncate Multi-Line Content appeared first on Best jQuery.
|