Thursday, April 19, 2018

Best Practices for Agile UX Testing

Every product manager’s dream is to launch a product or new feature that is perfect for their customer right out of the gate. But we know this is hardly ever the case.

It’s only through experience, and repeated user feedback using user experience testing, that we learn to tweak our product’s features and interface according to our users’ conscious or unconscious demands.

Over the last two decades, agile and sprint based development has enabled an efficient and effective product management – development team – design team feedback loop. The next stage in the Agile revolution is to add the customer and the user to this cycle, through Agile user experience testing (Agile UX Testing).

Test small, test often

Conducting market research and usability testing used to be an expensive and lengthy process. That’s why it was typically performed only once, or maybe twice during the design and development of new products and features. Since UX testing was often done towards the end of the product development cycle, the feedback gained was often used more as a “validation” exercise than an “exploratory” exercise.

It’s now possible to set up a UX test script in 5 minutes, receive qualitative picture-in-picture responses (webcam view recording of respondents + screen recording + audio + quantitative data) within hours, and add the customer and the user to the agile software development feedback loop.

You can even run a user test for every sprint, and for every design and development iteration. This iterative process avoids the risk of putting together a complete prototype and realising far too late that there is a flaw in the design that should have been dealt with in the early development stages

You don’t need to run these tests with large sample sets. It’s a rule of thumb within the usability industry that 5 participants going through a qualitative picture-in-picture recording session like that of Userlytics.com will allow you to uncover 80% of the usability and user experience issues in a design.

See who is testing your product

It’s important to always have your target persona front of mind. It helps you look at your product through the lens of your customer – as much as possible.

However, it’s impossible to fully immerse yourself as your own customer no matter how hard you try. If you can’t be them, watch them. The best feedback you can get on your product is from the users its meant for.

Online remote tests with only screen recording and audio don’t allow you to know if the person providing the feedback is truly your target persona. Including a webcam view of participants adds a whole new level of depth and details to your qualitative UX testing insights. You can start to verify whether the person is actually your target persona, and better understand their contextual surroundings as they interact with your UI and answer questions. By being able to visually analyse the tester you can track their real-time emotional/physiological reactions to the product.

It’s always better to actually see people use your product. 

When launching a test with Userlytics, you can use demographic filters and set screener questions to ensure their global participant panel provides you with a tester that fits your persona. They also track participant location via their IP, and review every result to reject or approve it through their QA process.

Getting feedback on your product is always great, but it’s even better when the feedback is from participants that match your target persona.

Moderated vs. unmoderated vs. hybrid

For lab-based user testing, moderated testing (a UX researcher guiding the respondent) used to be the norm. The advent of new technologies allowed UX researchers to conduct moderated sessions on a remote, online basis, using screen sharing platforms like GoToMeeting, Webex, Zoom, Skype, Hangouts and so on. The problem is scalability. UX design researchers only have so much time to moderate target participants, let alone conduct the project management and scheduling and logistics required to manage a moderated usability testing process.

When Userlytics and its peers in the industry invented unmoderated usability testing, the economics, time requirements and scalability of user testing advanced by orders of magnitude. The drawback? A rigid non-personalisable test script.

In other words, a single UX researcher could manage tests of hundreds or even thousands of respondents, anywhere in the world, at a fraction of the time, and cost required for moderated or in-lab UX testing. However, it was not possible to adapt the unmoderated test script according to the answers and actions of each respondent, which would be possible with moderated usability testing.

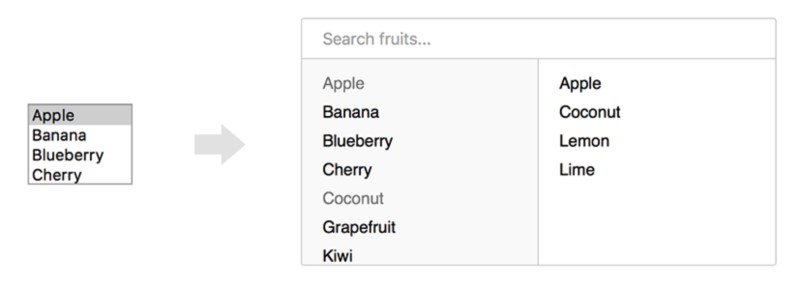
But that problem has now been solved, through conditional logic (“branching” or “skipping” logic). The most advanced UX testing platforms have a hybrid approach that marries the scalability, speed and economics of unmoderated user testing with the personalisation of moderated user testing by leveraging branching logic. When branching logic is applied to a given task/question in the test script, it redirects the tester to a new task/question depending on their response to the prior question or task. Through branching logic you can essentially replace the moderator’s function through creating a customised set of instructions to different testers depending on their actions.

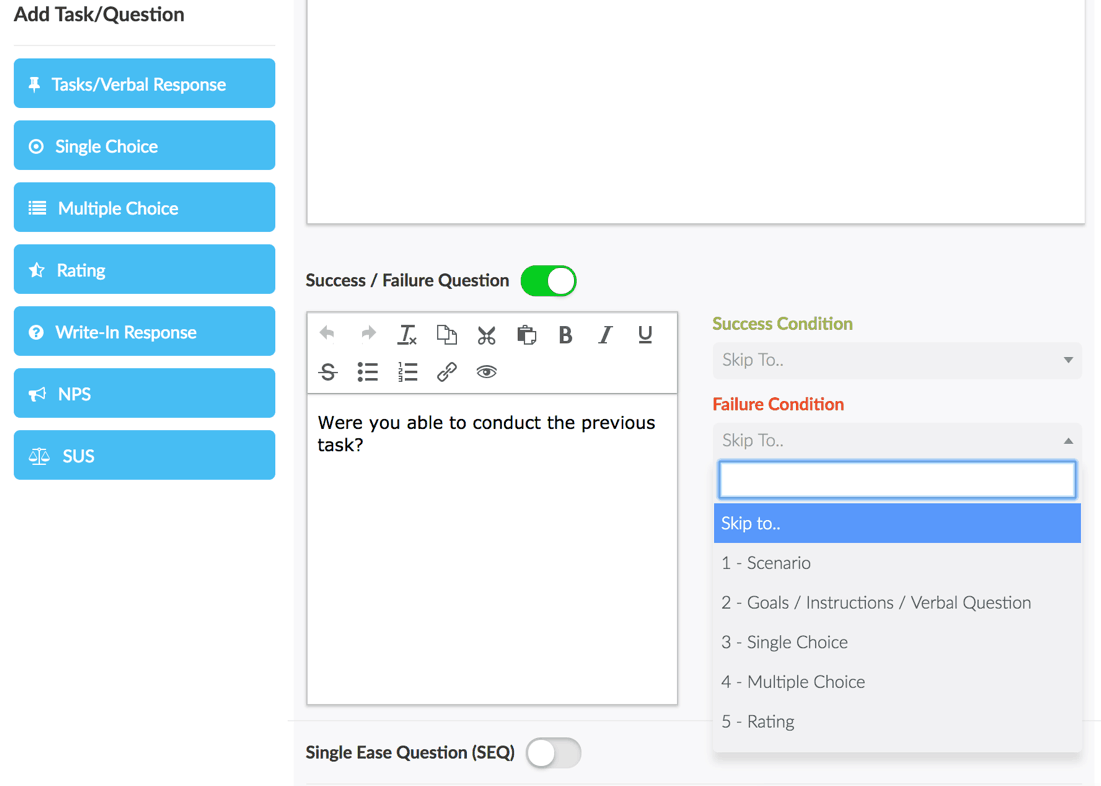
Branching logic creates more personalised tests.

Efficient analysis

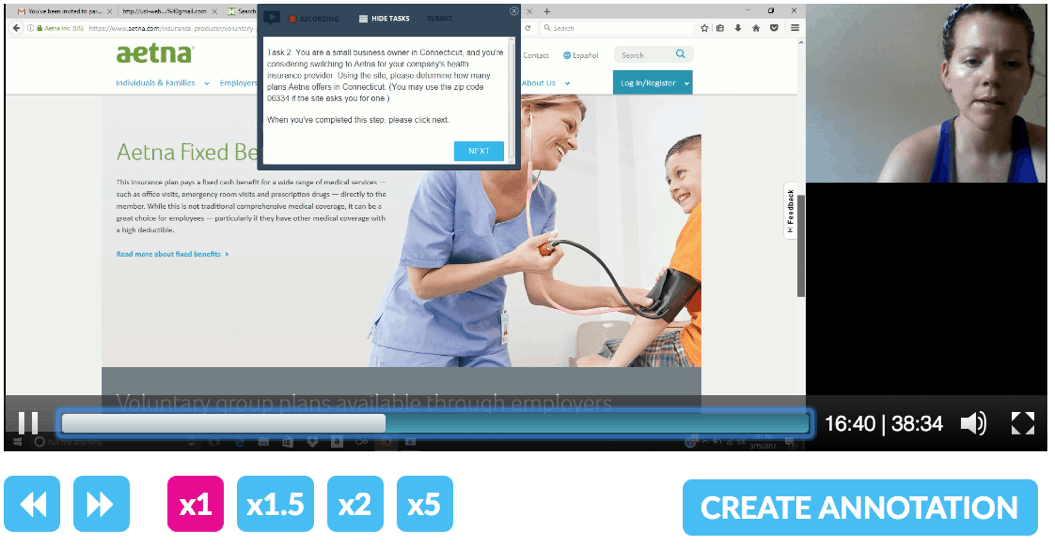
In an agile sprint where time is short, you need to get to your analysis quickly. Rapidly and economically launching a user experience test is only part of the equation. Reviewing and analysing the results, and decision-making in a timely manner is the other half. If you launched a test with 30-minute sessions of 10 participants, you and your colleagues have 5 hours of video to watch, analyse, make annotations, and pull insights so as to enable product and UI optimisation. 100 participants would imply 50 hours. This time adds up quickly.

When you’re working in sprints, you needs results quickly.

Your user testing platform should provide the tools you need to quickly review participant sessions, leverage searchable, time stamped & hyperlinked audio transcriptions to locate the most interesting actions and comments, add & share hyperlinked and shareable annotations, and create & share highlight reels.  

Benchmark your product

Learning from how your users engage with your product is one way to ensure a positive customer experience. It’s also important, however, to see how your product compares to your competitors through benchmarking.

Benchmarking your prototype designs against each other, against existing production assets, and against your competition will allow you to identify additional opportunity areas where you can improve your usability design to create a superior customer experience.

The best way to do this is using pre-formatted system usability scale questions with automatic calculations of the resulting score. You can also use comparison metrics such as net promoter score, time on task, and success/failure, which allow you to quantitatively measure your usability and user experience against different design iterations and against the competition, or best practice websites and apps. “If you are not measuring, you are not managing”

TestFlight and Google Play equivalent

Testing your product early in the process is essential. However, once your mobile app prototype reaches a high fidelity stage and is on the Appstore or Google Play, you need to have a process for testing the apps prior to production.

Some platforms use testing apps, which may have the drawback of incompatibility with the tested app and the Testflight app. Others like Userlytics use an approach that does not require any kind of SDK or testing app, therefore avoiding potential usability testing pitfalls.

Conclusion

An agile UX testing approach takes an iterative customer-centric approach, providing many small sample tests with your target persona at every stage of the product lifecycle allowing you to optimize your product prior to launch. Like having your customers form a seamless whole with your sprint teams. This strategy reduces time and money wasted in design and development and results in a much higher customer engagement and satisfaction score.

If you want to learn more about agile UX, or how to launch an agile UX testing process you can schedule a demo here

We just wanted to let you know this is a sponsored post. Every now and then, we partner with people and companies doing awesome things. Read more about UX Mastery sponsorship here

The post Best Practices for Agile UX Testing appeared first on UX Mastery.


by Brenden Martin via UX Mastery

Wednesday, April 18, 2018

Why Brands Need to Utilize Influencer Marketing in 2018 - #infographic

This infographic, created by St. Joseph Communications, illustrates the current and future trends of influencer marketing. With 39% of marketers planning to increase their influencer marketing budget in 2018, and 19% planning to spend over $100,000 per program, the growing importance of this...

[ This is a content summary only. Visit our website https://ift.tt/1b4YgHQ for full links, other content, and more! ]

by Web Desk via Digital Information World

How To Leverage Visual Marketing Strategies to Craft Engaging Content - #infographic

Visual content is becoming high priority for digital marketers, as statistics underscore the impact of graphics and imagery on reach, engagement and conversion. Given only 15 minutes to consume content, 66% of consumers would prefer something beautifully-designed over something plain and...

[ This is a content summary only. Visit our website https://ift.tt/1b4YgHQ for full links, other content, and more! ]

by Web Desk via Digital Information World

Creative Upload Interaction with JavaScript & Canvas

Well in this tutorial we will see how to implement a creative component to upload files, using as inspiration the previous animation by Jakub Antalík. The Idea is to bring better visual feedback around what happens with the file after is dropped.

We will be focusing only on implementing the drag and drop interactions and some animations, without actually implementing all the necessary logic to actually upload the files to the server and use the component in production.

The post Creative Upload Interaction with JavaScript & Canvas appeared first on Best jQuery.


by Admin via Best jQuery

Hi Chrome 66, bye annoying autoplaying media

#336 — April 18, 2018

Read on the Web

Frontend Focus

Chrome 66 has been released on Chrome's stable channel this week. As well as the usual new DevTools goodies, the big news for Web developers is that media autoplaying policies have changed.

Media without sound (or muted) will automatically play as before, but media with sound now only autoplays under certain conditions. If your site relies on autoplay, check that things are behaving as expected.

Site Isolation is another new feature to be aware of, though it's only being rolled out to a 'small percentage' of users on a trial basis, for now.
— Chris Brandrick, Editor

Best Practices with CSS Grid Layout — Now that CSS Grid development is becoming mainstream, developers are looking for good rules of thumb - Rachel Andrew looks at both best practices but also some things you probably don’t need to worry about.

Rachel Andrew

Going Offline with Service Workers — In this excerpt from his new book Going Offline, Jeremy Keith introduces us to Service Workers, a critical component of Progressive Web Apps. This is a great high-level introduction.

Jeremy Keith

The New Generation of Project Management Tools Is Here and It’s Visual — monday.com is a visual tool your team will actually enjoy using. It makes it fun and easy for everyone to collaborate, focus on what's important, and get more done. A project management tool that’ll help you and your team collaborate and achieve more together.

monday.com sponsor

The Front-End Developer Handbook 2018 Edition — An online guide that outlines and discusses the practice of front-end engineering, how to learn it and what tools are used in the practice, as of 2018.

Cody Lindley

What's New in Chrome 67's DevTools — 67 is the current ‘Dev’ channel release. It includes an improved network tab search feature, CSS variable value previews, the ability to copy a network request as a Fetch API call, and more.

Google Developers

Scroll to the Future: Scrolling on the Modern Web — A whirlwind tour of the latest CSS and JavaScript features that make navigating around a single page smooth, beautiful and less resource-hungry.

Anna Selezniova and Andy Barnov

Mission Critical: Optimizing CSS for CDNs — ‘Critical CSS’ is a technique for getting above-the-fold CSS for a page into the first 14KB window of the page request.

John Bender

Introducing the Accessibility Inspector in the Firefox Developer Tools — The Accessibility Inspector, now in ‘nightly’ builds of Firefox, allows you to inspect your site’s exposure to assistive technologies, such as screen readers.

Marco Zehe

💻 Jobs

Web Backend Developer (Fairfax, VA) — City State Entertainment is looking for an ASP.NET dev to help create Camelot Unchained, an RvR fantasy MMO for its studio in VA.

City State Entertainment

Front-End Engineer, React/Redux — At Manifold, we’re creating the world’s largest independent cloud marketplace. Made by developers who care, for developers who care.

Manifold

Front-End Expert? Sign Up for Vettery — Top developers can get 5+ interview requests during their first week on Vettery.

Vettery

📢 News & Articles

What's New in Chrome 66 for Developers — It came out on the general release channel this week.

Pete LePage

A New Web Performance Conference in London with 24 Industry Experts

DELTAV CONFERENCE sponsor

'Can I Use' Now Tracking 'Do Not Track' API Support — All current browsers essentially support it now.

Can I Use

CSS Layout API Level 1: W3C First Public Working Draft

W3C

The Story of Getting Rid of the 'grid-' Prefix on CSS Grid Layout Gutter Properties

Manuel Rego Casasnovas

Open Source Spotlight: Make an Advanced Streaming App, Compete for Prizes

ONVIF sponsor

📘 Tutorials

How Browsers Position Floats

Monica Dinculescu

Another Collection of Interesting Facts About CSS Grid — Including using the grid shorthand property, creating sticky footers, and using feature queries with Edge.

Manuel Matuzovic

Automating Your Feature Testing with Selenium WebDriver — An up to date intro to using Selenium from Java.

Nils Schuette

Editorial Design and CSS Grid: Inspiration and Examples — Breaking down an example of a CSS Grid-based implementation of a magazine-inspired editorial design. “passing an editorial design to web design is not easy although with CSS Grid we can achieve a quite acceptable result.”

Ricardo Prieto

Your Free Pass to Stronger Front-End Skills — You can learn a lot in 10 days—start a free trial & get unlimited access to expert-led dev courses & more.

Pluralsight sponsor

Cropping Away Negative Impacts of Line Height

Kevin Powell

Traversing the DOM with JavaScript

Zell Liew

A Brief Explainer on How 'font-display' Affects WebFont Load

Chris Coyier

🔧 Code and Demos

10 New Open-Source Bootstrap Themes

Alexander Rechsteiner

multi.js: A User-Friendly Replacement for Select Boxes with Multiple Attribute Enabled

Fabian Lindfors

element-to-pdf.js: Turn a DOM Element Into a PDF using Headless Chrome

Google

pico.js: Client-Side Face Detection with JavaScriptGitHub repo.

tehnokv

Creating CSS Gradient Rounded Borders — A demo showing how CSS gradients can be applied to a rounded border.

George W. Park


by via Frontend Focus

Testing in Laravel

Irrespective of the application you're dealing with, testing is an important and often overlooked aspect that you should give the attention it deserves. Today, we're going to discuss it in the context of the Laravel web framework.

In fact, Laravel already supports the PHPUnit testing framework in the core itself. PHPUnit is one of the most popular and widely accepted testing frameworks across the PHP community. It allows you to create both kinds of tests—unit and functional.

We'll start with a basic introduction to unit and functional testing. As we move on, we'll explore how to create unit and functional tests in Laravel. I assume that you're familiar with basics of the PHPUnit framework as we will explore it in the context of Laravel in this article.

Unit and Functional Tests

If you're already familiar with the PHPUnit framework, you should know that you can divide tests into two flavors—unit tests and functional tests.

In unit tests, you test the correctness of a given function or a method. More importantly, you test a single piece of your code's logic at a given time.

In your development, if you find that the method you've implemented contains more than one logical unit, you're better off splitting that into multiple methods so that each method holds a single logical and testable piece of code.

Let's have a quick look at an example that's an ideal case for unit testing.

As you can see, the method does one and only one thing. It uses the ucfirst function to convert a title into a title that starts with uppercase.

Whereas the unit test is used to test the correctness of a single logical unit of code, the functional test, on the other hand, allows you to test the correctness of a specific use case. More specifically, it allows you to simulate actions a user performs in an application in order to run a specific use case.

For example, you could implement a functional test case for some login functionality that may involve the following steps.

  • Create the GET request to access the login page.
  • Check if we are on the login page.
  • Generate the POST request to post data to the login page.
  • Check if the session was created successfully.

So that's how you're supposed to create the functional test case. From the next section onward, we'll create examples that demonstrate how to create unit and functional test cases in Laravel.

Setting Up the Prerequisites

Before we go ahead and create actual tests, we need to set up a couple of things that'll be used in our tests.

We will create the Post model and related migration to start with. Go ahead and run the following artisan command to create the Post model.

The above command should create the Post model class and an associated database migration as well.

The Post model class should look like:

And the database migration file should be created at database/migrations/YYYY_MM_DD_HHMMSS_create_posts_table.php.

We also want to store the title of the post. Let's revise the code of the Post database migration file to look like the following.

As you can see, we've added the $table->string('name') column to store the title of the post. Next, you just need to run the migrate command to actually create that table in the database.

Also, let's replace the Post model with the following contents.

We've just added the accessor method, which modifies the title of the post, and that's exactly what we'll test in our unit test case. That's it as far as the Post model is concerned.

Next, we'll create a controller file at app/Http/Controllers/AccessorController.php. It'll be useful to us when we create the functional test case at a later stage.

In the index method, we retrieve the post id from the request parameters and try to load the post model object.

Let's add an associated route as well in the routes/web.php file.

And with that in place, you can run the http://your-laravel-site.com/accessor/index URL to see if it works as expected.

Unit Testing

In the previous section, we did the initial setup that's going to be useful to us in this and upcoming sections. In this section, we are going to create an example that demonstrates the concepts of unit testing in Laravel.

As always, Laravel provides an artisan command that allows you to create the base template class of the unit test case.

Run the following command to create the AccessorTest unit test case class. It's important to note that we're passing the --unit keyword that creates the unit test case, and it'll be placed under the tests/Unit directory.

And that should create the following class at tests/Unit/AccessorTest.php.

Let's replace it with some meaningful code.

As you can see, the code is exactly the same as it would have been in core PHP. We've just imported Laravel-specific dependencies that allow us to use the required APIs. In the testAccessorTest method, we're supposed to test the correctness of the getNameAttribute method of the Post model.

To do that, we've fetched an example post from the database and prepared the expected output in the $db_post_title variable. Next, we load the same post using the Eloquent model that executes the getNameAttribute method as well to prepare the post title. Finally, we use the assertEquals method to compare both variables as usual.

So that's how to prepare unit test cases in Laravel.

Functional Testing

In this section, we'll create the functional test case that tests the functionality of the controller that we created earlier.

Run the following command to create the AccessorTest functional test case class. As we're not using the --unit keyword, it'll be treated as a functional test case and placed under the tests/Feature directory.

It'll create the following class at tests/Feature/AccessorTest.php.

Let's replace it with the following code.

Again, the code should look familiar to those who have prior experience in functional testing.

Firstly, we're fetching an example post from the database and preparing the expected output in the $db_post_title variable. Following that, we try to simulate the /accessor/index?id=1 GET request and grab the response of that request in the $response variable.

Next, we've tried to match the response code in the $response variable with the expected response code. In our case, it should be 200 as we should get a valid response for our GET request. Further, the response should contain a title that starts with uppercase, and that's exactly what we're trying to match using the assertSeeText method.

And that's an example of the functional test case. Now, we have everything we could run our tests against. Let's go ahead and run the following command in the root of your application to run all tests.

That should run all tests in your application. You should see a standard PHPUnit output that displays the status of tests and assertions in your application.

And with that, we're at the end of this article.

Conclusion

Today, we explored the details of testing in Laravel, which already supports PHPUnit in its core. The article started with a basic introduction to unit and functional testing, and as we moved on we explored the specifics of testing in the context of Laravel.

In the process, we created a handful of examples that demonstrated how you could create unit and functional test cases using the artisan command.

If you're just getting started with Laravel or looking to expand your knowledge, site, or application with extensions, we have a variety of things you can study in Envato Market.

Don't hesitate to express your thoughts using the feed below!


by Sajal Soni via Envato Tuts+ Code

New eBooks Available for Subscribers in April 2018