Saturday, June 9, 2018

Instagram Reveals News Feed Algorithm Secrets

Welcome to this week’s edition of the Social Media Marketing Talk Show, a news show for marketers who want to stay on the leading edge of social media. On this week’s Social Media Marketing Talk Show, we explore Instagram announcing how their news feed algorithm works with Jeff Sieh, Facebook Watch news shows, and more [...]

The post Instagram Reveals News Feed Algorithm Secrets appeared first on .


by Grace Duffy via

AJ Studio

AJ is a design studio driven by the creation of unique, distinctive and memorable brand communication.Showcase: http://bit.ly/2J3gW7j
by via Awwwards - Sites of the day

Friday, June 8, 2018

HTTP/2: Background, Performance Benefits and Implementations

On top of the infrastructure of the internet --- or the physical network layers --- sits the Internet Protocol, as part of the TCP/IP, or transport layer. It's the fabric underlying all or most of our internet communications.

A higher level protocol layer that we use on top of this is the application layer. On this level, various applications use different protocols to connect and transfer information. We have SMTP, POP3, and IMAP for sending and receiving emails, IRC and XMPP for chatting, SSH for remote sever access, and so on.

The best-known protocol among these, which has become synonymous with the use of the internet, is HTTP (hypertext transfer protocol). This is what we use to access websites every day. It was devised by Tim Berners-Lee at CERN as early as 1989. The specification for version 1.0 was released in 1996 (RFC 1945), and 1.1 in 1999.

The HTTP specification is maintained by the World Wide Web Consortium, and can be found at https://ift.tt/2JqT2zr.

The first generation of this protocol --- versions 1 and 1.1 --- dominated the web up until 2015, when HTTP/2 was released and the industry --- web servers and browser vendors --- started adopting it.

HTTP/1

HTTP is a stateless protocol, based on a request-response structure, which means that the client makes requests to the server, and these requests are atomic: any single request isn't aware of the previous requests. (This is why we use cookies --- to bridge the gap between multiple requests in one user session, for example, to be able to serve an authenticated version of the website to logged in users.)

Transfers are typically initiated by the client --- meaning the user's browser --- and the servers usually just respond to these requests.

We could say that the current state of HTTP is pretty "dumb", or better, low-level, with lots of "help" that needs to be given to the browsers and to the servers on how to communicate efficiently. Changes in this arena are not that simple to introduce, with so many existing websites whose functioning depends on backward compatibility with any introduced changes. Anything being done to improve the protocol has to be done in a seamless way that won't disrupt the internet.

In many ways, the current model has become a bottleneck with this strict request-response, atomic, synchronous model, and progress has mostly taken the form of hacks, spearheaded often by the industry leaders like Google, Facebook etc. The usual scenario, which is being improved on in various ways, is for the visitor to request a web page, and when their browser receives it from the server, it parses the HTML and finds other resources necessary to render the page, like CSS, images, and JavaScript. As it encounters these resource links, it stops loading everything else, and requests specified resources from the server. It doesn't move a millimeter until it receives this resource. Then it requests another, and so on.

Average number of requests in the world's top websites

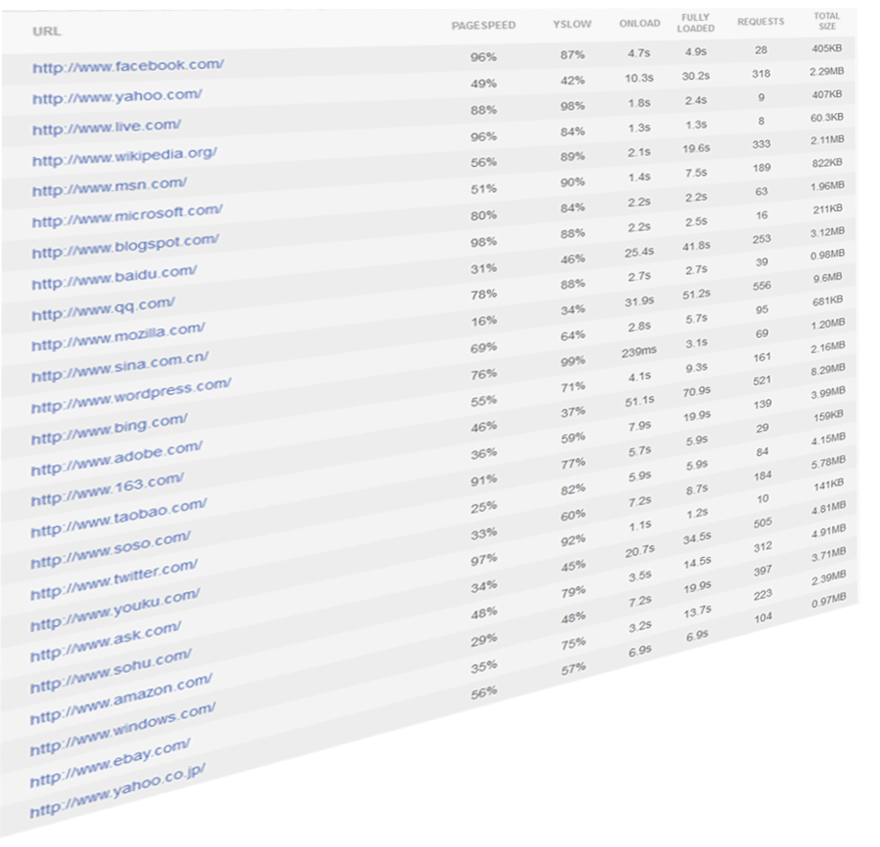
The number of requests needed to load world's biggest websites is often in couple of hundreds.

This includes a lot of waiting, and a lot of round trips during which our visitor sees only a white screen or a half-rendered website. These are wasted seconds. A lot of available bandwidth is just sitting there unused during these request cycles.

CDNs can alleviate a lot of these problems, but even they are nothing but hacks.

As Daniel Stenberg (one of the people working on HTTP/2 standardization) from Mozilla has pointed out, the first version of the protocol is having a hard time fully leveraging the capacity of the underlying transport layer, TCP.
Users who have been working on optimizing website loading speeds know this often requires some creativity, to put it mildly.

Over time, internet bandwidth speeds have drastically increased, but HTTP/1.1-era infrastructure didn't utilize this fully. It still struggled with issues like HTTP pipelining --- pushing more resources over the same TCP connection. Client-side support in browsers has been dragging the most, with Firefox and Chrome disabling it by default, or not supporting it at all, like IE, Firefox version 54+, etc.
This means that even small resources require opening a new TCP connection, with all the bloat that goes with it --- TCP handshakes, DNS lookups, latency… And due to head-of-line blocking, the loading of one resource results in blocking all other resources from loading.

HTTP pipelining

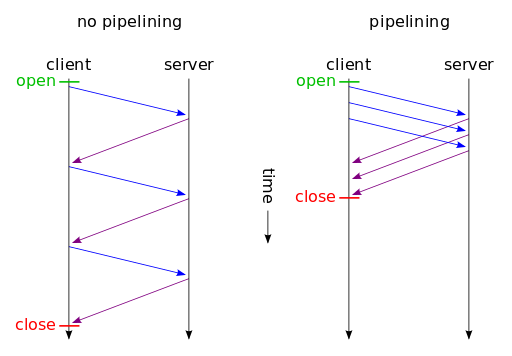
A synchronous, non-pipelined connection vs a pipelined one, showing possible savings in load time.

Some of the optimization sorcery web developers have to resort to under the HTTP/1 model to optimize their websites include image sprites, CSS and JavaScript concatenation, sharding (distributing visitors' requests for resources over more than one domain or subdomain), and so on.

The improvement was due, and it had to solve these issues in a seamless, backward-compatible way so as not to interrupt the workings of the existing web.

SPDY

In 2009, Google announced a project that would become a draft proposal of a new-generation protocol, SPDY (pronounced speedy), adding support to Chrome, and pushing it to all of its web services in subsequent years. Then followed Twitter and server vendors like Apache, nginx with their support, Node.js, and later came Facebook, WordPress.com, and most CDN providers.

SPDY introduced multiplexing --- sending multiple resources in parallel, over a single TCP connection. Connections are encrypted by default, and data is compressed. First, preliminary tests in the SPDY white paper performed on the top 25 sites showed speed improvements from 27% to over 60%.

After it proved itself in production, SPDY version 3 became basis for the first draft of HTTP/2, made by the Hypertext Transfer Protocol working group httpbis in 2015.

HTTP/2 aims to address the issues ailing the first version of the protocol --- latency issues --- by:

It also aims to solve head-of-line blocking. The data it transfers is in binary format, improving its efficiency, and it requires encryption by default (or at least, this is a requirement imposed by major browsers).

Header compression is performed with the HPACK algorithm, solving the vulnerability in SPDY, and reducing web request sizes by half.

Server push is one of the features that aims to solve wasted waiting time, by serving resources to the visitor's browser before the browser requires it. This reduces the round trip time, which is a big bottleneck in website optimization.

Due to all these improvements, the difference in loading time that HTTP/2 brings to the table can be seen on this example page by imagekit.io.

Savings in loading time become more apparent the more resources a website has.

The post HTTP/2: Background, Performance Benefits and Implementations appeared first on SitePoint.


by Tonino Jankov via SitePoint

Build a To-do List with Hyperapp, the 1KB JS Micro-framework

In this tutorial, we’ll be using Hyperapp to build a to-do list app. If you want to learn functional programming principles, but not get bogged down in details, read on.

Hyperapp is hot right now. It recently surpassed 11,000 stars on GitHub and made the 5th place in the Front-end Framework section of the 2017 JavaScript Rising Stars. It was also featured on SitePoint recently, when it hit version 1.0.

The reason for Hyperapp’s popularity can be attributed to its pragmatism and ultralight size (1.4 kB), while at the same time achieving results similar to React and Redux out of the box.

So, What Is HyperApp?

Hyperapp allows you to build dynamic, single-page web apps by taking advantage of a virtual DOM to update the elements on a web page quickly and efficiently in a similar way to React. It also uses a single object that’s responsible for keeping track of the application’s state, just like Redux. This makes it easier to manage the state of the app and make sure that different elements don’t get out of sync with each other. The main influence behind Hyperapp was the Elm architecture.

At its core, Hyperapp has three main parts:

  • State. This is a single object tree that stores all of the information about the application.
  • Actions. These are methods that are used to change and update the values in the state object.
  • View. This is a function that returns virtual node objects that compile to HTML code. It can use JSX or a similar templating language and has access to the state and actions objects.

These three parts interact with each other to produce a dynamic application. Actions are triggered by events on the page. The action then updates the state, which then triggers an update to the view. These changes are made to the Virtual DOM, which Hyperapp uses to update the actual DOM on the web page.

Getting Started

To get started as quickly as possible, we’re going to use CodePen to develop our app. You need to make sure that the JavaScript preprocessor is set to Babel and the Hyperapp package is loaded as an external resource using the following link:

https://unpkg.com/hyperapp

To use Hyperapp, we need to import the app function as well as the h method, which Hyperapp uses to create VDOM nodes. Add the following code to the JavaScript pane in CodePen:

const { h, app } = hyperapp;

We’ll be using JSX for the view code. To make sure Hyperapp knows this, we need to add the following comment to the code:

/** @jsx h */

The app() method is used to initialize the application:

const main = app(state, actions, view, document.body);

This takes the state and actions objects as its first two parameters, the view() function as its third parameter, and the last parameter is the HTML element where the application is to be inserted into your markup. By convention, this is usually the <body> tag, represented by document.body.

To make it easy to get started, I’ve created a boilerplate Hyperapp code template on CodePen that contains all the elements mentioned above. It can be forked by clicking on this link.

Hello Hyperapp!

Let’s have a play around with Hyperapp and see how it all works. The view() function accepts the state and actions objects as arguments and returns a Virtual DOM object. We’re going to use JSX, which means we can write code that looks a lot more like HTML. Here’s an example that will return a heading:

const view = (state, actions) => (
  <h1>Hello Hyperapp!</h1>
);

This will actually return the following VDOM object:

{
  name: "h1",
  props: {},
  children: "Hello Hyperapp!"
}

The view() function is called every time the state object changes. Hyperapp will then build a new Virtual DOM tree based on any changes that have occurred. Hyperapp will then take care of updating the actual web page in the most efficient way by comparing the differences in the new Virtual DOM with the old one stored in memory.

Components

Components are pure functions that return virtual nodes. They can be used to create reusable blocks of code that can then be inserted into the view. They can accept parameters in the usual way that any function can, but they don’t have access to the state and actions objects in the same way that the view does.

In the example below, we create a component called Hello() that accepts an object as a parameter. We extract the name value from this object using destructuring, before returning a heading containing this value:

const Hello = ({name}) => <h1>Hello {name}</h1>;

We can now refer to this component in the view as if it were an HTML element entitled <Hello />. We can pass data to this element in the same way that we can pass props to a React component:

const view = (state, actions) => (
  <Hello name="Hyperapp" />
);

Note that, as we’re using JSX, component names must start with capital letters or contain a period.

State

The state is a plain old JavaScript object that contains information about the application. It’s the “single source of truth” for the application and can only be changed using actions.

Let’s create the state object for our application and set a property called name:

const state = {
  name: "Hyperapp"
};

The view function now has access to this property. Update the code to the following:

const view = (state, actions) => (
  <Hello name={state.name} />
);

Since the view can access the state object, we can use its name property as an attribute of the <Hello /> component.

The post Build a To-do List with Hyperapp, the 1KB JS Micro-framework appeared first on SitePoint.


by Darren Jones via SitePoint

Keego

Long-scrolling Landing Page for Keego – the world’s first squeezable metal bottle. The centrally-divided layout features the interactive (press to squeeze) product left and a scrolling right panel with all the info you’ll need to back the product on Indiegogo. Great to see the use of a marketing One Pager to strengthen a product fundraiser and congrats on the 863% funding!


by Rob Hope @robhope via One Page Love

Introducing Truffle, a Blockchain Smart Contract Suite

In the early days of smart contract development (circa 2016) the way to go was to write smart contracts in your favorite text editor and deploy them by directly calling geth and solc.

The way to make this process a little bit more user friendly was to make bash scripts which could first compile and then deploy the contract … which was better, but still pretty rudimentary — the problem with scripting, of course, being the lack of standardization and the suboptimal experience of bash scripting.

The answer came in two distinct flavors — Truffle and Embark — with Truffle being the more popular of the two (and the one we’ll be discussing in this article).

To understand the reasoning behind Truffle, we must understand the problems it’s trying to solve, which are detailed below.

Compilation
Multiple versions of the solc compiler should be supported at the same time, with a clear indication which one is used.

Environments
Contracts need to have development, integration and production environments, each with their own Ethereum node address, accounts, etc.

Testing
The contracts must be testable. The importance of testing software can’t be overstated. For smart contracts, the importance is infinitely more important. So. Test. Your. Contracts!

Configuration
Your development, integration and production environments should be encapsulated within a config file so they can be committed to git and reused by teammates.

Web3js Integration
Web3.js is a JavaScript framework for enabling easier communication with smart contracts from web apps. Truffle takes this a step further and enables the Web3.js interface from within the Truffle console, so you can call web functions while still in development mode, outside the browser.

Installing Truffle

The best way to install Truffle is by using the Node Package Manager (npm). After setting up NPM on your computer, install Truffle by opening the terminal and typing this:

npm install -g truffle

Note: the sudo prefix may be required on Linux machines.

Getting Started

Once Truffle is installed, the best way to get a feel for how it works is to set up the Truffle demo project called “MetaCoin”.

Open the terminal app (literally Terminal on Linux and macOS, or Git Bash, Powershell, Cygwin or similar on Windows) and position yourself in the folder where you wish to initialize the project.

Then run the following:

mkdir MetaCoin
cd MetaCoin
truffle unbox metacoin

You should see output like this:

Downloading...
Unpacking...
Setting up...
Unbox successful. Sweet!

Commands:

  Compile contracts: truffle compile
  Migrate contracts: truffle migrate
  Test contracts:    truffle test

If you get some errors, it could be that you’re using a different version of Truffle. The version this tutorial is written for is Truffle v4.1.5, but the instructions should stay relevant for at least a couple of versions.

The Truffle Project Structure

Your Truffle folder should look a little bit like this:

.
├── contracts
│   ├── ConvertLib.sol
│   ├── MetaCoin.sol
│   └── Migrations.sol
├── migrations
│   ├── 1_initial_migration.js
│   └── 2_deploy_contracts.js
├── test
│   ├── TestMetacoin.sol
│   └── metacoin.js
├── truffle-config.js
└── truffle.js

The post Introducing Truffle, a Blockchain Smart Contract Suite appeared first on SitePoint.


by Mislav Javor via SitePoint

Introducing Axios, a Popular, Promise-based HTTP Client

Axios is a popular, promise-based HTTP client that sports an easy-to-use API and can be used in both the browser and Node.js.

Making HTTP requests to fetch or save data is one of the most common tasks a client-side JavaScript application will need to do. Third-party libraries — especially jQuery — have long been a popular way to interact with the more verbose browser APIs, and abstract away any cross-browser differences.

As people move away from jQuery in favor of improved native DOM APIs, or front-end UI libraries like React and Vue.js, including it purely for its $.ajax functionality makes less sense.

Let's take a look at how to get started using Axios in your code, and see some of the features that contribute to its popularity among JavaScript developers.

Axios vs Fetch

As you’re probably aware, modern browsers ship with the newer Fetch API built in, so why not just use that? There are several differences between the two that many feel gives Axios the edge.

One such difference is in how the two libraries treat HTTP error codes. When using Fetch, if the server returns a 4xx or 5xx series error, your catch() callback won't be triggered and it is down to the developer to check the response status code to determine if the request was successful. Axios, on the other hand, will reject the request promise if one of these status codes is returned.

Another small difference, which often trips up developers new to the API, is that Fetch doesn’t automatically send cookies back to the server when making a request. It's necessary to explicitly pass an option for them to be included. Axios has your back here.

One difference that may end up being a show-stopper for some is progress updates on uploads/downloads. As Axios is built on top of the older XHR API, you’re able to register callback functions for onUploadProgress and onDownloadProgress to display the percentage complete in your app's UI. Currently, Fetch has no support for doing this.

Lastly, Axios can be used in both the browser and Node.js. This facilitates sharing JavaScript code between the browser and the back end or doing server-side rendering of your front-end apps.

Note: there are versions of the Fetch API available for Node but, in my opinion, the other features Axios provides give it the edge.

Installing

As you might expect, the most common way to install Axios is via the npm package manager:

npm i axios

and include it in your code where needed:

// ES2015 style import
import axios from 'axios';

// Node.js style require
const axios = require('axios');

If you're not using some kind of module bundler (e.g. webpack), then you can always pull in the library from a CDN in the traditional way:

<script src="https://unpkg.com/axios/dist/axios.min.js"></script>

Browser support

Axios works in all modern web browsers, and Internet Explorer 8+.

Making Requests

Similar to jQuery's $.ajax function, you can make any kind of HTTP request by passing an options object to Axios:

axios({
  method: 'post',
  url: '/login',
  data: {
    user: 'brunos',
    lastName: 'ilovenodejs'
  }
});

Here, we're telling Axios which HTTP method we'd like to use (e.g. GET/POST/DELETE etc.) and which URL the request should be made to.

We're also providing some data to be sent along with the request in the form of a simple JavaScript object of key/value pairs. By default, Axios will serialize this as JSON and send it as the request body.

Request Options

There are a whole bunch of additional options you can pass when making a request, but here are the most common ones:

  • baseUrl: if you specify a base URL, it'll be prepended to any relative URL you use.
  • headers: an object of key/value pairs to be sent as headers.
  • params: an object of key/value pairs that will be serialized and appended to the URL as a query string.
  • responseType: if you're expecting a response in a format other than JSON, you can set this property to arraybuffer, blob, document, text, or stream.
  • auth: passing an object with username and password fields will use these credentials for HTTP Basic auth on the request.

Convenience methods

Also like jQuery, there are shortcut methods for performing different types of request.

The get, delete, head and options methods all take two arguments: a URL, and an optional config object.

axios.get('/products/5');

The post, put, and patch methods take a data object as their second argument, and an optional config object as the third:

axios.post(
  '/products',
  { name: 'Waffle Iron', price: 21.50 },
  { options }
);

The post Introducing Axios, a Popular, Promise-based HTTP Client appeared first on SitePoint.


by Nilson Jacques via SitePoint