React 16 is the first version of React built on top of React’s new core architecture, codenamed "Fiber". React 16 is designed from the ground up to support asynchronous rendering, which allows processing large component trees without blocking the main execution thread. It supports a number of key features such as catching exceptions using error boundaries, returning multiple components from render, reduced file size and support for MIT license.
If you’re developing a data-driven web application with React 16, chances are you’ll use a grid or spreadsheet-like interface at some point to display data for your users. Depending on the context, your users may expect the grid in your application to be capable of:
- Scrolling with a fixed header
- Sorting by clicking on a column header
- Showing and hiding specific columns
- Paging, grouping, and summarization
- Editing data in cells
- Exporting to Excel
- Drilling down/row expansion
A grid can be one of the trickiest and most complex UI components to build in React because many of the necessary features require both significant React expertise, as well as the willingness and ability to dig down into the DOM. Fortunately, the ExtReact Grid provides all of these capabilities and more.
In this article, we’re going to create an example using the Sencha ExtReact Grid that shows information about Stocks and equities companies. If you want to code a grid using an HTML table or another third-party component, you might have to do something like handle clicking on a column header to sort, or clicking on a divider between a column header to resize, or maybe sliding a pager and doing a fetch for the next page of data. With ExtReact Grid, these functionalities are built in. Want to try it yourself? Get started with a 30-day free trial of ExtReact today — sign up here.
Let’s get started with building an application using ExtReact Grid.
Getting Started with ExtReact App Generation
To get started on developing a React application with ExtReact components, please follow the steps below:
Make sure you have a Node environment set up
First, make sure you have Node 8.11+ and NPM 6+ set up on your system. You can download the latest Node version from the Node web site. If you’ve already installed Node, you can easily check the node and npm versions by using these commands:
node -v
npm -v
Get your login credentials for the ExtReact npm repo
ExtReact npm packages are hosted on Sencha’s private npm repo. You log in to that repo once to get access to all ExtReact packages. To get login credentials, go to the ExtReact 30-Day Free Trial page and fill out the form. We’ll send you an email with login details as well as some links to resources such as the docs and sample projects.
Login to ExtReact npm repo and get ExtReact app generator
The next step is to log in to Sencha’s private npm repo, which hosts the ExtReact packages. Use your npm login (provided in the email) to associate the repo with the @sencha scope, and enter the credentials when prompted:
npm login — registry=http://npm.sencha.com — scope=@sencha
The next step is to install ExtReact generator package.
npm install -g @sencha/ext-react-gen
Create your first React App
Run the Yeoman generator to create your first ExtReact app:
ext-react-gen app your-app-name-here -i
The generator will ask you to name your app, name the npm package, and select a theme. The default Material theme (based on Google’s Material design guidelines) is a good choice as a starting theme. Select "Generate an Empty App". The generator will also prompt you to create a new directory for your project. The generator will then download and create your sample application, including relevant dependencies.
Run your React App
In the generator output, you will find steps to run your application. It’s as simple as changing to your new application directory and running the application using:
npm start
This will fire up the app, your empty React app will just show up with the title of the app. The main component (e.g. StocksGrid) in the application has one container at the root, which is marked as full screen, layout is set to fit, which means it will stretch its child to fill it.
See the code up to this step on GitHub.
Adding a Grid to the application
Add Stocks Data
We’ll be adding an example data set, called stocks.json to the application. It’s a fairly large data set, around 10,000 rows in json, and each row represents a company or ticker symbol — so we have the name of the company, ticker symbol, sector, industries they are in, and an array of ticks which are the last 5 sales of that stock. This is the data we’re going to display in our grid. In a real-world application, all of this data would be returned on the back-end. We’re going to load it statically for this sample application rather than go through all of the mechanics of how to build a back-end rest API. But it’s going to be loaded in the exact same way you would fetch from a real back-end.
Creating a Basic Grid
In the StockGrid component render method, we’re going to return a grid with columns.
To put columns in our grid, we use a column component, and it takes a data index that is the same as the name field of the stocks data. It takes a text prop that is the column header text, and then we can also give the column a width, like a fixed width or a flex or a combination of flex and minimum or maximum as well. We’ll add column components for company name, symbol, ticks, sector, and industry. Create a new StocksGrid class with Grid as shown below:
<Grid >
      <Column dataIndex="name" text="Name" width={300} />
      <Column dataIndex="symbol" text="Symbol" />
      <Column dataIndex="ticks" text="Trend" />
      <Column dataIndex="sector" text="Sector" width={200} />
      <Column dataIndex="industry" text="Industry" width={350} />
</Grid>
Now, add StockGrid to Class App as shown below:
export default class App extends Component {
  render() {
       return (
           <ExtReact>
               <StocksGrid />
           </ExtReact>
       )
   }
}
See the code up to this step on GitHub.You will be able to see the web application with empty Grid on npm start.
Binding Stock Data with Grid
A grid in ExtReact is a data table that pulls in and renders data from an Ext Data Store. In ExtReact, our store implementation is a data structure that allows you to sort and filter data for a grid or components (like lists or charts).
We can now start by loading the stocks data and creating a store. Again, grids always grab their data from the store, and some of the interactions with grid will trigger events on the store, like reloading or sorting or paging. So to do that, we’ll create our store here.
The Ext data store is different from the flux store. What makes the grid and the store a little different from the standard React approach is that the two are tightly integrated. Typically, you can pass data directly to a store, or a store can pull data on its own from a back-end using a proxy. With ExtReact Grid, you get interactive functionality like filtering, sorting, paging, grouping, and summarization without having to actually code it.
For this example, we’re passing the data directly to the store from the Stocks data file. You can also create a store with a proxy config — having a proxy allows us to do all sorts of great things like remote paging, filtering, and sorting. We set autoload to true, so it automatically loads the grid. The data isn’t particularly sorted by any criteria, so we’re going to have it sort on the client-side by specifying the name property.
     this.store = new Ext.data.Store({
           data: stocks,
           autoLoad: true,
           sorters: [{
               property: 'name'
           }],
           listeners: {
               update: this.onRecordUpdated
           }
       })
In the Grid, assign the store config to the store that was created.
<Grid store={this.store}>
      ...
</Grid>
Now, we have a grid with all the data as shown below:
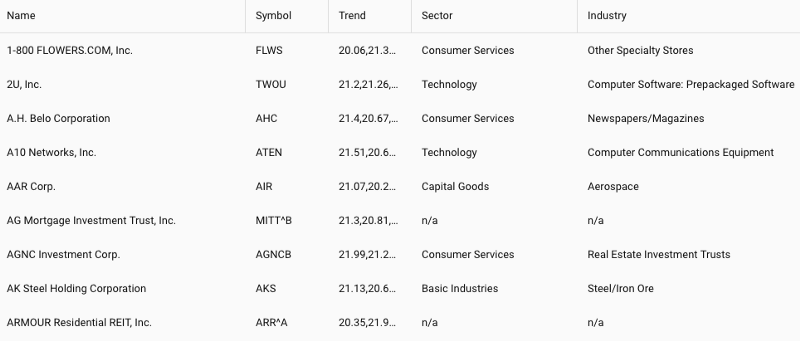
With this simple code, you get a lot of features for free — such as sorting — which allows you to click on any column header and it automatically sorts (see the symbol column in the example below).
In this case, the sorting is done on the client side. But if we implemented a real back-end API, we could configure the proxy to do remote sorting on the back-end and use an "order by clause" in the database to do a sort.
You also get resizable columns for free. So even though we set a width on these columns, if the user wants to see something or close something, he can do that by dragging the column from side to side.
You also get a nice grouping feature too. So if we wanted to group by industry, we could say group by this field, and it will group all of the data by the value of industry, and it will give you a pinned header as you scroll down for each of the groupings.
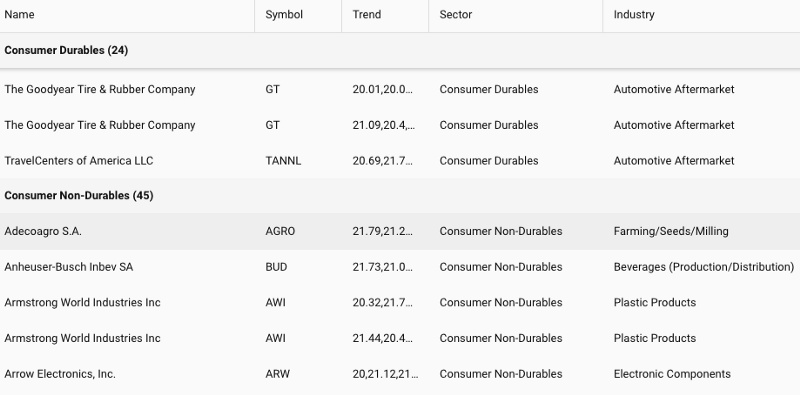
You’ll notice that this data is rendering pretty quickly for 10,000 records. The reason it renders so quickly is because it’s using what we call buffered rendering. So despite the fact that this table looks full, and you can scroll down and it keeps going and going, on initial loading it only renders a little bit more than what you’re actually seeing in terms of the "view port height."
The post How to Build React 16 Web Apps with the Sencha Grid appeared first on SitePoint.
by Sandeep Adwankar via SitePoint