When building a new Vue app, the best way to get up and running quickly is to use Vue CLI. This is a command-line utility that allows you to choose from a range of build tools, which it will then install and configure for you. It will also scaffold out your project, providing you with a pre-configured starting point that you can build on, rather than starting everything from scratch.
The most recent version of Vue CLI is version 3. It provides a new experience for Vue developers and helps them start developing Vue apps without dealing with the complex configuration of tools like webpack. At the same time, it can be configured and extended with plugins for advanced use cases.
Vue CLI v3 is a complete system for rapid Vue.js development and prototyping. It’s composed of different components, such as the CLI service, CLI plugins and recently a web UI that allows developers to perform tasks via an easy-to-use interface.
Throughout this article, I’ll introduce the latest version of Vue CLI and its new features. I’ll demonstrate how to install the latest version of Vue CLI and how to create, serve and build an example project.
Vue CLI v3 Installation and Requirements
In this section, we’ll look at the requirements needed for Vue CLI v3 and how to install it.
Requirements
Let’s start with the requirements. Vue CLI v3 requires Node.js 8.9+, but v8.11.0+ is recommended.
You can install the latest version of Node.js in various ways:
- By downloading the binaries for your system from the official website.
- By using the official package manager for your system.
- Using a version manager. This is probably the easiest way, as it allows you to manage multiple versions of Node on the same machine. If you’d like to find out more about this approach, please see our quick tip Installing Multiple Versions of Node.js Using nvm.
Vue creator, Evan You, described version 3 of the CLI as a “completely different beast” from its predecessor. As such, it’s important to uninstall any previous version of the CLI (that is, 2.x.x) before preceding with this tutorial.
If the vue-cli package is installed globally on your system, you can remove it by running the following command:
npm uninstall vue-cli -g
Installing Vue CLI v3
You can now install Vue CLI v3 by simply running the following command from your terminal:
npm install -g @vue/cli
Note: if you find yourself needing to add sudo before your command in macOS or Debian-based systems, or to use an administrator CMD prompt in Windows in order to install packages globally, then you should fix your permissions. The npm site has a guide on how to do this, or just use a version manager and you avoid the problem completely.
After successfully installing the CLI, you’ll be able to access the vue executable in your terminal.
For example, you can list all the available commands by executing the vue command:
vue
You can check the version you have installed by running:
vue --version
$ 3.2.1
Creating a Vue Project
After installing Vue CLI, let’s now look at how we can use it to quickly scaffold complete Vue projects with a modern front-end toolset.
Using Vue CLI, you can create or generate a new Vue app by running the following command in your terminal:
vue create example-vue-project
Tip: example-vue-project is the name of the project. You can obviously choose any valid name for your project.
The CLI will prompt you for the preset you want to use for your project. One option is to select the default preset which installs two plugins: Babel for transpiling modern JavaScript, and ESLint for ensuring code quality. Or you can manually select the features needed for your project from a set of official plugins. These include:
- Babel
- TypeScript
- Progressive Web App support
- Vue Router
- Vuex (Vue’s official state management library)
- CSS Pre-processors (PostCSS, CSS modules, Sass, Less & Stylus)
- Linter/ Formatter using ESLint and Prettier
- Unit Testing using Mocha or Jest
- E2E Testing using Cypress or Nightwatch
Whatever you choose, the CLI will download the appropriate libraries and configure the project to use them. And if you choose to manually select features, at the end of the prompts you’ll also have the option to save your selections as a preset so that you can reuse it in future projects.
Now let’s look at the other scripts for serving the project (using a webpack development server and hot module reloading) and building the project for production.
Navigate inside your project’s folder:
cd example-vue-project
Next, run the following command to serve your project locally:
npm run serve
The command will allow you to run a local development server from the http://localhost:8080 address. If you use your web browser to navigate to this address, you should see the following page:
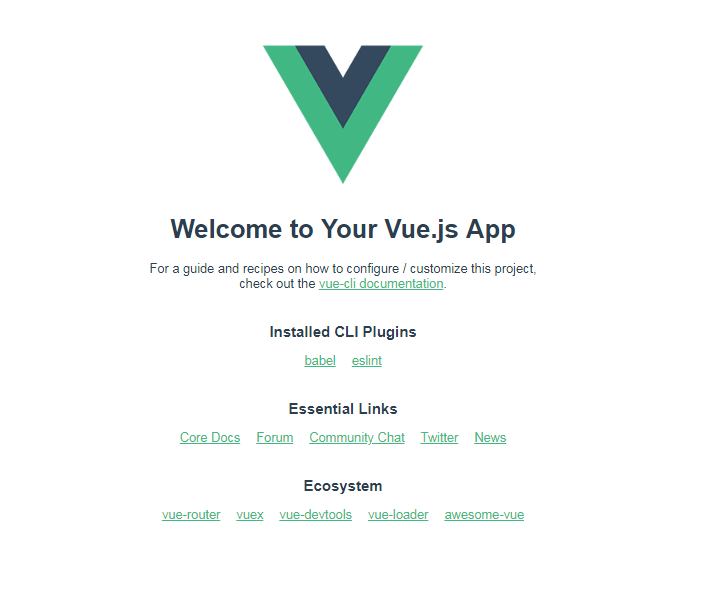
The development server supports features like hot code reloading, which means you don’t need to stop and start your server every time you make any changes to your project’s source code. It will even preserve the state of your app!
And when you’ve finished developing your project, you can use the following command to build a production bundle:
npm run build
This will output everything to a dist folder within your project. You can read more about deployment here.
What is the Vue CLI Service?
The Vue CLI Service is a run-time dependency (@vue/cli-service) that abstracts webpack and provides default configurations. It can be upgraded, configured and extended with plugins.
It provides multiple scripts for working with Vue projects, such as the serve, build and inspect scripts.
We’ve seen the serve and build scripts in action already. The inspect script allows you to inspect the webpack config in a project with vue-cli-service. Try it out:
vue inspect
As you can see, that produces a lot of output. Later on we’ll see how to tweak the webpack config in a Vue CLI project.
The Project Anatomy
A Vue project generated with the CLI has a predefined structure that adheres to best practices. If you choose to install any extra plugins (such as the Vue router), the CLI will also create the files necessary to use and configure these libraries.
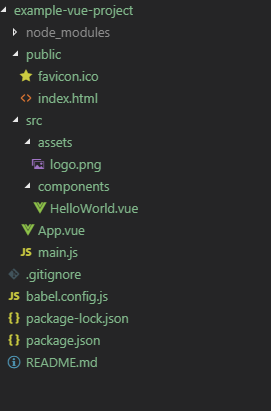
Let’s take a look at the important files and folders in a Vue project when using the default preset.
public. This folder contains public files likeindex.htmlandfavicon.ico. Any static assets placed here will simply be copied and not go through webpack.src. This folder contains the source files for your project. Most work will be done here.src/assets. This folder contains the project’s assets such aslogo.png.src/components. This folder contains the Vue components.src/App.vue. This is the main Vue component of the project.src/main.js. This is the main project file which bootstraps the Vue application.babel.config.js. This is a configuration file for Babel.package.json. This file contains a list of the project’s dependencies, as well as the configuration options for ESLint, PostCSS and supported browsers.node_modules. This folder contains the installed npm packages.
This is a screenshot of the project’s anatomy:
Vue CLI Plugins
Vue CLI v3 is designed with a plugin architecture in mind. In this section, we’ll look at what plugins are and how to install them in your projects. We’ll also look at some popular plugins that can help add advanced features by automatically installing the required libraries and making various settings—all of which would otherwise have to be done manually.
What a Vue Plugin Is
CLI Plugins are just npm packages that provide additional features to your Vue project. The vue-cli-service binary automatically resolves and loads all plugins listed in the package.json file.
The base configuration for a Vue CLI 3 project is webpack and Babel. All the other features can be added via plugins.
There are official plugins provided by the Vue team and community plugins developed by the community. Official plugin names start with @vue/cli-plugin-, and community plugin names start with vue-cli-plugin-.
Official Vue CLI 3 plugins include:
- Typescript
- PWA
- Vuex
- Vue Router
- ESLint
- Unit testing etc.
How to Add a Vue Plugin
Plugins are either automatically installed when creating the project or explicitly installed later by the developer.
You can install many built-in plugins in a project when initializing your project, and install any other additional plugins in the project using the vue add my-plugin command at any point of your project.
You can also install plugins with presets, and group your favorite plugins as reusable presets that you can use later as the base for other projects.
Some Useful Vue Plugins
There are many Vue CLI plugins that you might find useful for your next projects. For example, the Vuetify UI library is available as a plugin, as is Storybook. You can also use the Electron Builder plugin to quickly scaffold out a Vue project based on Electron.
I’ve also written a couple of plugins which you can make use of:
- vue-cli-plugin-nuxt: a Vue CLI plugin for quickly creating a universal Vue application with Nuxt.js
- vue-cli-plugin-bootstrap: a Vue CLI plugin for adding Bootstrap 4 to your project
If you’d like to find out more about plugins, check out this great article on Vue Mastery: 5 Vue CLI 3 plugins for your Vue project.
The post A Beginner’s Guide to Vue CLI appeared first on SitePoint.
by Ahmed Bouchefra via SitePoint

