[ This is a content summary only. Visit our website https://ift.tt/1b4YgHQ for full links, other content, and more! ]


by agha ali via Digital Information World



As great as Node.js is for “traditional” web applications, its potential uses are far broader. Microservices, REST APIs, tooling, working with the Internet of Things and even desktop applications: it’s got your back.
Another area where Node.js is really useful is for building command-line applications — and that’s what we’re going to be doing in this article. We’re going to start by looking at a number of third-party packages designed to help work with the command line, then build a real-world example from scratch.
What we’re going to build is a tool for initializing a Git repository. Sure, it’ll run git init under the hood, but it’ll do more than just that. It will also create a remote repository on GitHub right from the command line, allow the user to interactively create a .gitignore file, and finally perform an initial commit and push.
As ever, the code accompanying this tutorial can be found on our GitHub repo.
Before we dive in and start building, it’s worth looking at why we might choose Node.js to build a command-line application.
The most obvious advantage is that, if you’re reading this, you’re probably already familiar with it — and, indeed, with JavaScript.
Another key advantage, as we’ll see as we go along, is that the strong Node.js ecosystem means that among the hundreds of thousands of packages available for all manner of purposes, there are a number which are specifically designed to help build powerful command-line tools.
Finally, we can use npm to manage any dependencies, rather than have to worry about OS-specific package managers such as Aptitude, Yum or Homebrew.
Tip: that isn’t necessarily true, in that your command-line tool may have other external dependencies.
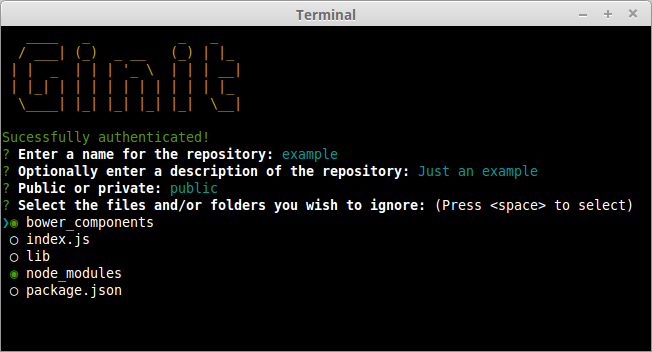
For this tutorial, We’re going to create a command-line utility which I’m calling ginit. It’s git init, but on steroids.
You’re probably wondering what on earth that means.
As you no doubt already know, git init initializes a git repository in the current folder. However, that’s usually only one of a number of repetitive steps involved in the process of hooking up a new or existing project to Git. For example, as part of a typical workflow, you may well:
git init.gitignore fileThere are often more steps involved, but we’ll stick to those for the purposes of our app. Nevertheless, these steps are pretty repetitive. Wouldn’t it be better if we could do all this from the command line, with no copy-pasting of Git URLs and such like?
So what ginit will do is create a Git repository in the current folder, create a remote repository — we’ll be using GitHub for this — and then add it as a remote. Then it will provide a simple interactive “wizard” for creating a .gitignore file, add the contents of the folder and push it up to the remote repository. It might not save you hours, but it’ll remove some of the initial friction when starting a new project.
With that in mind, let’s get started.
One thing is for certain: in terms of appearance, the console will never have the sophistication of a graphical user interface. Nevertheless, that doesn’t mean it has to be plain, ugly, monochrome text. You might be surprised by just how much you can do visually, while at the same time keeping it functional. We’ll be looking at a couple of libraries for enhancing the display: chalk for colorizing the output and clui to add some additional visual components. Just for fun, we’ll use figlet to create a fancy ASCII-based banner and we’ll also use clear to clear the console.
In terms of input and output, the low-level Readline Node.js module could be used to prompt the user and request input, and in simple cases is more than adequate. But we’re going to take advantage of a third-party package which adds a greater degree of sophistication — Inquirer. As well as providing a mechanism for asking questions, it also implements simple input controls: think radio buttons and checkboxes, but in the console.
We’ll also be using minimist to parse command-line arguments.
Here’s a complete list of the packages we’ll use specifically for developing on the command line:
Additionally, we’ll also be using the following:
Although we’re going to create the application from scratch, don’t forget that you can also grab a copy of the code from the repository which accompanies this article.
Create a new directory for the project. You don’t have to call it ginit, of course:
mkdir ginit
cd ginit
Create a new package.json file:
npm init
Follow the simple wizard, for example:
name: (ginit)
version: (1.0.0)
description: "git init" on steroids
entry point: (index.js)
test command:
git repository:
keywords: Git CLI
author: [YOUR NAME]
license: (ISC)
Now install the dependencies:
npm install chalk clear clui figlet inquirer minimist configstore @octokit/rest lodash simple-git touch --save
Alternatively, simply copy-paste the following package.json file — modifying the author appropriately — or grab it from the repository which accompanies this article:
{
  "name": "ginit",
  "version": "1.0.0",
  "description": "\"git init\" on steroids",
  "main": "index.js",
  "scripts": {
    "test": "echo \"Error: no test specified\" && exit 1"
  },
  "keywords": [
    "Git",
    "CLI"
  ],
  "author": "Lukas White <hello@lukaswhite.com>",
  "license": "ISC",
  "bin": {
    "ginit": "./index.js"
  },
  "dependencies": {
    "@octokit/rest": "^14.0.5",
    "chalk": "^2.3.0",
    "clear": "0.0.1",
    "clui": "^0.3.6",
    "configstore": "^3.1.1",
    "figlet": "^1.2.0",
    "inquirer": "^5.0.1",
    "lodash": "^4.17.4",
    "minimist": "^1.2.0",
    "simple-git": "^1.89.0",
    "touch": "^3.1.0"
  }
}
Now create an index.js file in the same folder and require the following dependencies:
const chalk       = require('chalk');
const clear       = require('clear');
const figlet      = require('figlet');
We’re going to create a lib folder where we’ll split our helper code into modules:
Let’s start with lib/files.js. Here, we need to:
.git).This sounds straightforward, but there are a couple of gotchas to take into consideration.
Firstly, you might be tempted to use the fs module’s realpathSync method to get the current directory:
path.basename(path.dirname(fs.realpathSync(__filename)));
This will work when we’re calling the application from the same directory (e.g. using node index.js), but bear in mind that we’re going to be making our console application available globally. This means we’ll want the name of the directory we’re working in, not the directory where the application resides. For this purpose, it’s better to use process.cwd:
path.basename(process.cwd());
Secondly, the preferred method of checking whether a file or directory exists keeps changing.The current way is to use fs.stat or fs.statSync. These throw an error if there’s no file, so we need to use a try … catch block.
Finally, it’s worth noting that when you’re writing a command-line application, using the synchronous version of these sorts of methods is just fine.
Putting that all together, let’s create a utility package in lib/files.js:
const fs = require('fs');
const path = require('path');

module.exports = {
  getCurrentDirectoryBase : () => {
    return path.basename(process.cwd());
  },

  directoryExists : (filePath) => {
    try {
      return fs.statSync(filePath).isDirectory();
    } catch (err) {
      return false;
    }
  }
};
Go back to index.js and ensure you require the new file:
const files = require('./lib/files');
With this in place, we can start developing the application.
Now let’s implement the start-up phase of our console application.
In order to demonstrate some of the packages we’ve installed to enhance the console output, let’s clear the screen and then display a banner:
clear();
console.log(
  chalk.yellow(
    figlet.textSync('Ginit', { horizontalLayout: 'full' })
  )
);
The output from this is shown below.
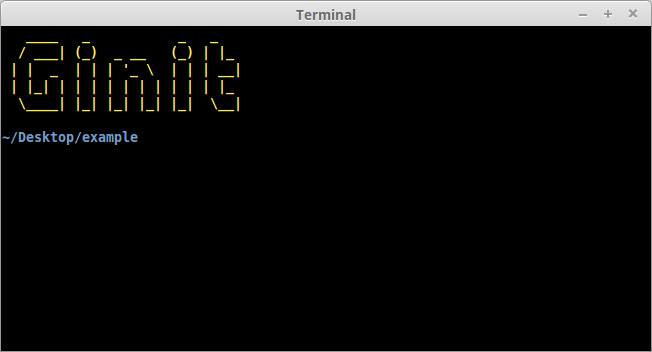
Next up, let’s run a simple check to ensure that the current folder isn’t already a Git repository. That’s easy: we just check for the existence of a .git folder using the utility method we just created:
if (files.directoryExists('.git')) {
  console.log(chalk.red('Already a git repository!'));
  process.exit();
}
Tip: notice we’re using the chalk module to show a red-colored message.
The post Build a JavaScript Command Line Interface (CLI) with Node.js appeared first on SitePoint.

This sponsored article was created by our content partner, BAW Media. Thank you for supporting the partners who make SitePoint possible.
Doing a great job of showcasing your work doesn’t have to be difficult. You don’t have to print out a batch of fancy brochures to distribute or carry around a folder containing a sheaf of papers. You’ll get far better results by using a website builder to create your own personal online portfolio for the whole world to see.
Building a portfolio website is relatively easy if you have the right tool for the job. If you can envision an awesome, engaging portfolio, you can build it. Especially with any of the six portfolio website tools described in this article. Since all six are top-of-the-line tools, there’s no reason to settle for anything else.
Best of all, these website building tools are either free or offer free trials.

Portfoliobox was designed with photographers, artists, web designers, and other creative types in mind. Small business owners and entrepreneurs will find it attractive as well. This portfolio website builder is super easy to use, and since it’s not theme-based, it’s extremely flexible as well. Another plus is you don’t have to worry about coding.
As its name implies, this is a perfect tool for creating portfolio websites that range in style and looks from the epitome of professionalism to flat-out awesome. You can display your work or your products to the world, and by doing so you’ll hopefully earn a bushel of dollars, euros, or whatever, as well.
We suggest you try the free plan. In that way, you can get acquainted with Portfoliobox while having the tools at hand to create a medium-sized portfolio. If you have large galleries of images in mind, you may eventually want to upgrade to the pro plan. If you’re a student, opening a student account may be your best move.
Portfoliobox 4 is currently in the works and coming soon. Features include increased flexibility and functionality and a more intuitive interface. Portfoliobox has more than one million users.

Wix is a versatile and powerful website building tool you can use with great effect to promote your business or build an online shop. Where Wix really shines, however, is in the role of a portfolio website builder. Everything is drag and drop, supported by the necessary tools and features to customize any of the 500+ designer-made templates you choose to work with.
If you can visualize an online portfolio that’s truly stunning and a cut above the rest, you can build it — without coding. Rather than being restricted to trying to cleverly present a series of static images, you can use scroll effects, animations, video backgrounds and more to bring your portfolio to life and keep viewers engaged and encouraged to spread the word.
If you want total freedom to create your crowd-pleasing portfolio website, Wix is for you.

We said up front that you shouldn’t have to settle for less than the best, and that certainly applies to the Weebly portfolio website builder. What you design and build is limited only by your imagination, and if your technical expertise is somewhat challenged and you lack coding experience it doesn’t matter one bit. Everything you need is at your fingertips.
If “free” appeals to you, that’s just one more reason to go with Weebly. The website builder is free, hosting is free, and there’s even a mobile app you can use to manage your portfolio website and track its performance — from anywhere.
You can either purchase a domain from Weebly or use your own. If you need professional photos for your portfolio, Weebly can provide them at an affordable price.

Since Mobirise is an offline website builder, you can download it and get started building an awesome portfolio website right away. No coding is necessary. Google AMP and Bootstrap 4 guarantees your website will be lightning-fast and 100% mobile friendly.
You’ll have plenty of trendy themes and templates to work with. Best of all, Mobirise is free for both personal and commercial uses — making it a very attractive option.
The post 6 Popular Portfolio Builders for Designers appeared first on SitePoint.


