Monday, October 21, 2019

How to Install Docker on Windows 10 Home

How to Install Docker on Windows 10 Home

If you've ever tried to install Docker for Windows, you've probably came to realize that the installer won't run on Windows 10 Home. Only Windows Pro, Enterprise or Education support Docker. Upgrading your Windows license is pricey, and also pointless, since you can still run Linux Containers on Windows without relying on Hyper-V technology, a requirement for Docker for Windows.

If you plan on running Windows Containers, you'll need a specific version and build of Windows Server. Check out the Windows container version compatibility matrix for details.

99.999% of the time, you only need a Linux Container, since it supports software built using open-source and .NET technologies. In addition, Linux Containers can run on any distro and on popular CPU architectures, including x86_64, ARM and IBM.

In this tutorial, I'll show you how to quickly setup a Linux VM on Windows Home running Docker Engine with the help of Docker Machine. Here's a list of software you'll need to build and run Docker containers:

  • Docker Machine: a CLI tool for installing Docker Engine on virtual hosts
  • Docker Engine: runs on top of the Linux Kernel; used for building and running containers
  • Docker Client: a CLI tool for issuing commands to Docker Engine via REST API
  • Docker Compose: a tool for defining and running multi-container applications

I'll show how to perform the installation in the following environments:

  1. On Windows using Git Bash
  2. On Windows Subsystem for Linux 2 (running Ubuntu 18.04)

First, allow me to explain how the Docker installation will work on Windows.

How it Works

As you probably know, Docker requires a Linux kernel to run Linux Containers. For this to work on Windows, you'll need to set up a Linux virtual machine to run as guest in Windows 10 Home.
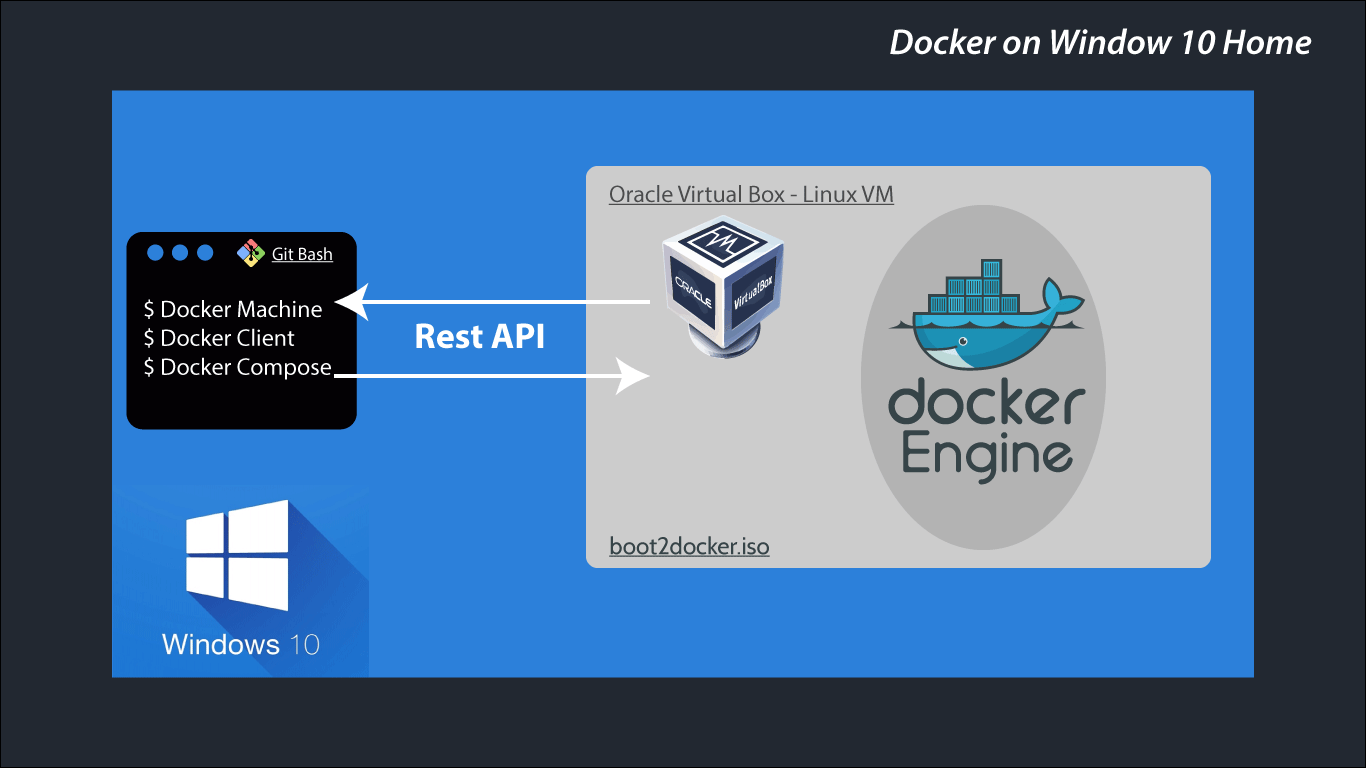
docker windows home

Setting up the Linux VM can be done manually. The easiest way is to use Docker Machine to do this work for you by running a single command. This Docker Linux VM can either run on your local system or on a remote server. Docker client will use SSH to communicate with Docker Engine. Whenever you create and run images, the actual process will happen within the VM, not on your host (Windows).

Let's dive into the next section to set up the environment needed to install Docker.

Initial Setup

You may or may not have the following applications installed on your system. I'll assume you don't. If you do, make sure to upgrade to the latest versions. I'm also assuming you're running the latest stable version of Windows. At the time of writing, I'm using Windows 10 Home version 1903. Let's start installing the following:

  1. Install Git Bash for Windows. This will be our primary terminal for running Docker commands.

  2. Install Chocolatey, a package manager for Windows. It will make the work of installing the rest of the programs easier.

  3. Install VirtualBox and its extension. Alternatively, If you have finished installing Chocolatey, you can simply execute this command inside an elevated PowerShell terminal:

    C:\ choco install virtualbox
    
  4. If you'd like to try running Docker inside the WSL2 environment, you'll need to set up WSL2 first. You can follow this tutorial for step-by-step instructions.

Docker Engine Setup

Installing Docker Engine is quite simple. First we need to install Docker Machine.

  1. Install Docker Machine by following instructions on this page. Alternatively, you can execute this command inside an elevated PowerShell terminal:

    C:\ choco install docker-machine
    
  2. Using Git Bash terminal, use Docker Machine to install Docker Engine. This will download a Linux image containing the Docker Engine and have it run as a VM using VirtualBox. Simply execute the following command:

    $ docker-machine create --driver virtualbox default
    
  3. Next, we need to configure which ports are exposed when running Docker containers. Doing this will allow us to access our applications via localhost<:port>. Feel free to add as many as you want. To do this, you'll need to launch Oracle VM VirtualBox from your start menu. Select default VM on the side menu. Next click on Settings > Network > Adapter 1 > Port Forwarding. You should find the ssh forwarding port already set up for you. You can add more like so:
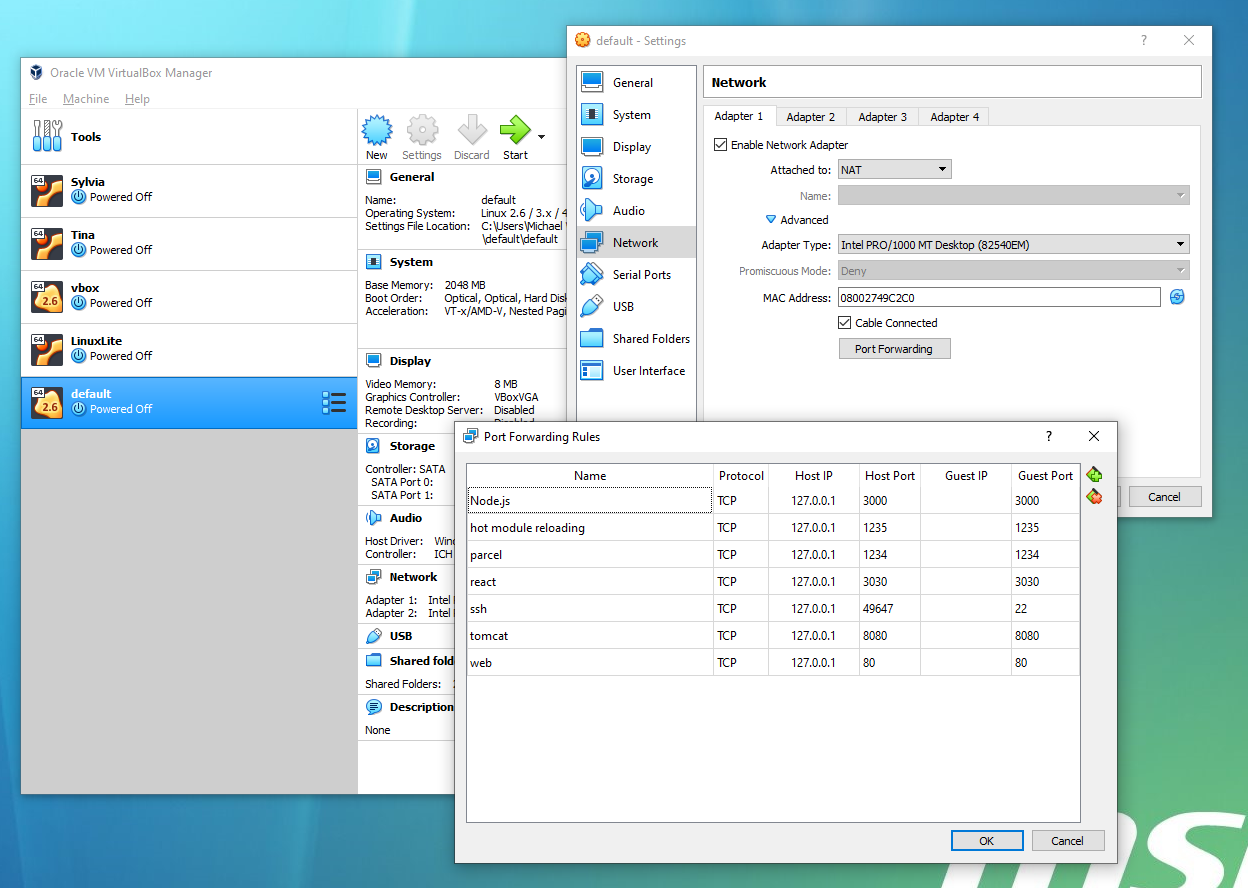
    docker vm ports

  4. Next, we need to allow Docker to mount volumes located on your hard drive. By default, you can only mount from the C://Users/ directory. To add a different path, simply go to Oracle VM VirtualBox GUI. Select default VM and go to Settings > Shared Folders. Add a new one by clicking the plus symbol. Enter the fields like so. If there's an option called Permanent, enable it.
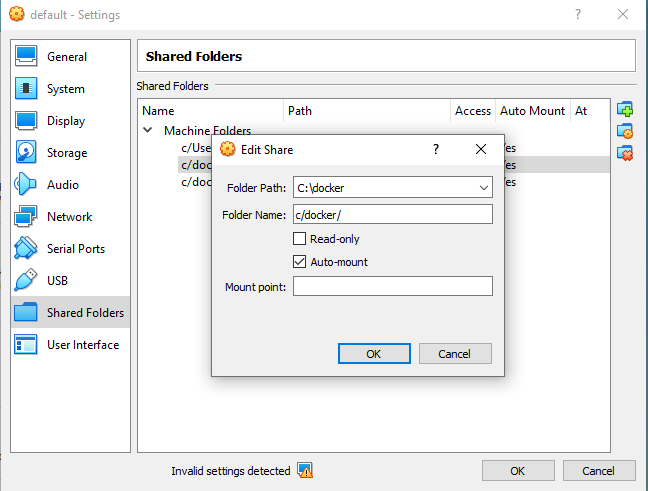
    docker vm volumes

  5. To get rid of the invalid settings error as seen in the above screenshot, simply increase Video Memory under the Display tab in the settings option. Video memory is not important in this case, as we'll run the VM in headless mode.

  6. To start the Linux VM, simply execute this command in Git Bash. The Linux VM will launch. Give it some time for the boot process to complete. It shouldn't take more than a minute. You'll need to do this every time you boot your host OS:

    $ docker-machine start vbox
    
  7. Next, we need to set up our Docker environment variables. This is to allow the Docker client and Docker Compose to communicate with the Docker Engine running in the Linux VM, default. You can do this by executing the commands in Git Bash:

    # Print out docker machine instance settings
    $ docker-machine env default
    
    # Set environment variables using Linux 'export' command
    $ eval $(docker-machine env default --shell linux)
    

    You'll need to set the environment variables every time you start a new Git Bash terminal. If you'd like to avoid this, you can copy eval output and save it in your .bashrc file. It should look something like this:

    export DOCKER_TLS_VERIFY="1"
    export DOCKER_HOST="tcp://192.168.99.101:2376"
    export DOCKER_CERT_PATH="C:\Users\Michael Wanyoike\.docker\machine\machines\default"
    export DOCKER_MACHINE_NAME="default"
    export COMPOSE_CONVERT_WINDOWS_PATHS="true"
    

    IMPORTANT: for the DOCKER_CERT_PATH, you'll need to change the Linux file path to a Windows path format. Also take note that there's a chance the IP address assigned might be different from the one you saved every time you start the default VM.

In the next section, we'll install Docker Client and Docker Compose.

The post How to Install Docker on Windows 10 Home appeared first on SitePoint.


by Michael Wanyoike via SitePoint

Phishing Scam Hits LinkedIn Users

There are so many scams out there on the internet that it is pretty understandable that quite a few people out there are hesitant to take a lot of the communications that they receive through online platforms all that seriously. However, at the end of the day the fact of the matter is that if you...

[ This is a content summary only. Visit our website https://ift.tt/1b4YgHQ for full links, other content, and more! ]

by Zia Muhammad via Digital Information World

Range Slider Style 48

The post Range Slider Style 48 appeared first on Best jQuery.


by Admin via Best jQuery

CSS Timeline Style 83

The post CSS Timeline Style 83 appeared first on Best jQuery.


by Admin via Best jQuery

Google Photos Now Offers Manual Document Cropping

Whenever you upload some kind of a document to Google Photos, chances are that you would have wanted to crop this document. This is because of the fact that document cropping is the sort of thing that allows you to make anyone who would view the document focus on whichever aspect of the document is...

[ This is a content summary only. Visit our website https://ift.tt/1b4YgHQ for full links, other content, and more! ]

by Zia Muhammad via Digital Information World

Google Keep Gets New Shortcut

Google Keep is a useful productivity tool that basically allows you to take notes. This can be something that you can use whenever you want to try and jot something down or attempt to make the most of the kind of creativity your mind has to offer at any given point in time by making a note of...

[ This is a content summary only. Visit our website https://ift.tt/1b4YgHQ for full links, other content, and more! ]

by Zia Muhammad via Digital Information World

Article: How to create Parallax Scrolling in your Squarespace Landing Page

Squarespace Logo

Parallax Scrolling is the visual effect caused when a layer in a webpage moves at a different speed to another – often activated by scrolling.

The effect really gives that wow factor when a user starts to scroll down your Landing Page. Resulting in a memorable first impression versus a traditionally static webpage.

In this tutorial I’m going to show you just how easy it is to integrate Parallax Scrolling in your Squarespace Landing Page and impress your website visitors.

Advertisement


One Page Love Exclusive Coupon

OPL10

Yay! Squarespace has been kind enough to give One Page Love readers the exclusive coupon OPL10 for 10% Off your first website or domain purchase. (There is a free 14-day trial with no credit card needed, so you can try risk free.)


Step One: Ensure you start with a Brine family Squarespace template

The Parallax Scrolling effect is only enabled in the Squarespace Brine family of templates. They are all brilliant templates allowing you to customize the headers, footer, content inset and mobile styles to make your website really shine.

Here is the quick list of Brine family templates: Aria, Basil, Blend, Brine, Burke, Cacao, Clay, Ethan, Fairfield, Feed, Foster, Greenwich, Hatch, Heights, Hunter, Hyde, Impact, Jaunt, Juke, Keene, Kin, Maple, Margot, Marta, Mentor, Mercer, Miller, Mojave, Moksha, Motto, Nueva, Pedro, Polaris, Pursuit, Rally, Rover, Royce, Sofia, Sonny, Sonora, Stella, Thorne, Vow, Wav, West.

The Nueva template is a great starting point for a Landing Page with Parallax Scrolling. Note how the background image moves slower than the foreground text as you scroll:

Squarespace Nueva Parallax Scrolling

Step Two: Turn on the Parallax effect

Head to Design in the main Squarespace builder menu, then Site Styles > scroll down to the Main: Overlay section and check Enable Parallax. Click Save.

Enable Parallax Scrolling on Squarespace

Step Three: Add layered elements to create the Parallax Scrolling effect

The Brine family templates will automatically start Parallax Scrolling the default placeholder content but if you are creating a new Landing Page follow these steps to recreate the effect.

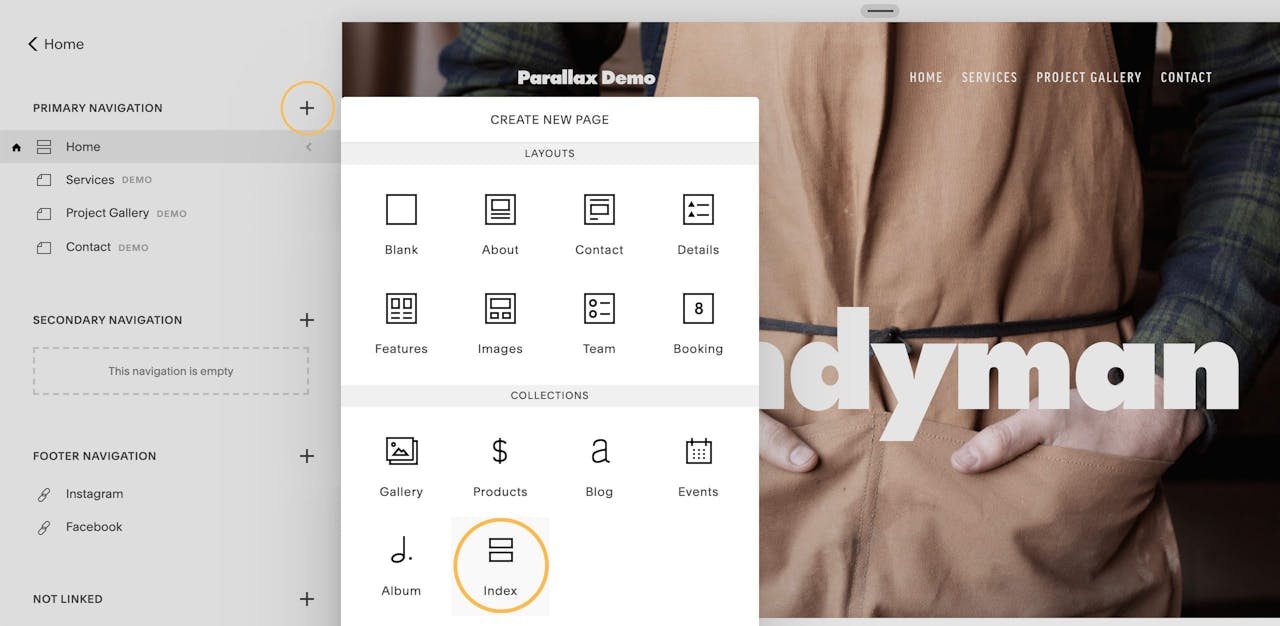
Step 1 – Start by creating a new long-scrolling Landing Page using the Index block collection option. Click the plus icon next to the Primary Navigation and select the Index block:

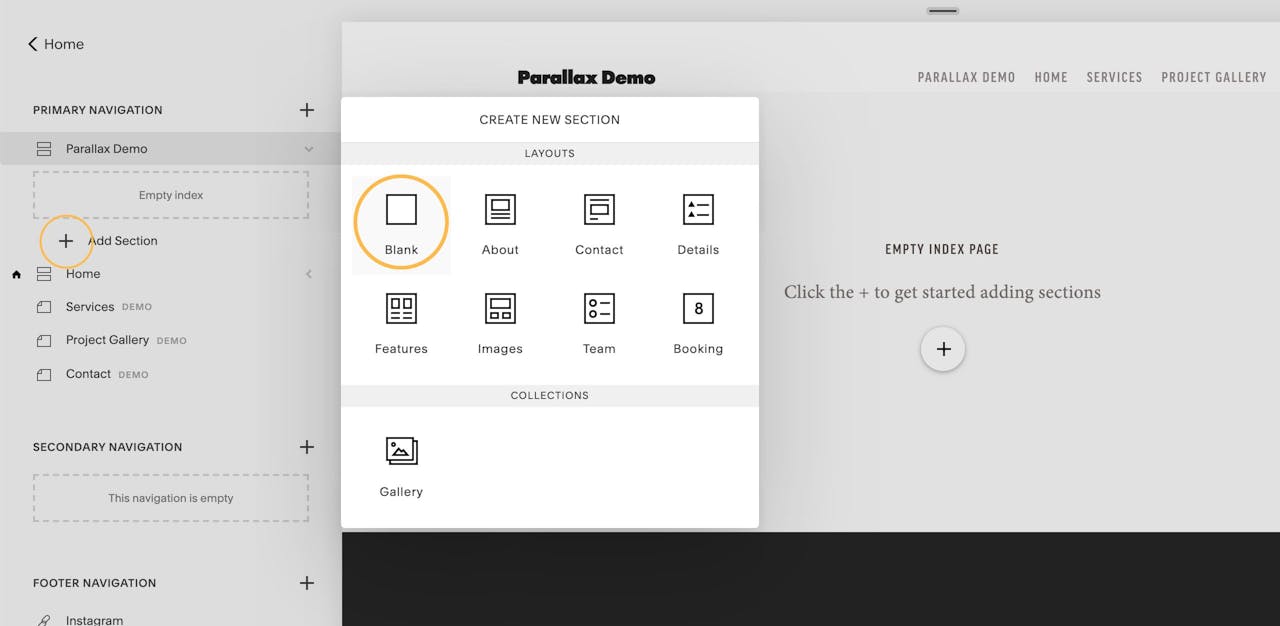
Step 2 – Add a blank section within your page by clicking the Add Section link within the new Index you just created on the left. Then select the Blank block:

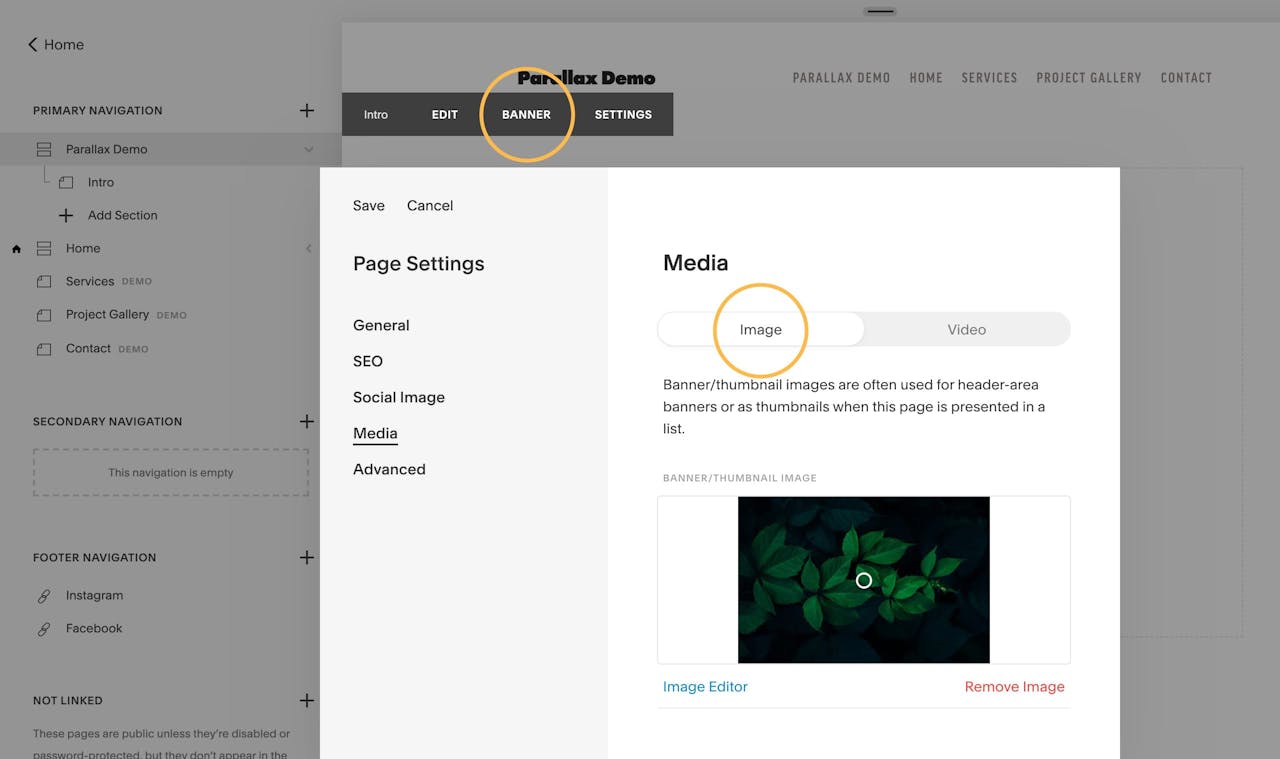
Step 3 – Add your background image layer by hovering your cursor over your new section until the section toolbar appears with 3 options: Edit, Banner, Settings. Select the Banner option then proceed to upload your background image. Click Save.

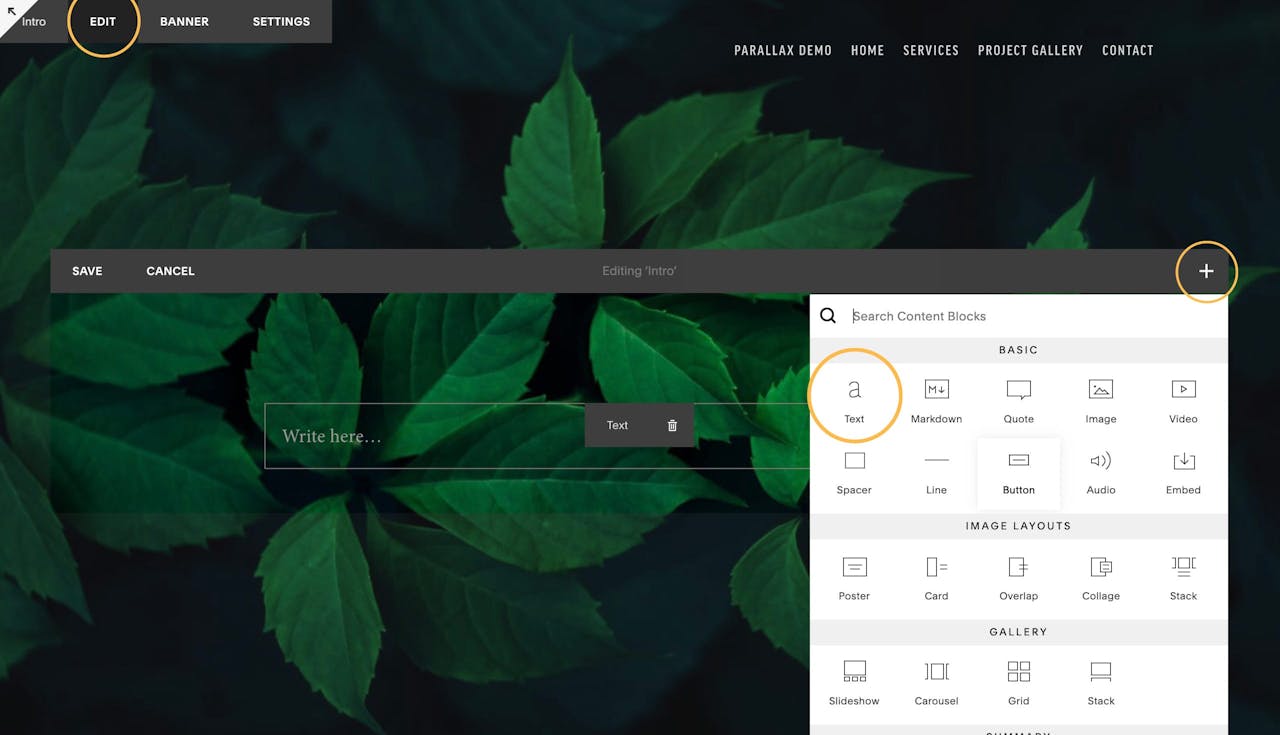
Step 4 – Add text within the new section using the content editor. Just like Step 3, hover your cursor over your new section, except select the Edit option when prompted. Now click the plus icon to the right of the content area, select the Text block:

Proceed to enter and style your text then click save. That’s it, your Landing Page now has live Parallax effects! Note how the text in the foreground moves faster than the plants in the background:

Squarespace Parallax Scrolling Effect

FAQ: What are the benefits of using Squarespace?

Squarespace is a leading online website builder. What sets them apart from the rest is their superior level of design and customer support. They have a huge support team and are available 24/7. Other main benefits are:

  • No Website Hosting Needed - their platform is fast and secure
  • Online Content Management - all edits are done within your browser, no software needed
  • Easily Drag and Drop Images - unlimited galleries with unlimited bandwidth
  • Free Domain Name - when registering for your first website, if you pay annually (renews at standard rate)
  • Beautifully Responsive - all templates work for all devices, so you only have to design your website once. Test and preview how your website will appear on a range of screen sizes.
  • Blog Sections - can easily be added to start sharing your journey
  • Commerce Solutions - are an upgrade away if you want to start selling products
  • Email Marketing - gather email addresses, send marketing emails and analyze the reader email activity

That’s a wrap! Don’t forget your 10% Off coupon: OPL10

OPL10

I hope you enjoyed this tutorial on how to create Parallax Scrolling on your Squarespace template. Props to Squarespace for creating a platform where we can create beautiful Landing Pages, easily. If you missed it I curated 5 Stylish Squarespace Templates to Promote your Clothing Brand.


by Rob Hope @robhope via One Page Love