"Mr Branding" is a blog based on RSS for everything related to website branding and website design, it collects its posts from many sites in order to facilitate the updating to the latest technology.
To suggest any source, please contact me: Taha.baba@consultant.com
In programming, modules are self-contained units of functionality that can be shared and reused across projects. They make our lives as developers easier, as we can use them to augment our applications with functionality that we haven't had to write ourselves. They also allow us to organize and decouple our code, leading to applications that are easier to understand, debug and maintain.
In this article, I'll examine how to work with modules in Node.js, focusing on how to export and consume them.
Different Module Formats
As JavaScript originally had no concept of modules, a variety of competing formats have emerged over time. Here's a list of the main ones to be aware of:
The CommonJS (CJS) format is used in Node.js and uses require and module.exports to define dependencies and modules. The npm ecosystem is built upon this format.
The ES Module (ESM) format. As of ES6 (ES2015), JavaScript supports a native module format. It uses an export keyword to export a module's public API and an import keyword to import it.
The System.register format was designed to support ES6 modules within ES5.
The Universal Module Definition (UMD) format can be used both in the browser and in Node.js. It's useful when a module needs to be imported by a number of different module loaders.
Please be aware that this article deals solely with the CommonJS format, the standard in Node.js. If you'd like to read into any of the other formats, I recommend this article, by SitePoint author Jurgen Van de Moere.
Requiring a Module
Node.js comes with a set of built-in modules that we can use in our code without having to install them. To do this, we need to require the module using the require keyword and assign the result to a variable. This can then be used to invoke any methods the module exposes.
For example, to list out the contents of a directory, you can use the file system module and its readdir method:
Note that in CommonJS, modules are loaded synchronously and processed in the order they occur.
Creating and Exporting a Module
Now let's look at how to create our own module and export it for use elsewhere in our program. Start off by creating a user.js file and adding the following:
Now create an index.js file in the same folder and add this:
const user = require('./user');
console.log(`User: ${user.getName()}`);
Run the program using node index.js and you should see the following output to the terminal:
User: Jim
So what has gone on here? Well, if you look at the user.js file, you'll notice that we're defining a getName function, then using the exports keyword to make it available for import elsewhere. Then in the index.js file, we're importing this function and executing it. Also notice that in the require statement, the module name is prefixed with ./, as it's a local file. Also note that there's no need to add the file extension.
Exporting Multiple Methods and Values
We can export multiple methods and values in the same way:
const user = require('./user');
console.log(
  `${user.getName()} lives in ${user.getLocation()} and was born on ${user.dob}.`
);
The code above produces this:
Jim lives in Munich and was born on 12.01.1982.
Notice how the name we give the exported dateOfBirth variable can be anything we fancy (dob in this case). It doesn't have to be the same as the original variable name.
Variations in Syntax
I should also mention that it's possible to export methods and values as you go, not just at the end of the file.
Facebook has recently introduced an app, named Viewpoints that lets you earn by just participating in the surveys. It is a market research app that lets you participate in researches, surveys and tasks. Viewpoints is a lot similar to the Google Opinion Rewards with the only difference that it...
[ This is a content summary only. Visit our website https://ift.tt/1b4YgHQ for full links, other content, and more! ]
E-commerce design & development for Boundary Supply. Boundary Supply creates technically innovative & sustainable products designed to last and make life a little more comfortable.
by via Awwwards - Sites of the day
In this post, we’re going to discuss the Subscriptio WooCommerce subscriptions plugin which allows you to sell subscriptions on your WordPress store. More importantly, it adds recurring payments capability which allows you to sell different types of subscriptions or memberships.
If you’re in the field of eCommerce and you’re looking for a way to sell subscription products on your store, you’re at the right place! Selling subscription products on your store is something which is going to take a whole lot of effort: from configuring subscriptions to handling automatic payments for those products. Along with the checkout of regular products, you’ll have to pay attention to subscriptions that have its own challenges.
And thus, it would be great if you could find an extension or plugin which is all-in-one and provides all the necessary features that we’ve just discussed. When it comes to setting up subscriptions in WordPress, there are thousands of extensions and scripts available online. Alongside, you’ll also find commercial options that provide ready-to-use features and extended support. In the case of commercial options, you should also expect quality code, bug fixes, and new enhancements.
Today, we’re going to explore the Subscriptio—WooCommerce Subscriptions plugin which is one of the most popular plugin for selling subscriptions in the WooCommerce category. It allows you to sell different kinds of subscriptions and collect recurring payments automatically once the order is placed for such products. Along with the payment reminders, it is an all-in-one plugin one for those looking to set up recurring payments for a WooCommerce store.
Let’s have a look at a couple of important features this plugin brings:
integrate subscription features with WooCommerce
Stripe and PayPal support for automatic subscription payments
subscription support for all types of products
support for subscription and non-subscription products in a single checkout flow
powerful subscription management UI
hooks and filters for developers
and many more
In fact, this plugin provides a complete set of features to fulfill all the requirements of a complete subscription checkout flow on a typical eCommerce store, and that too at a very reasonable price!
What You'll Be Building
As it’s a WooCommerce specific extension, I assume that you’ve installed WooCommerce on your WordPress site and you’re familiar with it. We’re not going to get into the specifics of WooCommerce while setting up the subscriptions.
[woocommerce content]
Let’s assume that you are selling different types of magazines online. Along with the regular magazines, users can also purchase subscriptions for it at a discounted price. In our case, we’re going to sell half-yearly and yearly subscriptions. In this way, you could also boost up sales, since users would be tempted to buy subscriptions if they are regular users.
When a user purchases a product with subscription from the front-end, it’ll create a subscription order, and thus it’ll send automatic payment reminders at every month. If a user pays with the payment method which supports subscriptions, we can attempt to process automatic payments as well.
Throughout the rest of this tutorial, we’ll explore different aspects of this plugin while moving closer to our goal. Next, we'll see how to download and install this plugin.
Download and Installation
Let’s quickly go through the installation process of the Subscriptio—WooCommerce Subscriptions plugin once you’ve purchased and downloaded it from CodeCanyon. For this post, I’ve used the latest version of the Subscriptio—WooCommerce Subscriptions plugin: 2.4.9. I would recommend that you install it if you want to follow along with this post.
As soon as you purchase this plugin, you’ll be able to download the plugin zip file. It’s the WordPress plugin file which you could use to install this plugin from the WordPress admin side.
Go ahead and follow the standard WordPress plugin installation process and you’re almost done.
Important Back-End Configurations
In this section, we’ll go through a couple of important back-end configuration settings. Head over to the WordPress admin side and access the Subscription > Settings section.
Under the General tab, it provides a couple of generic settings for the subscription cart. Among them, the settings under the Limits section are important. The Subscription limit setting allows you to configure subscriptions per customer. On the other hand, the Trial limit setting allows you to limit trails per customer.
In the Capabilities tab, you can enable or disable pausing and cancellation of subscriptions by customers.
Under the Flow tab, you can enable and configure period of renewal orders, payment reminders, overdue and suspensions. According to this, the email notifications will be sent.
So that was a brief about the important configuration settings. Next section on wards, we’ll go ahead and start working on subscriptions and related configuration.
Create Magazine Subscriptions
Before we go ahead and start creating subscriptions let’s quickly go through what we’re going to achieve.
As discussed earlier, we’re going to sell magazine subscriptions, and we’ll create two types of subscriptions: half-yearly and yearly. If user buys a magazine without any subscription, it would cost 10$ per month. With half yearly subscription, the cost is 7$ per month with the subscription fee of 8$. On the other hand, it will take 5$ per month with the subscription fee of 20$ for yearly subscriptions.
Create Subscription Products
In this section, we’ll see how to create subscription products. In fact, it’s pretty similar to what you’re used to with WooCommerce with the only difference is that you need to enter data related to the subscription if you want to make the product be subscription product.
Let’s go ahead and see how to create our first subscription product as shown in the following screenshot.
As you can see, you just need to select the Subscription checkbox if you want to make it a subscription product. When you check it, it displays a couple of extra fields related to subscription pricing. It’s important to understand these fields in the first place.
Firstly, we need to fill in the Regular price field for our product. As we’ve decided to charge 5$ per month for yearly subscription, you need to enter 5$ in that field.
The Price is per field is the frequency which will be used to regenerate new orders and charge customers. As we’re creating yearly subscription and want to charge every month, choose month in this field.
The Free trial field allows you to configure the trial period which you want to provide your customers. For example, if you enter 2 months in this field, customers won’t be charged for the first two months. In our case, we won’t give any free subscription, so you could leave it blank.
Next, the Sign-up fee field allows to configure a one time fee which you want to collect for the subscription. In our case, we will take 20$ signup fees for yearly subscription. Of course you could leave it blank, if you don’t want to charge it.
Finally, the max length field allows you to configure how long the subscription will run. In our case, we’ll select 12 months as we want to run it for a year.
Go ahead and enter the rest of the product details and save it. In the same way, go ahead and create half-yearly subscription product as shown in the following screenshot.
So we’ve created two subscription products, and we’ll see how it looks like on the front-end in the very next section.
Front-End Overview and Placing an Order
In this section, we’ll see how subscription products look on the front-end.
Start by navigatng to the product detail page of the yearly subscription.
As you can see, the plugin clearly shows how much it’s going to cost you per month along with the sign-up fee. Let’s add this to cart and see how it looks like on the cart detail page.
So that’s what you pay: 25$. It includes the first month fees plus sign-up fees. And for the next 11 months, subscribers will have to pay 5$. And yes, they’re going to get automatic payment reminders before certain days as per your the configuration settings.
Go ahead and complete the order as usual, and we’ll see how subscriptions look like on the back-end in the next section.
Subscription Management in Back-End
As soon as the order is created which has subscription attached, you can view it on the back-end. Go ahead and navigate to the Subscriptions > Subscriptions section. This will list out all the subscriptions on your store.
The Status column indicates the status of the subscription order. Also, as depicted in the screenshot, you can see all the important information like start date of subscription, the next payment due date and subscription expiration date.
Also, this plugin takes care of sending automatic payment and subscription expiration reminders. If the subscriber doesn’t pay in time, it’ll suspend the subscription. And finally, it’ll cancel the subscription if there’s no action taken by subscribers.
So as you can see, this plugin provides a complete flow of subscription management which allows you to create different types of subscription products in your store and sell it easily.
And with that, we’ve reached the end of this tutorial as well.
Conclusion
Today, we discussed one of the most popular plugins in the WooCommerce category in WordPress: Subscriptio—WooCommerce Subscriptions. It’s a commercial plugin available at CodeCanyon at a very reasonable price.
Throughout this tutorial, we discussed the different aspects of this plugin along with the real-world example to demonstrate how it works. If you have any suggestions or comments, feel free to use the feed below and I’ll be happy to answer your queries!
Mobile users have come to expect the UI consistency and performance that can only come from native apps. However, building a feature-rich iOS app with an elegant user interface can be challenging. Fortunately, by using an app template, you can save substantial amounts of time and effort.
CodeCanyon has a huge collection of Swift language iOS app templates. If you don't know what an app template is, it is basically a pre-built application with a lot of the core functionality already implemented for you. It allows you to easily customise and add to the template's code to create the kind of app you want.
Depending on the license that you purchase for a template, you can either use it as a learning tool or offer it as a real product on the App Store.
No matter what kind of app you’re looking for, there's a good chance that CodeCanyon has a template to suit your needs. In this article, I'll show you 15 of my favourite Swift app templates available on CodeCanyon.
A Swift app template allows you to build your mobile iOS app. Developing an app from scratch is a costly and time-consuming process, but a Swift app template is affordable because much of the code is already written for you.
Besides, it comes with all the features you need to create your own mobile app. You only need to follow instructions in the documentation in order customize and add elements that will make your app unique.
What Standard App Templates Must Have
An app template must come with core functionalities that are necessary for your app to run efficiently.
How to Pick a Mobile Swift iOS Template
When you're choosing an app template, keep the following factors in mind:
Ease of Use
It has to be so simple that someone with no coding expertise can easily learn and use it. The documentation should be clear.
Customization
The template should be easy to customize so that the finished app can reflect your unique style and branding. Customization should not take a lot of time.
Design
Simplicity is key. The design of the template should be intuitive, uncluttered, and consistent from screen to screen.
Cost
Compare the prices of other templates and see what fits your budget.
Social Log In and Sharability
Make it easy for users to log in from their social media. Enable them to publicize your app by sharing it with others through social media.
Ratings and Reviews
Let customers know they can trust your product or service.
Downloads
The number of downloads is proof that a template is popular among users and that they trust the provider.
Security and Frequent Updates
Regular updates mean the developer cares about security of the template. Your choice of an app template should factor this in.
Support
Make sure that the seller offers support. Check what other users say about the quality of support from the provider.
Integration With Payment and Marketing Gateways
These allow for revenue through advertising, subscriptions and so on.
Swift App Templates on CodeCanyon
There are plenty of Swift app templates on code CodeCanyon. I have selected a mix of trending new templates and older templates that have been popular year after year—and which have received regular updates, of course!
Universal for iOS is a template that anyone can use to create amazing apps using content from all around the web. No coding knowledge is needed. It supports many content sources including WordPress, YouTube, Flicker, Tumblr, Twitter, Pinterest and more.
It comes with lots of features including Admob for monetization and in-app purchases if your user wants to have ad-free content. You also have the ability to change your content remotely.
The WebViewGold app template is another great template that allows users to convert a website's content into an app. It does so by using a Swift Xcode package to wrap the URL or local HTML into an iOS app. The real genius of this app template, though, is that it does its work in just a few clicks, so no coding knowledge is required! WebViewGold is optimised for iPhone, iPod touch, and iPad.
SuperView is a template designed to let web developers easily create a native iOS container for their website. It provides some basic functionality, including a toolbar with back, forward, and refresh buttons, but it keeps your website front and centre.
This template also adds a lot of extra features you can take advantage of in your app, including Firebase or OneSignal push notifications, GPS support, social network login, Google AdMob, and support for right-to-left languages such as Arabic.
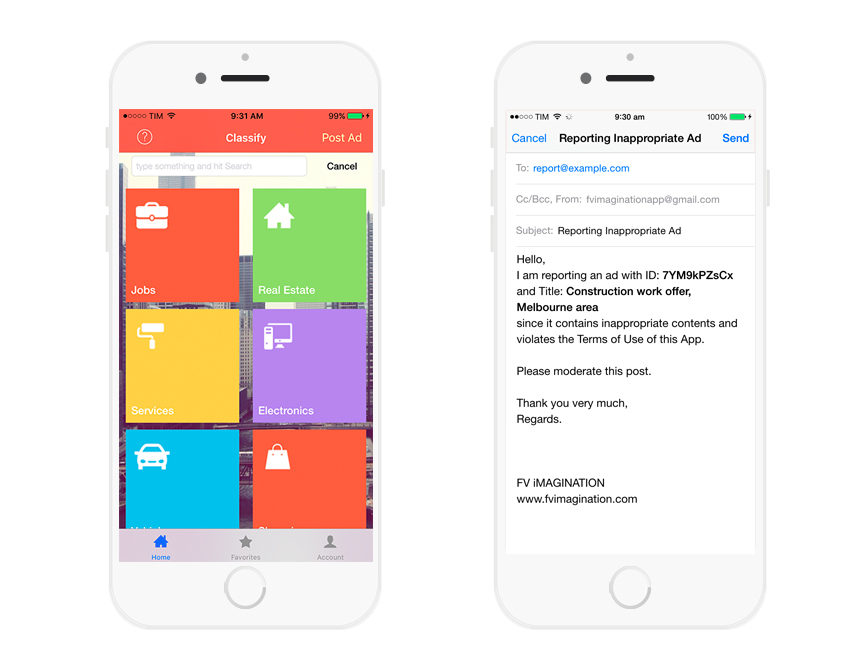
If you're looking for a template to help you create a classified ad app, then check out Classify, a universal app template that you can use to develop your own mobile classifieds service app. End users will be able to post and edit ads using their mobile device of choice. The app allows end users to do everything you’d expect, like browse listings by categories, search for what they need, and contact the seller.
The iOS Recipe App template gives you an app which displays various recipes based on categories, including a user-customisable Favourites category. The screen for viewing the details of a recipe supports multiple images, sharing, and smooth transitions.
All the recipe data is stored in an XML file which can be easily edited or replaced with data loaded from a server. This template also includes quite a few extra features, including a shopping list, Google AdMob integration, push notifications, and a sliding menu on the left side of the app.
The Events app template allows you to create your own mobile iOS events app to store and share events happening all over the world. End users are able to submit new events, and you can approve and add them in your Parse Dashboard.
The app also has a button that enables end users to automatically add an event on their native iOS calendar and to open its address in Maps to get directions. They can also share the event via their social media platform of choice.
Mokets, short for mobile markets, is an eCommerce app template targeting today’s busy shoppers. The template distinguishes itself from the competition with a gorgeous Pinterest-type grid that displays items for sale with all relevant information. It features user registration and login, shopping cart with checkout, transaction history, push notification, user feedback, analytics which track customer interests, and so much more.
woopy is an app template that allows developers to create listing apps that facilitate the buying and selling of used and handcrafted items online. Users can browse by keyword or category. They can also chat with sellers or potential buyers and give feedback on each transaction.
One of the app’s outstanding features for sellers is the ability to add a 10-second video to their listings. Another is the app’s optional email verification system that gives buyers and sellers extra assurance by posting a verification symbol next to the user’s name.
When you need to find a specific item or store and don’t want to spend all day driving from one end of town to the other or doing laps around the mall, a store finder app is a lifesaver. Enter the Store Finder app template, a developer’s dream, with a long list of must-have features like photos, call, email and SMS integration, comments, Google directions, social media logins, pinch and zoom function, and so much more.
If you have a brick and mortar store and you want build your eCommerce store in the shortest time possible you’re in good hands with MStore Pro. And if you’re developer pressed for time, this app template is your friend. It supports WooCommerce integration, AdMob and Facebook ads, push notifications, and multiple payment gateways.
The Webview Swift app template is the perfect choice to turn your website into an app with a native-seeming look and feel. It is made using Swift 5 and Xcode 11. You can easily customize it by changing colors of buttons, text, and even hide them using config files. It also includes a Swift 4.2 for Xcode 10 version if you prefer to work with that version.
Making the world less lonely one person at a time is easy through the Dating App. The iOS version of this app is built with Xcode 10.3 using Swift 5. Its long list of must have features that will keep users engaged include: full-featured admin panel that allows you to manage user accounts, view personal conversations of users, account and gallery moderation, manage advertising. To boost your revenue you can add in-app purchases and Admob ads.
Consider Ad Forest if you're looking to manage product listing for your ad posting website. It comes with handy features like Google maps integration, radius search, featured ads, social media registration and login, seller ratings and more. Once you install you can make necessary changes and your app is ready to use. And since its completely white labeled you can upload it to the iOS app store with your business brand name.
Instagram stories are booming. Big companies spend millions of dollars to get their products mentioned in Instagram stories. Here is your chance to provide your clients with an app that will make it easy to tell their stories on Instagram. Insta Story Editor allows you to build an app with story templates that can be edited easily.
The templates are in the gallery screen. Users can change background colors of stories, add text, change color of text and font sizes, add photos from library, and move images around. And finally users can save their stories to photo library and share directly on Instagram stories.
If you have an idea for quiz or trivia games then Quiz: Trivia 1 Pic 1 Word has got you covered. This template will get you started with 20 levels. Just type in your levels and names, and simply drag and drop images that match the names in your level. The game will load the levels from a file that is easy to visualize and understand. Users can purchase coins or watch reward video ads to earn coins. You don't need coding knowledge to add new levels.
appyMap is an excellent app for browsing different locations and points of interest near the user's current location. The template allows you to split up points of interest into various groups which, if you want, can easily be locked behind an in-app purchase. appyMap also lets you choose between using either Apple's CloudKit or a local plist file for your data. Additionally, this template features AdMob integration if you want to use it.
Conclusion
These 15 templates are just some of the many available on CodeCanyon. There are a lot more great Swift app templates that weren't included in this article, so I encourage you to have a look and see what else you can find.
And if you want to improve your skills building iOS apps and templates, then check out some of our other posts on iOS app development.
The articles below will help you in the search for the app template that is perfectly suited for your needs.