[ This is a content summary only. Visit our website https://ift.tt/1b4YgHQ for full links, other content, and more! ]


by Arooj Ahmed via Digital Information World


Today, we're going to discuss control structures and loops in PHP. I'll show you how to use all the main control structures that are supported in PHP, like if, else, for, foreach, while, and more.
In simple terms, a control structure allows you to control the flow of code execution in your application. Generally, a program is executed sequentially, line by line, and a control structure allows you to alter that flow, usually depending on certain conditions.
Control structures are core features of the PHP language that allow your script to respond differently to different inputs or situations. This could allow your script to give different responses based on user input, file contents, or some other data.
The following flowchart explains how a control structure works in PHP.

As you can see in the above diagram, first a condition is checked. If the condition is true, the conditional code will be executed. The important thing to note here is that code execution continues normally after conditional code execution.
Let's consider the following example.
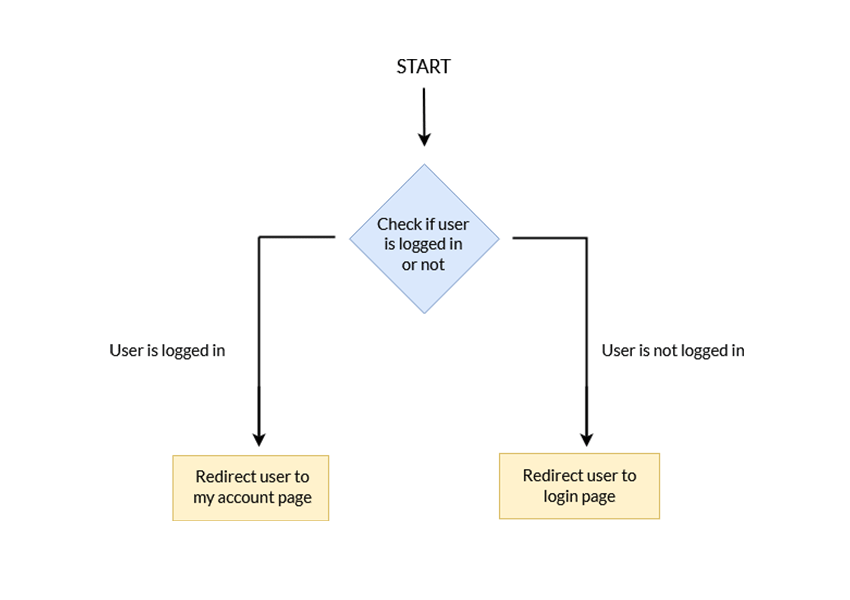
In the above example, the program checks whether or not the user is logged in. Based on the user's login status, they will be redirected to either the Login page or the My Account page. In this case, a control structure ends code execution by redirecting users to a different page. This is a crucial ability of the PHP language.
PHP supports a number of different control structures:
ifelseelseifswitchwhiledo-whileforforeachLet's take a look at a few of these control structures with examples.
In the previous section, we learned the basics of control structures in PHP and their usefulness in application development. In this section, we'll go through a couple of important control structures that you'll end up using frequently in your day-to-day application development.
The if construct allows you to execute a piece of code if the expression provided along with it evaluates to true.
Let's have a look at the following example to understand how it actually works.
<?php
$age = 50;

if ($age > 30)
{
  echo "Your age is greater than 30!";
}
?>
The above example should output the Your age is greater than 30! message since the expression evaluates to true. In fact, if you want to execute only a single statement, the above example can be rewritten as shown in the following snippet without brackets.
<?php
$age = 50;

if ($age > 30)
  echo "Your age is greater than 30!";
?>
On the other hand, if you have more than one statements to execute, you must use brackets, as shown in the following snippet.
<?php
if (is_array($user))
{
  $user_id = isset($user['user_id']) ? $user['user_id'] : '';
  $username = isset($user['username']) ? $user['username'] : '';
  // and more statements...
}
?>
In the previous section, we discussed the if construct, which allows you to execute a piece of code if the expression evaluates to true. On the other hand, if the expression evaluates to false, it won't do anything. More often than not, you also want to execute a different code snippet if the expression evaluates to false. That's where the else statement comes into the picture.
You always use the else statement in conjunction with an if statement. Basically, you can define it as shown in the following pseudo code.
if (expression)
{
  // code is executed if the expression evaluates to TRUE
}
else
{
  // code is executed if the expression evaluates to FALSE
}
Let's revise the previous example to understand how it works.
<?php
$age = 50;

if ($age < 30)
{
  echo "Your age is less than 30!";
}
else
{
  echo "Your age is greater than or equal 30!";
}
?>
So when you have two choices, and one of them must be executed, you can use the if-else construct.
We can consider the elseif statement as an extension to the if-else construct. If you've got more than two choices to choose from, you can use the elseif statement.
Let's study the basic structure of the elseif statement, as shown in the following pseudo code.
if (expression1)
{
  // code is executed if the expression1 evaluates to TRUE
}
elseif (expression2)
{
  // code is executed if the expression2 evaluates to TRUE
}
elseif (expression3)
{
  // code is executed if the expression3 evaluates to TRUE
}
else
{
  // code is executed if the expression1, expression2 and expression3 evaluates to FALSE, a default choice
}
Again, let's try to understand it using a real-world example.
<?php
$age = 50;

if ($age < 30)
{
  echo "Your age is less than 30!";
}
elseif ($age > 30 && $age < 40)
{
  echo "Your age is between 30 and 40!";
}
elseif ($age > 40 && $age < 50)
{
  echo "Your age is between 40 and 50!";
}
else
{
  echo "Your age is greater than 50!";
}
?>
As you can see in the above example, we have multiple conditions, so we've used a series of elseif statements. In the event that all if conditions evaluate to false, it executes the code provided in the last else statement.
The switch statement is somewhat similar to the elseif statement which we've just discussed in the previous section. The only difference is the expression which is being checked.
In the case of the elseif statement, you have a set of different conditions, and an appropriate action will be executed based on a condition. On the other hand, if you want to compare a variable with different values, you can use the switch statement.
As usual, an example is the best way to understand the switch statement.
<?php
$favourite_site = 'Code';

switch ($favourite_site) {
  case 'Business':
    echo "My favourite site is business.tutsplus.com!";
    break;
  case 'Code':
    echo "My favourite site is code.tutsplus.com!";
    break;
  case 'Web Design':
    echo "My favourite site is webdesign.tutsplus.com!";
    break;
  case 'Music':
    echo "My favourite site is music.tutsplus.com!";
    break;
  case 'Photography':
    echo "My favourite site is photography.tutsplus.com!";
    break;
  default:
    echo "I like everything at tutsplus.com!";
}
?>
As you can see in the above example, we want to check the value of the $favourite_site variable, and based on the value of the $favourite_site variable we want to print a message.
For each value you want to check with the $favourite_site variable, you have to define the case block. If the value is matched with a case, the code associated with that case block will be executed. After that, you need to use the break statement to end code execution. If you don't use the break statement, script execution will be continued up to the last block in the switch statement.
Finally, if you want to execute a piece of code if the variable's value doesn't match any case, you can define it under the default block. Of course, it's not mandatory—it's just a way to provide a default case.
So that's the story of conditional control structures. We'll discuss loops in PHP in the next section.
Loops in PHP are useful when you want to execute a piece of code repeatedly until a condition evaluates to false. So code is executed repeatedly as long as a condition evaluates to true, and as soon as the condition evaluates to false, the script continues executing the code after the loop.
The following flowchart explains how loops work in PHP.

As you can see in the above screenshot, a loop contains a condition. If the condition evaluates to true, the conditional code is executed. After execution of the conditional code, control goes back to the loop condition, and the flow continues until the condition evaluates to false.
In this section, we'll go through the different types of loops supported in PHP.
The while loop is used when you want to execute a piece of code repeatedly until the while condition evaluates to false.
You can define it as shown in the following pseudo code.
while (expression)
{
  // code to execute as long as expression evaluates to TRUE
}
Let's have a look at a real-world example to understand how the while loop works in PHP.
<?php
$max = 0;
echo $i = 0;
echo ",";
echo $j = 1;
echo ",";
$result=0;

while ($max < 10 )
{
    $result = $i + $j;

    $i = $j;
    $j = $result;

    $max = $max + 1;
    echo $result;
    echo ",";
}
?>
If you're familiar with the Fibonacci series, you might recognize what the above program does—it outputs the Fibonacci series for the first ten numbers. The while loop is generally used when you don't know the number of iterations that are going to take place in a loop.
The do-while loop is very similar to the while loop, with the only difference being that the while condition is checked at the end of the first iteration. Thus, we can guarantee that the loop code is executed at least once, irrespective of the result of the while expression.
Let's have a look at the syntax of the do-while loop.
do
{
  // code to execute
} while (expression);
Let's go through a real-world to understand possible use-cases where you can use the do-while loop.
<?php
$handle = fopen("file.txt", "r");
if ($handle)
{
    do
    {
        $line = fgets($handle);

        // process the line content

    } while($line !== false);
}
fclose($handle);
?>
In the above example, we're trying to read a file line by line. Firstly, we've opened a file for reading. In our case, we're not sure if the file contains any content at all. Thus, we need to execute the fgets function at least once to check if a file contains any content. So we can use the do-while loop here. do-while evaluates the condition after the first iteration of the loop.
Generally, the for loop is used to execute a piece of code for a specific number of times. In other words, if you already know the number of times you want to execute a block of code, it's the for loop which is the best choice.
Let's have a look at the syntax of the for loop.
for (expr1; expr2; expr3)
{
  // code to execute
}
The expr1 expression is used to initialize variables, and it's always executed. The expr2 expression is also executed in the beginning of a loop, and if it evaluates to true, the loop code is executed. After execution of the loop code, the expr3 is executed. Generally, the expr3 is used to alter the value of a variable which is used in the expr2 expression.
Let's go through the following example to see how it works.
<?php
for ($i=1; $i<=10; ++$i)
{
  echo sprintf("The square of %d is %d.</br>", $i, $i*$i);
}
?>
The above program outputs the square of the first ten numbers. It initializes $i to 1, repeats as long as $i is less than or equal to 10, and adds 1 to $i at each iteration.
The foreach loop is used to iterate over array variables. If you have an array variable, and you want to go through each element of that array, the foreach loop is the best choice.
Let's have a look at a couple of examples.
<?php
$fruits = array('apple', 'banana', 'orange', 'grapes');
foreach ($fruits as $fruit)
{
  echo $fruit;
  echo "<br/>";
}

$employee = array('name' => 'John Smith', 'age' => 30, 'profession' => 'Software Engineer');
foreach ($employee as $key => $value)
{
  echo sprintf("%s: %s</br>", $key, $value);
  echo "<br/>";
}
?>
If you want to access array values, you can use the first version of the foreach loop as shown in the above example. On the other hand, if you want to access both a key and a value, you can do it as shown in the $employee example above.
There are times when you might want to break out of a loop before it runs it course. This can be achieved easily using the break keyword. It will get you out of the current for, foreach, while, do-while or switch structure.
You can also use break to get out of multiple nested loops by supplying a numeric argument. For example, using break 3 will break you out of 3 nested loops. However, you cannot pass a variable as the numeric argument if you are using a PHP version greater than or equal to 5.4.
<?php

echo 'Simple Break';
for($i = 1; $i <= 2; $i++) {
    echo "\n".'$i = '.$i.' ';
    for($j = 1; $j <= 5; $j++) {
        if($j == 2) {
            break;
        }
        echo '$j = '.$j.' ';
    }
}

/*
Simple Break
i = 1 j = 1
i = 2 j = 1
*/

echo 'Multi-level Break';
for($i = 1; $i <= 2; $i++) {
    echo "\n".'$i = '.$i.' ';
    for($j = 1; $j <= 5; $j++) {
        if($j == 2) {
            break 2;
        }
        echo '$j = '.$j.' ';
    }
}

/*
Multi-level Break
i = 1 j = 1
*/

?>
Another keyword that can interrupt loops in PHP is continue. However this only skips the rest of the current loop iteration instead of breaking out of the loop altogether. Just like break, you can also use a numerical value with continue to specify how many nested loops should it skip for current iteration.
<?php

echo 'Simple Continue';
for($i = 1; $i <= 2; $i++) {
    echo "\n".'$i = '.$i.' ';
    for($j = 1; $j <= 5; $j++) {
        if($j == 2) {
            continue;
        }
        echo '$j = '.$j.' ';
    }
}

/*
Simple Continue
i = 1 j = 1 j = 3 j = 4 j = 5
i = 2 j = 1 j = 3 j = 4 j = 5
*/

echo 'Multi-level Continue';
for($i = 1; $i <= 2; $i++) {
    echo "\n".'$i = '.$i.' ';
    for($j = 1; $j <= 5; $j++) {
        if($j == 2) {
            continue 2;
        }
        echo '$j = '.$j.' ';
    }
}

/*
Multi-level Continue
i = 1 j = 1
i = 2 j = 1
*/

?>
In this article, we discussed different control structures and loops in PHP. They are an essential part of PHP—or any programming language for that matter.
If you want to learn PHP, check out our free online course on PHP fundamentals!
In this course, you'll learn the fundamentals of PHP programming. You'll start with the basics, learning how PHP works and writing simple PHP loops and functions. Then you'll build up to coding classes for simple object-oriented programming (OOP). Along the way, you'll learn all the most important skills for writing apps for the web: you'll get a chance to practice responding to GET and POST requests, parsing JSON, authenticating users, and using a MySQL database.


If you've had any experience working with parent and child themes in WordPress, you'll know that the template files in your child theme override those in your parent theme. So for example if your parent theme has a page.php file and you create a new one in your child theme, WordPress will use the one in the child theme when displaying pages.
You might think that functions would work in the same way: create a new function in your child theme's functions.php file with the same name as one in the parent theme, and it'll take precedence. Unfortunately it isn't as simple as this.
In this tutorial I'll show you three methods you can use to override functions from the parent theme in your child theme:
Before examining the methods for overriding functions in your child themes, it helps to understand how functions work in parent and child themes.
Firstly, you need to know that all of the functions in your parent theme will be run when you're using a child theme. You don't have to add anything to your child theme's functions file to make this happen. This is different from CSS, where you have to manually include the parent theme's stylesheet in the child theme's stylesheet.
Another thing to know is that if your parent and child themes have functions with the same name, this will break your site—unless the function in the parent theme is a pluggable function (more on this shortly). This is why it’s important to use prefixes for all your functions, and to use a different prefix in parent and child themes—just in case.
However you can change the order in which functions are fired, and you can prevent functions from being fired altogether, as we'll see shortly.
Pluggable functions are something you code into your parent theme, so they won't be any use to you if you're working with an existing parent theme that doesn't have them.
But if you're writing your own parent theme, maybe as a starting point for future projects, or if you're creating your own theme framework, it's good practice to make your functions pluggable so that you can easily override them in child themes. It's also a good idea to look through the functions that are written into the parent theme you're using, as many of them, including the WordPress default theme, will have pluggable functions.
To write a pluggable function, you simply enclose it in a conditional tag to check if a function with that name has already been run:
<?php
if ( ! function_exists ( 'my_function' ) ) {
    function my_function() {
        // Contents of your function here.
    }
}
?>
So if you enclose the functions in your parent theme in a conditional tag like this, WordPress will check if there is a function with the same name in your child theme that's already been run, and if that's the case it won't run the function from the parent theme.
Then when you come to write a function in your child theme which you want to override the one in the parent theme, you just give it the same name as the one in the parent theme:
<?php
function my_function() {
    // Contents for your function override here.
}
?>
WordPress will run the function in the child theme first, and when it comes to the one in the parent theme, it'll check if it already exists and because it does, it won't run it.
If you're not using your own parent theme, or you're using a third party one without pluggable functions, you'll need another method.
When you write functions you can assign them a priority, which tells WordPress when to run them. You do this when adding your function to an action or filter hook. WordPress will then run the functions attached to a given hook in ascending order of priority, so those with higher numbers will run last.
Let's imagine the function in the parent theme isn't pluggable, and looks like this:
<?php
function parent_function() {
    // Contents for your function here.
}
add_action( 'init', 'parent_function' );
?>
This function is attached to the init hook and hasn't been given a priority. By default WordPress assigns a priority of 10 to functions which haven't had a priority added, so to fire your function after it you use a number larger than 10. I tend to use 15 so I've got some breathing room in case I want to add another function between the two later on.
This means the function in your child theme would look like this:
<?php
function child_function() {
    // Contents for your function here.
}
add_action( 'init', 'child_function', 15 );
?>
Alternatively, the function in your parent theme may have had a priority assigned to it:
<?php
function parent_function() {
    // Contents for your function here.
}
add_action( 'init', 'parent_function', 20 );
?>
So you just need to make sure the priority you give the function in your child theme is higher:
<?php
function child_function() {
    // Contents for your function here.
}
add_action( 'init', 'child_function', 25 );
?>
Sometimes running another function after the first one isn't enough to override it—you need to make sure the function in the parent theme doesn't run at all. In this case, you can remove the parent theme function from the hook it's attached to, using the remove_action() or remove_filter() functions. The one you use will depend on whether the function is attached to an action hook or filter hook in the parent theme.
So let's return to our previous function in the parent theme:
<?php
function parent_function() {
    // Contents for your function here.
}
add_action( 'init', 'parent_function' );
?>
To remove this function from its action hook and therefore prevent it from firing, you create a function in your child theme to remove it using remove_action():
<?php
remove_action( 'init', 'parent_function' );
?>
However, this won't work on its own—you need to attach this function to a hook which will fire after the hook which the parent theme function is attached to. This is because you can't remove the action before it's been fired. You can find details of the order in which actions are fired in the Codex.
<?php
function child_remove_parent_function() {
    remove_action( 'init', 'parent_function' );
}
add_action( 'wp_loaded', 'child_remove_parent_function' );
?>
Once you've done this, you can simply write an alternative function to replace the parent theme function in your child theme's functions file, or you can do nothing if all you wanted to do was remove the functionality from the parent theme.
Note that if you're trying to remove a function using remove_action() or remove_filter() and the function has had a priority assigned to it, you must include the priority when removing it, or it won't work.
So if the function in the parent theme looks like this:
<?php
function parent_function() {
    // Contents for your function here.
}
add_action( 'init', 'parent_function', 15 );
?>
... you'll need to include the same priority value when removing it:
<?php
function child_remove_parent_function() {
    remove_action( 'widgets_init', 'parent_function', 15 );
}
add_action( 'wp_loaded', 'child_remove_parent_function' );
?>
As well as the above, there are some specific scenarios in which you might want to take things further. The following tips are in response to questions that have been asked in the comments below.
Strictly speaking, you can’t partially override a function. You can only let it run, or disable it. But there are workarounds.
The first is if the function you want to partially override itself contains functions that are pluggable. You might find that the function includes a call to another pluggable function from within the parent theme.
If this is the case, you can override any functions within the main function, if that’s the code you want to change. Do it by writing a new version of the pluggable function that either contains just a return statement or contains alternative code. Note that this will only work if the function is pluggable—if it isn’t, your site will break.
However this method only works if you’re lucky enough to need to override functionality within a function that’s provided by another contained and pluggable function.
In the vast majority of cases, this won't be an option. In which case, you'll need to deactivate the function and replace it with a function of your own, with a different name. To create your new function, you can copy and paste the function from the parent theme into the child themes functions.php file, and then edit it to remove the code you don’t want.
You’d use two of your own functions: one to remove the original one, and the second to provide new code, like this example overriding a parent theme called on the init hook:
<?php
function remove_parent_function(
    remove_action( 'init', 'parent_theme_function');
)
add_action( 'wp_loaded', 'remove_parent_function');

function child_theme_function(
    // contents of child theme function based on original parent theme function
)
add_action( 'init', 'child_theme_function');
?>
Functions in the parent theme that aren’t pluggable can’t be overridden in any special way. So you’d have to use the method above, removing the function from its action hook and then writing a new function on the same action hook that provides the new code.
Don’t give the function in your child theme the same name as the function from the parent theme as this will break your site!
Functions are generally not designed to be extendable. However there may be an exception if your function includes calls to other pluggable functions.
If this is the case, you can extend the function by overriding the functions within the main function, without having to replace the whole of the main function.
In most cases, you can only extend a parent theme function in one of three ways:
remove_action() and write a new function (with a different name) on the same hook with extra code. You might want to copy code from the original function into your new function and edit that.add_action() to specify whether your second function will run before or after the original function.Overriding functions in a parent theme is more complicated than overriding template files or styling, but it can be done. Here I've shown you three methods for doing this:
remove_action() or remove_filter() to remove functions in the parent theme altogether.Which method you use will depend on the way your parent theme is coded and whether you need to remove the parent theme function altogether or just run another function after it to override it.
