In this article, we’re going to see CSS Grid in action by creating a responsive multi-column website layout.
CSS Grid is a new, hot trend in web development these days. Forget about table layouts and floats: a new way to design websites is already here! This technology introduces two-dimensional grids which define multiple areas of layout with a handful of CSS rules.
Grid can make third-party frameworks such as 960gs or Bootstrap grid redundant, as you may easily do everything yourself! This feature is supported by all major browsers, though Internet Explorer implements an older version of the specification.
What We’re Going to Build
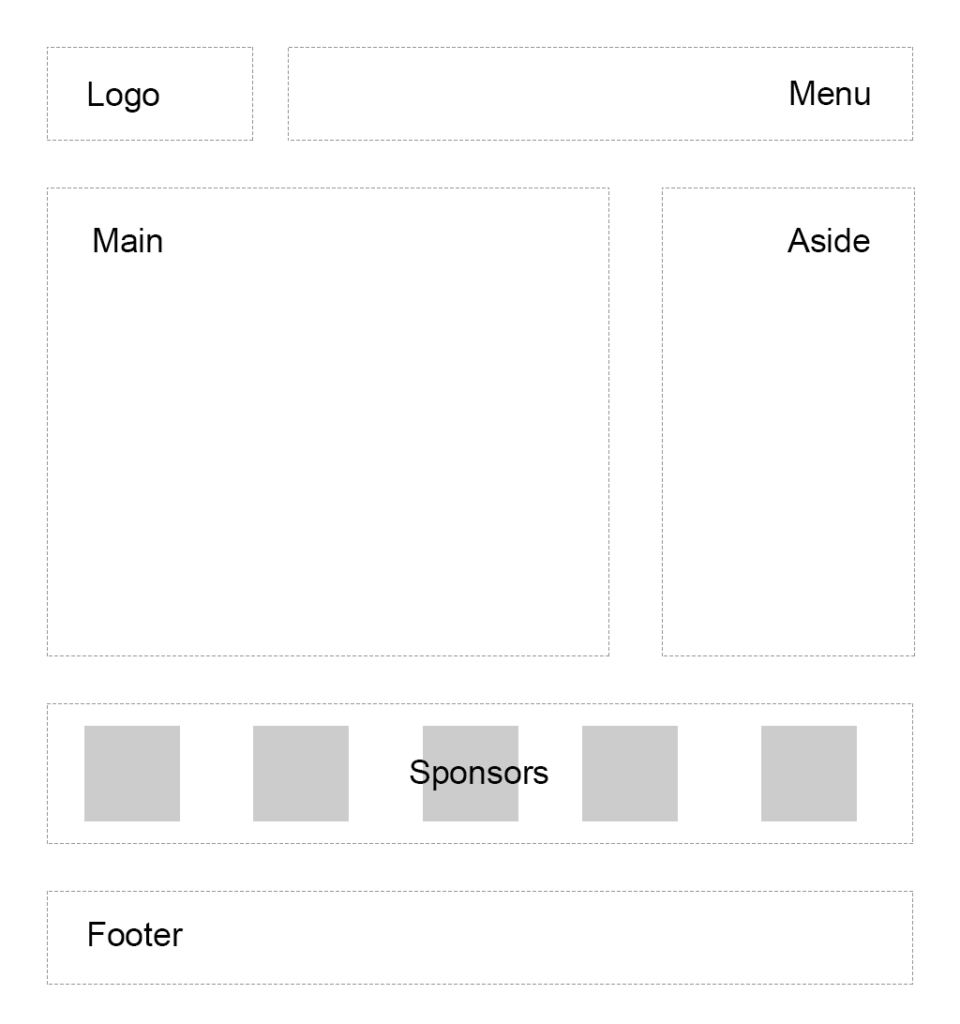
So, we were asked to create a typical website layout with a header, main content area, sidebar to the right, a list of sponsors, and a footer:

Another developer has already tried to solve this task and came up with a solution that involves floats, display: table, and some clearfix hacks. We’re going to refer to this existing layout as "initial":
See the Pen SP: Multi-Column Layout With Floats by SitePoint (@SitePoint) on CodePen.
Until recently, floats were considered to be the best option to create such layouts. Prior to that, we had to utilize HTML tables, but they had a number of downsides. Specifically, such table layout is very rigid, requiring lots of tags (table, tr, td, th etc), and semantically these tags are used to present table data, not to design layouts.
But CSS continues to evolve, and now we have CSS Grid. Conceptually, it’s similar to an old table layout but can use semantic HTML elements with a more flexible layout.
Planning the Grid
First things first: we need to define a basic HTML structure for our document. Before that, let’s briefly talk about how the initial example works. It has the following main blocks:
.containeris the global wrapper that has small margins to the left and to the right..main-headeris the header that contains the.logo(occupying 20% of the space, floating to the left) and the.main-menu(occupying 79% of the space, floating to the right). The header is also assigned a hacky fix to clear the floats..content-area-wrapperwraps the main.content-area(occupying 66.6% of the space minus1remreserved for margin, floating to the left) and the.sidebar(occupying 33.3% of the space, floating to the right). The wrapper itself is also assigned with a clearfix..sponsors-wrappercontains the logos of the sponsors. Inside, there’s a.sponsorssection with thedisplayproperty set totable. Each sponsor, in turn, is displayed as a table cell..footeris our footer and spans to 100% of the space.
Our new layout will be very similar to the initial one, but with one exception: we won’t add the .main-header and .content-area-wrapper wrappers because the clearfixes won’t be required anymore. Here is the new version of the HTML:
<div class="container">
<header class="logo">
<h1><a href="#">DemoSite</a></h1>
</header>
<nav class="main-menu">
<ul>
<li class="main-menu__item"><a href="#">Our clients</a></li>
<li class="main-menu__item"><a href="#">Products</a></li>
<li class="main-menu__item"><a href="#">Contact</a></li>
</ul>
</nav>
<main class="content-area">
<h2>Welcome!</h2>
<p>
Content
</p>
</main>
<aside class="sidebar">
<h3>Additional stuff</h3>
<ul>
<li>Items</li>
<li>Are</li>
<li>Listed</li>
<li>Here</li>
<li>Wow!</li>
</ul>
</aside>
<section class="sponsors-wrapper">
<h2>Our sponsors</h2>
<section class="sponsors">
<figure class="sponsor">
<img src="https://via.placeholder.com/150x150">
</figure>
<figure class="sponsor">
<img src="https://via.placeholder.com/200x150">
</figure>
<figure class="sponsor">
<img src="https://via.placeholder.com/100x200">
</figure>
<figure class="sponsor">
<img src="https://via.placeholder.com/100x100">
</figure>
<figure class="sponsor">
<img src="https://via.placeholder.com/200x200">
</figure>
</section>
</section>
<footer class="footer">
<p>
© 2018 DemoSite. White&Sons LLC. All rights (perhaps) reserved.
</p>
</footer>
</div>
Note that you may utilize the body as the global .container; that’s just a matter of preference in this case. All in all, we have six main areas:
- Logo
- Menu
- Main content
- Sidebar
- Sponsors
- Footer
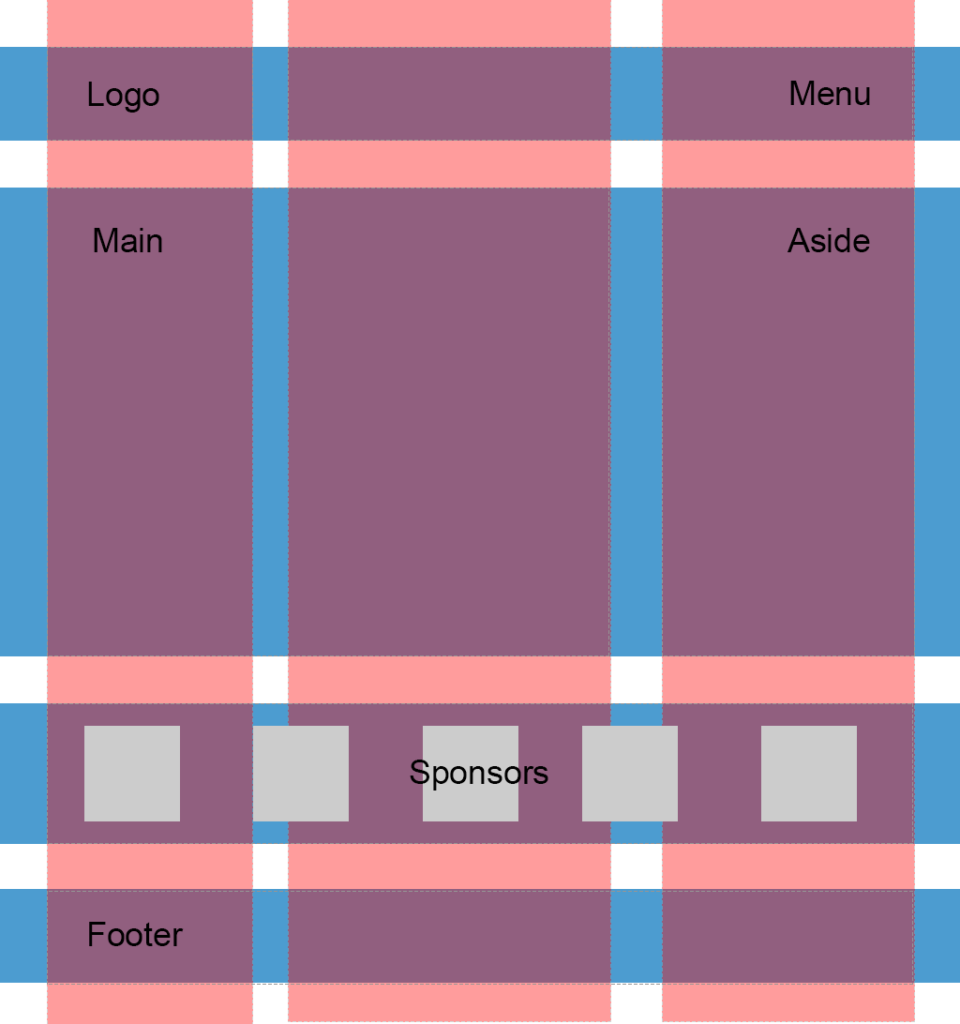
Usually it’s recommended that you implement a mobile-first approach. That is, you start from the mobile layout and then add styles for larger screens. This isn’t necessary in this case, since we’re adapting an initial layout that already falls back to a linearized view on small-screen devices. Therefore, let’s start by focusing on the grid’s implementation, and after that talk about responsiveness and fallback rules. So, return to our scheme and see how the grid columns can be arranged:

So, I propose having three columns (highlighted in red) and four rows (highlighted in blue). Some areas, like the logo, are going to occupy only one column, whereas others, like main content, are going to span multiple columns. Later we can easily modify the layout, move the areas around, or add new ones.
Following the scheme, give each area a unique name. These will be used in the layout defined below:
.logo {
  grid-area: logo;
}

.main-menu {
  grid-area: menu;
}

.content-area {
  grid-area: content;
}

.sidebar {
  grid-area: sidebar;
}

.sponsors-wrapper {
  grid-area: sponsors;
}

.footer {
  grid-area: footer;
}
Now set the display property to grid, define three columns and add small margins to the left and right of the main container:
.container {
  display: grid;
  margin: 0 2rem;
  grid-template-columns: 2fr 6fr 4fr;
}
display: grid defines a grid container and sets a special formatting context for its children. fr is a special unit that means "fraction of the free space of the grid container". 2 + 6 + 4 gives us 12, and 6 / 12 = 0.5. It means that the middle column is going to occupy 50% of the free space.
I would also like to add some spacing between the rows and columns:
.container {
  // ...
  grid-gap: 2rem 1rem;
}
Having done this, we can work with individual areas. But before wrapping up this section, let’s quickly add some common styles:
* {
  box-sizing: border-box;
}

html {
  font-size: 16px;
  font-family: Georgia, serif;
}

body {
  background-color: #fbfbfb;
}

h1, h2, h3 {
  margin-top: 0;
}

header h1 {
  margin: 0;
}

main p {
  margin-bottom: 0;
}
Good! Now we can proceed to the first target, which is going to be the header.
The post Redesigning a Site to Use CSS Grid Layout appeared first on SitePoint.
by Ilya Bodrov-Krukowski via SitePoint
No comments:
Post a Comment