
Apps that communicate in real time are becoming more and more popular nowadays, as they make for a smoother, more natural user experience.
In this tutorial, we’re going to build a real-time chat application using Vue.js powered by ChatKit, a service provided by Pusher. The ChatKit service will provide us with a complete back end necessary for building a chat application on any device, leaving us to focus on building a front-end user interface that connects to the ChatKit service via the ChatKit client package.
Prerequisites
This is an intermediate- to advanced-level tutorial. You’ll need to be familiar with the following concepts to follow along:
- Vue.js basics
- Vuex fundamentals
- employing a CSS framework
You’ll also need Node installed on your machine. You can do this by downloading the binaries from the official website, or by using a version manager. This is probably the easiest way, as it allows you to manage multiple versions of Node on the same machine.
Finally, you’ll need to install Vue CLI globally with the following command:
npm install -g @vue/cli
At the time of writing, Node 10.14.1 and Vue CLI 3.2.1 are the latest versions.
About the Project
We’re going to build a rudimentary chat application similar to Slack or Discord. The app will do the following:
- have multiple channels and rooms
- list room members and detect presence status
- detect when other users start typing
As mentioned earlier, we’re just building the front end. The ChatKit service has a back-end interface that will allows us to manage users, permissions and rooms.
You can find the complete code for this project on GitHub.
Setting up a ChatKit Instance
Let’s create our ChatKit instance, which is similar to a server instance if you’re familiar with Discord.
Go to the ChatKit page on Pusher’s website and click the Sign Up button. You’ll be prompted for an email address and password, as well as the option to sign in with GitHub or Google.
Select which option suits you best, then on the next screen fill out some details such as Name, Account type, User role etc.
Click Complete Onboarding and you’ll be taken to the main Pusher dashboard. Here, you should click the ChatKit Product.
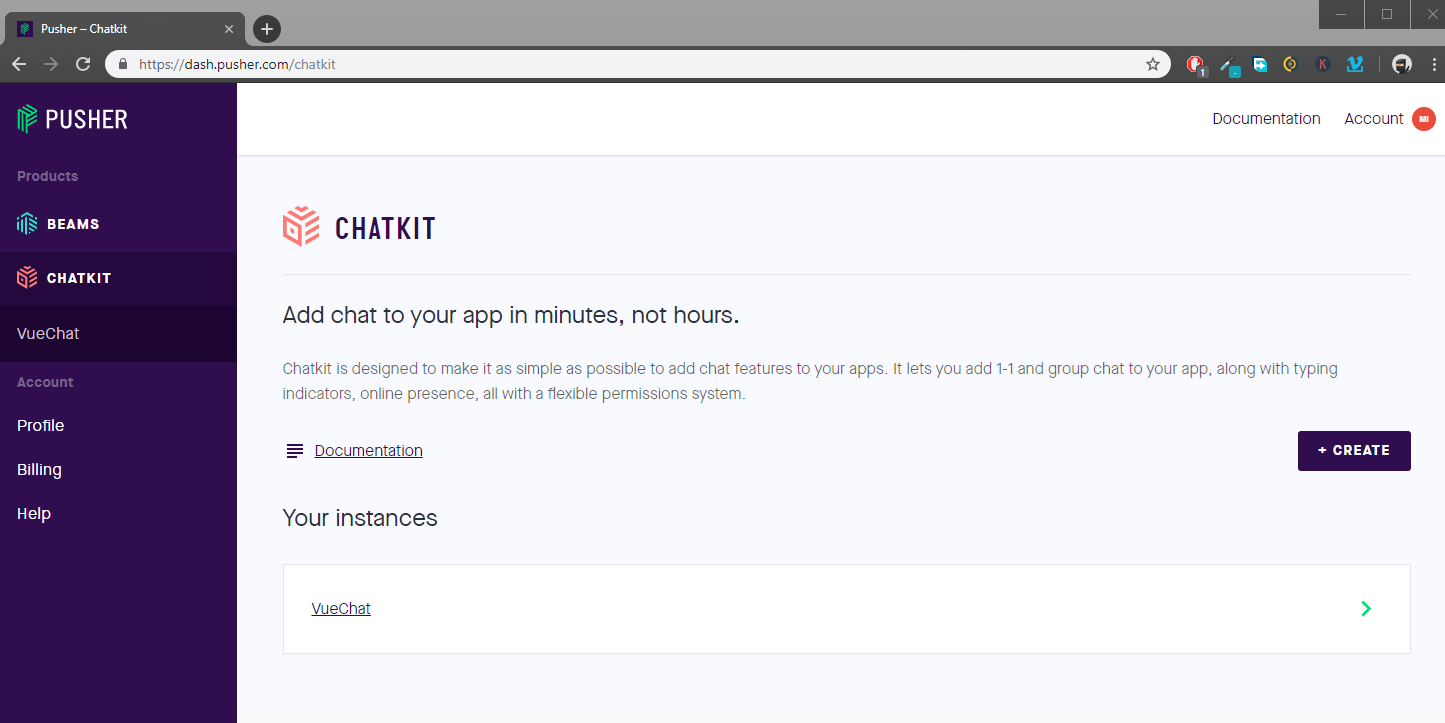
Click the Create button to create a new ChatKit Instance. I’m going to call mine VueChatTut.

We’ll be using the free plan for this tutorial. It supports up to 1,000 unique users, which is more than sufficient for our needs. Head over to the Console tab. You’ll need to create a new user to get started. Go ahead and click the Create User button.
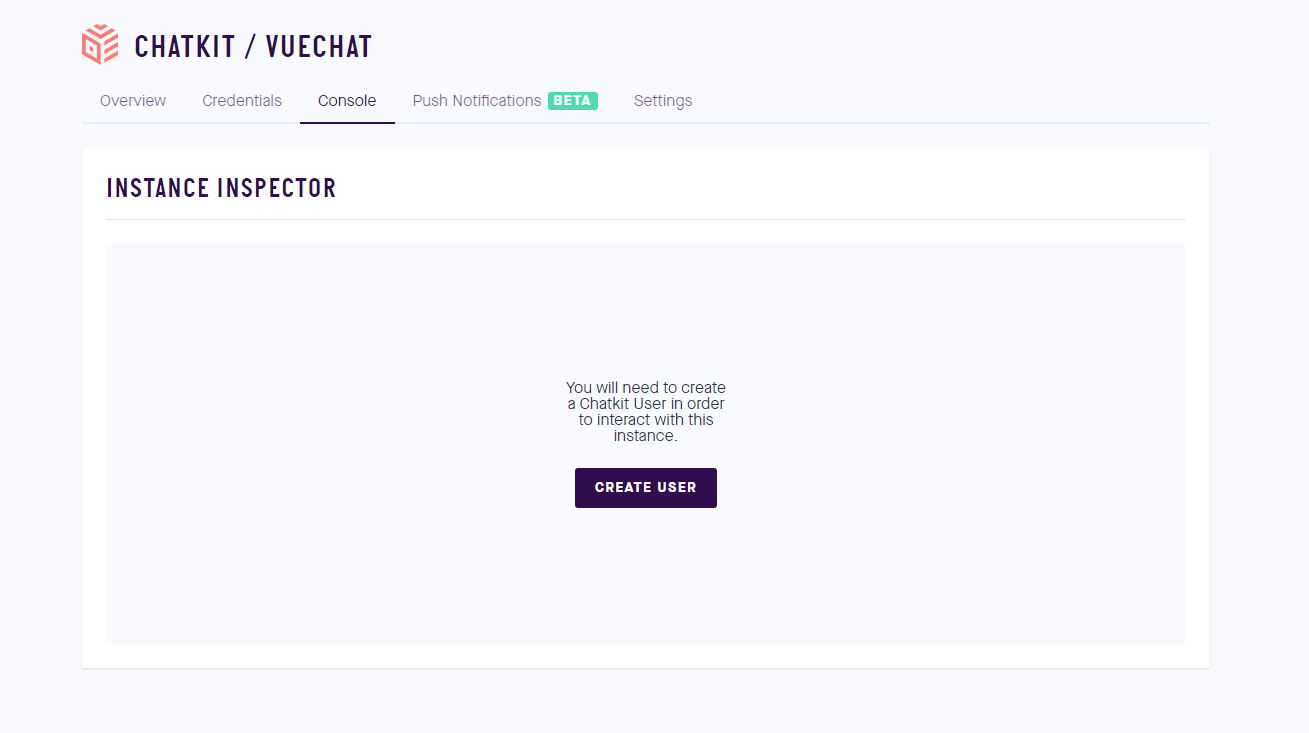
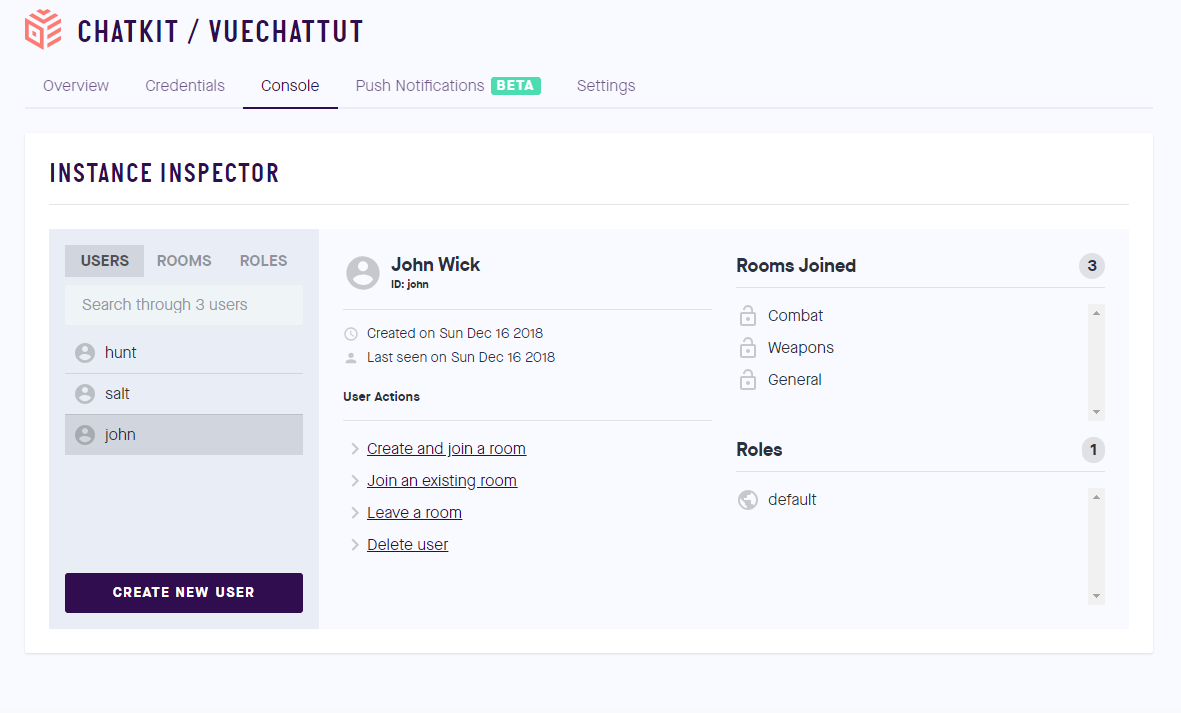
I’m going to call mine “john” (User Identifier) and “John Wick” (Display Name), but you can name yours however you want. The next part is easy: create the two or more users. For example:
- salt, Evelyn Salt
- hunt, Ethan Hunt
Create three or more rooms and assign users. For example:
- General (john, salt, hunt)
- Weapons (john, salt)
- Combat (john, hunt)
Here’s a snapshot of what your Console interface should like.
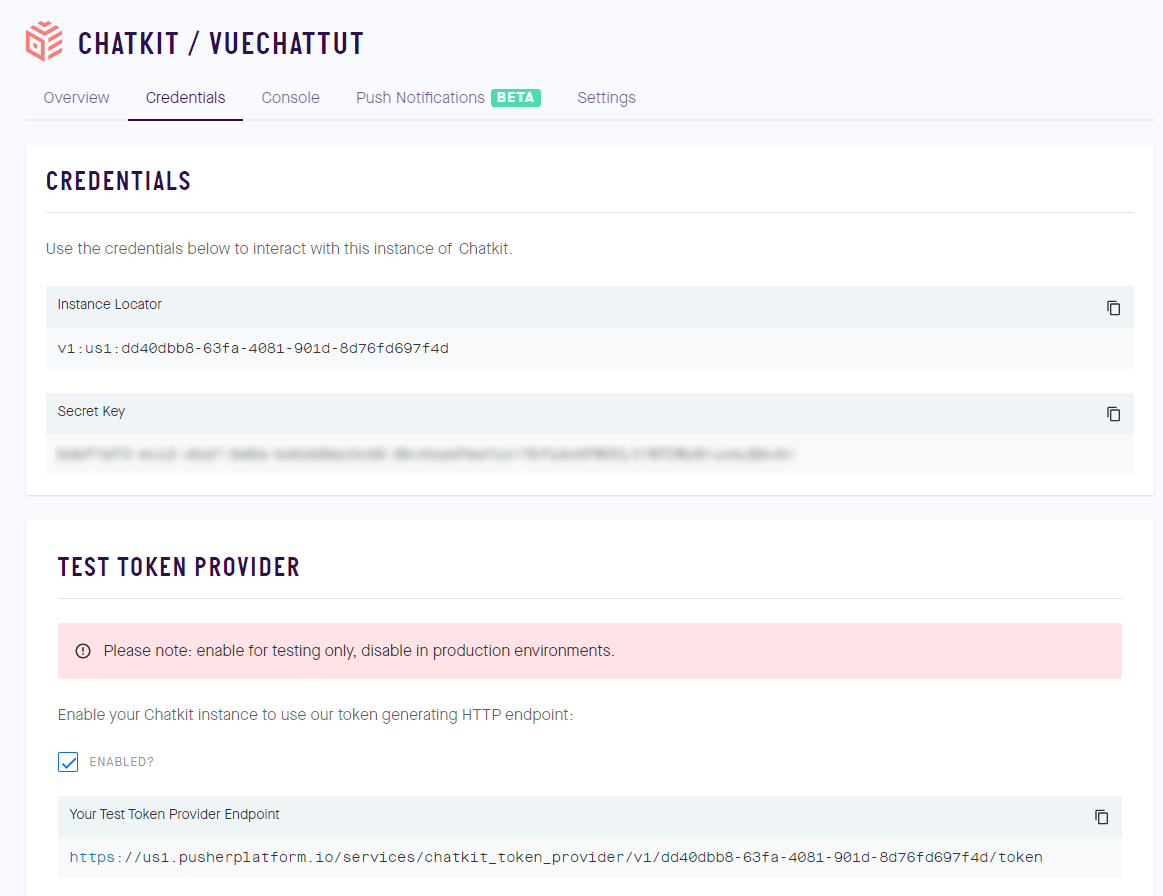
Next, you can go to the Rooms tab and create a message using a selected user for each room. This is for testing purposes. Then go to the Credentials tab and take note of the Instance Locator. We’ll need to activate the Test Token Provider, which is used for generating our HTTP endpoint, and take a note of that, too.
Our ChatKit back end is now ready. Let’s start building our Vue.js front end.
Scaffolding the Vue.js Project
Open your terminal and create the project as follows:
vue create vue-chatkit
Select Manually select features and answer the questions as shown below.
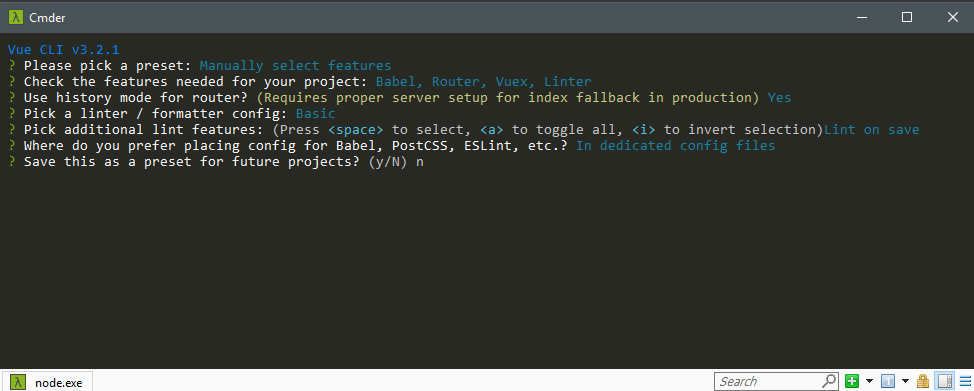
Make doubly sure you’ve selected Babel, Vuex and Vue Router as additional features. Next, create the following folders and files as follows:
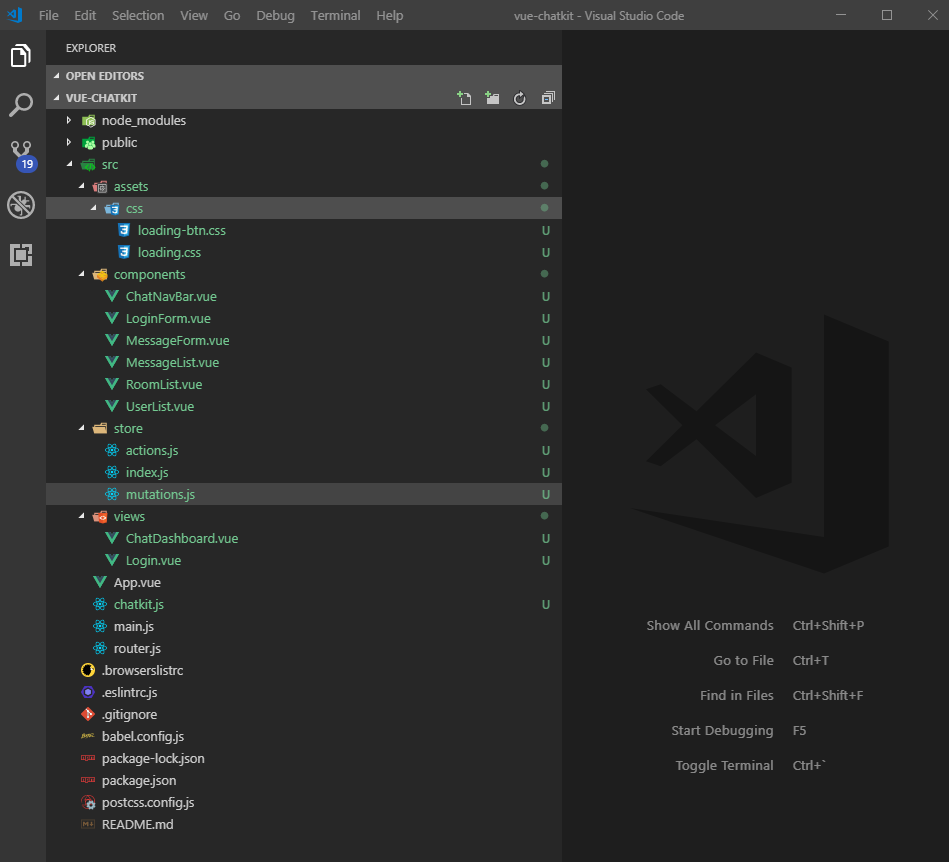
Make sure to create all the folders and files as demonstrated. Delete any unnecessary files that don’t appear in the above illustration.
For those of you that are at home in the console, here are the commands to do all that:
mkdir src/assets/css
mkdir src/store

touch src/assets/css/{loading.css,loading-btn.css}
touch src/components/{ChatNavBar.vue,LoginForm.vue,MessageForm.vue,MessageList.vue,RoomList.vue,UserList.vue}
touch src/store/{actions.js,index.js,mutations.js}
touch src/views/{ChatDashboard.vue,Login.vue}
touch src/chatkit.js

rm src/components/HelloWorld.vue
rm src/views/{About.vue,Home.vue}
rm src/store.js
When you’re finished, the contents of the src folder should look like so:
.
├── App.vue
├── assets
│   ├── css
│   │   ├── loading-btn.css
│   │   └── loading.css
│   └── logo.png
├── chatkit.js
├── components
│   ├── ChatNavBar.vue
│   ├── LoginForm.vue
│   ├── MessageForm.vue
│   ├── MessageList.vue
│   ├── RoomList.vue
│   └── UserList.vue
├── main.js
├── router.js
├── store
│   ├── actions.js
│   ├── index.js
│   └── mutations.js
└── views
    ├── ChatDashboard.vue
    └── Login.vue
For the loading-btn.css and the loading.css files, you can find them on the loading.io website. These files are not available in the npm repository, so you need to manually download them and place them in your project. Do make sure to read the documentation to get an idea on what they are and how to use the customizable loaders.
Next, we’re going to install the following dependencies:
- @pusher/chatkit-client, a real-time client interface for the ChatKit service
- bootstrap-vue, a CSS framework
- moment, a date and time formatting utility
- vue-chat-scroll, which scrolls to the bottom automatically when new content is added
- vuex-persist, which saves Vuex state in browser’s local storage
npm i @pusher/chatkit-client bootstrap-vue moment vue-chat-scroll vuex-persist
Do check out the links to learn more about what each package does, and how it can be configured.
Now, let’s configure our Vue.js project. Open src/main.js and update the code as follows:
import Vue from 'vue'
import BootstrapVue from 'bootstrap-vue'
import VueChatScroll from 'vue-chat-scroll'

import App from './App.vue'
import router from './router'
import store from './store/index'

import 'bootstrap/dist/css/bootstrap.css'
import 'bootstrap-vue/dist/bootstrap-vue.css'
import './assets/css/loading.css'
import './assets/css/loading-btn.css'

Vue.config.productionTip = false
Vue.use(BootstrapVue)
Vue.use(VueChatScroll)

new Vue({
  router,
  store,
  render: h => h(App)
}).$mount('#app')
Update src/router.js as follows:
import Vue from 'vue'
import Router from 'vue-router'
import Login from './views/Login.vue'
import ChatDashboard from './views/ChatDashboard.vue'

Vue.use(Router)

export default new Router({
  mode: 'history',
  base: process.env.BASE_URL,
  routes: [
    {
      path: '/',
      name: 'login',
      component: Login
    },
    {
      path: '/chat',
      name: 'chat',
      component: ChatDashboard,
    }
  ]
})
Update src/store/index.js:
import Vue from 'vue'
import Vuex from 'vuex'
import VuexPersistence from 'vuex-persist'
import mutations from './mutations'
import actions from './actions'

Vue.use(Vuex)

const debug = process.env.NODE_ENV !== 'production'

const vuexLocal = new VuexPersistence({
  storage: window.localStorage
})

export default new Vuex.Store({
  state: {
  },
  mutations,
  actions,
  getters: {
  },
  plugins: [vuexLocal.plugin],
  strict: debug
})
The vuex-persist package ensures that our Vuex state is saved between page reloads or refreshes.
Our project should be able to compile now without errors. However, don’t run it just yet, as we need to build the user interface.
The post Build a Real-time Chat App with Pusher and Vue.js appeared first on SitePoint.
by Michael Wanyoike via SitePoint
No comments:
Post a Comment