by via Awwwards - Sites of the day


dom-to-image is a JavaScript library which can turn arbitrary DOM node into a SVG (vector) or PNG-JPEG (raster) image.
Designers know that communication and organization are essential to making a project successful. Otherwise, it's just too easy to suffer from setbacks and misunderstandings. Working as a team means knowing who's responsible for handling tasks, keeping tabs on progress and being mindful of deadlines. But even if you're working on your own, you still need a way to stay on top of your to-do list.
Thankfully, there is a solution. Monday.com turns task management and collaboration into a visual experience. Its unique combination of a user-friendly UI and powerful functionality make it a must-have tool. They have helped companies of all sizes get things done more efficiently – and they can help you do the same. Let's find out how:
When it comes to project work, there are so many things we need to stay on top of. Trying to do so with email or traditional meetings ends up causing more problems than they solve. There's got to be a better way.
Monday.com (formerly known as dapulse) is here to save the day with everything you need. Use it to communicate with team members, manage and assign tasks, share progress, files and more. They have a strong set of core features to help you achieve your goals, including:
Use boards to keep track of every aspect of your projects. You can set up multiple boards to provide anything from a high-level view of what your team is working on to a task list for a single person.
Boards are designed to be intuitive and user-friendly. From color-coded task statuses to a simple drag-and-drop method for moving things around – there's no steep learning curve to adjust to. Things simply work.
And, you'll love the fact that you can tag each task and easily search for every related item in the system. This makes it incredibly painless to find what you're looking for.
With monday.com, you'll find that communicating with team members and clients is both easy and enjoyable. Participants are kept in the loop with new message notifications on their desktop or mobile devices in real-time. That means you'll spend less time in pointless meetings and more time knocking tasks off your list.
You can also share files directly from your device or supported third-party cloud services. Plus, this forum provides a great place to share new ideas, feedback or ask a quick question. And, because everything is all in one place, you won't have to dig through huge archives to go back and reference something. Try doing that with email.
As a bonus, you can cheer on team members by sharing .gifs and giving them a thumbs-up. A little bit of encouragement can go a long way!
Seeing your projects in a visual manner can really open your eyes to the bigger picture. With monday.com's Timeline feature, you'll see a listing of team members, which projects they're assigned to and respective dates. It's all there in an attractive and interactive chart.
The Timeline lets you easily find out which team members are super-busy, along with those who might have time for a new task assignment. Because it provides such a great view of what's happening, you'll be better able to stay on top of project deadlines. Task management has never looked so good.
Reading about how monday.com's features make life easier is great. But when you see the real-life results others have had, it's all the more impressive. You'll find that monday.com has been utilized by companies ranging from solo entrepreneurs all the way up to large corporations.
It's not often that a tool can be successfully used by such a wide variety of clients. This speaks to monday.com's flexibility in adapting to the different needs of its users. The system can be easily customized to your specific requirements – no matter how simple or complex.
And it's a great fit for every industry. Your first thought might be of a hot tech company – and it does do wonders there. But it's also been an indispensible tool for schools, fitness gurus and even a small bike company.
Implementing a strong task management tool can transform the way you work. You'll have a better understanding of your projects – right down to the smallest details. Team members will stay on the same page and be aware of their own responsibilities. This results in projects that get done more quickly and with fewer hiccups. monday.com provides you with a highly-visual and easy-to-use platform that brings everything and everyone together.
The best part is that you can start using monday.com for free. Experience this revolutionary tool for yourself and see how much it can streamline your workflow.
Continue reading %Get Things Done More Efficiently than Ever with monday.com%
|
In this article, we’ll take a look a bit closer at Angular 2 components — how they’re defined, and how to get data into them and back out of them.
This is the second part in the Angular 2 series. You can read part one here. We covered the basic idea of components and decorators in an earlier article, and have specifically seen the @Component and @View decorators used to build an Angular application. This article dives in a bit deeper. However, we can’t cover everything about components in a single article, so future articles will take up other aspects of Angular components.
The code for this article and the other articles in the series is available as in the angular2-samples repo. You can also see the samples running at: http://angular2-samples.azurewebsites.net/.
Although it’s possible to write Angular 2 applications in ECMAScript 5 (the most common version of JavaScript supported by browsers), we prefer to write in TypeScript. Angular 2 itself is written in TypeScript and it helps us at development time and includes features that make it easier for us to define Angular components.
In particular, TypeScript supports decorators (sometimes referred to as “annotations”) which are used to declaratively add to or change an existing “thing”. For example, class decorators can add metadata to the class’s constructor function or even alter how the class behaves. For more information on decorators and the types of things you can do with them, see the proposal for JavaScript decorators. Angular 2 includes several decorators.
As we’ve covered in an earlier article, components are the key building block for Angular applications. They include a view, defined with HTML and CSS, and an associated controller that implements functionality needed by the view. The controller has three major responsibilities:
Depending on your background, the above list might sound familiar. In fact, the Angular component controller sounds very much like the original definition of a view model as defined by John Gossman in 2005:
The term means “Model of a View”, and can be thought of as abstraction of the view, but it also provides a specialization of the Model that the View can use for data-binding. In this latter role the ViewModel contains data-transformers that convert Model types into View types, and it contains Commands the View can use to interact with the Model. — Source (captured 11/27/2015)
Because components aren’t native JavaScript entities, Angular provides a way to define a component by pairing a constructor function with a view. You do this by defining a constructor function (in TypeScript it’s defined as a class) and using a decorator to associate your view with the constructor. The decorator can also set various configuration parameters for the component. This magic is accomplished using the @Component decorator we saw in the first article in this series.
The above describes an individual component, but Angular 2 applications are actually made up of a hierarchy of components – they begin with a root component that contains as descendants all the components used in the application. Components are intended to be self-contained because we want to encapsulate our component functions and we don’t want other code to arbitrarily reach into our components to read or change properties. Also, we don’t want our component to affect another component written by someone else. An obvious example is CSS: if we set CSS for one component, we don’t want our CSS to “bleed out” to another components just as we don’t want other CSS to “bleed in” to our component.
At the same time, components do need to exchange data. In Angular 2, a component can receive data from its parent as long as the receiving component has specifically said it’s willing to receive data. Similarly, components can send data to their parents by trigger an event the parent listens for. Let’s look at how the component hierarchy behaves. To begin, we can draw it as follows:
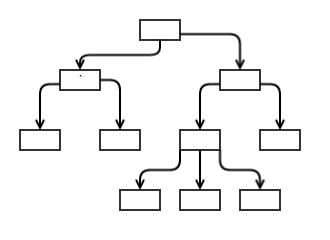
Each box is a component and technically this representation is called “graph” — a data structure consisting of nodes and connecting “edges.” The arrows represent the data flow from one component to another, and we can see that data flows in only one direction — from the top downwards to descendants. Also, note there are no paths that allow you to travel from one node, through other nodes and back to the one where you started. The official name for this kind of data structure is a “directed acyclic graph” — that is, it flows in only one direction and has no circular paths in it.
This kind of structure has some important features: it’s predictable, it’s simple to traverse, and it’s easy to see what’s impacted when a change is made. For Angular’s purposes, when data changes in one node, it’s easy to find the downstream nodes that could be affected.
A simple example of how this might be used is a table with rows containing customers and information about them, in which a table component contains multiple individual row components that represent each customer. The table component could manage a record set containing all the customers and pass the data on an individual customer to each of the row components it contains.
This works fine for simply displaying data, but in the real world data will need to flow the other way — back up the hierarchy — such as when a user edits a row. In that case, the row needs to tell the table component that the data for a row has changed so the change can be sent back to the server. The problem is that, as diagrammed above, data only flows down the hierarchy, not back up. To ensure we maintain the simplicity of one-way data flow down the hierarchy, Angular 2 uses a different mechanism for sending data back up the hierarchy: events.
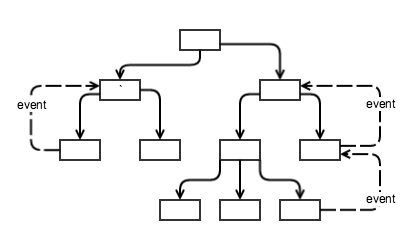
Now, when a child component takes an action that a parent needs to know about, the child fires an event that’s caught by the parent. The parent can take any action it needs which might include updating data that will, through the usual one-way downwards data flow, update downstream components. By separating the downward flow of data from the upwards flow of data, things are kept simpler and data management performs well.
Continue reading %Angular 2 Components: Inputs and Outputs%