In this article, we’ll take a look a bit closer at Angular 2 components — how they’re defined, and how to get data into them and back out of them.
This is the second part in the Angular 2 series. You can read part one here. We covered the basic idea of components and decorators in an earlier article, and have specifically seen the @Component and @View decorators used to build an Angular application. This article dives in a bit deeper. However, we can’t cover everything about components in a single article, so future articles will take up other aspects of Angular components.
The code for this article and the other articles in the series is available as in the angular2-samples repo. You can also see the samples running at: http://angular2-samples.azurewebsites.net/.
Although it’s possible to write Angular 2 applications in ECMAScript 5 (the most common version of JavaScript supported by browsers), we prefer to write in TypeScript. Angular 2 itself is written in TypeScript and it helps us at development time and includes features that make it easier for us to define Angular components.
In particular, TypeScript supports decorators (sometimes referred to as “annotations”) which are used to declaratively add to or change an existing “thing”. For example, class decorators can add metadata to the class’s constructor function or even alter how the class behaves. For more information on decorators and the types of things you can do with them, see the proposal for JavaScript decorators. Angular 2 includes several decorators.
As we’ve covered in an earlier article, components are the key building block for Angular applications. They include a view, defined with HTML and CSS, and an associated controller that implements functionality needed by the view. The controller has three major responsibilities:
- Manage the model, i.e. the application data used by the view
- Implement methods needed by the view for things like submitting data or hiding/showing sections of the UI
- Managing data related to the state of the view, such as which item in a list is currently selected.
Depending on your background, the above list might sound familiar. In fact, the Angular component controller sounds very much like the original definition of a view model as defined by John Gossman in 2005:
The term means “Model of a View”, and can be thought of as abstraction of the view, but it also provides a specialization of the Model that the View can use for data-binding. In this latter role the ViewModel contains data-transformers that convert Model types into View types, and it contains Commands the View can use to interact with the Model. — Source (captured 11/27/2015)
Because components aren’t native JavaScript entities, Angular provides a way to define a component by pairing a constructor function with a view. You do this by defining a constructor function (in TypeScript it’s defined as a class) and using a decorator to associate your view with the constructor. The decorator can also set various configuration parameters for the component. This magic is accomplished using the @Component decorator we saw in the first article in this series.
Component Hierarchy
The above describes an individual component, but Angular 2 applications are actually made up of a hierarchy of components – they begin with a root component that contains as descendants all the components used in the application. Components are intended to be self-contained because we want to encapsulate our component functions and we don’t want other code to arbitrarily reach into our components to read or change properties. Also, we don’t want our component to affect another component written by someone else. An obvious example is CSS: if we set CSS for one component, we don’t want our CSS to “bleed out” to another components just as we don’t want other CSS to “bleed in” to our component.
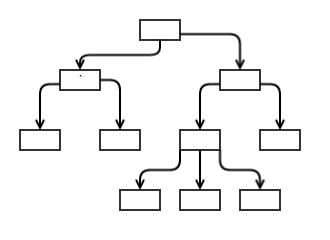
At the same time, components do need to exchange data. In Angular 2, a component can receive data from its parent as long as the receiving component has specifically said it’s willing to receive data. Similarly, components can send data to their parents by trigger an event the parent listens for. Let’s look at how the component hierarchy behaves. To begin, we can draw it as follows:

Each box is a component and technically this representation is called “graph” — a data structure consisting of nodes and connecting “edges.” The arrows represent the data flow from one component to another, and we can see that data flows in only one direction — from the top downwards to descendants. Also, note there are no paths that allow you to travel from one node, through other nodes and back to the one where you started. The official name for this kind of data structure is a “directed acyclic graph” — that is, it flows in only one direction and has no circular paths in it.
This kind of structure has some important features: it’s predictable, it’s simple to traverse, and it’s easy to see what’s impacted when a change is made. For Angular’s purposes, when data changes in one node, it’s easy to find the downstream nodes that could be affected.
A simple example of how this might be used is a table with rows containing customers and information about them, in which a table component contains multiple individual row components that represent each customer. The table component could manage a record set containing all the customers and pass the data on an individual customer to each of the row components it contains.
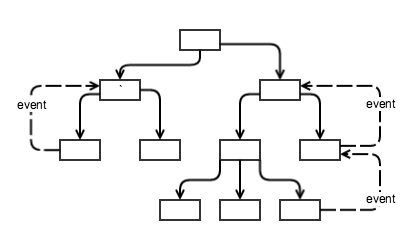
This works fine for simply displaying data, but in the real world data will need to flow the other way — back up the hierarchy — such as when a user edits a row. In that case, the row needs to tell the table component that the data for a row has changed so the change can be sent back to the server. The problem is that, as diagrammed above, data only flows down the hierarchy, not back up. To ensure we maintain the simplicity of one-way data flow down the hierarchy, Angular 2 uses a different mechanism for sending data back up the hierarchy: events.

Now, when a child component takes an action that a parent needs to know about, the child fires an event that’s caught by the parent. The parent can take any action it needs which might include updating data that will, through the usual one-way downwards data flow, update downstream components. By separating the downward flow of data from the upwards flow of data, things are kept simpler and data management performs well.
Continue reading %Angular 2 Components: Inputs and Outputs%
by David Aden via SitePoint
No comments:
Post a Comment