[ This is a content summary only. Visit our website https://ift.tt/1b4YgHQ for full links, other content, and more! ]


by Zubair Ahmed via Digital Information World
Wondering how to create a buyer persona? Looking for free tools to help you? Facebook offers several useful tools that allow businesses to conduct detailed audience research. In this article, you’ll discover how to use Facebook Insights to quickly and easily create a buyer persona for free. What Is a Buyer Persona? If you were [...]
This post How to Develop Buyer Personas Using Facebook Insights first appeared on Social Media Examiner.
If you want to start your day with some inspiration from some of the top designers on the planet, look no further. I can’t believe I just discovered this site. (interfacelovers.com)
Jon Gold shares some wise words about the current tooling landscape and what the near future looks like. He also touches on the newly released Figma API which is super exciting. (airbnb.design)
InVision has released a report on how some of the world’s most innovative companies approach design. The Design Genome Project is an online resource describing the processes, organisational structures, and tool stacks. (invisionapp.com)
A quick breakdown of the most useful JavaScript modules that Travis Fischer has found himself using over and over again. (hackernoon.com)
Jenn Lukas shares some thoughts from the last two years on crafting the CSS design system for her current workplace. (thenerdary.net)
An open source tool for building Design Systems with Vue.js. (vueds.com)
A command line tool to measure the efficiency of your responsive image markup across viewport sizes and device pixel ratios. (github.com)
If you’ve built a website that works offline, and you’re using Google Analytics, you should definitely be using Workbox so you can capture offline user-interactions too. (developers.google.com)
ReactAF does for React what Babel does for JavaScript. (hackernoon.com)
Sparkbox is looking for an experienced software developer with a real passion for building a better web. If you’re right for this position, you have solid knowledge of HTML, CSS, and JavaScript while being mindful of the diverse ecosystem of devices and connections. (seesparkbox.com)
JavaScript powers the magic behind Help Scout’s apps and services, bringing them to life with delightful interactions and dynamic real-time updates. (helpscout.com)
The post Web Design Weekly #312 appeared first on Web Design Weekly.


If we asked you to list the most important qualities of a UX designer, things like creativity, empathy and technical skills would no doubt spring to mind. But aside from these fundamentals, what really separates the best from the rest?
The answer? Teamwork. The most accomplished UX designers are kings and queens of collaboration. They have mastered the art of communication, and know just how to connect with those around them to leverage fresh perspectives and new ideas – all in the name of great UX.
That’s because great designers recognise that UX is universal. It isn’t merely the aesthetics of a product – it’s a culture, one that puts the user first and determines whether a brand succeeds or fails. UX needs to be a team effort, and more often than not, it’s up to the UX designer to get everyone on board.
To truly excel at your job, you need to make sure that teamwork is at the heart of what you do. This means collaborating effectively and maintaining strong relationships with your peers. So how do you go about this? Look no further than our five key pillars of UX teamwork.
There’s a very easy way to become a better team player: empathy. It’s time to practice what you preach, but forget the user for a minute and focus on your colleagues instead. Spend some time getting to know each department, finding out what they do and understanding their goals.
For smoother collaboration with your closest colleagues, it can be useful to step into their shoes for a day or two. Consider picking up some key frontend skills so you can communicate more technically with the developers, or spend a day shadowing the UI team to see how they work.

Empathy isn’t just for users – try stepping into your coworkers’ shoes.
In the professional world, empathy is important for a number of reasons. The better you know and understand your coworkers, the easier it becomes to recognise how your own work impacts theirs – and vice versa. If you know what motivates your colleagues, the easier it is to pitch your ideas in a way that appeals to them.
Empathy is also key when it comes to handling conflict. Not everyone will like your designs or agree with your decisions, so you need to be ready to discuss, explain and negotiate at any given moment. If you’ve already established a culture of mutual understanding, these conversations will proceed much more smoothly.
Just as empathy for the user enables you to design great experiences, empathy for your colleagues will greatly improve the UX of your professional environment.
As a UX designer, you will find yourself working with people who care immensely about the product – but are not necessarily experts in the field of UX. It’s your job to understand their vision and translate it into something that the developers can bring to life. A tricky balancing act if ever there was one.
When bridging the gap between what the stakeholders want and what’s technically possible, managing expectations can be a real challenge. Ultimately, honesty is the best policy. Be realistic about what’s achievable, even if this means having to quash certain ideas as soon as they are put forward. At the same time, be open about your progress and communicate any changes as and when they happen.
An honest, realistic approach keeps everyone on the same page and avoids last-minute surprises. Keep all key stakeholders in the loop at all times and you can’t go wrong.
Teamwork is all about trust, so make sure your colleagues know that they can rely on you. As Paul Towers points out: “Without each party trusting one another, the ability to come to an agreement or consensus on an issue is always going to be compromised.”
Building trust takes time, but relies on a very simple formula: keep your promises, deliver what you say you will, and meet your deadlines. This ties in with the previous point about honesty: if you’ve agreed on certain design elements with, say, the product manager, make sure you deliver them – or communicate and discuss why you can no longer do so.
How else can you build trust? Through consistency. Be consistent in terms of your methods and actions – even if it’s something seemingly insignificant, such as posting a weekly progress report in the company chat or delivering your work in a certain format. However subtle, establishing certain routines and protocols helps to create structure and reinforce the message that you are trustworthy and dependable.
Empathy works both ways, so give your colleagues the chance to understand and be part of the UX design process. I’m not suggesting you set them to work on wireframes, but it is important to take an inclusive approach. If you want to encourage a user-first mindset across the whole company, you need to be willing to share what you do.
Why not put together a brief presentation, outlining your methods and processes? Not only does this provide valuable insight into your work, it also helps to build enthusiasm. If you can show your coworkers from other departments just how important user-friendly design is to the overall success of the brand, they will certainly be much more supportive of your mission.
Last but not least, go to work with an open mind. Good designers are excellent listeners, always ready to hear new ideas and suggestions. We’re all users, after all, and you can broaden your horizons tenfold if you seek fresh perspectives. Who knows – your colleagues from other departments may just have the solution to your latest UX challenge.
When working on new ideas, invite your coworkers to take a look and provide feedback. Coming from a non-design background, they will be able to tell you if your approach is indeed as user-friendly as you’d hoped. If you really want to experiment with collaborative UX, consider installing a whiteboard in a common space. Jot down your current design challenge and invite others to add their ideas!
As a UX designer, it can be tempting to operate as a lone wolf. You’ve mastered your craft, after all, and working autonomously often seems like the quickest way to get things done. But to ignore the importance of teamwork is to miss out on the diversity of ideas, inspiration and feedback that is crucial to great UX. With these five strategies, you are well on your way to becoming a better team player – and with it, an even better UX designer.
What do you think are the most important soft skills for UX designers? Leave a comment or let us know in the forums!
The post How UX Designers Can Become Better Team Players appeared first on UX Mastery.
In a previous article, we looked at how to get data into and out of components using the @Input and @Output annotations. In this article, we’ll look at another fundamental aspect of Angular 2 components — their ability to use “providers.”
You may have seen “providers” in a list of properties you can use to configure components, and you might have realized that they allow you to define a set of injectable objects that will be available to the component. That’s nice, but it of course begs the question, “what is a provider?”
Answering that question gets us into an involved discussion of Angular 2’s Dependency Injection (DI) system. We may specifically cover DI in a future blog post, but it’s well covered in a series of articles by Pascal Precht, beginning with: http://blog.thoughtram.io/angular/2015/05/18/dependency-injection-in-angular-2.html. We’ll assume you are familiar with DI and Angular 2’s DI system in general, as covered in Pascal’s article, but in brief the DI system is responsible for:
In the previous article, we included a diagram showing that components form a hierarchy beginning with a root component. Let’s add to that diagram to include the injectors and the resources (providers) they register:
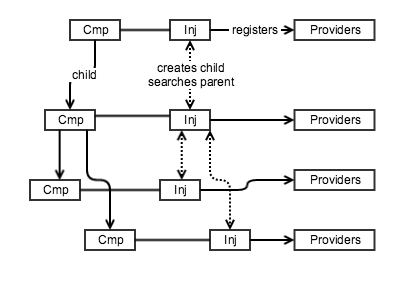
Figure 1: Each component has its own injector that registers providers. Injectors create child injectors and a request for a provider starts with the local injector and searches up the injector hierarchy.
We can see from the above that while components form a downwards directed graph, their associated injectors have a two-way relationship: parent injectors create children (downwards) and when a provider is requested, Angular 2 searches the parent injector (upwards) if it can’t find the requested provider in the component’s own injector. This means that a provider with the same identifier at a lower level will shadow (hide) the same-named provider at a higher level.
So, what are these “providers” that the injectors are registering at each level? Actually, it’s simple: a provider is a resource or JavaScript “thing” that Angular uses to provide (result in, generate) something we want to use:
Unfortunately, the term “provider” is sometimes used to mean both the class, function or value and the thing that results from the provider — a class instance, the function’s return value or the returned value.
Let’s see how we can add a provider to a component by creating a class provider using MyClass, a simple class that will generate the instance we want to use in our application.
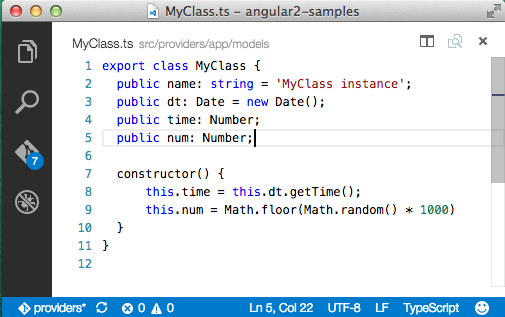
Figure 2: A simple class with four properties. (Code screenshots are from Visual Studio Code)
Okay, that’s the class. Now let’s instruct Angular to use it to register a class provider so we can ask the dependency injection system to give us an instance to use in our code. We’ll create a component, ProvDemo_01.ts, that will serve as the root component for our application. We load this component and kick-off our application in the bootstrap.ts:
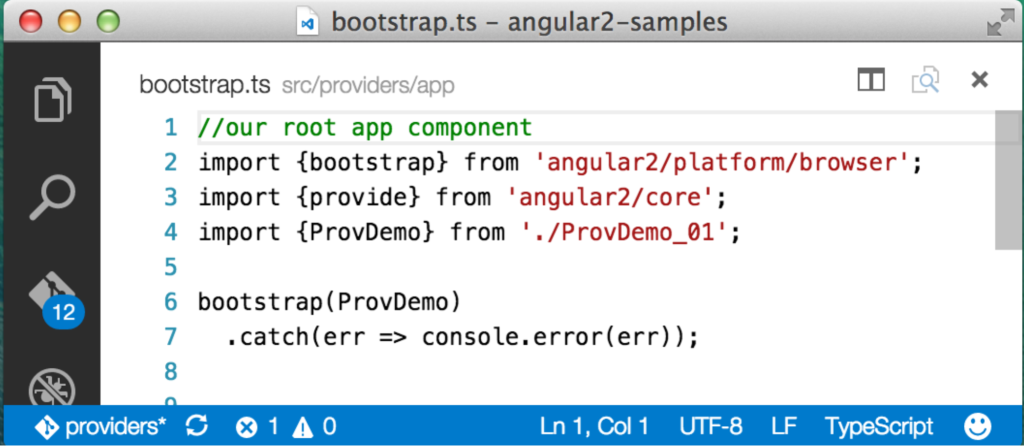
Figure 3: Our application’s bootstrap.ts file that instantiates the root component.
If the above doesn’t make sense, then take a look at our earlier post that walks through building a simple Angular 2 application. Our root component is called ProvDemo, and the repository contains several numbers versions of it. You can change the version that’s displayed by updating the line that imports ProvDemo above. Our first version of the root component looks like this:

Figure 4: CompDemo with MyClass imported, added to the providers array and used as a Type in the constructor arguments.
Adding the MyClass provider to this component is straightforward:
Under the covers, when Angular instantiates the component, the DI system creates an injector for the component which registers the MyClass provider. Angular then sees the MyClass type specified in the constructor’s argument list and looks up the newly registered MyClass provider and uses it to generate an instance which it assigns to “myClass” (initial small “m”).
The process of looking up the MyClass provider and generating an instance to assign to “myClass” is all Angular. It takes advantage of the TypeScript syntax to know what type to search for but Angular’s injector does the work of looking up and returning the MyClass instance.
Given the above, you might conclude that Angular takes the list of classes in the “providers” array and creates a simple registry used to retrieve the class. But there’s a slight twist to make things more flexible. A key reason why a “twist” is needed is to help us write unit tests for our components that have providers we don’t want to use in the testing environment. In the case of MyClass, there isn’t much reason not to use the real thing, but if MyClass made a call to a server to retrieve data, we might not want to or be able to do that in the test environment. To get around this, we need to be able to substitute within ProvDemo a mock MyClass that doesn’t make the server call.
How do we make the substitution? Do we go through all our code and change every MyClass reference to MyClassMock? That’s not efficient and is a poor pattern for writing tests.
We need to swap out the provider implementation without changing our ProvDemo component code. To make this possible, when Angular registers a provider it sets up a map to associate a key (called a “token”) with the actual provider. In our example above, the token and the provider are the same thing: MyClass. Adding MyClass to the providers property in the @Component decorator is shorthand for:
providers: [ provide(MyClass, {useClass: MyClass} ]
This says “register a provider using ‘MyClass’ as the token (key) to find the provider and set the provider to MyClass so when we request the provider, the dependency injection system returns a MyClass instance.” Most of us are used to thinking of keys as being either numbers or strings. But in this case the token (key) is the class itself. We could have also registered the provider using a string for the token as follows:
providers: [ provide(“aStringNameForMyClass”, {useClass: MyClass} ]
So, how does this help us with testing? It means in the test environment we can override the provider registration, effectively doing:
provide(MyClass, {useClass: MyClassMock})
This associates the token (key) MyClass with the class provider MyClassMock. When our code asked the DI system to inject MyClass in testing, we get an instance of MyClassMock which can fake the data call. The net effect is that all our code remains the same and we don’t have to worry about whether the unit test will make a call to a server that might not exist in the test environment.
Continue reading %Angular 2 Components and Providers: Classes, Factories & Values%