Monday, May 25, 2020

12 Best PHP Event Calendar and Booking Scripts... and 3 Free Options

In this article I'll review 15 of the best PHP calendar scripts. Whether you need an appointment booking script, an event calendar script or a PHP calendar reservation system, you'll find something on this list.

There are lots of reasons you might need a PHP calendar script. If you’re a service provider, you need an appointment booking system that allows customers to see your availability and select an appointment time and date that is best for them. This makes it easier for customers to book and cuts down on needless calls to your business.

Online calendars are also handy for organisations of any size to help team members share events and tasks and keep track of what everybody is working on.

Their usefulness isn’t just limited to companies, however. Artists, writers, performers, bloggers and anyone else with an active public life could make good use of PHP calendar scripts to let followers and fans know the whens and wheres of public appearances.

What Type of PHP Calendar Script Do You Need?

When it comes to PHP event calendar and appointment booking scripts, choosing the right one can be hard. They can take dozens of forms, and finding the right one for you can be a daunting task.

To help narrow the solutions down a bit, here’s a few questions to ask yourself before you get started:

  • Do I need to focus on events, which occur at specific times, with a large number of tickets to sell? Or on bookings, with a smaller number of services that could occur at any time?
  • Will I need to support only my business? Or are there others that will be included in my listings? For example, a business cooperative might need to handle bookings for multiple service providers.
  • Will there be a single entity that events or bookings are attributed to, or several—as in a hair studio, with several stylists available?
  • Do I need a script to embed into a current site, or do I need something that stands on its own?

PHP Event Calendar and Booking Scripts on CodeCanyon

There are currently almost 50 PHP event calendar and booking scripts available on CodeCanyon. Some of these scripts address very specific use cases like cleaning and laundry services. Others are more general-purpose scripts used to book all kinds of events.

PHP Event Calendar Scripts

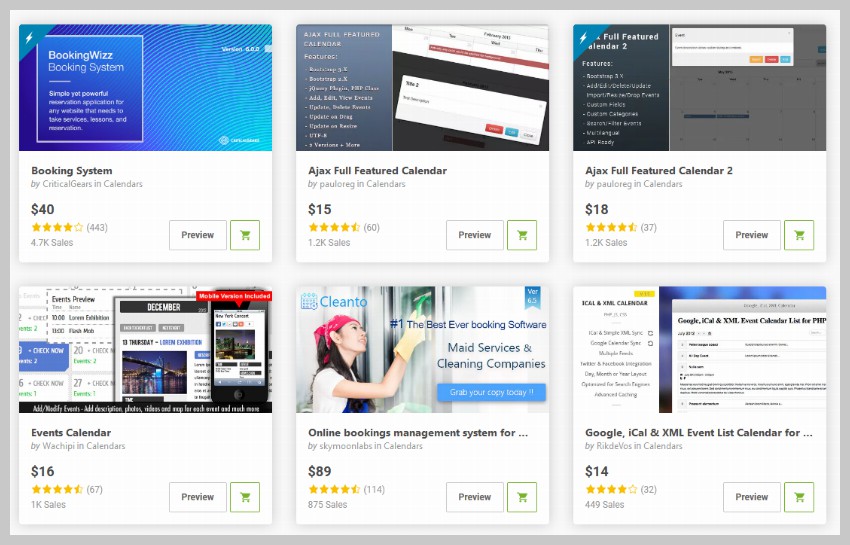
All of these scripts offer the basic functionality you expect in a booking system. Some of them also have a unique set of features that includes things like generating invoice PDFs or sending booking alerts through SMS.

After you purchase any of these scripts, you will get 6 months of free support to help you set things up. You also become eligible for free lifetime updates.

The Best PHP Event Calendar and Booking Scripts on CodeCanyon for 2020

With all this in mind, we’ve compiled 10 of our best PHP calendar, booking and events scripts available for download today at CodeCanyon. This post will help you choose the one that’s right for you.

1. Cleanto

Cleanto is ideal for many different types of service companies looking for a reliable way to provide clients with full-featured online booking.

Cleanto

Standout features:

  • PayPal, Authorize.Net, and Stripe payment methods
  • email reminders
  • auto confirm bookings
  • ability to add breaks in schedule
  • and more

User Crossera says:

“Amazing customer support. These guys came back to me within a day with a fix for all the problems I faced. The plugin can be customized to whatever your needs are.”

2. Appointo—Booking Management System

An end-to-end solution for booking, Appointo Booking Management System takes the heavy lifting off your CMS or static site. This script provides a front-end calendar and booking system that can be easily used to mark appointments or events. Then, on the administrative side, you can manage the events and services that are available, and keep track of customers or attendees.

Standout features:

  • front-end booking calendar
  • ability to manage services and booking
  • point-of-sale support
  • customer management
  • support for both PayPal and Stripe
Appointo PHP Booking Management System Admin Dashboard
Appointo's admin dashboard in action

User moffei says:

“Cool and Clean Customer Support. The fastest customer support I've ever had on CodeCanyon, plus a better script for the job. I definitely recommend it.”

3. Vacation Rentals Booking Calendar

The Vacation Rentals Booking Calendar is an online vacation rental booking calendar script that allows property owners or management agencies to create and manage rental availability calendars for their vacation rental properties.

Vacation Rentals Booking Calendar

Standout features:

  • highly customizable
  • email notifications to site owner or administrator
  • XML and JSON availability feeds
  • export calendars to iCalendar format
  • and more

User Craignic says:

“Great product and quick support given when I had a query.”

4. NodAPS Online Booking System

The NodAPS Online Booking System promises to help you manage your appointments more easily. You can create unlimited accounts with administrative, assistant, and staff permission, and add unlimited languages to the system. You can also change the booking time and date with a drag-and-drop feature.

NodAPS Online Booking System

Standout features:

  • multi-provider system
  • seven different booking type forms
  • multilingual
  • easy to install
  • and more

User Jam79 says:

“Very simple to use. Fast and effective support!”

5. Laravel Booking System

The Laravel Booking System with live chat offers a great online system for booking and making appointments. Users can buy credits as a payment option and view available services, total transactions, their total credits, and administrator contact information via their dashboard.  

From the administrative side, the system administrator can manage all things system related: general settings, payment settings, and user management. Admins can also manage bookings and respond to inquiries from their dashboard.  

Laravel Booking System

Standout features include:

  • live chat
  • multi-language support
  • booking and transaction history
  • PayPal integration
  • and more

User brentxscholl says:

“This plugin works great. Great code. Customer service is fantastic. We asked for extended features and they were delivered for a reasonable price.”

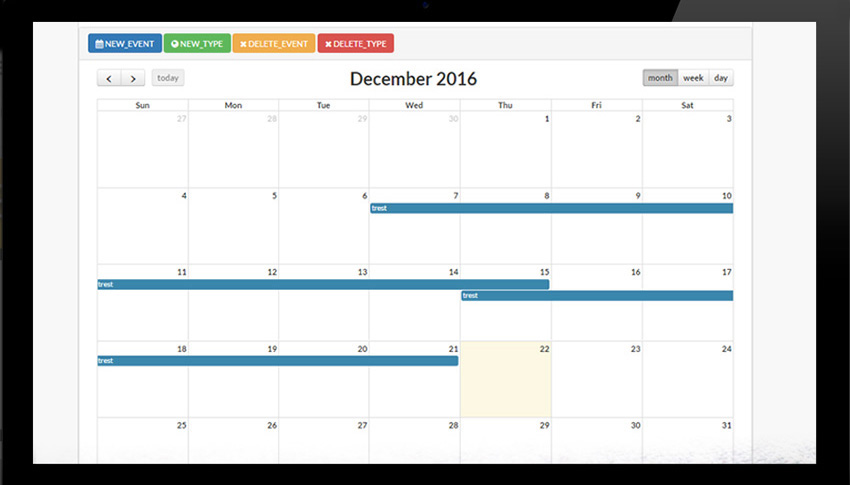
6. Ajax Full Featured Calendar 2

Ajax Full Featured Calendar 2 is a highly customizable personal calendar designed to help you keep organized. This is a best-selling update of another popular script, the Ajax Full Featured Calendar.

Ajax Calendar 2

Standout features include:

  • PHP and JS versions with PHP classes and object-oriented programming
  • ability to auto-embed YouTube, Vimeo, Dailymotion, or SoundCloud media
  • ability to export calendar or events to iCal format
  • supports recurring events
  • and more

User sv_fr says:

“Great script. Practical uses. Helpful support.”

7. Event Calendar

Built with jQuery FullCalendar and integrated into Bootstrap’s grid layout, the Event Calendar plugin allows users to organise and plan their events.

Event Calendar

Standout features:

  • create new types of events
  • ability to add fields such as title, colour, description, link, and photo
  • Google Fonts and Font Awesome icons
  • and more

User teddyedward says:

“Really enjoy using your script—it's perfect for my needs. It's also well documented and easy to use.”

8. eCalendar

Quite simply, the eCalendar script is designed to keep individual users or companies organised with a calendar that allows users to add as many events as needed, as well as updating details like the event title, location, or time.

eCalendar

Standout features:

  • choice of two designs
  • cross-browser compatibility (IE8+, Safari, Opera, Chrome, Firefox)
  • events are saved in your MySQL database
  • fully responsive design
  • and more

User levitschi says:

“Everything works perfectly! Support was better than I ever expected!”

9. BookMySlot

Focusing largely on event bookings, BookMySlot takes it up a notch by allowing your site to handle multiple vendors, with their individual events nested underneath. This script is thorough and self-contained, so if you are looking for a turnkey solution, rather than something to add to an existing website, this could be the script for you.

BookMySlot

Standout features:

  • thorough documentation
  • separate dashboards for admins and vendors
  • supports Stripe payments
  • built-in messaging system

User aungoo says:

“Outstanding customer support. I'm also happy with the quality of coding. ”

10. Laundry Booking and Management

This Laundry booking and management script serves a very specific purpose. This is good news for anyone who wants to create their own laundry and dry cleaning business. It has some great features for both the users of the service as well as the business owner.

Laundry Booking and Management

Users will be able to book orders for services like washing, dry cleaning or ironing etc. The user interface allows them to pick the number of different types of clothes like trousers, shirts etc.

The business owner can get paid through a lot of payment gateways like PayPal, Stripe and Authorize.net among others. They will also get alerts about different booking through SMS.

Here are some other additional features of the script:

  • multiple SMS and Email templates for users
  • guest checkout for orders
  • generate invoices in PDF format
  • staff dashboard to easily manage everything from one place

This fantastic script offers a lot of other features that you will find useful. If you are serious about starting a laundry business, you should definitely consider giving it a try.

11. BookingWizz Booking System

The BookingWizz System script has been around for over 10 years now. It was added to CodeCanyon in February 2010 is still updated regularly today. And it has been receiving good reviews from its buyers all this time! So, you can be rest assured that it is a great booking plugin that will serve your needs well.

BookingWizz

BookingWizz offers a features like discount coupons with unique codes and expiration dates. All your sales stats are available for you to see in the dashboard. The design is also fully responsive and looks great on all kinds of devices and browsers as old as IE9.

Here are some of its other features:

  • unlimited calendars and events
  • hourly and daily bookings
  • integrated PayPal payments and offline payments
  • multilingual support
  • automatic booking reminder
  • printable PDF schedule
  • and more

You should try out some of its features in the live preview of the script and see if it does what you want.

12. Rezervy—Online Appointment Scheduling

Rezervy is a great online appointment scheduling and reservation booking script. It was added only recently to CodeCanyon, but the numerous 5 star ratings of the script are proof of its quality.

Rezervy

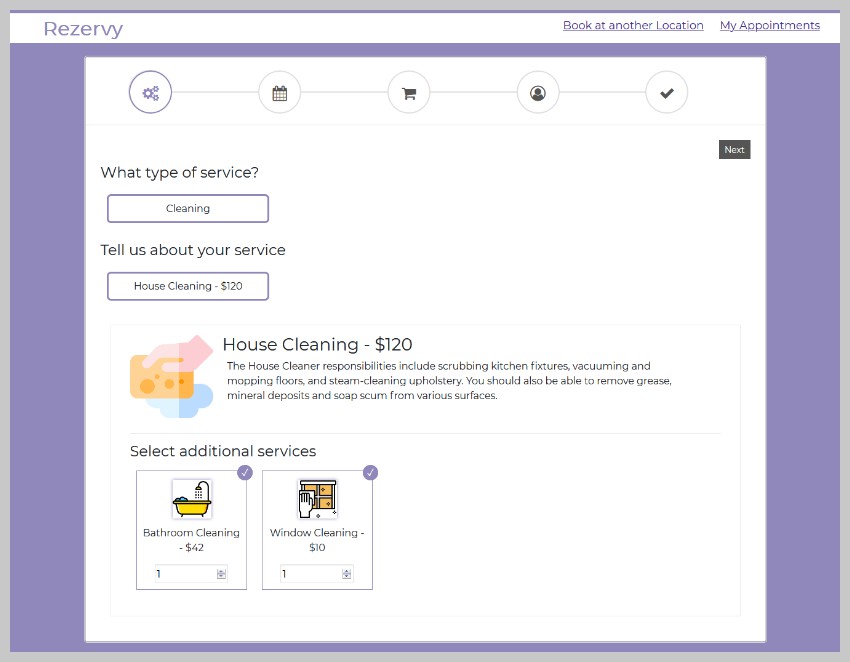
Rezervy comes with both single step and multi-step booking form features. The script creates a fully responsive booking system so it looks great on large screens as well as smaller mobile devices.

There are many amazing features in this script like:

  • support tickets
  • guest checkout
  • coupon discounts and recurring discounts
  • support for multiple currencies
  • manual booking
  • referral codes
  • rating and review for each appointment
  • and a lot more

Just try the live preview of the script and you will be amazed by its design and functionality.

Free PHP Event Calendar and Booking Scripts

Creating a great PHP calendar script is hard. As a result, it can be hard to find quality scripts—especially for free!

That's why our recommendation is to try one of the CodeCanyon scripts mentioned in the article. They all offer a lot of features and you will get 6 months of support and free lifetime updates.

Most of the free PHP calendar and event booking scripts either have a very limited feature set or have not been updated in a long time. There are some good options out there though. Here are three of the best:

1. phpmyreservation

This is a very basic reservation plugin that you can use to take bookings for a single item like appointments with a dentist or a conference room etc. You can control the pricing of each reservation.

2. laravel-booking

This is a simple room booking system based on Laravel 5.6. Laravel is a free open source PHP framework to create web applications. So, you need to be familiar with both PHP and Laravel to set it up.

3. laravel-google-calendar

This is yet another free PHP script based on Laravel. It allows you to easily create, delete or update any events in Google Calendar.

Tips for Using Event Calendars and Booking Scripts

Here are a few tips that you should remember when starting a business that based on booking products and services.

1. Make Sure That the Booking System is Responsive

People almost always have their smartphones with them. They usually also prefer to do things like booking reservations on their smartphones. If your booking system has a responsive layout that provides an amazing user experience, you will have a big advantage over your competition.

2. Don't Cram Too Much Information on the Screen at Once

Depending on the type of business that you operate, it might not always be possible to just ask users a couple of questions and book their slots. In such cases, use simple layouts that guide people throughout the booking process without overwhelming them. One great example would be the booking system by Rezervy.

Other PHP Scripts on CodeCanyon

These PHP event calendar and booking scripts just scratch the surface of what's available at CodeCanyon. There are over 4000 PHP scripts available in the marketplace that cover everything from calendars and forms to social networking and shopping carts.

PHP Scripts on CodeCanyon

Here are a few of the best-selling and up-and-coming PHP scripts available on CodeCanyon for 2020.


by Monty Shokeen via Envato Tuts+ Code

Hosting WordPress on AWS: Pros and Cons and How To

If your WordPress website is going to be a success, then you need the right hosting provider! In this article, I'll tell you some pros and cons of hosting WordPress on AWS. Then I'll show you how to launch a website with Amazon Lightsail.

Choose the right provider, and you’ll enjoy faster loading times, improved SEO, and less downtime—plus, you’ll avoid many of the headaches associated with running a successful WordPress website.

There are countless WordPress hosting providers out there, but in this article we’ll be focusing on Amazon’s Lightsail. We’ll be exploring the benefits and drawbacks of choosing Amazon as your hosting provider, before showing you how to launch a website using Lightsail. Even if you have zero previous experience with Amazon Web Services (AWS), by the end of this article you’ll have configured and launched a WordPress website, using Amazon’s Lightsail. 

And in case our pros and cons section leaves you questioning whether Lightsail is really the best option for your website, we’ll also be taking a look at an alternative hosting provider. 

What Are Amazon Web Services (AWS)?

AWS is an on-demand cloud computing platform that provides access to large-scale cloud computing capacity, without you having to build your own physical server farm. 

Although AWS is metered on a pay-as-you-go basis, subscription fees vary depending on your chosen hardware, software and networking features, as well as your availability, security and service requirements. 

AWS is an umbrella term for hundreds of cloud computing services. In February 2020, Amazon was offering over 200 separate AWS products, with more products expected to be launched throughout the year.

Although there’s too many to cover in this article, some of the notable AWS products include: 

  • Amazon Simple Storage Service (Amazon S3). Provides a computer data storage architecture that manages data as objects, making Amazon S3 ideal for backup and recovery, data archiving, and hybrid cloud storage. Amazon S3 uses the same scalable storage infrastructure as the Amazon.com website.
  • Amazon Elastic Compute Cloud (EC2). Provides access to a virtual cluster of computers that come with pre-loaded application software, including databases and web servers.  
  • AWS Lambda. This is a serverless, event-driven computing platform that’s designed for building on-demand applications that run code in response to specific events. Lambda automatically manages the computing resources required to run your code, which makes it ideal for provisioning back-end services that are triggered in response to HTTP requests, and then automatically deprovisioning these resources when they’re no longer required. 

For the purposes of this tutorial, we’ll be focusing on one AWS product in particular: Amazon Lightsail. 

Getting Started With AWS: What Is Amazon Lightsail?

Lightsail is a cloud platform that provides everything you need to deploy and host your WordPress website, including instances, managed databases, static IP addresses, and load balancers. Although we’ll be focusing on using Lightsail to launch your WordPress instance, you can also use Lightsail to deploy small-scale web applications, business software, developer sandboxes, and testing environments.

Lightsail is very popular among WordPress users, but it isn’t the only choice for hosting a WordPress website. Before I show you how to install WordPress and launch your website on Amazon Lightsail, let’s make sure it’s the right platform for you, by examining its strengths and weaknesses.

Lightsail and WordPress: The Pros

Let’s start positive, and look at the reasons why you may want to opt for Lightsail over other WordPress hosting services. 

1. It’s Beginner-Friendly 

Lightsail is geared towards helping new users get started with AWS. 

The Lightsail management console provides easy access to all the core AWS configuration options, so you can configure your server, your static IP addresses and DNS (Domain Name System) settings without any specialist assistance. If you’re an individual or small business who doesn’t have a system administrator on-hand, then you can easily use Lightsail to create, deploy and maintain a self-hosted WordPress website.

Using Lightsail, you can typically bring a host online within minutes, even if you have zero previous AWS experience. 

2. It Has a Set Monthly Limit

With Lightsail, you pay an hourly rate for the resources you consume, up to a pre-arranged maximum monthly cost. 

At the time of writing, Lightsail subscriptions ranged from $3.50-$240 per month, although plans that include a Windows Server license are noticeably higher than the comparable Linux and UNIX plans. In addition, any outbound data transfers that exceed your plan’s data transfer allowance, will be subject to overage charges.

3. It’s Flexible 

What happens if your website outgrows its Lightscale subscription? If you require more resources, then you can upgrade your RAM and storage capacity at any time, by migrating to a new Lightsail instance. Alternatively, if you need to cut costs or save resources, then you can switch to a smaller Lightsail instance. 

Although migrations are supported, Lightsail doesn’t offer one-click migration. If you’re upgrading your Lightsail plan to a larger instance, then you’ll need to take a snapshot and then create a larger instance from this snapshot. If you’re migrating to a smaller instance then you’ll need to backup your data to an alternative AWS service, launch a smaller Lightsail instance, and then manually migrate all your data to this new instance. 

Lightsail and WordPress: The Cons

While Lightsail has many positives, there are some drawbacks that make it unsuitable for certain use cases.

Could an alternative hosting platform be a better fit for your WordPress website? 

In this section, we’ll explore some of the cons of opting for Amazon’s Lightsail platform.

1. It Doesn’t Auto-Scale

Although you can upgrade to a larger Lightscale instance at any time, Lightscale won’t spin up additional instances when certain criteria are met, and it won’t spin down resources when they’re no longer required.

If you’re building a personal website, or your site isn’t business-critical, then this lack of agility may not be a huge issue, however it does make Lightscale unsuitable for the enterprise, or websites that have fluctuating workloads. 

If you require an enterprise-ready platform that auto-scales to meet your website’s demands, and can handle significant fluctuations in traffic, then you may want to look for an alternative platform.

2. You Need to Pay Extra for Technical Support

By default, all Lightsail users are entitled to the Basic Support package, which provides access to the official AWS documentation, whitepapers and support forms. This Basic Support package also includes 24x7 customer service, but it’s important to note that this isn’t technical support.

If you require technical support, then you’ll need to purchase a separate support package, which at the time of writing ranged from $29 per month to $15,000 per month. 

Lightsail is straightforward to setup and maintain, so in theory you’re unlikely to require much technical assistance, but if you do encounter an issue then you’ll need to either purchase a dedicated support package, or deal with the problem yourself. 

If your WordPress website is business-critical, or you plan to implement advanced or complex functionality, then you should either plan to purchase an additional support package, or opt for an alternative platform that provides technical support as standard. 

Purchasing a Domain Name 

The first step to launching a successful website, is to register a domain name. 

As a general rule, you should opt for a domain name that’s easy to spell, pronounce and remember, includes keywords that are relevant to your website’s content, and doesn’t have any numbers or hyphens. 

There are countless domain registrars to choose from, but some of the most popular include:

How to Host Your WordPress Website Using Amazon Lightsail 

In this section, we’ll launch and configure a WordPress instance using Lightsail. By the end of this tutorial, your Lightsail instance and your WordPress website will be online, and open for business.

Sign Up for Amazon Web Services

To complete this tutorial, you’ll need an AWS account. If you don’t have an AWS account, then you can sign up for 12 months of Free Tier access, which includes a 30-day free trial of Amazon Lightsail. 

Create Your WordPress Instance 

To start, we need to create a WordPress instance in Lightsail:

Create a Lightsail instance
  • Lightsail should detect your AWS Region and Availability Zone automatically, but you can change these values, if required. 

Select your Amazon Web Services region and availability zone
  • Under Pick your instance image, choose Linux / Unix.
  • Under Select a blueprint, choose WordPress.
  • In Choose an instance plan, select the plan that you want to use; at the time of writing you could try Lightsail for free, for 30 days.
  • Give your Lightsail instance a unique name.
  • Click Create instance.

AWS will now create your Lightsail instance.

Amazon’s SSH Client: Retrieving Your WordPress Password

In this section, you’ll connect to your instance using the browser-based SSH client that’s included as part of the Lightsail console. We’ll then use this client to retrieve the password you’ll use to log into your WordPress account:

  • In the Lightsail console, select the Instances tab.
  • Find the instance that you just created and click its accompanying SSH quick-connect icon. The browser-based SSH client will now launch in a new window. 
You need to retrieve the password youll use to log into your Lightsail account

In the SSH window, type the following command and press Enter.

The SSH client will now display the password you’ll need to log into your WordPress dashboard; make a note of this password, as you’ll be needing it shortly. 

Log Into the WordPress Admin Dashboard

To access WordPress, you’ll need the public IP address of your WordPress instance. 

In the Lightsail console, select the Instances tab; you should see a card representing your WordPress instance.

The public IP address will be displayed in the card’s bottom-right corner. 

In a new tab, enter the following URL, making sure to replace publicIP with the public IP address you retrieved from the Lightsail console:

http://publicIP/wp-login.php

You should now see the standard WordPress login screen.

You can now log into the WordPress admin dashboard

You can now log into your account using the email address associated with your AWS account and the password you retrieved from the SSH client. 

Create a Static IP Address

By default, the public IP attached to your Lightsail instance will change every time you stop and restart your instance, which means you’ll need to constantly update your domain’s DNS records.  

In this section, I’ll show you how to create a static IP address and attach it to your WordPress instance, so you don’t have to worry about updating your DNS records: 

  • In the Lightsail console, select your WordPress instance. 
  • Select the Networking tab.
Create a static IP address and attach it to your WordPress instance
  • Select Create static IP.
  • Open the Attach to an instance dropdown and select the WordPress instance you created earlier.
Under Attach to an instance select the instance we created earlier
  • In Identify your static IP, give your static IP address a unique name.
  • Click Create.

Adding a Record to Your DNS

Next, we need to map a domain name to our Amazon Lightsail instance:

Map a domain name to your AWS Lightsail instance
  • Select Create DNS zone.
  • Find Enter the domain you have registered, and enter your domain name.
  • Select Create DNS zone.

The Lightsail console will now display several name server addresses. 

To transfer management of your DNS records to Lightsail, you’ll need to add these name server addresses to your domain name’s registrar, so either make a note of these addresses or leave this page open in a separate tab. 

Switch to Lightsail’s Name Servers 

Now, you need to sign into your DNS hosting provider’s website, and replace the default name servers with Lightsail’s name servers. 

This process can vary, so check your provider’s official documentation or blog for more information. To give you an idea of the steps involved, here’s how I changed the name serves for my GoDaddy account: 

The process of adding Lightsails name servers will vary depending on your domain provider
  • Choose Manage DNS.

Youll typically be able to edit your providers DNS settings in the Manage DNS menu
  • In the Nameservers section, select Change.
  • Select the I'll use my own nameservers checkbox.
  • Delete all of GoDaddy’s default name servers.  
  • Select Add nameserver.
  • Copy/paste Lightsail’s name servers into the GoDaddy console, and then click Save.

Mapping the Root of Your Domain

Now, you need to map the root of your domain to your Lightsail instance:

  • If you don’t already have the Networking screen open, then navigate to Lightsail Console > Networking and select your WordPress instance. 
  • In the DNS records section, click Add record.
Select your WordPress instance followed by Add record
  • In the Subdomain box, enter the @ character, as this signifies that you’re mapping the root of your domain, and not a subdomain. 
  • Select the Resolves to box, and in the subsequent dropdown choose the static IP address that you attached to this WordPress instance.
  • Save your changes by clicking the green checkmark.

You may need to wait while the name server propagates through the Internet’s DNS, so this change may not be instant. However, in the Lightsail console’s Instances tab, there should now be a blue pin next to your instance’s IP address, which indicates this is now a static IP address.

You’re Ready to Build Your WordPress Website! 

Now, head over to the domain name you purchased earlier, and you should see the standard Hello World WordPress website.  

To start working on your site, enter your domain with a wp-login.php suffix, for example if you purchased the domain name my-example-website.co.uk then you’d use the following:

http://my-example-website.co.uk/wp-login.php

You can now log into your account using your email address and password, and start working on your WordPress website. 

Don’t Want to Use Amazon Lightsail? Seven Reasons to Host With SiteGround Instead 

Amazon Lightsail isn’t the only platform where you can host your WordPress website. 

If Lightsail doesn’t tick all your boxes, then you may want to take a look at SiteGround. This web hosting company already provides managed WordPress hosting to over 2,000,000 domains, and is widely recognized as one of the highest rated WordPress hosting providers on the market—second only to WordPress themselves!

1. Recommended by WordPress

SiteGround is one of only three companies that’s officially recommended by WordPress.org.

“Just like flowers need the right environment to grow, WordPress works best when it’s in a rich hosting environment... We’ve dealt with more hosts than you can imagine; in our opinion, the hosts below (SiteGround, DreamHost and BlueHost) represent some of the best and brightest of the hosting world.” — WordPress Web Hosting

2. One-Click Installation and Automatic Updates

Why go to the effort of downloading, installing and configuring WordPress manually, when SiteGround provides a straightforward, click-and-install solution? 

3. A Speedier WordPress Website 

To improve your website’s loading speeds, SiteGround uses SSD, a custom PHP handling setup that's optimized with an OPCache extension, the CloudFlare Content Delivery Network (CDN), and a unique SuperCacher feature that caches your WordPress website on three different levels. 

SiteGround also frees up RAM for dynamic content caching, by using NGINX Direct Delivery to remove static content from the server memory.

For users who want an additional performance boost, SiteGround also offers a SG Optimizer plugin that’s been proven to deliver a 20-30% performance boost even for websites that are already optimized. 

4. Staging: Test Changes and New Content in Private 

Do you want to test experimental changes or new features in private, before sending them out into the world? 

SiteGround lets you create a staged copy of your WordPress website with a single click, so you can test your changes without disrupting your live website. Once you’re happy with your changes, SiteGround makes it easy to roll them out to your users.

5. Protect Your Site Against the Latest Hacks and Exploits 

To help protect your WordPress installation, SiteGround manages the overall security of your application at the server and firewall level. Since new security threats are emerging all the time, SiteGroud frequently adds new rules that are designed to help protect your website against the latest security threats. 

6. Technical Support: Your Issues Resolved Within 5 Minutes 

Regardless of whether you purchase the StartUp or GoGeek subscription, you’ll have access to 24/7 technical support over the phone, via instant message, or using SiteGround’s ticketing system, with SiteGround aiming to resolve the majority of serious issues within 5 minutes.

7. Easily Migrate an Existing WordPress Website

Do you already have a WordPress website, but are unhappy with your current hosting provider?

The prospect of migrating your entire website can be daunting, but SiteGround’s Migrator plugin lets you securely migrate all your content, while keeping your WordPress configuration intact. 

Conclusion

In this article, we looked at the pros and cons of hosting your website with Lightsail. We also saw exactly how to install, configure and launch a WordPress website using Amazon’s cloud platform. 

Using Lightsail, you can create a website even if you have zero previous AWS experience. However, there’s no such thing as a one-size-fits-all hosting provider, so there are some drawbacks that mean Lightsail may not be the best choice for your particular website. 

If Lightsail doesn’t meet all your requirements, or you simply don’t want to use an AWS product, then we explored SiteGround as a possible alternative. 

Have you launched a WordPress website using either Lightsail or SiteGround? We’d love to hear about your experiences, so be sure to share them in the comments below!


by Jessica Thornsby via Envato Tuts+ Code

Google Voice Users Will Soon Be Able To Transfer Ongoing Calls

Google Voice will soon allow users to transfer the on-going calls to existing contacts or other numbers through the calling app. After becoming the part of G Suit, Google Voice is increasingly becoming important for many people. It may not be available in all the regions, but areas, where Google...

[ This is a content summary only. Visit our website https://ift.tt/1b4YgHQ for full links, other content, and more! ]

by Aqsa Rasool via Digital Information World

Elon Musk realizes his mistake - Wants to take back some of the tweets made during COVID-19 lockdown

Entrepreneur Elon Musk is all geared up to launch two NASA astronauts to the ISS through Crew Dragon - a spacecraft developed by his private company SpaceX. However, during these intensity-ridden days, he took the time for an interview with Bloomberg. The prime focus of the interview remained on...

[ This is a content summary only. Visit our website https://ift.tt/1b4YgHQ for full links, other content, and more! ]

by Saima Salim via Digital Information World

material-table – Material Datatable for React with Additional Features

material-table is a simple and powerful datatable for React, based on Material UI's table with some additional features.

Features:

  • Actions
  • Component overriding
  • Custom column rendering
  • Detail Panel
  • Editable
  • Export
  • Filtering

by via jQuery-Plugins.net RSS Feed

LinkedIn has been on a ‘cleaning spree’ and that too, for a good reason

Recently, LinkedIn released its Transparency Report and has claimed that its automated defenses encountered a huge number of fake accounts in 2019, out of which, 93% have been blocked. As per this report, there were a lot of fake account registration attempts that were made all through last year,...

[ This is a content summary only. Visit our website https://ift.tt/1b4YgHQ for full links, other content, and more! ]

by Arooj Ahmed via Digital Information World

Website Inspiration: Stromwerk

Gorgeous initial load transition in this dark-schemed One Pager promoting Stromwerk E-bikes.

Full Review


by Rob Hope @robhope via One Page Love