
Browser extensions are small programs that can modify and enhance the functionality of a web browser. They can be used for a variety of tasks, such as blocking ads, managing passwords, organizing tabs, altering the look and behavior of web pages, and much more.
The good news is that browser extensions aren’t difficult to write. They can be created using the web technologies you’re already familiar with — HTML, CSS and JavaScript — just like a regular web page. However, unlike regular web pages, extensions have access to a number of browser-specific APIs, and this is where the fun begins.
In this tutorial, I’m going to show you how to build a simple extension for Chrome, which alters the behavior of the new tab page. For the JavaScript part of the extension, I’ll be using the Vue.js framework, as it will allow us to get up and running quickly and is a lot of fun to work with.
The code for this tutorial can be found on GitHub.
The Basics of a Chrome Extension
The core part of any Chrome extension is a manifest file and a background script. The manifest file is in a JSON format and provides important information about an extension, such as its version, resources, or the permissions it requires. A background script allows the extension to react to specific browser events, such as the creation of a new tab.
To demonstrate these concepts, let’s start by writing a “Hello, World!” Chrome extension.
Make a new folder called hello-world-chrome and two files: manifest.json and background.js:
mkdir hello-world-chrome
cd hello-world-chrome
touch manifest.json background.js
Open up manifest.json and add the following code:
{
  "name": "Hello World Extension",
  "version": "0.0.1",
  "manifest_version": 2,
  "background": {
    "scripts": ["background.js"],
    "persistent": false
  }
}
The name, version and manifest_version are all required fields. The name and version fields can be whatever you want; the manifest version should be set to 2 (as of Chrome 18).
The background key allows us to register a background script, listed in an array after the scripts key. The persistent key should be set to false unless the extension uses chrome.webRequest API to block or modify network requests.
Now let’s add the following code to background.js to make the browser say hello when the extension is installed:
chrome.runtime.onInstalled.addListener(() => {
  alert('Hello, World!');
});
Finally, let’s install the extension. Open Chrome and enter chrome://extensions/ in the address bar. You should see a page displaying the extensions you’ve installed.
As we want to install our extension from a file (and not the Chrome Web Store) we need to activate Developer mode using the toggle in the top right-hand corner of the page. This should add an extra menu bar with the option Load unpacked. Click this button and select the hello-world-chrome folder you created previously. Click Open and you should see the extension installed and a “Hello, World!” popup appear.

Congratulations! You just made a Chrome extension.
Overriding Chrome’s New Tab Page
The next step will to have our extension greet us when we open up a new tab. We can do this by making use of the Override Pages API.
Note: before you progress, please make sure to disable any other extensions which override Chrome’s new tab page. Only one extension at a time may alter this behavior.
We’ll start off by creating a page to display instead of the new tab page. Let’s call it tab.html. This should reside in the same folder as your manifest file and background script:
<!DOCTYPE html>
<html lang="en">
<head>
  <meta charset="UTF-8">
  <title>My New Tab Page!</title>
</head>
<body>
  <h1>My New Tab Page!</h1>
  <p>You can put any content here you like</p>
</body>
</html>
Next we need to tell the extension about this page. We can do so by specifying a chrome_url_overrides key in our manifest file, like so:
"chrome_url_overrides": {
  "newtab": "tab.html"
}
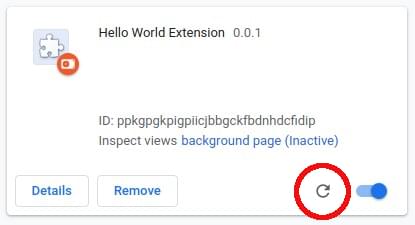
Finally, you need to reload the extension for the changes to take effect. You can do this by clicking the reload icon for the Hello World extension on Chrome’s extensions page.
Now, when you open a new tab, you should be greeted by your custom message.
Adding Vue to the Extension
Now we have a very basic implementation of our extension up and running, the time has come to think about what the rest of the desired functionality will look like. When a user opens a new tab, I would like the extension to:
- Fetch a joke from the wonderful icanhazdadjoke.com.
- Display that joke in a nicely formatted manner to the user.
- Display a button for the user to favorite the joke. This will save the joke to
chrome.storage. - Display a button for the user to list favorited jokes.
You could, of course, do all of this with plain JavaScript, or a library like jQuery — and if that’s your thing, feel free!
For the purposes of this tutorial, however, I’m going to implement this functionality using Vue and the awesome vue-web-extension boilerplate.
Using Vue allows me to write better, more organized code faster. And as we’ll see, the boilerplate provides several scripts that take the pain out of some of the common tasks when building a Chrome extension (such as having to reload the extension whenever you make changes).
vue-web-extension-boilerplate
This section assumes that you have Node and npm installed on your computer. If this isn’t the case, you can either head to the project’s home page and grab the relevant binaries for your system, or you can use a version manager. I would recommend using a version manager.
We’ll also need Vue CLI installed and the @vue/cli-init package:
npm install -g @vue/cli
npm install -g @vue/cli-init
With that done, let’s grab a copy of the boilerplate:
vue init kocal/vue-web-extension new-tab-page
This will open a wizard which asks you a bunch of questions. To keep this tutorial focused, I answered as follows:
? Project name new-tab-page
? Project description A Vue.js web extension
? Author James Hibbard <jim@example.com>
? License MIT
? Use Mozilla's web-extension polyfill? No
? Provide an options page? No
? Install vue-router? No
? Install vuex? No
? Install axios? Yes
? Install ESLint? No
? Install Prettier? No
? Automatically install dependencies? npm
You can adapt your answers to suit your preferences, but the main thing to be certain of is that you choose to install axios. We’ll be using this to fetch the jokes.
Next, change into the project directory and install the dependencies:
cd new-tab-page
npm install
And then we can build our new extension using one of the scripts the boilerplate provides:
npm run watch:dev
This will build the extension into a dist folder in the project root for development and watch for changes.
To add the extension to Chrome, go through the same process as outlined above, making sure to select the dist folder as the extension directory. If all goes according to plan, you should see a “Hello world!” message when the extension initializes.
Project Setup
Let’s take a minute to look around our new project and see what the boilerplate has given us. The current folder structure should look like this:
.
├── dist
│   └── <the built extension>
├── node_modules
│   └── <one or two files and folders>
├── package.json
├── package-lock.json
├── scripts
│   ├── build-zip.js
│   └── remove-evals.js
├── src
│   ├── background.js
│   ├── icons
│   │   ├── icon_128.png
│   │   ├── icon_48.png
│   │   └── icon.xcf
│   ├── manifest.json
│   └── popup
│       ├── App.vue
│       ├── popup.html
│       └── popup.js
└── webpack.config.js
As you can see, from the config file in the project root, the boilerplate is using webpack under the hood. This is awesome, as this gives us Hot Module Reloading for our background script.
The src folder contains all of the files we’ll be using for the extension. The manifest file and background.js should be familiar, but also notice a popup folder containing a Vue component. When the boilerplate builds the extension into the dist folder, it will pipe any .vue files through the vue-loader and output a JavaScript bundle which the browser can understand.
Also in the src folder is an icons folder. If you look in Chrome’s toolbar, you should see a new icon for our extension (also known as the browser action). This is being pulled from this folder. If you click it, you should see a popup open which displays “Hello world!” This is created by popup/App.vue.
Finally, note a scripts folder containing two scripts — one to remove eval usages to comply with the Content Security Policy of Chrome Web Store and one to package your extension into a .zip file, which is necessary when uploading it to the Chrome Web Store.
There are also various scripts declared in the package.json file. We’ll be using npm run watch:dev for developing the extension and later on npm run build-zip to generate a ZIP file to upload to the Chrome Web Store.
The post How to Build a Chrome Extension with Vue appeared first on SitePoint.
by James Hibbard via SitePoint
No comments:
Post a Comment