
The beauty of the Internet is how it allows us humans to communicate across the planet in seconds. What many don’t realize is behind-the-scenes popular websites and services are communicating too.
An API (Application Programming Interface) allows for the communication between two online platforms that is understandable by both. Lucky for us, Squarespace have an excellent API that enables communication with the worlds best automation tool Zapier.
The Squarespace and Zapier relationship allows for hundreds of automated tasks (a.k.a. Zaps) like adding an event to Google Calendar, adding a lead to the Hubspot CRM or even creating a Slack notification.
In this tutorial I show you exactly how to connect a Squarespace newsletter form to Zapier and then run you through a few possible automation options.
FAQ: Is Zapier free? The free Zapier account allows for up to 5 tasks/Zaps. If you need more, the Starter plan is $20/month for 20 Zaps.
One Page Love Exclusive Coupon
Yay! Squarespace has been kind enough to give One Page Love readers the exclusive coupon OPL10 for 10% Off your first website or domain purchase. (There is a free 14-day trial with no credit card needed, so you can try risk free.)
How to connect Squarespace with Zapier
Step One – Upgrade to the Business tier: Ensure you are on the Squarespace Business Plan at $18/month allowing premium app integrations. Additional benefits of the Business Plan are a free Google email account connected to your domain, advanced CSS editing, promotional pop-ups and fully integrated E-Commerce functionality. Incredible value for $18/month.
Demo’d here is a newsletter landing page I built using Squarespace (see full tutorial).
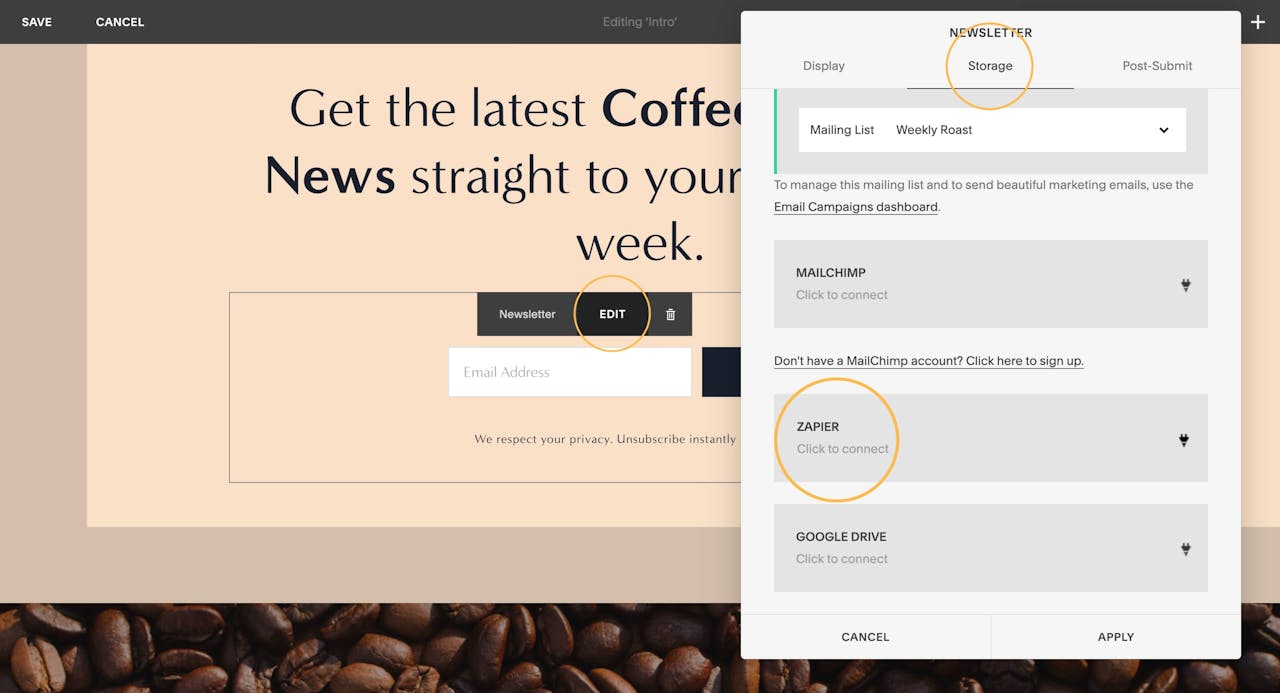
Step Two – Enable Zapier Form Connection: Open up your Squarespace website page editor. Hover your cursor over your newsletter block (this can be a contact form too) and click Edit. When prompted with the settings, head to the Storage tab, scroll down to the Zapier block and Click to connect. Once clicked, the text within the Zapier block will change to Awaiting Connection to Zapier.
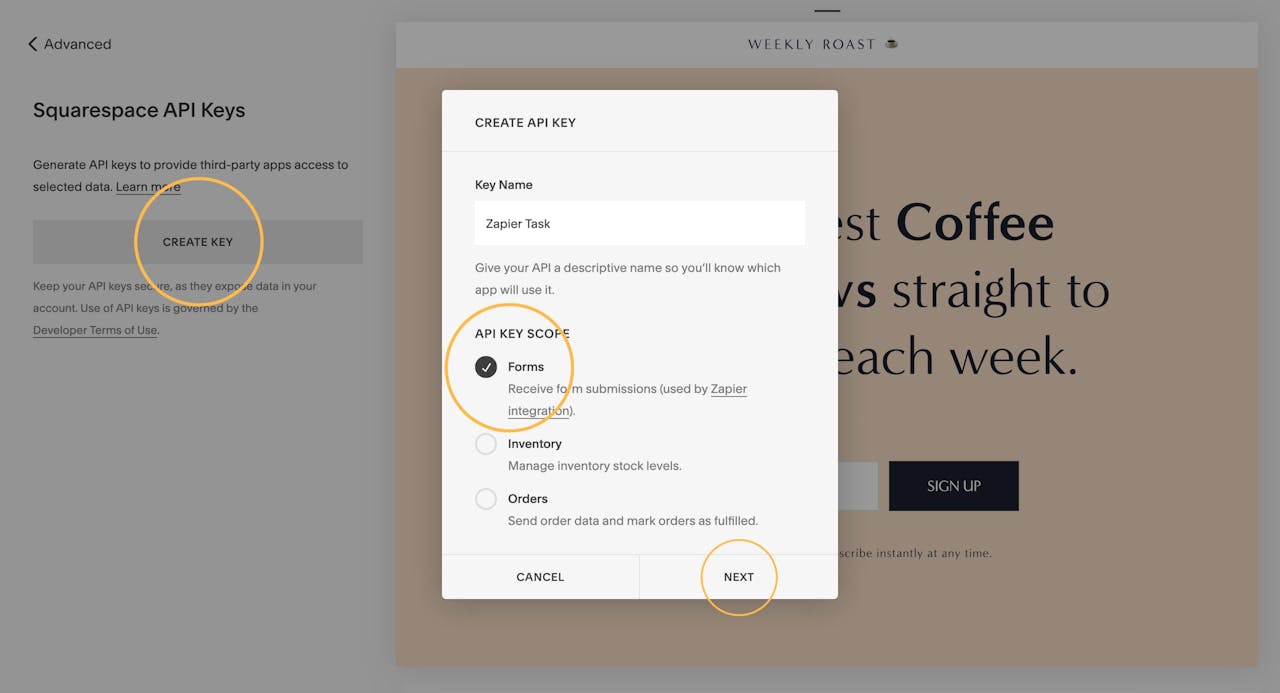
Step Three – Create an API key: Head to Home Menu > Settings > Advanced > Squarespace API Keys > click the Create Key button. When prompted, name the key according to your task intention, select the Forms setting under API Key Scope, then click Next. Now copy the unique API key provided and store it in a safe place.
Step Four – Sign up at Zapier, create a Zap: Sign up for a free Zapier account. Go through the quick on-boarding then click the big orange Make a Zap! button top right.
Step Five – Choose Squarespace Trigger app: In the big search bar, type in Squarespace. Once prompted with the Squarespace option, select it:
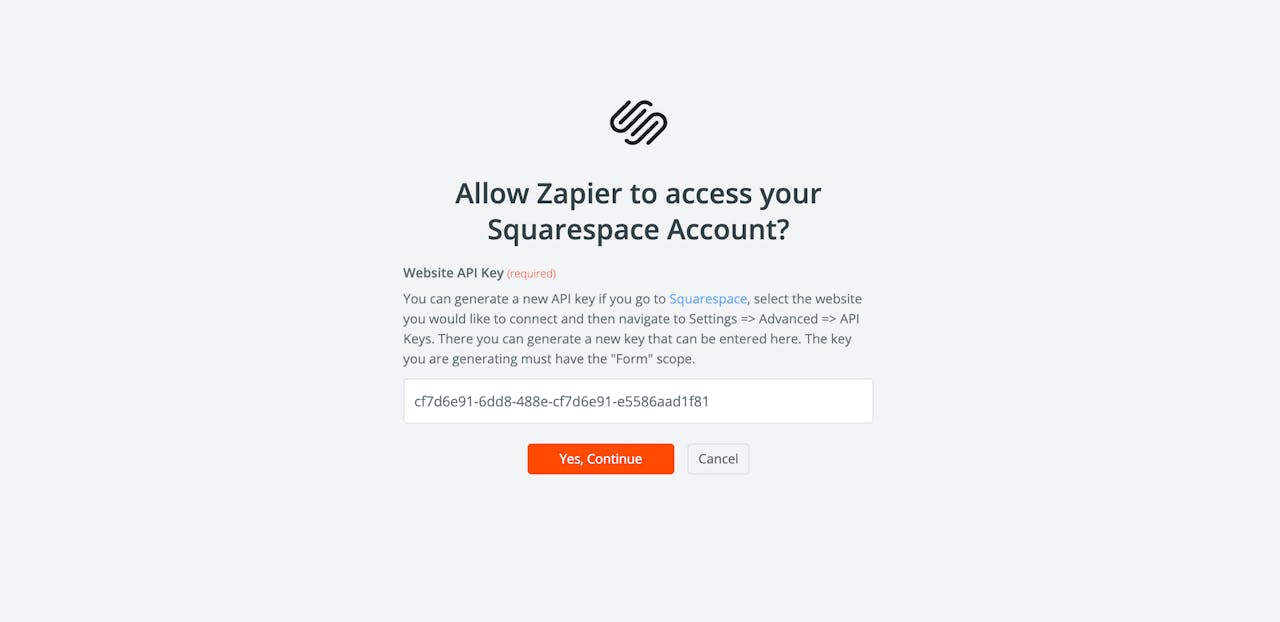
Step Six – Connect Squarespace API: You are now promoted with New Form Submission (the only option), simply click the Save + Continue button. Now click the Connect Account button on the next page. In the pop-up form, paste the API key we created in step three:
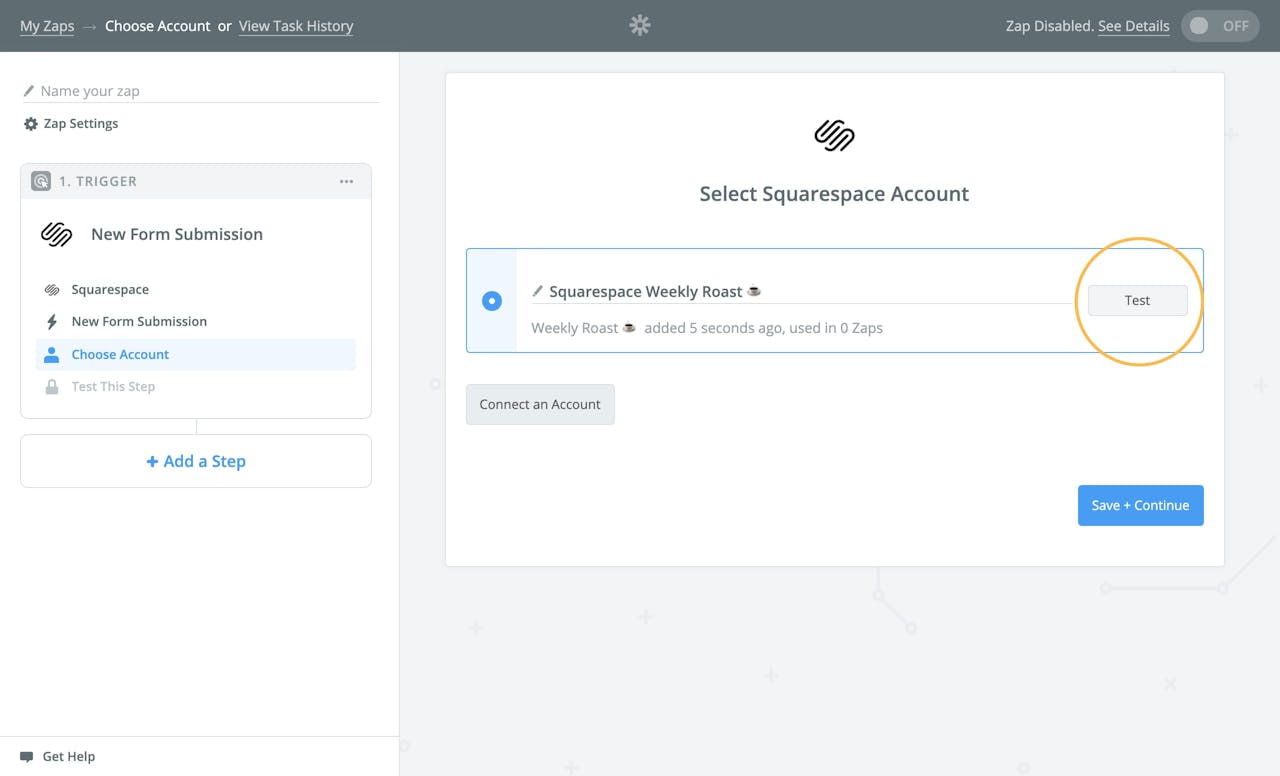
Step Seven – Test the integration: You’ll notice your Squarespace site and form name now appear in the main form area. Click the Test button to confirm the integration is working perfectly. Click the Save + Continue button.
Final Step – Add an Action: To complete your Zap, Zapier will ask you to add an Action step. There are many integrations, simply find the one matching your needs and go through the steps to complete the Action setup. Note how the left sidebar navigation shows progress in the Zap creation process, also allowing us to go back and edit steps easily:
Once your Zap is finished and turned on, each time a form is submitted on your Squarespace website, the API contacts Zapier and the magic happens automatically behind-the-scenes:)
What automated tasks do Squarespace and Zapier allow?
Zapier allows you to instantly connect Squarespace with over 1500 apps to automate your work. Here is a brief overview of the power of the integration:

A few of my favorite automations include:
- Get Slack channel notifications for new Squarespace form submissions
- Create Trello cards from new Squarespace form responses
- Save new Squarespace form responses to Google Sheets
For help with any of the above integrations, visit Zapier’s Squarespace documentation.
FAQ: What are the benefits of using Squarespace?
Squarespace is a leading online website builder. What sets them apart from the rest is their superior level of design and customer support. They have a huge support team and are available 24/7. Other main benefits are:
- No Website Hosting Needed - their platform is fast and secure
- Online Content Management - all edits are done within your browser, no software needed
- Easily Drag and Drop Images - unlimited galleries with unlimited bandwidth
- Free Domain Name - when registering for your first website, if you pay annually (renews at standard rate)
- Beautifully Responsive - all templates work for all devices, so you only have to design your website once. Test and preview how your website will appear on a range of screen sizes.
- Blog Sections - can easily be added to start sharing your journey
- Commerce Solutions - are an upgrade away if you want to start selling products
- Email Marketing - gather email addresses, send marketing emails and analyze the reader email activity
That’s a wrap! Don’t forget your 10% Off coupon: OPL10
I hope you enjoyed this tutorial on how to integrate Squarespace with Zapier and start automating tasks. Props to Squarespace for creating a platform where we can create beautiful Landing Pages, easily. If you missed it I also wrote a tutorial on how to get more exposure for your business using Squarespace Marketing Tools.
by Rob Hope @robhope via One Page Love



No comments:
Post a Comment