[ This is a content summary only. Visit our website http://ift.tt/1b4YgHQ for full links, other content, and more! ]
by Web Desk via Digital Information World
"Mr Branding" is a blog based on RSS for everything related to website branding and website design, it collects its posts from many sites in order to facilitate the updating to the latest technology.
To suggest any source, please contact me: Taha.baba@consultant.com
The MEAN stack comprises advanced technologies used to develop both the server-side and the client-side of a web application in a JavaScript environment. The components of the MEAN stack include the MongoDB database, Express.js (a web framework), Angular (a front-end framework), and the Node.js runtime environment. Taking control of the MEAN stack and familiarizing different JavaScript technologies during the process will help you in becoming a full-stack JavaScript developer.
JavaScript’s sphere of influence has dramatically grown over the years and with that growth, there’s an ongoing desire to keep up with the latest trends in programming. New technologies have emerged and existing technologies have been rewritten from the ground up (I’m looking at you, Angular).
This tutorial intends to create the MEAN application from scratch and serve as an update to the original MEAN stack tutorial. If you’re familiar with MEAN and want to get started with the coding, you can skip to the overview section.
Node.js - Node.js is a server-side runtime environment built on top of Chrome's V8 JavaScript engine. Node.js is based on an event-driven architecture that runs on a single thread and a non-blocking IO. These design choices allow you to build real-time web applications in JavaScript that scale well.
Express.js - Express is a minimalistic yet robust web application framework for Node.js. Express.js uses middleware functions to handle HTTP requests and then either return a response or pass on the parameters to another middleware. Application-level, router-level, and error-handling middlewares are available in Express.js.
MongoDB - MongoDB is a document-oriented database program where the documents are stored in a flexible JSON-like format. Being an NoSQL database program, MongoDB relieves you from the tabular jargon of the relational database.
Angular - Angular is an application framework developed by Google for building interactive Single Page Applications. Angular, originally AngularJS, was rewritten from scratch to shift to a Component-based architecture from the age old MVC framework. Angular recommends the use of TypeScript which, in my opinion, is a good idea because it enhances the development workflow.
Now that we’re acquainted with the pieces of the MEAN puzzle, let’s see how we can fit them together, shall we?
Here’s a high-level overview of our application.
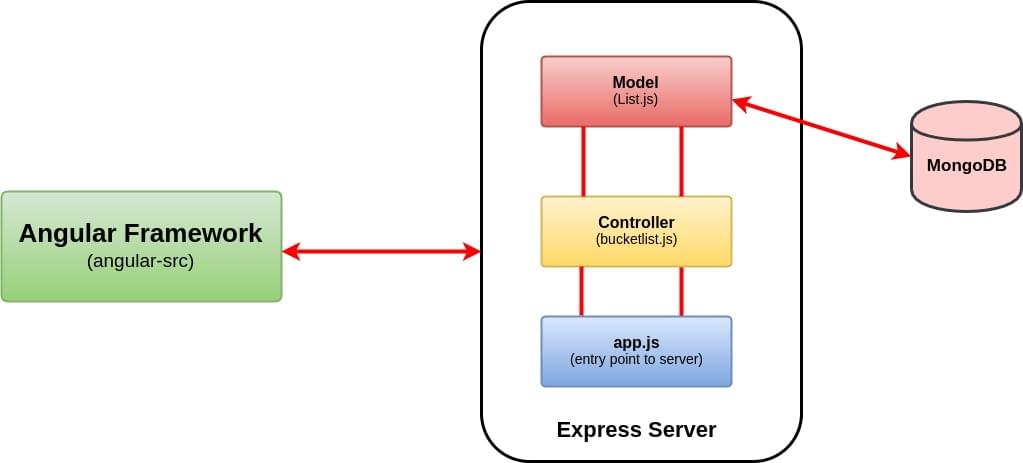
We’ll be building an Awesome Bucket List Application from the ground up without using any boilerplate template. The front end will include a form that accepts your bucket list items and a view that updates and renders the whole bucket list in real time.
Any update to the view will be interpreted as an event and this will initiate an HTTP request. The server will process the request, update/fetch the MongoDB if necessary, and then return a JSON object. The front end will use this to update our view. By the end of this tutorial, you should have a bucket list application that looks like this.
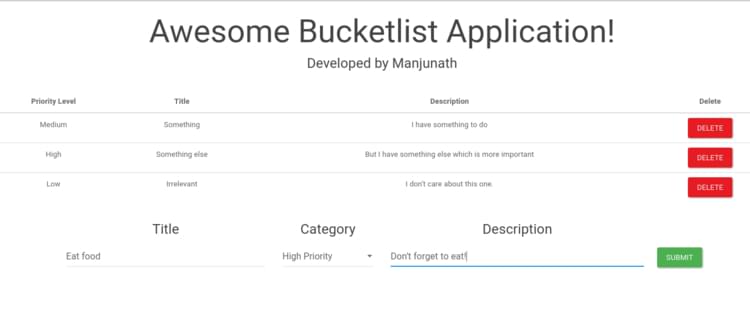
The entire code for the Bucket List application is available on GitHub.
First things first, you need to have Node.js and MongoDB installed to get started. If you’re entirely new to Node, I would recommend reading the Beginner’s Guide to Node to get things rolling. Likewise, setting up MongoDB is easy and you can check out their documentation for installation instructions specific to your platform.
$ node -v
# v8.0.0
Start the mongo daemon service using the command.
sudo service mongod start
To install the latest version of Angular, I would recommend using Angular CLI. It offers everything you need to build and deploy your Angular application. If you’re not familiar with the Angular CLI yet, make sure you check out The Ultimate Angular CLI Reference.
npm install -g @angular/cli
Create a new directory for our bucket list project. That’s where both the front-end and the back-end code will go.
mkdir awesome-bucketlist
cd awesome-bucketlist
Express doesn’t impose any structural constraints on your web application. You can place the entire application code in a single file and get it to work, theoretically. However, your codebase would be a complete mess. Instead, we’re going to do this the MVC way (Model, View, and Controller)—minus the view part.
MVC is an architectural pattern that separates your models (the back end) and views (the UI) from the controller (everything in between), hence MVC. Since Angular will take care of the front end for us, we’ll have three directories, one for models and another one for controllers, and a public directory where we’ll place the compiled angular code.
In addition to this, we’ll create an app.js file that will serve as the entry point for running the Express server.
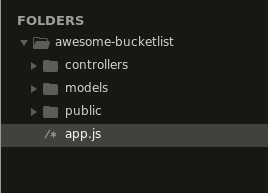
Although using a model and controller architecture to build something trivial like our bucket list application might seem essentially unnecessary, this will be helpful in building apps that are easier to maintain and refactor.
We’re missing a package.json file for our back end. Type in npm init and, after you’ve answered the questions, you should have a package.json made for you.
We’ll declare our dependencies inside the package.json file. For this project we’ll need the following modules:
I’ve also added a start script so that we can start our server using npm start.
{
  "name": "awesome-bucketlist",
  "version": "1.0.0",
  "description": "A simple bucketlist app using MEAN stack",
  "main": "app.js",
  "scripts": {
    "start": "node app"
  },

//The ~ is used to match the most recent minor version (without any breaking changes)

 "dependencies": {
    "express": "~4.15.3",
    "mongoose": "~4.11.0",
    "cors": "~2.8.3",
    "body-parser": "~1.17.2"
  },

  "author": "",
  "license": "ISC"
}
Now run npm install and that should take care of installing the dependencies.
First, we require all of the dependencies that we installed in the previous step.
// We’ll declare all our dependencies here
const express = require('express');
const path = require('path');
const bodyParser = require('body-parser');
const cors = require('cors');
const mongoose = require('mongoose');

//Initialize our app variable
const app = express();

//Declaring Port
const port = 3000;
As you can see, we’ve also initialized the app variable and declared the port number. The app object gets instantiated on the creation of the Express web server. We can now load middleware into our Express server by specifying them with app.use().
//Middleware for CORS
app.use(cors());

//Middleware for bodyparsing using both json and urlencoding
app.use(bodyParser.urlencoded({extended:true}));
app.use(bodyParser.json());

/*express.static is a built in middleware function to serve static files.
 We are telling express server public folder is the place to look for the static files
*/
app.use(express.static(path.join(__dirname, 'public')));
The app object can understand routes too.
app.get('/', (req,res) => {
    res.send("Invalid page");
})
Here, the get method invoked on the app corresponds to the GET HTTP method. It takes two parameters, the first being the path or route for which the middleware function should be applied.
The second is the actual middleware itself, and it typically takes three arguments: the req argument corresponds to the HTTP Request; the res argument corresponds to the HTTP Response; and next is an optional callback argument that should be invoked if there are other subsequent middlewares that follow this one. We haven’t used next here since the res.send() ends the request–response cycle.
Add this line towards the end to make our app listen to the port that we had declared earlier.
//Listen to port 3000
app.listen(port, () => {
    console.log(`Starting the server at port ${port}`);
});
npm start should get our basic server up and running.
By default, npm doesn’t monitor your files/directories for any changes, and you have to manually restart the server every time you’ve updated your code. I recommend using nodemon to monitor your files and automatically restart the server when any changes are detected. If you don't explicitly state which script to run, nodemon will run the file associated with the main property in your package.json.
npm install -g nodemon
nodemon
We’re nearly done with our app.js file. What’s left to do? We need to
app.js.Setting up and connecting a database is straightforward with MongoDB. First, create a config directory and a file named database.js to store our configuration data. Export the database URI using module.exports.
// 27017 is the default port number.
module.exports = {
    database: 'mongodb://localhost:27017/bucketlist'
}
And establish a connection with the database in app.js using mongoose.connect().
// Connect mongoose to our database
const config = require('./config/database');
mongoose.connect(config.database);
“But what about creating the bucket list database?”, you may ask. The database will be created automatically when you insert a document into a new collection on that database.
Now let’s move on to create our bucket list controller. Create a bucketlist.jsfile inside the controller directory. We also need to route all the /bucketlist requests to our bucketlist controller (in app.js).
const bucketlist = require('./controllers/bucketlist');

//Routing all HTTP requests to /bucketlist to bucketlist controller
app.use('/bucketlist',bucketlist);
Here’s the final version of our app.js file.
// We’ll declare all our dependencies here
const express = require('express');
const path = require('path');
const bodyParser = require('body-parser');
const cors = require('cors');
const mongoose = require('mongoose');
const config = require('./config/database');
const bucketlist = require('./controllers/bucketlist');

//Connect mongoose to our database
mongoose.connect(config.database);

//Declaring Port
const port = 3000;

//Initialize our app variable
const app = express();

//Middleware for CORS
app.use(cors());

//Middlewares for bodyparsing using both json and urlencoding
app.use(bodyParser.urlencoded({extended:true}));
app.use(bodyParser.json());


/*express.static is a built in middleware function to serve static files.
 We are telling express server public folder is the place to look for the static files

*/
app.use(express.static(path.join(__dirname, 'public')));


app.get('/', (req,res) => {
    res.send("Invalid page");
})


//Routing all HTTP requests to /bucketlist to bucketlist controller
app.use('/bucketlist',bucketlist);


//Listen to port 3000
app.listen(port, () => {
    console.log(`Starting the server at port ${port}`);
});
As previously highlighted in the overview, our awesome bucket list app will have routes to handle HTTP requests with GET, POST, and DELETE methods. Here’s a bare-bones controller with routes defined for the GET, POST, and DELETE methods.
//Require the express package and use express.Router()
const express = require('express');
const router = express.Router();

//GET HTTP method to /bucketlist
router.get('/',(req,res) => {
    res.send("GET");
});

//POST HTTP method to /bucketlist

router.post('/', (req,res,next) => {
    res.send("POST");

});

//DELETE HTTP method to /bucketlist. Here, we pass in a params which is the object id.
router.delete('/:id', (req,res,next)=> {
    res.send("DELETE");

})

module.exports = router;
I’d recommend using Postman app or something similar to test your server API. Postman has a powerful GUI platform to make your API development faster and easier. Try a GET request on http://localhost:3000/bucketlist and see whether you get the intended response.
And as obvious as it seems, our application lacks a model. At the moment, our app doesn’t have a mechanism to send data to and retrieve data from our database.
Create a list.js model for our application and define the bucket list Schema as follows:
//Require mongoose package
const mongoose = require('mongoose');

//Define BucketlistSchema with title, description and category
const BucketlistSchema = mongoose.Schema({
    title: {
        type: String,
        required: true
    },
    description: String,
    category: {
        type: String,
        required: true,
        enum: ['High', 'Medium', 'Low']
    }
});
When working with mongoose, you have to first define a Schema. We have defined a BucketlistSchema with three different keys (title, category, and description). Each key and its associated SchemaType defines a property in our MongoDB document. If you’re wondering about the lack of an id field, it's because we’ll be using the default _id that will be created by Mongoose.
Mongoose assigns each of your schemas an
_idfield by default if one is not passed into the Schema constructor. The type assigned is an ObjectId to coincide with MongoDB's default behavior.You can read more about it in the Mongoose Documentation
However, to use our Schema definition we need to convert our BucketlistSchema to a model and export it using module.exports. The first argument of mongoose.model is the name of the collection that will be used to store the data in MongoDB.
const BucketList = module.exports = mongoose.model('BucketList', BucketlistSchema );
Apart from the schema, we can also host database queries inside our BucketList model and export them as methods.
//BucketList.find() returns all the lists
module.exports.getAllLists = (callback) => {
    BucketList.find(callback);
}
Here we invoke the BucketList.find method which queries the database and returns the BucketList collection. Since a callback function is used, the result will be passed over to the callback.
Let’s fill in the middleware corresponding to the GET method to see how this fits together.
const bucketlist = require('../models/List');

//GET HTTP method to /bucketlist
router.get('/',(req,res) => {
    bucketlist.getAllLists((err, lists)=> {
        if(err) {
            res.json({success:false, message: `Failed to load all lists. Error: ${err}`});
        }
        else {
            res.write(JSON.stringify({success: true, lists:lists},null,2));
            res.end();

    }
    });
});
We’ve invoked the getAllLists method and the callback takes two arguments, error and result.
All callbacks in Mongoose use the pattern: callback(error, result). If an error occurs executing the query, the error parameter will contain an error document, and result will be null. If the query is successful, the error parameter will be null, and the result will be populated with the results of the query.
-- MongoDB Documentation
Similarly, let’s add the methods for inserting a new list and deleting an existing list from our model.
//newList.save is used to insert the document into MongoDB
module.exports.addList = (newList, callback) => {
    newList.save(callback);
}

//Here we need to pass an id parameter to BUcketList.remove
module.exports.deleteListById = (id, callback) => {
    let query = {_id: id};
    BucketList.remove(query, callback);
}
We now need to update our controller’s middleware for POST and DELETE also.
//POST HTTP method to /bucketlist

router.post('/', (req,res,next) => {
    let newList = new bucketlist({
        title: req.body.title,
        description: req.body.description,
        category: req.body.category
    });
    bucketlist.addList(newList,(err, list) => {
        if(err) {
            res.json({success: false, message: `Failed to create a new list. Error: ${err}`});

        }
        else
            res.json({success:true, message: "Added successfully."});

    });
});

//DELETE HTTP method to /bucketlist. Here, we pass in a param which is the object id.

router.delete('/:id', (req,res,next)=> {
  //access the parameter which is the id of the item to be deleted
    let id = req.params.id;
  //Call the model method deleteListById
    bucketlist.deleteListById(id,(err,list) => {
        if(err) {
            res.json({success:false, message: `Failed to delete the list. Error: ${err}`});
        }
        else if(list) {
            res.json({success:true, message: "Deleted successfully"});
        }
        else
            res.json({success:false});
    })
});
With this, we have a working server API that lets us create, view, and delete the bucket list. You can confirm that everything is working as intended by using Postman.
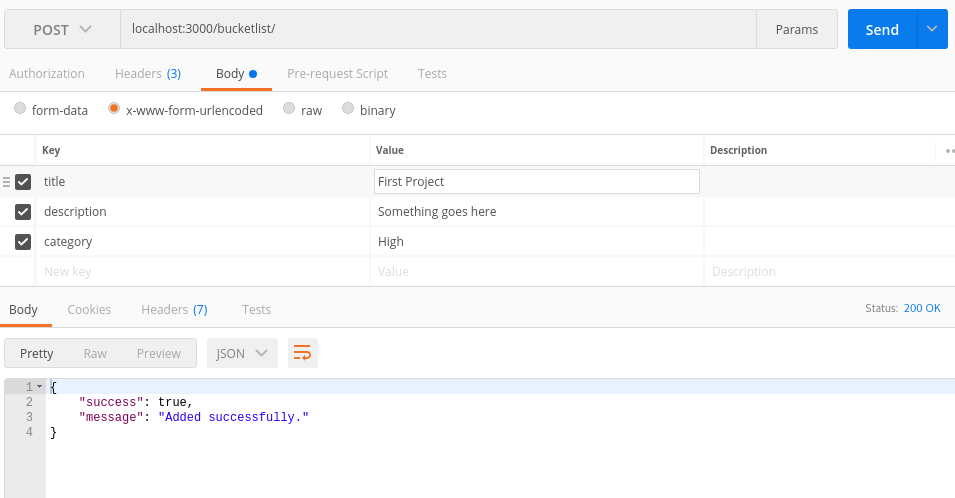
We’ll now move on to the front end of the application using Angular.
Continue reading %MEAN Stack: Build an App with Angular 2+ and the Angular CLI%
Google announced this week that starting in July 2018, page speed will be a ranking factor for mobile searches. Time to make those website even faster  (googleblog.com)
If you are not on the Progressive Web App train, this article might tip you over the edge. Some great words by Matt Ludwig. (dockyard.com)
Less than a month ago, HTML 5.2 became an official W3C Recommendation. In this post, Ire Aderinokun goes over some of the major changes she thinks will impact us the most. (bitsofco.de)
James Sinclair has wrapped up a recent workshop into a pretty epic in-depth look at why you should consider using React and Redux. (jrsinclair.com)
Aligning things in CSS today isn’t quite what it used to be. We now have to take more modern ways to do CSS layout into account, like Flexbox and Grid among other things. In this post Patrick Brosset talks about what has changed and how to best approach alignment today. (medium.com)
A quick list of some of the Netlify features you might not know about. (medium.com)
Laws of UX, developed and designed by Jon Yablonski is a collection of the key maxims that designers must consider when building user interfaces. Great resource. (lawsofux.com)
There are lots of ways to learn coding, but Treehouse is the best at making it fun and keeping the quality high. Start with a free trial! (teamtreehouse.com)
Choosy: A smarter default browser for macOS (choosyosx.com)
A repository of publicly available design systems and pattern libraries. (uxpin.com)
We are not looking for those with experience that only touches in advertising, branding, campaigns, or marketing. We are a digital product shop, and the ability to understand digital product building is paramount to your success. (metalab.co)
As Stripe looks beyond the API, we are hiring engineers to help build beautiful, usable interfaces for businesses building on top of Stripe. If you are looking for your next challenge, please reach out today. (stripe.com)
The post Web Design Weekly #304 appeared first on Web Design Weekly.
The following is an excerpt from the book Get Programming with Node.js, published by manning.com. You can purchase the book here at a 37% discount by using the code fccwexler.
 This article is a practical introduction to using Node.js. We’re going to go over installing Node.js, learn about npm, and then we’re going to build a Node.js module and jump right in to initializing a web server. Feel free to follow along at home as you read!
Node.js is growing in popularity and support. Because of this, new versions to download are being deployed quite frequently, and it’s important to stay up to date with the latest versions to see how they may benefit or otherwise impact the applications you’re building. At the time of writing, the version of Node.js to download is 7.6 or greater.
NOTE: The release of Node.js 7.6 comes with support for ES6 syntax. ES6 (ECMAScript 2015) is a recent update to JavaScript, with syntax improvements for defining variables, functions, and OOP code altogether. To keep up with updates to JavaScript, download the latest stable version of Node.js as your development progresses.
There are a couple of ways to download and install Node.js, all of which are listed on the Node.js main site.
Because Node.js is platform-independent, you can download and install it on macOS, Windows, or Linux and expect full functionality.
The simplest way to install Node.js is to go to the download link and follow the instructions and prompts to download the installer for the latest version of Node.js.
NOTE: When you install Node.js, you also get npm, the Node.js ecosystem of external libraries (multiple files of code other people wrote) that can be imported into your future projects. You’ll learn more about npm in the next section.

Figure 1. Node.js installer page
When the installer file is downloaded, double-click the file from your browser’s download panel or from your computer’s download folder. The installer will open a new window that looks like Figure 1 and write all necessary files and core Node.js libraries to your system. You may be asked to accept licensing agreements or give the installer permission to install Node.js onto your computer. Follow the prompts to click through the installation.
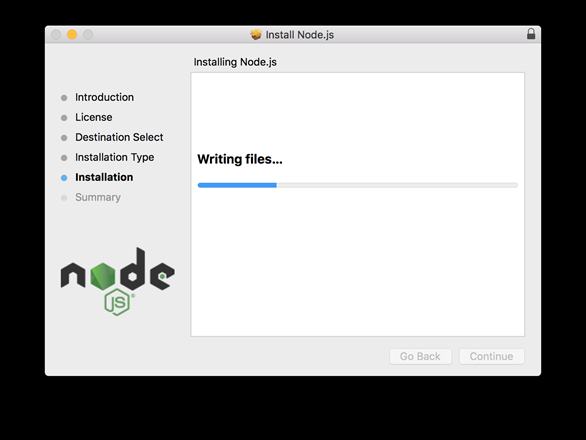
Figure 2. Node.js writing to your machine
You’ll be working mostly in your computer’s terminal, which is built-in software used to navigate and run commands on your computer without a graphical interface. This book teaches using the Unix terminal (Bash) commands. Those of you who are Windows users can follow along using Window’s CMD terminal window (you may need to look up command-equivalents throughout the book). You can reference this table comparing Windows and Unix commands. To make things easier on Windows, you can download and install an additional Bash terminal called GitBash from git-scm.com.
Make a note of where your version of Node.js and npm are installed on your machine. This information is shown in the final window in the installer. The installer attempts to add these directory locations to your system’s PATH.
Your computer’s PATH variable is the first place the terminal will look for resources used in development. Think of it like your computer’s index for quickly finding the tools you need. By adding these tools’ original file path or directory locations to the PATH variable, terminal won’t have any problems finding them. If you experience any problems starting Node.js in your terminal, follow the installation steps here.
Now that you have Node.js installed, let’s use terminal to make sure everything is installed correctly. Open terminal (or GitBash) and type the following command at the prompt: node-v.
The output of this command should show you the version of Node.js you’ve just installed. Similarly, you can check the version of npm that you’ve installed by running the command npm -v at the command prompt.
NOTE: If your terminal responds with an error or with nothing at all, it’s possible that your installation of Node.js was not successful. In the case of an error, try copying and pasting that error into a search engine to look for common solutions or simply try repeating the installation process.
Now that you have Node.js installed and your terminal running, you need somewhere to write your code. Although text editors come in many different forms and can be used to make non-code files as well, text editors designed specifically for developers often come prepackaged with helpful tools and plugins. I recommend installing the Atom text editor, which you can download at atom.io.
TIP: If you ever forget where you installed Node.js or npm, you can open a command window and type either which node or which npm at the prompt to see the corresponding location. From a Windows command-line prompt, use where in place of which.
Imagine that you want to build an application for your city’s community-supported agriculture (CSA) club. Through this application, users could subscribe to receive food from local farms and distributors. The application ensures that your community gets healthy food and stays connected. You plan to use Node.js to build this web application and you want to start by verifying users’ zip codes to see if they live close enough for delivery. The question is: will you need to build your own tool to make this possible?
Luckily for us, the answer is no, npm can be used to install Node.js packages, libraries of code others have written that you can use to add specific features to your application. In fact, there’s a package for verifying locations based on zip codes. We’ll take a closer look at that package and how to install it in a little bit.
A Node.js application is ultimately made up of many JavaScript files. For your application to stay organized and efficient, these files need to have access to each other’s contents when necessary. Each file, whose code is collectively related, is called a module. Let’s look at our app again and add some positive messages to it. You can create a file called messages.js with the following code:
let messages = ["You are great!", "You can accomplish anything!", "Success is in your future!"];
Keeping these messages separate from the code you’ll write to display them will make your code more organized. To manage these messages in another file, you need to change the let variable definition to use the exports object, like so:
exports.messages =["You are great!", "You can accomplish anything!", "Success is in your future!"];
Just like other JavaScript objects, you are adding a messages property on the Node.js exports object, which can be shared between modules.
NOTE: The exports object is actually a property of the moduleobject. module is both the name of the code files in Node.js and one of its global objects. Using exports is essentially a shorthand for module.exports.
The module is ready to be required (imported) by another JavaScript file. You can test this by creating another file called printMessages.js, whose purpose is to loop through the messages and log them to your console with the code in listing 1. First, require the local module by using the require object and the module’s filename (with or without a .js extension). Then, refer to the module’s array by the variable set up in printMessages.js.
Listing 1. log messages to console in printMessages.js
const messageModule = require(’./messages’); 1

messageModule.messages.forEach( (m) => { 2

  console.log(m);

});
messages.js module.messageModule.messages.require is another Node.js global object used to locally introduce methods and objects from other modules. Node.js interprets require('./messages'); to look for a module called messages.js within your project directory and allow code within printMessages.js to use any properties added to the exports object.
Next, we’ll use npm, another tool for adding modules to your project.
With your installation of Node.js, you also got Node Package Manager (npm). As the name suggests, npm is responsible for managing the external packages (modules others have built and made available online) in your application. Throughout application development, npm will be used to install, remove, and modify these packages. Entering npm -l in your terminal brings up a list of npm commands with brief explanations.
Listing 2 contains a few npm commands that you’ll want to know about.
Listing 2. Npm commands to know
npm init. Initializes a Node.js application and creates a package.json filenpm install <package>. Installs a Node.js package.npm publish. Saves and uploads a package you built to the npm package community.npm start. Runs your Node.js application (provided the package.json file is set up to use this command). npm stop will quit the running application.When using the npm install <package>, appending --save to your command installs the package as a dependency for your application. Appending --global installs the package globally on your computer to be used anywhere within terminal. These command extensions, called flags, have the shorthand forms of -S and -g, respectively. npmuninstall <package> reverses the install action. Should a project call for it, the npm install express -S can be used to install the Express.js framework, and npm install express-generator -g to install the Express.js generator for use as a command-line tool.
Continue reading %How to Build a Simple Web Server with Node.js%

Are you concerned about the impact of Facebook’s recent announcement on changes to the news feed? Wondering how these news feed changes will affect your marketing? In this article, you’ll find out what to expect from the changes and learn how you can best maintain interaction and visibility with audiences on the Facebook news feed. [...]
This post Facebook Zero: The Changing News Feed and What Marketers Need to Know first appeared on .
- Your Guide to the Social Media Jungle