by via Awwwards - Sites of the day


In this article, we’re going to look at managing user authentication in the MEAN stack. We’ll use the most common MEAN architecture of having an Angular single-page app using a REST API built with Node, Express and MongoDB.
When thinking about user authentication, we need to tackle the following things:
Before we dive into the code, let’s take a few minutes for a high-level look at how authentication is going to work in the MEAN stack.
So what does authentication look like in the MEAN stack?
Still keeping this at a high level, these are the components of the flow:
JWTs are preferred over cookies for maintaining the session state in the browser. Cookies are better for maintaining state when using a server-side application.
The code for this article is available on GitHub. To run the application, you’ll need to have Node.js installed, along with MongoDB. (For instructions on how to install, please refer to Mongo’s official documentation — Windows, Linux, macOS).
To keep the example in this article simple, we’ll start with an Angular app with four pages:
The pages are pretty basic and look like this to start with:
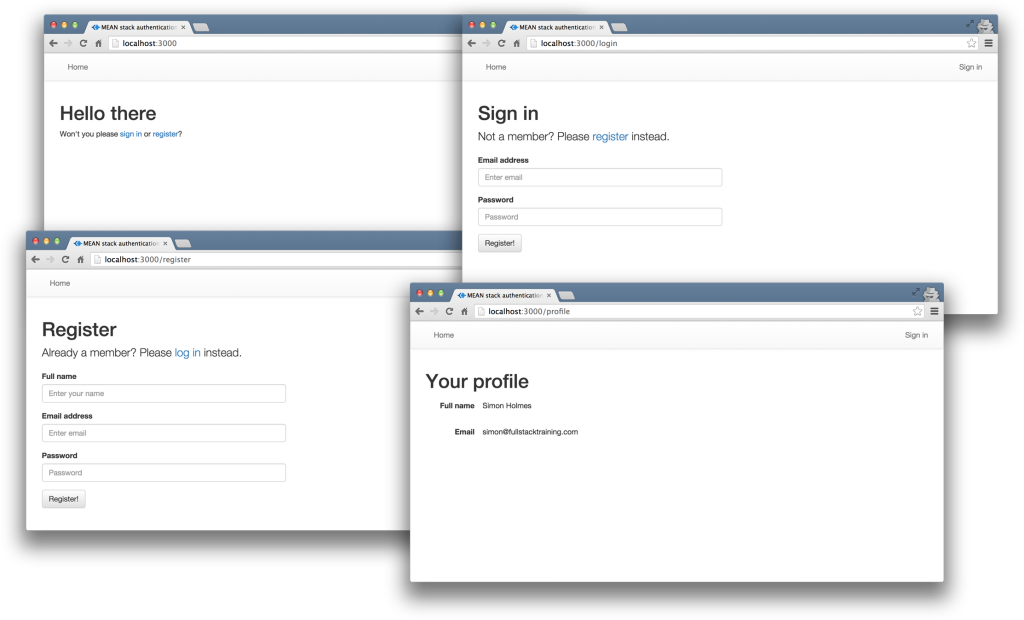
The profile page will only be accessible to authenticated users. All the files for the Angular app are in a folder inside the Angular CLI app called /client.
We’ll use the Angular CLI for building and running the local server. If you’re unfamiliar with the Angular CLI, refer to the Angular 2 Tutorial: Create a CRUD App with Angular CLI to get started.
We’ll also start off with the skeleton of a REST API built with Node, Express and MongoDB, using Mongoose to manage the schemas. This API has three routes:
/api/register (POST) — to handle new users registering/api/login (POST) — to handle returning users logging in/api/profile/USERID (GET) — to return profile details when given a USERID.The code for the API is all held in another folder inside the Express app, called api. This holds the routes, controllers and model, and is organized like this:
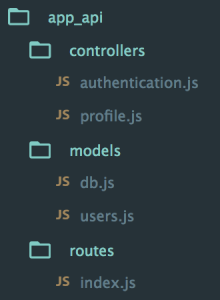
At this starting point, each of the controllers simply responds with a confirmation, like this:
module.exports.register = function(req, res) {
  console.log("Registering user: " + req.body.email);
  res.status(200);
  res.json({
    "message" : "User registered: " + req.body.email
  });
};
Okay, let’s get on with the code, starting with the database.
There’s a simple user schema defined in /api/models/users.js. It defines the need for an email address, a name, a hash and a salt. The hash and salt will be used instead of saving a password. The email is set to unique as we’ll use it for the login credentials. Here’s the schema:
var userSchema = new mongoose.Schema({
  email: {
    type: String,
    unique: true,
    required: true
  },
  name: {
    type: String,
    required: true
  },
  hash: String,
  salt: String
});
Saving user passwords is a big no-no. Should a hacker get a copy of your database, you want to make sure they can’t use it to log in to accounts. This is where the hash and salt come in.
The salt is a string of characters unique to each user. The hash is created by combining the password provided by the user and the salt, and then applying one-way encryption. As the hash can’t be decrypted, the only way to authenticate a user is to take the password, combine it with the salt and encrypt it again. If the output of this matches the hash, the password must have been correct.
To do the setting and the checking of the password, we can use Mongoose schema methods. These are essentially functions that you add to the schema. They’ll both make use of the Node.js crypto module.
At the top of the users.js model file, require crypto so that we can use it:
var crypto = require('crypto');
Nothing needs installing, as crypto ships as part of Node. Crypto itself has several methods; we’re interested in randomBytes to create the random salt and pbkdf2Sync to create the hash (there’s much more about Crypto in the Node.js API docs).
To save the reference to the password, we can create a new method called setPassword on the userSchema schema that accepts a password parameter. The method will then use crypto.randomBytes to set the salt, and crypto.pbkdf2Sync to set the hash:
userSchema.methods.setPassword = function(password){
  this.salt = crypto.randomBytes(16).toString('hex');
  this.hash = crypto.pbkdf2Sync(password, this.salt, 1000, 64, 'sha512').toString('hex');
};
We’ll use this method when creating a user. Instead of saving the password to a password path, we’ll be able to pass it to the setPassword function to set the salt and hash paths in the user document.
Checking the password is a similar process, but we already have the salt from the Mongoose model. This time we just want to encrypt the salt and the password and see if the output matches the stored hash.
Add another new method to the users.js model file, called validPassword:
userSchema.methods.validPassword = function(password) {
  var hash = crypto.pbkdf2Sync(password, this.salt, 1000, 64, 'sha512').toString('hex');
  return this.hash === hash;
};
One more thing the Mongoose model needs to be able to do is generate a JWT, so that the API can send it out as a response. A Mongoose method is ideal here too, as it means we can keep the code in one place and call it whenever needed. We’ll need to call it when a user registers and when a user logs in.
To create the JWT, we’ll use a module called jsonwebtoken which needs to be installed in the application, so run this on the command line:
npm install jsonwebtoken --save
Then require this in the users.js model file:
var jwt = require('jsonwebtoken');
This module exposes a sign method that we can use to create a JWT, simply passing it the data we want to include in the token, plus a secret that the hashing algorithm will use. The data should be sent as a JavaScript object, and include an expiry date in an exp property.
Adding a generateJwt method to userSchema in order to return a JWT looks like this:
userSchema.methods.generateJwt = function() {
  var expiry = new Date();
  expiry.setDate(expiry.getDate() + 7);

  return jwt.sign({
    _id: this._id,
    email: this.email,
    name: this.name,
    exp: parseInt(expiry.getTime() / 1000),
  }, "MY_SECRET"); // DO NOT KEEP YOUR SECRET IN THE CODE!
};
Note: It’s important that your secret is kept safe: only the originating server should know what it is. It’s best practice to set the secret as an environment variable, and not have it in the source code, especially if your code is stored in version control somewhere.
That’s everything we need to do with the database.
Passport is a Node module that simplifies the process of handling authentication in Express. It provides a common gateway to work with many different authentication “strategies”, such as logging in with Facebook, Twitter or Oauth. The strategy we’ll use is called “local”, as it uses a username and password stored locally.
To use Passport, first install it and the strategy, saving them in package.json:
npm install passport --save
npm install passport-local --save
Inside the api folder, create a new folder config and create a file in there called passport.js. This is where we define the strategy.
Before defining the strategy, this file needs to require Passport, the strategy, Mongoose and the User model:
var passport = require('passport');
var LocalStrategy = require('passport-local').Strategy;
var mongoose = require('mongoose');
var User = mongoose.model('User');
For a local strategy, we essentially just need to write a Mongoose query on the User model. This query should find a user with the email address specified, and then call the validPassword method to see if the hashes match. Pretty simple.
There’s just one curiosity of Passport to deal with. Internally, the local strategy for Passport expects two pieces of data called username and password. However, we’re using email as our unique identifier, not username. This can be configured in an options object with a usernameField property in the strategy definition. After that, it’s over to the Mongoose query.
So all in, the strategy definition will look like this:
passport.use(new LocalStrategy({
    usernameField: 'email'
  },
  function(username, password, done) {
    User.findOne({ email: username }, function (err, user) {
      if (err) { return done(err); }
      // Return if user not found in database
      if (!user) {
        return done(null, false, {
          message: 'User not found'
        });
      }
      // Return if password is wrong
      if (!user.validPassword(password)) {
        return done(null, false, {
          message: 'Password is wrong'
        });
      }
      // If credentials are correct, return the user object
      return done(null, user);
    });
  }
));
Note how the validPassword schema method is called directly on the user instance.
Now Passport just needs to be added to the application. So in app.js we need to require the Passport module, require the Passport config and initialize Passport as middleware. The placement of all of these items inside app.js is quite important, as they need to fit into a certain sequence.
The Passport module should be required at the top of the file with the other general require statements:
var express = require('express');
var path = require('path');
var favicon = require('serve-favicon');
var logger = require('morgan');
var cookieParser = require('cookie-parser');
var bodyParser = require('body-parser');
var passport = require('passport');
The config should be required after the model is required, as the config references the model.
require('./api/models/db');
require('./api/config/passport');
Finally, Passport should be initialized as Express middleware just before the API routes are added, as these routes are the first time that Passport will be used.
app.use(passport.initialize());
app.use('/api', routesApi);
We’ve now got the schema and Passport set up. Next, it’s time to put these to use in the routes and controllers of the API.
Continue reading %User Authentication with the MEAN Stack%
Developers spend precious little time coding. Even if we ignore irritating meetings, much of the job involves basic tasks which can sap your working day:
console and debugger statements from scriptsTasks must be repeated every time you make a change. You may start with good intentions, but the most infallible developer will forget to compress an image or two. Over time, pre-production tasks become increasingly arduous and time-consuming; you'll dread the inevitable content and template changes. It's mind-numbing, repetitive work. Wouldn’t it be better to spend your time on more profitable jobs?
If so, you need a task runner or build process.
Creating a build process will take time. It's more complex than performing each task manually, but over the long term, you’ll save hours of effort, reduce human error and save your sanity. Adopt a pragmatic approach:
Some of the tools and concepts may be new to you, but take a deep breath and concentrate on one thing at a time.
Build tools such as GNU Make have been available for decades, but web-specific task runners are a relatively new phenomenon. The first to achieve critical mass was Grunt — a Node.js task runner which used plugins controlled (originally) by a JSON configuration file. Grunt was hugely successful, but there were a number of issues:
Many issues were addressed in later editions, but Gulp had already arrived and offered a number of improvements:
Of course, Gulp itself isn't perfect, and new task runners such as Broccoli.js, Brunch and webpack have also been competing for developer attention. More recently, npm itself has been touted as a simpler option. All have their pros and cons, but Gulp remains the favorite and is currently used by more than 40% of web developers.
Gulp requires Node.js, but while some JavaScript knowledge is beneficial, developers from all web programming faiths will find it useful.
This tutorial describes how to use Gulp 3 — the most recent release version at the time of writing. Gulp 4 has been in development for some time but remains a beta product. It's possible to use or switch to Gulp 4, but I recommend sticking with version 3 until the final release.
Node.js can be downloaded for Windows, macOS and Linux from nodejs.org/download/. There are various options for installing from binaries, package managers and docker images, and full instructions are available.
Note for Windows users: Node.js and Gulp run on Windows, but some plugins may not install or run if they depend on native Linux binaries such as image compression libraries. One option for Windows 10 users is the new bash command-line, which solves many issues.
Once installed, open a command prompt and enter:
node -v
This reveals the version number. You're about to make heavy use of npm — the Node.js package manager which is used to install modules. Examine its version number:
npm -v
Note for Linux users: Node.js modules can be installed globally so they’re available throughout your system. However, most users will not have permission to write to the global directories unless npm commands are prefixed with sudo. There are a number of options to fix npm permissions and tools such as nvm can help, but I often change the default directory. For example, on Ubuntu/Debian-based platforms:
cd ~
mkdir .node_modules_global
npm config set prefix=$HOME/.node_modules_global
npm install npm -g
Then add the following line to the end of ~/.bashrc:
export PATH="$HOME/.node_modules_global/bin:$PATH"
Finally, update with this:
source ~/.bashrc
Install Gulp command-line interface globally so the gulp command can be run from any project folder:
npm install gulp-cli -g
Verify Gulp has installed with this:
gulp -v
Note for Node.js projects: you can skip this step if you already have a package.json configuration file.
Presume you have a new or pre-existing project in the folder project1. Navigate to this folder and initialize it with npm:
cd project1
npm init
You’ll be asked a series of questions. Enter a value or hit Return to accept defaults. A package.json file will be created on completion which stores your npm configuration settings.
Note for Git users: Node.js installs modules to a node_modules folder. You should add this to your .gitignore file to ensure they’re not committed to your repository. When deploying the project to another PC, you can run npm install to restore them.
For the remainder of this article, we'll presume your project folder contains the following sub-folders:
src folder: preprocessed source files
This contains further sub-folders:
html - HTML source files and templatesimages — the original uncompressed imagesjs — multiple preprocessed script filesscss — multiple preprocessed Sass .scss filesbuild folder: compiled/processed files
Gulp will create files and create sub-folders as necessary:
html — compiled static HTML filesimages — compressed imagesjs — a single concatenated and minified JavaScript filecss — a single compiled and minified CSS fileYour project will almost certainly be different but this structure is used for the examples below.
Tip: If you're on a Unix-based system and you just want to follow along with the tutorial, you can recreate the folder structure with the following command:
mkdir -p src/{html,images,js,scss} build/{html,images,js,css}
You can now install Gulp in your project folder using the command:
npm install gulp --save-dev
This installs Gulp as a development dependency and the "devDependencies" section of package.json is updated accordingly. We’ll presume Gulp and all plugins are development dependencies for the remainder of this tutorial.
Development dependencies are not installed when the NODE_ENV environment variable is set to production on your operating system. You would normally do this on your live server with the Mac/Linux command:
export NODE_ENV=production
Or on Windows:
set NODE_ENV=production
This tutorial presumes your assets will be compiled to the build folder and committed to your Git repository or uploaded directly to the server. However, it may be preferable to build assets on the live server if you want to change the way they are created. For example, HTML, CSS and JavaScript files are minified on production but not development environments. In that case, use the --save option for Gulp and all plugins, i.e.
npm install gulp --save
This sets Gulp as an application dependency in the "dependencies" section of package.json. It will be installed when you enter npm install and can be run wherever the project is deployed. You can remove the build folder from your repository since the files can be created on any platform when required.
Create a new gulpfile.js configuration file in the root of your project folder. Add some basic code to get started:
// Gulp.js configuration
var
  // modules
  gulp = require('gulp'),

  // development mode?
  devBuild = (process.env.NODE_ENV !== 'production'),

  // folders
  folder = {
    src: 'src/',
    build: 'build/'
  }
;
This references the Gulp module, sets a devBuild variable to true when running in development (or non-production mode) and defines the source and build folder locations.
ES6 note: ES5-compatible JavaScript code is provided in this tutorial. This will work for all versions of Gulp and Node.js with or without the --harmony flag. Most ES6 features are supported in Node 6 and above so feel free to use arrow functions, let, const, etc. if you're using a recent version.
gulpfile.js won't do anything yet because you need to …
On its own, Gulp does nothing. You must:
It's possible to write your own plugins but, since almost 3,000 are available, it's unlikely you'll ever need to. You can search using Gulp's own directory at gulpjs.com/plugins/, on npmjs.com, or search "gulp something" to harness the mighty power of Google.
Gulp provides three primary task methods:
gulp.task — defines a new task with a name, optional array of dependencies and a function.gulp.src — sets the folder where source files are located.gulp.dest — sets the destination folder where build files will be placed.Any number of plugin calls are set with pipe between the .src and .dest.
Continue reading %An Introduction to Gulp.js%
iFlow is a concise & powerful state management framework, iFlow has no dependencies and it's very small.

This article was sponsored by CloudApp. Thank you for supporting the partners who make SitePoint possible.
While you’re trying to figure out how to explain what you’re looking at, thousands of people are already capturing GIFs, videos, or images and sharing them with the world.
With CloudApp, you can replace bulleted lists and fragmented thoughts with easily understood visuals. Here are just a few ways teams use CloudApp to collaborate better:
Don’t believe us? Here’s how it works.
Continue reading %Tongue Tied? Communicate Faster with Visuals%
|

 Brian Rinaldi recommends
 Peter Cooper recommends
 Chris Brandrick recommends
 Holly Schinsky recommends