is-thirteen is a javascript library to check if a number is equal to 13.
by via jQuery-Plugins.net RSS Feed
is-thirteen is a javascript library to check if a number is equal to 13.
This article was originally published on Sencha. Thank you for supporting the partners who make SitePoint possible.
Progressive Web Applications have become a viable alternative to native applications: they can be installed, used to work offline, and have access to the device hardware. In this article, I'll show you how to make your existing web applications even better than before by adding native-like notifications. I'll explain the concept of Web Push Notifications and show you how to add them to your existing web apps. Last, I'll cover the state of specifications and browser support.
The Web Push Notifications protocol is relatively new. It gives web applications the ability to act as native applications and receive messages pushed to them from a server at any time even when the web app is not active or not currently loaded in a browser. This lets you engage users with urgent and relevant notifications when they are not using your application and motivate them to return to the application.
It makes clear the commercial value of implementing Web Push Notifications in your web apps. It increases user engagement. The overall value of your application increases too, because push notifications make your application more useful for your users. This improves the usability of web applications and moves us closer to developing a single web application for all platforms instead of having to develop a native application for every platform.
Before going into the details of the technology, I would like to talk a bit about the differences between Web Push and Web Sockets. First, here is what they have in common. Web Push and Web Sockets are designed to implement real-time communication between the web application and application server, and to send real-time data and updates from the application server to your web application.
Here are the differences:
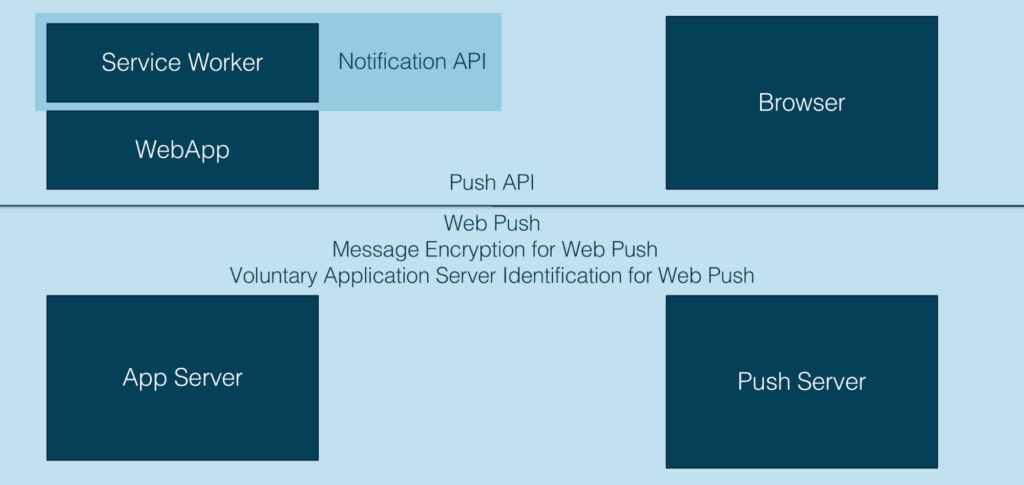
Let's move to the technical details of the technology. I would like to explain the details using a game with special rules, players, and rounds. I'll start by describing the players of the game. There are 5 players involved in this game called Web Push Notifications:
Push Server is a service that is implemented by the browser vendor; it is a communication bridge between your application server and a browser. It is responsible for delivering messages from your application server to the browser.
Using a game, I'll demonstrate how you can add web push notifications to your apps. The rules of this game are defined by several specifications provided by the World Wide Web Consortium and the Internet Engineering Task Force:
Communications between the Browser and the web application or service worker associated with this application are described in the Push API specification.
Displaying different types of Notifications as well as Notification handling are described in the Notifications API specification.
Communications between the Application Server and the Push Server are defined in the Web Push Protocol specification.
There are also additional specifications describing push message encryption and application server identification that let your application server prove that it is allowed to send messages to your user.
I have split the game into four rounds and will explain the concept and target of every round. Then, I'll show you how you can implement every round in your application.
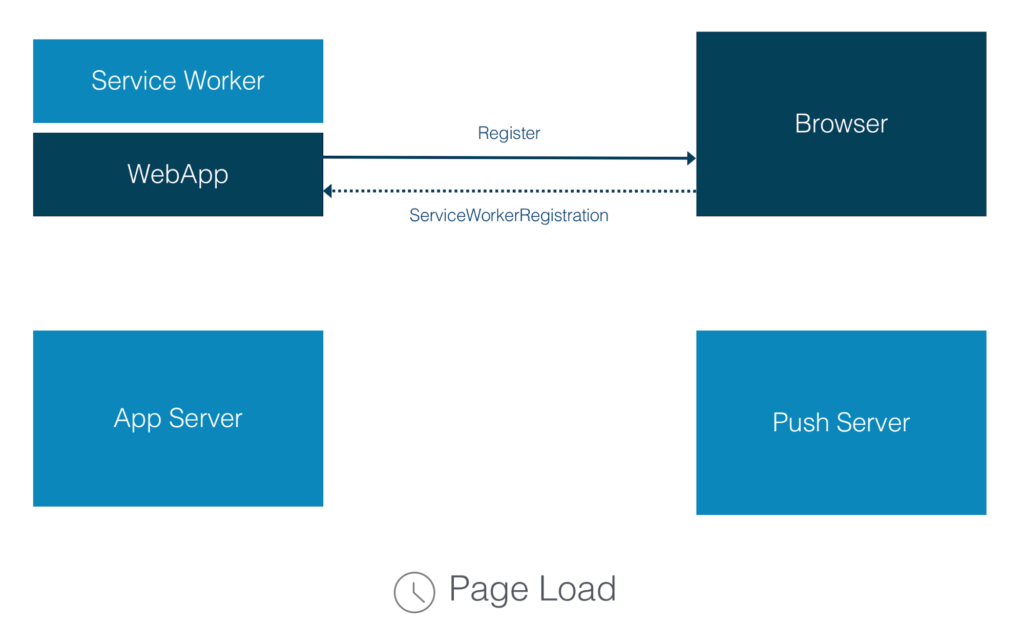
Web Push Notifications require Service Workers to handle push messages, so the first round will be to register your service worker. Only your web application and the browser are involved in this round. And this round occurs at the page load.
The web application sends a request to a browser to register a Service Worker and the browser replies with the ServiceWorkerRegistration object if the Service Worker was registered successfully.
To implement this round, you need to add the following code to your web application:
if ('serviceWorker' in navigator) {

  if ('PushManager' in window) {

    navigator.serviceWorker.register('ServiceWorker.js').then(function(registration) {

      //state initializing

    })

    .catch(function() {

      //error handling

    });

  } else {

    //error handling

  }

} else {

  //error handling

}
First, we need to check if the browser supports Service Workers. Then, we need to check if the browser supports web push notifications. As browser support is growing, it's always a good idea to add both checks.
If both are supported, we register our service worker. For this step, we call the navigator.serviceWorker.register() method and pass the path to our Service Worker file as a parameter. After this step, the browser will download this file and run it in a service worker environment. The Service Worker file is a standard JavaScript file, but the browser will "give it access" to the service worker APIs, including push. If everything ran correctly and there were no errors, the promise returned by register() will resolve. If there are errors of any kind, the promise is rejected, and we need to handle this case as well as the case when the browser doesn't support Service Workers. When register() does resolve, it returns a ServiceWorkerRegistration object that will be used in the next round.
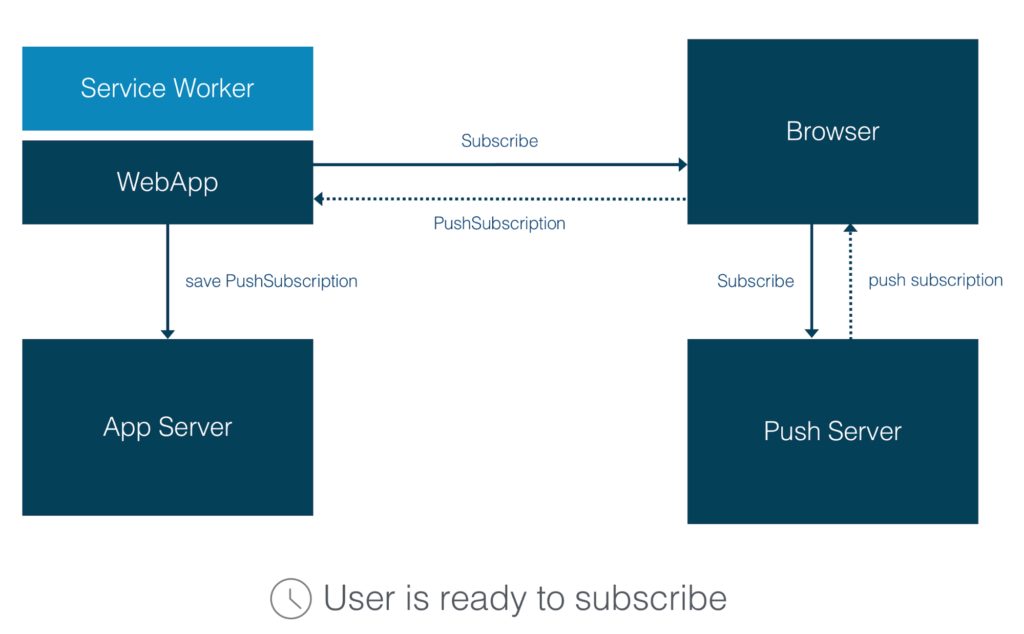
The second round handles the subscription for Web Push Notifications. This is when you ask the user if he wants to receive Web Push Notifications from your application, and if he agrees, you subscribe him. This round involves more players – Web Application, Browser, Application Server and Push Server and more communications.
This round should be played when a user is ready to subscribe. You should ask him to subscribe only when you are sure that it is relevant and meaningful for him, because you will only have one chance to ask. If the user blocks the request, then the browser will not permit you to ask this question again later. The only way to unblock an application is to change it in the browser settings. And as you can imagine, almost no user ever does this. So, you need to explain to the user what kind of Notifications he will receive and why. You may also offer to subscribe the user using a custom in-page message, and once the user clicks yes, then show him a system browser request.
What happens in this round? Your web application asks the browser to subscribe the user to receive Web Push Notifications. If the user agrees, the browser sends a request to the Push Server to generate a push subscription. The Push Server replies to the browser with a push subscription object that the browser forwards to your web application. As the last step, your web application sends this push subscription object to your application server via an Ajax call, for example. And your application server saves it to use in the next round.
Your web application is the main actor in this round, so this code should be added to your web app:
navigator.serviceWorker.ready.then(function(registration) {

  registration.pushManager.subscribe({

    userVisibleOnly: true,

    applicationServerKey: urlBase64ToUint8Array('...')

  })

  .then(function(subscription) {

    // The subscription was successful

    savePushSubscription(subscription);

  })

  .catch(function(e) {

    //error handling

  });

});
Once the service worker is ready, we can subscribe a user by calling the registration.pushManager.subscribe() method of the Service Worker registration object that we received in the previous round. The browser requests permission to show notifications to a user. If the user allows it, the promise will be resolved with a subscription object. The subscription object contains necessary information for sending a push notification to a user. Now, you will need to save this object on your application server. I won't go deeper into this process – it could just be a standard Ajax call to the server, or you could send this object as a JSON or a string and then the server would need to save this object in a database. I will not show this code, because it highly depends on how your App Server is implemented. If the user denies permission or any other error occurs, then the promise will be rejected and you need to handle this issue.
If your web app doesn't have permissions to show notifications at the time of calling subscribe(), the browser will request the permissions for you. But there is another option – you can request permissions manually by calling Notification.requestPermission method directly. This method will return a promise that resolves with the permission picked by the user. Possible values for this are granted, denied, or default.
Notification.requestPermission(function(result) {

  if (result!== 'granted') {

    //handle permissions deny

  }

});
Let's look at the parameter object passed into the subscribe method:
reg.pushManagerpushManager.subscribe({

  userVisibleOnly: true,

  applicationServerKey: new Uint8Array([...])

});
Let's look at the PushSubscription object that is returned by resolving the promise. This PushSubscription object is associated with the Service Worker that we registered in the previous round. This Push subscription describes the delivery bridge for push messages.
interface PushSubscription {

  readonly attribute endpoint;

  // "https://{push\_server\_url}/{user\_identifier}",

  function getKey();

  //auth - authentication secret

  //p256dh - key for encrypting messages

};
It contains two important parts:
Continue reading %How to Build Push Notifications for Web Applications%
After 10yrs of working on One Page Love, here are the 3 takeaways reflecting on what it took to grow from side project to my full time job!
Thank you so much for the feedback and encouragement over the years – it meant and still means the world to me 
This article was created in partnership with CanvasFlip. Thank you for supporting the partners who make SitePoint possible.
Visual Inspector is a collaboration tool for getting feedback on your website. It helps stakeholders to visualize changes on live websites without coding and to collaborate effectively with developers.
As a developer, when you are building a web-based project with multiple stakeholders - designers, clients, delivery managers, etc, everyone likes to share their feedback on the fonts, colors, content copy, and almost on everything else.
At the end of the day, it is your responsibility to gather all the feedback from the stakeholders and implement their suggestions on your website.
But that’s much easier said than done.
Whereas there are many collaboration tools at the design stage, iterating on the post-development and pre-launch stages of website creation, is still a very cumbersome process.
First, to make suggestions on websites, one needs to “Inspect Element”, dig into native in-browser devtools, and apply coding skills (which most non-developer stakeholders like designers, customers, marketing folks, etc., don’t have or are not often even aware of).
Second, once these changes are made, working collaboratively over them with other stakeholders, e.g., discussing, making decisions, tracking these changes over email + Screenshot, etc., is an extremely painful process. Especially when collaborating with multiple stakeholders over multiple changes.
Traditional ways of getting collaborative feedback (Screenshot + Email) often result in delays in website development with a lot of wasted time and effort, not to mention the confusion this generates within a team.
Thanks to the available technology, the cost of gathering feedback and making iterations has gone down multifold in the last few years. Iterations during web development are no different.
Let me introduce you to Visual Inspector, a simple in-browser editing tool, which lets you make temporary changes to live websites without any coding - more like a visual alternative to Chrome’s native DevTools.
Visual Inspector also allows you to share these changes remotely among stakeholders for faster design decisions.
Stakeholders can make these changes without coding, highlight them by adding comments right within the page, discuss issues by replying to the comments, or resolve issues/suggestions made by other team members.
Everyone in the team is always updated with real-time notifications over email/Slack or other integrations.
[caption id="attachment_164075" align="alignnone" width="640"]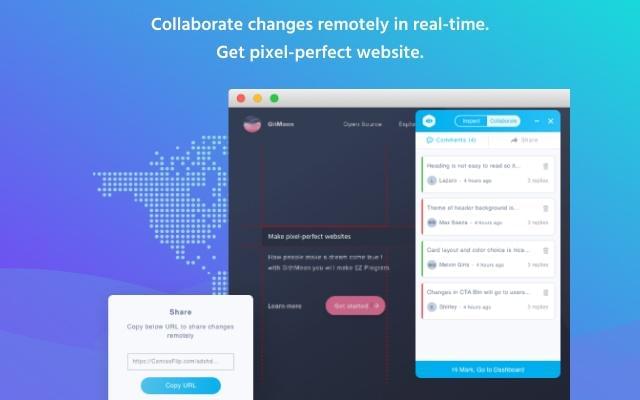 Collaborate and get real-time feedback by sharing changes over a link[/caption]
Getting started with Visual Inspector is extremely easy and you should start with installing the extension.
Once installed, the extension will guide you in how you can make design changes and collaborate over them with stakeholders.
Continue reading %Build Pixel Perfect Websites Without Dev-Design Conflict In Your Team%


|
In this tutorial, we’re going to look at how to build a basic Twitter client with NodeJS, and an Angular application to display your home timeline of tweets. This is a rapid tour with things to consider while setting up your own Twitter client and Angular application.
First, we’re going to build a NodeJS server, which will handle communicating between the Twitter API and the Angular application. Then, we’ll build up the Angular application to display and interact with your Twitter timeline.
While you may be able to go through this tutorial without any prior NodeJS or Angular experience, I’ll assume some prior knowledge in the article.
You’ll need a recent version of NodeJS set up on your machine. Then ensure you have the Angular CLI. The links provided give you a good place to start if you need help with either of those tasks.
The project source code can be found on GitHub. You can get it all running locally by either cloning it with Git or downloading the files from the repo’s GitHub archive.
git clone https://github.com/sitepoint-editors/twitter-angular-client
Once you have the files, from your terminal you’ll need to run npm install to get all of the dependencies installed. Then we can get to work!
To access Twitter’s API, we need to register for a new “app”, which is essentially a way for Twitter to give us a set of credentials. These are unique for your application, so don’t share them publicly anywhere. You must, of course, have a Twitter account to access the data.
To start, go to https://apps.twitter.com/ and select Create New App. You can fill out the name, description, and website URL for your app. (You can use a fake URL for now. If you publish your app it should be your actual website.)
From there, you’ll see the new app page with your details. Go to the Keys and Access Tokens page, where you can see a button to Create my access token near the bottom. Click the button, and then you should see four values: Consumer Key (API Key), Consumer Secret (API Secret), Access Token, and Access Token Secret. We’ll use these in a moment, so be sure to keep this information handy.
Now it’s time to dig into our NodeJS server, which will bridge the gap between Twitter’s API and the Angular app. In the project, you should see the server.js file, which you’ll need to open and tweak.
First, you’ll need to update the block that contains the credentials you received from the Twitter app earlier. You should copy those values into the block here. We’re using a Twitter package called Twit to help us connect to Twitter, though there are others available with various levels of functionality.
const client = new Twitter({
  consumer_key: 'CONSUMER_KEY',
  consumer_secret: 'CONSUMER_SECRET',
  access_token: 'ACCESS_TOKEN',
  access_token_secret: 'ACCESS_TOKEN_SECRET'
});
Now we should be able to connect to Twitter. We’re also using the popular ExpressJS to create and manage our server. Now that you have the credentials installed, you can run the server.
node server
Our next step is to make several routes that will handle the HTTP requests our Angular application will need to make to load the Twitter data. Our first route is to get the current user, and validate their credentials. The Access Token and Secret you provided are linked to your Twitter account, so you’ll be the authorized user in this case. When this route is called, it will call the Twitter account/verify_credentials endpoint and return an object containing your user data.
app.get('/api/user', (req, res) => {
  client.get('account/verify_credentials').then(user => {
    res.send(user)
  }).catch(error => {
    res.send(error);
  });
});
The next route we’ll create is to get your home timeline. It requests the statuses/home_timeline endpoint, and passes a few parameters to give us more of the data we need.
Due to rate limiting on the Twitter API, we’ve implemented a simple cache that will only request new data once a minute (which is the max rate before you receive errors). It basically keeps track of the last response and the time it was requested, only allowing new requests to Twitter to run after a minute. Rate limiting is a primary design consideration to have when building a Twitter app.
let cache = [];
let cacheAge = 0;

app.get('/api/home', (req, res) => {
  if (Date.now() - cacheAge > 60000) {
    cacheAge = Date.now();
    const params = { tweet_mode: 'extended', count: 200 };
    if (req.query.since) {
      params.since_id = req.query.since;
    }
    client
      .get(`statuses/home_timeline`, params)
      .then(timeline => {
        cache = timeline;
        res.send(timeline);
      })
      .catch(error => res.send(error));
  } else {
    res.send(cache);
  }
});
Finally, we create a set of routes to handle like/unlike and retweet/unretweet actions for a tweet. This will allow us not only to read data, but also take action. These will require that you’ve set the application Access Level to Read and write (in case you changed it in the Twitter app settings).
app.post('/api/favorite/:id', (req, res) => {
  const path = (req.body.state) ? 'create' : 'destroy';
  client
    .post(`favorites/${path}`, {id: req.params.id})
    .then(tweet => res.send(tweet))
    .catch(error => res.send(error));
});

app.post('/api/retweet/:id', (req, res) => {
  const path = (req.body.state) ? 'retweet' : 'unretweet';
  client
    .post(`statuses/retweet/${req.params.id}`)
    .then(tweet => res.send(tweet))
    .catch(error => res.send(error));
});
There are many Twitter APIs for engaging with Twitter data, but the fundamental rules remain the same. The only major issue here is we’ve hard-coded credentials to a single user, which you’d need in order to set up your own OAuth server (or use an existing one) to handle the authentication aspects, which you can learn more about on Twitter Authentication documentation.
Now it’s time to turn our attention to the Angular application that uses the server we created. We’ll take a look at the key aspects of the application and how they work to create the final result. We’ve built this application using Clarity for the UI layer (it gives us many useful layout components), but otherwise everything is just Angular.
To run the Angular application, just run the following command and then open up http://localhost:4200:
ng serve
Inside of the application, we have a model at src/app/tweet.ts which contains the TypeScript interface that describes most of the properties of a tweet (some have been omitted). I believe it’s essential to describe your types properly for large-scale Angular applications as well as smaller ones, so this interface gives us the shape of a tweet.
First, we’ll need a service that can make requests to our NodeJS server to get the latest tweets. In Angular, the HttpClient is the utility you use to make HTTP requests, so I’ve created an Angular service to encapsulate the logic for these calls. Open up src/app/twitter.service.ts and you’ll see the following code:
import { Injectable } from '@angular/core';
import { HttpClient } from '@angular/common/http';
import { environment } from '../environments/environment';
import { Tweet } from './tweet';

export interface TwitterResponse {
  data: any;
  resp: any;
}

@Injectable()
export class TwitterService {

  constructor(private http: HttpClient) { }

  user() {
    return this.http.get<TwitterResponse>(`${environment.api}/user`);
  }

  home(since?: string) {
    return this.http.get<TwitterResponse>(`${environment.api}/home?since=${since}`);
  }

  action(property: 'favorite'|'retweet', id: string, state: boolean) {
    return this.http.post<TwitterResponse>(`${environment.api}/${property}/${id}`, {state});
  }
}
This is a fairly basic service, which has methods to build a request for each API that we’ll support. The user method will return the current user (which will always be you). The home method will return the latest 200 tweets in your home timeline (or how ever many appeared since the last tweet specified). Finally, the action property handles making either a favorite or retweet call, by sending a boolean state value to toggle the status.
This service is generic, and each of these methods returns an Observable. If you want to learn more about them, you can read about Functional Reactive with RXJS, but the way they’re used here is similar to how a promise works. We’ll see how to use them in a moment.
We’ll use the TwitterService in a few places, starting with loading the AppComponent. We’ll use it to load the user details (which appears in the top corner), and to load the list of tweets for the home page. Open up src/app/app.component.ts and you should see the following code:
import { Component , OnInit } from '@angular/core';
import { TwitterService } from './twitter.service';
import { Tweet } from './tweet';

@Component({
  selector: 'app-root',
  templateUrl: './app.component.html',
  styleUrls: ['./app.component.scss'],
  providers: [TwitterService]
})
export class AppComponent implements OnInit {
  user;

  constructor(private twitter: TwitterService) {}

  ngOnInit() {
    this.twitter.user().subscribe(user => this.user = user.data);
  }
}
The AppComponent does one main thing using our TwitterService. The ngOnInit method fires as soon as the component has initialized, and requests the user data. Here we’re using the Observable returned by the TwitterService.user method, and when we use subscribe it will trigger the actual HTTP request to fire. Once it’s returned, the callback function stores the user property, which is used to display content in the navbar. You can see the user property bindings in the component template below, such as user.profile_image_url_https:
<clr-main-container>
  <clr-header class="header-4">
    <div class="branding">
      <a class="nav-link">
        <div class="title">Twangular</div>
      </a>
    </div>
    <div class="header-actions" *ngIf="user">
      <a class="nav-link">
        <span class="nav-text">
          <img [src]="user.profile_image_url_https" class="avatar" />
          @
        </span>
      </a>
    </div>
  </clr-header>
  <div class="content-container">
    <main class="content-area">
      <app-tweets></app-tweets>
    </main>
  </div>
</clr-main-container>
Also, the use of <app-tweets></app-tweets> will insert the TweetsComponent, which handles the actual loading and display of tweets, so let’s take a look at it now.
Continue reading %Building a Twitter Client with NodeJS and Angular%


