This article was originally published on Sencha. Thank you for supporting the partners who make SitePoint possible.
Progressive Web Applications have become a viable alternative to native applications: they can be installed, used to work offline, and have access to the device hardware. In this article, I'll show you how to make your existing web applications even better than before by adding native-like notifications. I'll explain the concept of Web Push Notifications and show you how to add them to your existing web apps. Last, I'll cover the state of specifications and browser support.
Web Push Notifications Protocol
The Web Push Notifications protocol is relatively new. It gives web applications the ability to act as native applications and receive messages pushed to them from a server at any time even when the web app is not active or not currently loaded in a browser. This lets you engage users with urgent and relevant notifications when they are not using your application and motivate them to return to the application.
It makes clear the commercial value of implementing Web Push Notifications in your web apps. It increases user engagement. The overall value of your application increases too, because push notifications make your application more useful for your users. This improves the usability of web applications and moves us closer to developing a single web application for all platforms instead of having to develop a native application for every platform.
Web Push vs Web Sockets
Before going into the details of the technology, I would like to talk a bit about the differences between Web Push and Web Sockets. First, here is what they have in common. Web Push and Web Sockets are designed to implement real-time communication between the web application and application server, and to send real-time data and updates from the application server to your web application.
Here are the differences:
- Web Sockets can only be used when a web page is loaded and active. But the opposite is true of Web Push Notifications which can be used at any time, including when the application is active, inactive, or not loaded, and when the browser is not active or even closed.
- Data sent using Web Push must be encrypted, and there is a size limit per message (it must not be larger than 4Kb). There's also a count limit for the number of messages you are allowed to send (the exact limit value depends on the browser). Some browsers (for example Chrome) may also require that a notification be displayed to the user every time a message is received. You don't have any of these limitations when you use Web Sockets: you can send any number of unencrypted messages of any size and handle them as you want; and you may display a notification or silently update the data in your application or even do nothing at all.
- The general rule is to use Web Sockets for sending ordinary data updates to your web app when a user is interacting with the application. Use Web Push Notifications for sending urgent and important messages to a user that have to be received immediately, whether or not the user is working with your application at that moment.
Technical Concepts
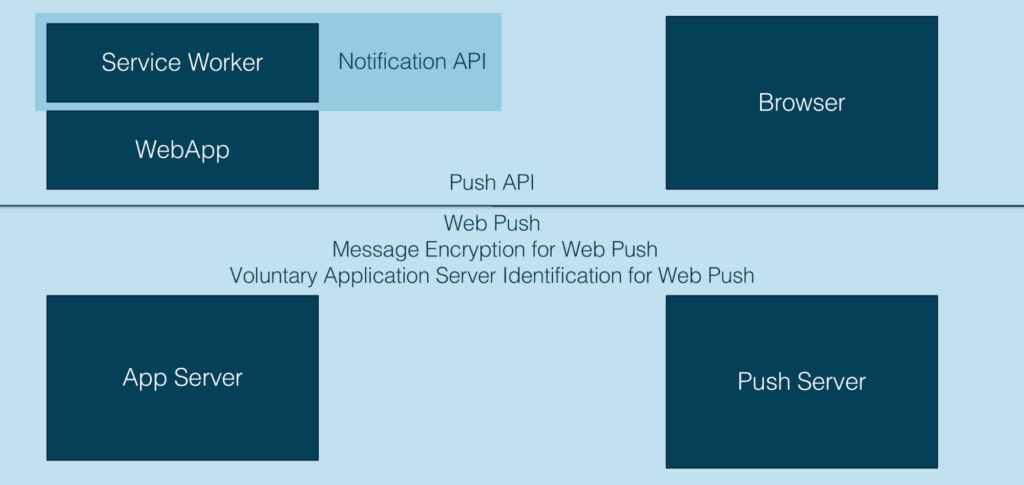
Let's move to the technical details of the technology. I would like to explain the details using a game with special rules, players, and rounds. I'll start by describing the players of the game. There are 5 players involved in this game called Web Push Notifications:
- Web Application
- Service Worker
- Browser
- Application Server
- Push Server
Push Server is a service that is implemented by the browser vendor; it is a communication bridge between your application server and a browser. It is responsible for delivering messages from your application server to the browser.
Using a Game to Demonstrate Web Push Notifications
Using a game, I'll demonstrate how you can add web push notifications to your apps. The rules of this game are defined by several specifications provided by the World Wide Web Consortium and the Internet Engineering Task Force:
-
Communications between the Browser and the web application or service worker associated with this application are described in the Push API specification.
-
Displaying different types of Notifications as well as Notification handling are described in the Notifications API specification.
-
Communications between the Application Server and the Push Server are defined in the Web Push Protocol specification.
-
There are also additional specifications describing push message encryption and application server identification that let your application server prove that it is allowed to send messages to your user.
Game Rounds
I have split the game into four rounds and will explain the concept and target of every round. Then, I'll show you how you can implement every round in your application.
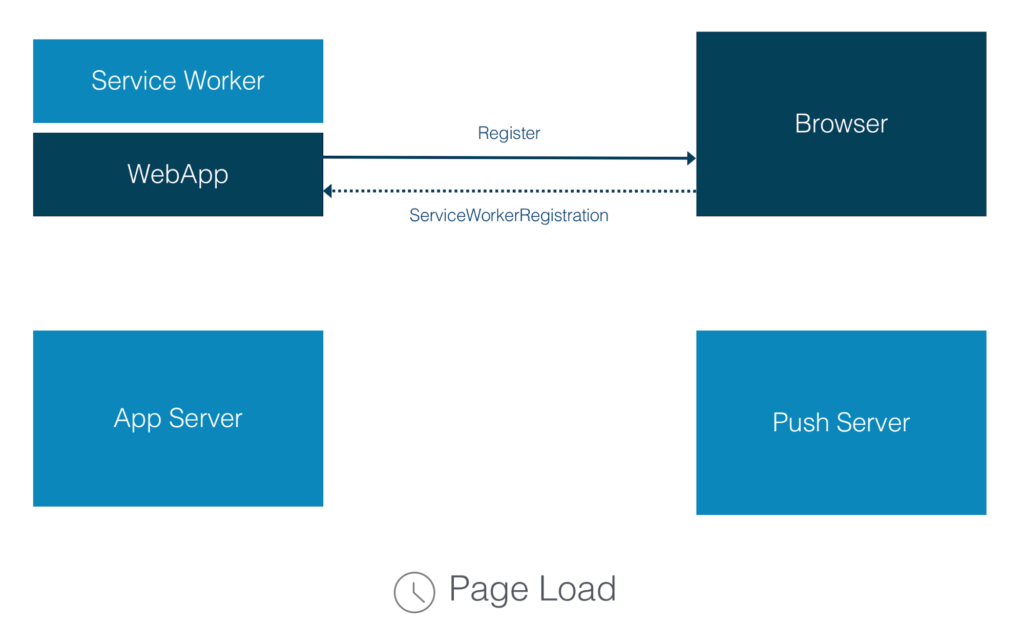
Round 1: Service Worker Registration
Web Push Notifications require Service Workers to handle push messages, so the first round will be to register your service worker. Only your web application and the browser are involved in this round. And this round occurs at the page load.
The web application sends a request to a browser to register a Service Worker and the browser replies with the ServiceWorkerRegistration object if the Service Worker was registered successfully.
To implement this round, you need to add the following code to your web application:
if ('serviceWorker' in navigator) {

  if ('PushManager' in window) {

    navigator.serviceWorker.register('ServiceWorker.js').then(function(registration) {

      //state initializing

    })

    .catch(function() {

      //error handling

    });

  } else {

    //error handling

  }

} else {

  //error handling

}
First, we need to check if the browser supports Service Workers. Then, we need to check if the browser supports web push notifications. As browser support is growing, it's always a good idea to add both checks.
If both are supported, we register our service worker. For this step, we call the navigator.serviceWorker.register() method and pass the path to our Service Worker file as a parameter. After this step, the browser will download this file and run it in a service worker environment. The Service Worker file is a standard JavaScript file, but the browser will "give it access" to the service worker APIs, including push. If everything ran correctly and there were no errors, the promise returned by register() will resolve. If there are errors of any kind, the promise is rejected, and we need to handle this case as well as the case when the browser doesn't support Service Workers. When register() does resolve, it returns a ServiceWorkerRegistration object that will be used in the next round.
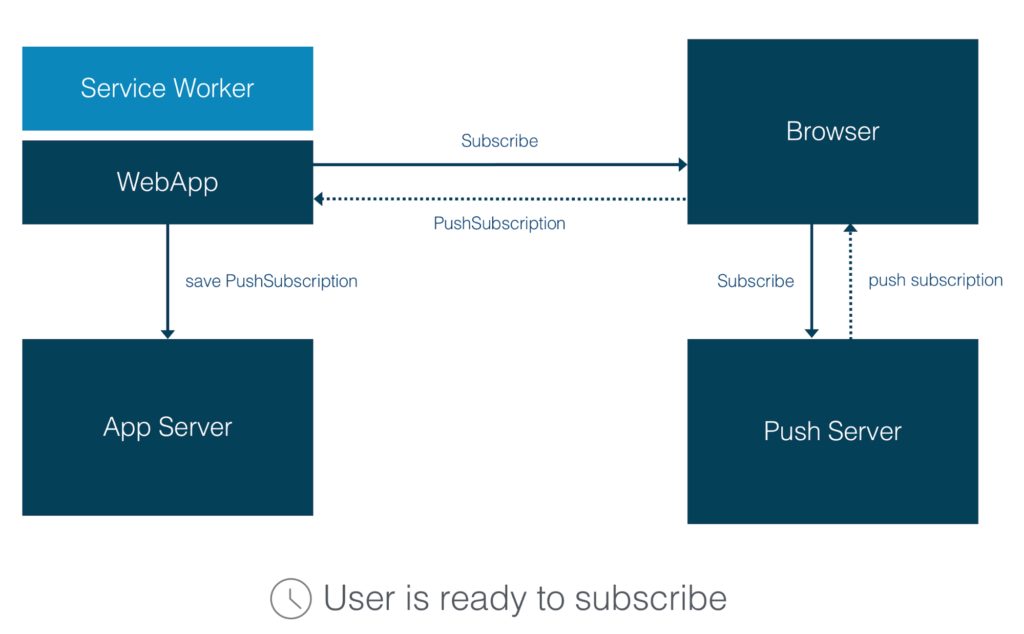
Round 2: Subscription
The second round handles the subscription for Web Push Notifications. This is when you ask the user if he wants to receive Web Push Notifications from your application, and if he agrees, you subscribe him. This round involves more players – Web Application, Browser, Application Server and Push Server and more communications.
This round should be played when a user is ready to subscribe. You should ask him to subscribe only when you are sure that it is relevant and meaningful for him, because you will only have one chance to ask. If the user blocks the request, then the browser will not permit you to ask this question again later. The only way to unblock an application is to change it in the browser settings. And as you can imagine, almost no user ever does this. So, you need to explain to the user what kind of Notifications he will receive and why. You may also offer to subscribe the user using a custom in-page message, and once the user clicks yes, then show him a system browser request.
What happens in this round? Your web application asks the browser to subscribe the user to receive Web Push Notifications. If the user agrees, the browser sends a request to the Push Server to generate a push subscription. The Push Server replies to the browser with a push subscription object that the browser forwards to your web application. As the last step, your web application sends this push subscription object to your application server via an Ajax call, for example. And your application server saves it to use in the next round.
Your web application is the main actor in this round, so this code should be added to your web app:
navigator.serviceWorker.ready.then(function(registration) {

  registration.pushManager.subscribe({

    userVisibleOnly: true,

    applicationServerKey: urlBase64ToUint8Array('...')

  })

  .then(function(subscription) {

    // The subscription was successful

    savePushSubscription(subscription);

  })

  .catch(function(e) {

    //error handling

  });

});
Once the service worker is ready, we can subscribe a user by calling the registration.pushManager.subscribe() method of the Service Worker registration object that we received in the previous round. The browser requests permission to show notifications to a user. If the user allows it, the promise will be resolved with a subscription object. The subscription object contains necessary information for sending a push notification to a user. Now, you will need to save this object on your application server. I won't go deeper into this process – it could just be a standard Ajax call to the server, or you could send this object as a JSON or a string and then the server would need to save this object in a database. I will not show this code, because it highly depends on how your App Server is implemented. If the user denies permission or any other error occurs, then the promise will be rejected and you need to handle this issue.
Permission Request
If your web app doesn't have permissions to show notifications at the time of calling subscribe(), the browser will request the permissions for you. But there is another option – you can request permissions manually by calling Notification.requestPermission method directly. This method will return a promise that resolves with the permission picked by the user. Possible values for this are granted, denied, or default.
Notification.requestPermission(function(result) {

  if (result!== 'granted') {

    //handle permissions deny

  }

});
Subscription Parameters
Let's look at the parameter object passed into the subscribe method:
reg.pushManagerpushManager.subscribe({

  userVisibleOnly: true,

  applicationServerKey: new Uint8Array([...])

});
- userVisibleOnly: If it's set to true, it means that every push message will result in showing a Notification to the user. Silent push messages sent in the background, when the user isn't notified, are not allowed in this case. Currently, Chrome only allows this option to be set to true because theoretically silent push could be used by a developer to do nasty things like setting up hidden geo tracking for example. Firefox supports a limited number of silent push messages. There might be changes in the specification regarding this rule.
- applicationServerKey: It's the public part of a public/private key pair identifying your application server. The browser will send this application server key to the push server, and it will be used by the push server to identify that the application subscribing a user is the same application that is messaging that user. I will explain the identification process in detail in the next round.
Subscription Object
Let's look at the PushSubscription object that is returned by resolving the promise. This PushSubscription object is associated with the Service Worker that we registered in the previous round. This Push subscription describes the delivery bridge for push messages.
interface PushSubscription {

  readonly attribute endpoint;

  // "https://{push\_server\_url}/{user\_identifier}",

  function getKey();

  //auth - authentication secret

  //p256dh - key for encrypting messages

};
It contains two important parts:
Continue reading %How to Build Push Notifications for Web Applications%
by Olga Petrova via SitePoint
No comments:
Post a Comment