
by via Awwwards - Sites of the day
According to Builtwith.com, WordPress holds close to 50% of the CMS share of the world's top 1,000,000 websites. As for the ecommerce sphere, we're at 33% with WooCommerce. And if we cast a wider net, percentages go higher. Although we may complain that WordPress can get bloated, resource-heavy, and its data model leaves a lot to be desired, there is no denying that WordPress is everywhere.
WordPress can thank its simplicity and a low barrier to entry for this pervasiveness. It's easy to set up, and requires next to no technical knowledge. Hosting for WordPress can be found for as little as a couple of dollars per month, and the basic setup takes just a half hour of clicking. Free themes for WordPress are galore, some with included WYSIWYG page builders.
Many look down on it, but in many ways we can thank WordPress for the growth of the internet and PHP, and many internet professionals have WP's gentle learning curve to thank for their careers.
But this ease of entry comes at a cost. Plenty of websites that proudly wear the WordPress badge were not done by professionals but by the cheapest developers. And often, it shows. Professional look and professional performance were afterthoughts.
One of the main points of feedback the owner of an aspiring high-quality website will get from a grudging professional is that performance and a professional look and feel shouldn't be afterthoughts. You can't easily paint or stick them over a website. Professional websites should be premeditated.
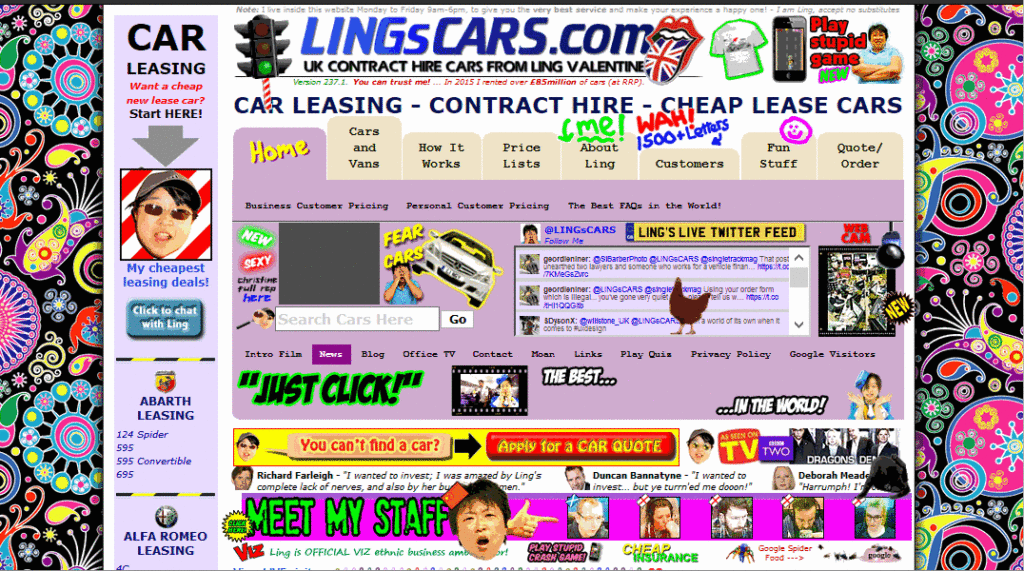
Above, a famous UK used car dealer, Ling's Cars, tried a unique way to make a kitsch marketing punchline. Unless you're REALLY sure about what you're doing, DO NOT try this at home
And this starts with…
Typically, new users will go with products that are on the low-cost side, with most of beginner-friendly bells and whistles. Considering the shady business practices by some big industry players in this arena, and the complaints and demands for site migration professionals coming from clients, this is a part of website setup that requires due attention.
We can divide WordPress hosting vendors into a few tiers.
Premium, WordPress-dedicated vendors like Kinsta whose plans start at $100 per month, or even higher-grade managed hosting like WordPress VIP by Automattic, may be worth their salt, but also may be out of reach for many website owners.
Medium tier Flywheel, A2 hosting, Siteground and Pantheon are among those considered reliable and performance oriented, offering acceptable speed and a managed hosting service for those more price-conscious. Users here may get a bit less hand-holding, but these services usually strike an acceptable balance between a solid setup, price, and options for more advanced users. Not to forget, there is Cloudways, which is a hybrid between VPS and managed hosting. Those with their audience in Europe may look into Pilvia, as it offers a performant server stack and is pretty affordable.
There's an interesting survey of customer satisfaction with more prominent hosting vendors, published by Codeinwp.
For those of us not scared of the command line, there are VPS and dedicated-server vendors like Digital Ocean, Vultr, Linode, Amazon's Lightsail, Hetzner in Europe, and OVH. Hetzner is a German vendor known for its quality physical servers on offer, somewhat above the price of virtual servers, while OVH offers very cost-efficient virtual servers. For the price-conscious, OVH's subsidiary Kimsufi in Europe and Canada also offers bargain physical dedicated servers, and Host US has very affordable virtual servers.
With managed hosting, things to look for are a good server stack, good CDN integration, and of course SSD storage. Guaranteed resources, like with A2, are a big plus. The next thing to look for is SSH-access. Tech-savvy users may profit from WP-CLI availability.
When choosing a VPS, the thing to look for is XEN or KVM virtualization over OpenVZ, because it mitigates the overselling of resources, helping guarantee that the resources you bought are really yours. It also provides better security.
Easy Engine is software that can make your entire VPS/WordPress installation a one-hour job.
Regarding the server stack, Nginx is preferred to Apache if we're pursuing performance, and PHP 7 is a must. If we really need Apache, using Nginx as a reverse proxy is a plus, but this setup can get complex.
Tests performed give PHP 7 a big edge over the previous version. According to fasthosts.co.uk:
WordPress 4.1 executed 95% more requests per second on PHP 7 compared to PHP 5.6.
When choosing your hosting, be aware of negative experiences with some providers that have become notorious.
Things that usually slow down WordPress websites are bulky, bloated front ends with a lot of static resources and database queries. These issues arise from the choice of theme (and its page builders, huge sliders, etc) --- which not only slow down initial loading due to many requests and overall size, but often slow down the browser due to a lot of JavaScript, and stuff to render, making it unresponsive.
The golden rule here is: don't use it unless there's a good reason to.
This may seem like a rule coming from the mouth of Homer Simpson, but if you can skip any of the bells and whistles, do so. Be conservative. If you must add some shiny functionality or JS eye candy, always prefer those tailored and coded as specifically as possible for your exact need. If you're a skilled coder, and the project justifies the effort, code it yourself with minimalism in mind.
Review all the plugins your website can't live without --- and remove the others.
And most importantly: back up your website before you begin pruning!
If you have a theme where you use a lot of custom posts or fields, be warned that a lot of these will slow down your database queries. Keep your data model as simple as possible, and if not, consider that WordPress' original intended purpose was as a blogging engine. If you need a lot more than that, you may want to consider some of the MVC web frameworks out there that will give you greater control over your data model and the choice of database.
In WordPress we can build a rich custom data model by using custom post types, custom taxonomies and custom fields, but be conscious of performance and complexity costs.
If you know your way around the code, inspect your theme to find unnecessary database queries. Every individual database trip spends precious milliseconds in your TTFB, and megabytes of your server's memory. Remember that secondary loops can be costly --- so be warned when using widgets and plugins that show extra posts, like in sliders or widget areas. If you must use them, consider fetching all your posts in a single query, where it may otherwise slow down your website. There's a GitHub repo for those not wanting to code from scratch.
Using custom fields to fetch posts by some criteria can be a great tool to develop sophisticated things with WP. This is an example of a meta query, and here you can find some elaboration on its costs. Summary: post meta wasn't built for filtering, taxonomies were.
get_post_meta is a function typically called to fetch custom fields, and it can be called with just the post ID as an argument, in which case it fetches all the post's meta fields in an array, or it can have a custom field's name as a second argument, in which case it returns just the specified field.
If using get_post_meta()for a certain post multiple times on a single page or request (for multiple custom fields), be aware that this won't incur extra cost, because the first time this function is called, all the post meta gets cached.
Installing and deleting various plugins, and changing different themes over the lifetime of your website, often clutters your database with a lot of data that isn't needed. It's completely possible to discover --- upon inspecting why a WordPress website is sluggish, or why it won't even load, due to exhausted server memory --- that the database has grown to hundreds and hundreds of megabytes, or over a gigabyte, with no content that explains it.
wp-options is where a lot of orphaned data usually gets left behind. This includes, but is not limited to, various transients (this post warns of best practices regarding deletion of transients in plugins). Transients are a form of cache, but as with any other caching, if misused, it can do more harm than good. If your server environment provides it, wp-cli has a command set dedicated to transients management, including deletion. If not, there are plugins in the WordPress plugins repo that can delete expired transients, but which offer less control.
If deleting transients still leaves us with a bloated database without any tangible cause, WP-Sweep is an excellent free tool that can do the job of cleaning up the database. Another one to consider is WP Optimize.
Before doing any kind of database cleanup, it's strongly recommended that you back up your database!
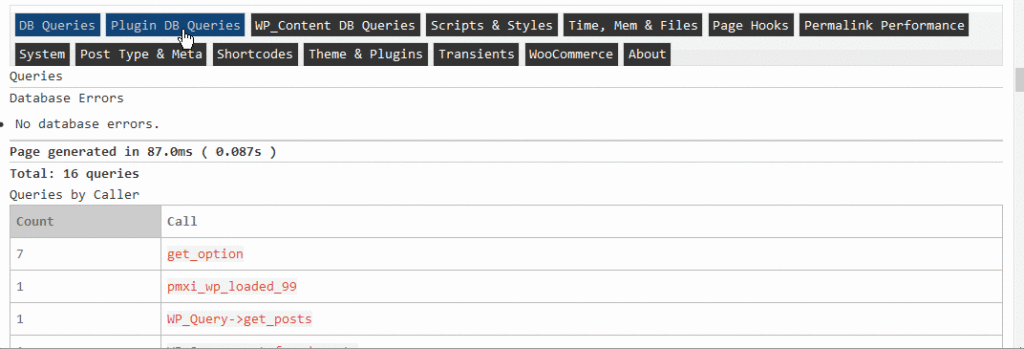
One of the plugins that comes in very handy for profiling of the whole WordPress request lifecycle is Debug Objects. It offers an inspection of all the transients, shortcodes, classes, styles and scripts, templates loaded, db queries, and hooks.
After ensuring a sane, performance-oriented setup --- considering our server stack in advance, eliminating the possible bloat created by theme choice and plugins and widgets overload --- we should try to identify bottlenecks.
If we test our website in a tool like Pingdom Speed Test, we'll get a waterfall chart of all the resources loaded in the request:
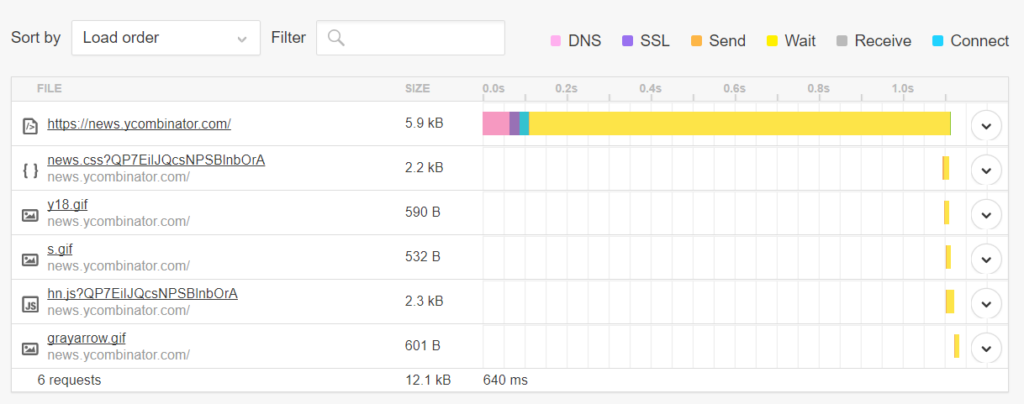
This gives us details about the request-response lifecycle, which we can analyze for bottlenecks. For instance:
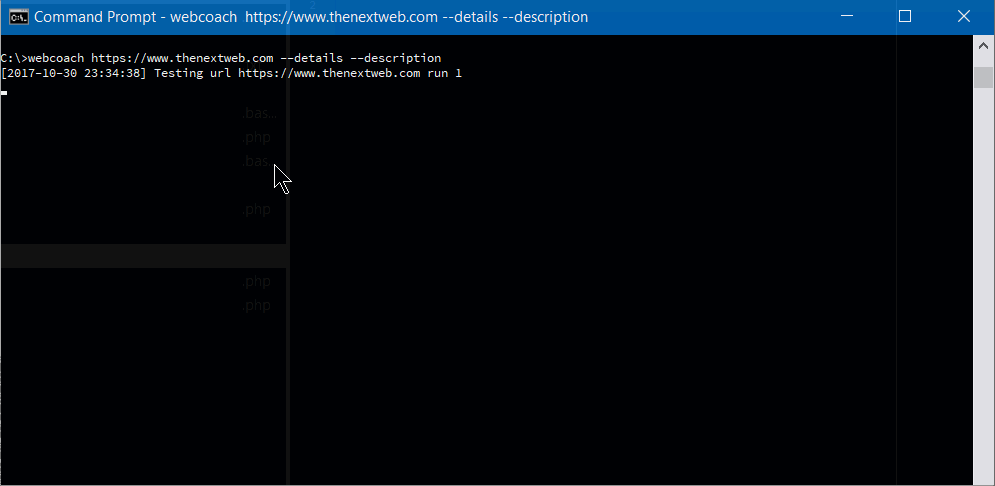
To get a more extensive testing and hand-holding tips on improving the website, there's a little command line utility called webcoach. In an environment with NodeJS and npm installed (like Homestead Improved), installing it is simple:
npm install webcoach -g
After it's been installed, we can get detailed insights and advice on how to improve our website's various aspects, including performance:
The post The Complete Guide to WordPress Performance Optimization appeared first on SitePoint.
This article was originally published on MongoDB. Thank you for supporting the partners who make SitePoint possible.
It can be quite difficult tying together multiple systems, APIs, and third-party services. Recently, we faced this exact problem in-house, when we wanted to get data from Segment into MongoDB so we could take advantage of MongoDB’s native analytics capabilities and rich query language. Using some clever tools we were able to make this happen in under an hour – the first time around.
While this post is detailed, the actual implementation should only take around 20 minutes. I’ll start off by introducing our cast of characters (what tools we used to do this) and then we will walk through how we went about it.
To collect data from a variety of sources including mobile, web, cloud apps, and servers, developers have been turning to Segment since 2011. Segment consolidates all the events generated by multiple data sources into a single clickstream. You can then route the data to over 200+ integrations all at the click of a button. Companies like DigitalOcean, New Relic, InVision, and Instacart all rely on Segment for different parts of their growth strategies.
To store the data generated by Segment, we turn to MongoDB Atlas – MongoDB’s database as a service. Atlas offers the best of MongoDB:
All this is wrapped up in a fully managed service, engineered and run by the same team that builds the database, which means that as a developer you actually can have your cake and eat it too.
The final character is MongoDB Stitch, MongoDB’s serverless platform. Stitch streamlines application development and deployment with simple, secure access to data and services – getting your apps to market faster while reducing operational costs. Stitch allows us to implement server-side logic that connects third-party tools like Segment, with MongoDB, while ensuring everything from security to performance is optimized.
We are going to go through the following steps. If you have completed any of these already, feel free to just cherry pick the relevant items you need assistance with:
While this blog focusses on integrating Segment with MongoDB, the process we outline below will work with other APIs and web services. Join the community Slack and ask questions if you are trying to follow along with a different service.
Each time Segment sees new data, a webhook fires an HTTP Post request to Stitch. A Stitch function then handles the authentication of the request and, without performing any data manipulation, saves the body of the request directly to the database – ready for further analysis.
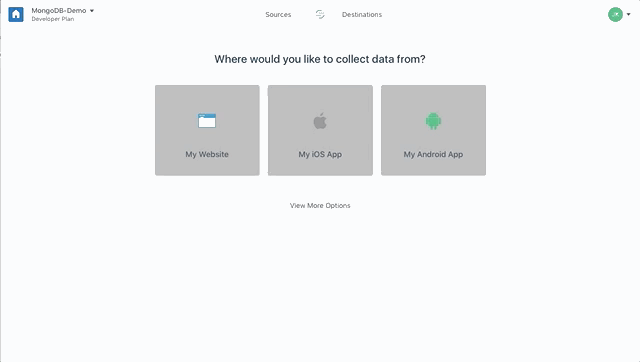
Head over to Segment.com and sign up for an account. Once complete, Segment will automatically create a Workspace for you. Workspaces allow you to collaborate with team members, control permissions, and share data sources across your whole team. Click through to the Workspace that you've just created.
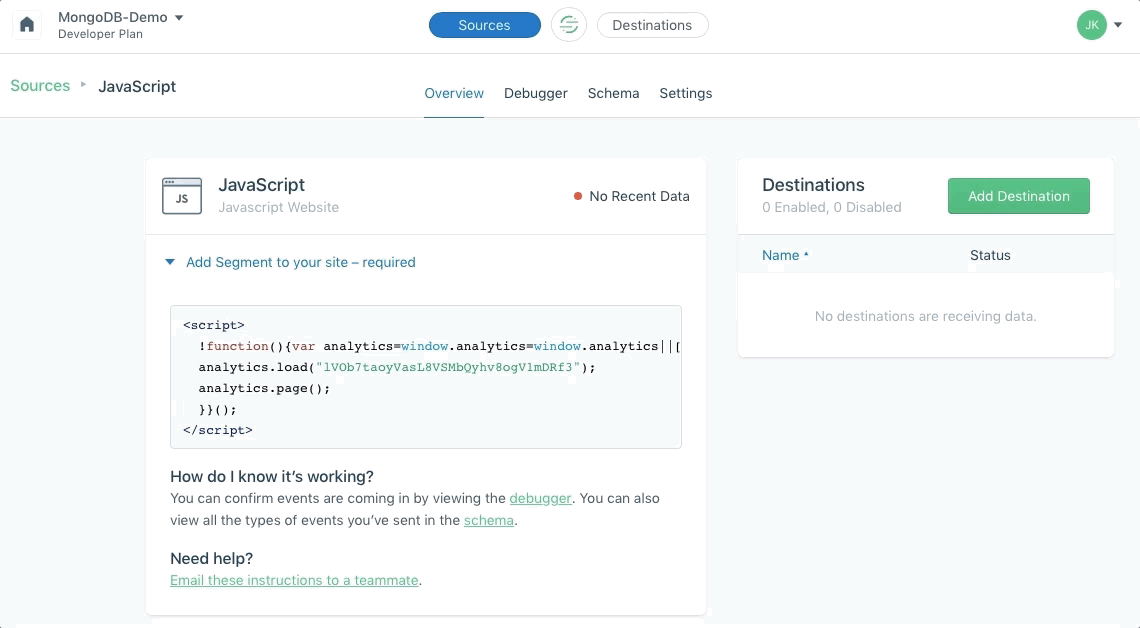
To start collecting data in your Workspace, we need to add a source. In this case, I’m going to collect data from a website, so I’ll select that option, and on the next screen, Segment will have added a JavaScript source to my workspace. Any data that comes from our website will be attributed to this source. There is a blue toggle link I can click within the source that will give me the code I need to add to my website so it can send data to Segment. Take note of this as we will need it shortly.
I mentioned a simple sample page I had created in case you want to test this implementation outside of other code you had been working on. You can grab it from this GitHub repo.
In my sample page, you’ll see I’ve copied and pasted the Segment code and dropped it in between my page’s <head> tags. You’ll need to do the equivalent with whatever code or language you are working in.
If you open that page in a browser, it should automatically start sending data to Segment. The easiest way to see this is by opening Segment in another window and clicking through to the debugger.
Clicking on the debugger button in the Segment UI takes you to a live stream of events sent by your application.
The Segment library enables you to get as granular as you like with the data you send from your application.
As your application grows, you’ll likely want to expand the scope of what you track. Best practice requires you to put some thought into how you name events and what data you send. Otherwise different developers will name events differently and will send them at different times – read this post for more on the topic.
To get us started, I’m going to assume that we want to track every time someone clicks a favorite button on a web page. We are going to use some simple JavaScript to call Segment’s analytics tracking code and send an event called a “track” to the Segment API. That way, each time someone clicks our favorite button, we'll know about it.
You’ll see at the bottom of my web page, that there is a jQuery function attached to the .btn class. Let’s add the following after the alert() function.
analytics.track("Favorited", {
        itemId: this.id,
        itemName: itemName
      });
Now, refresh the page in your browser and click on one of the favorite buttons. You should see an alert box come up. If you head over to your debugger window in Segment, you’ll observe the track event streaming in as well. Pretty cool, right!
You probably noticed that the analytics code above is storing the data you want to send in a JSON document. You can add fields with more specific information anytime you like. Traditionally, this data would get sent to some sort of tabular data store, like MySQL or PostgreSQL, but then each time new information was added you would have to perform a migration to add a new column to your table. On top of that, you would likely have to update the object-relational mapping code that's responsible for saving the event in your database. MongoDB is a flexible data store, that means there are no migrations or translations needed, as we will store the data in the exact form you send it in.
As mentioned, we’ll be using two different services from MongoDB. The first, MongoDB Atlas, is a database as a service. It’s where all the data generated by Segment will live, long-term. The second, MongoDB Stitch, is going to play the part of our backend. We are going to use Stitch to set up an endpoint where Segment can send data, once received, Stitch validates that the request Stitch was sent from Segment, and then coordinate all the logic to save this data into MongoDB Atlas for later analysis and other activities.
The post How to Integrate MongoDB Atlas and Segment using MongoDB Stitch appeared first on SitePoint.
Front-end frameworks are great. They abstract away much of the complexity of building a single-page application (SPA) and help you organize your code in an intelligible manner as your project grows.
However, there’s a flip side: these frameworks come with a degree overhead and can introduce complexity of their own.
That’s why, in this tutorial, we’re going to learn how to build an SPA from scratch, without using a client-side JavaScript framework. This will help you evaluate what these frameworks actually do for you and at what point it makes sense to use one. It will also give you an understanding of the pieces that make up a typical SPA and how they’re wired together.
Let’s get started …
For this tutorial, you’ll need a fundamental knowledge of modern JavaScript and jQuery. Some experience using Handlebars, Express and Axios will come handy, though it’s not strictly necessary. You’ll also need to have the following setup in your environment:
You can find the completed project on our GitHub repository.
We’re going to build a simple currency application that will provide the following features:
We’ll make use of the following free online REST APIs to implement these features:
Fixer is a well-built API that provides a foreign exchange and currency conversion JSON API. Unfortunately, it’s a commercial service and the free plan doesn’t allow currency conversion. So we’ll also need to use the Free Currency Converter API. The conversion API has a few limitations, which luckily won’t affect the functionality of our application. It can be accessed directly without requiring an API key. However, Fixer requires an API key to perform any request. Simply sign up on their website to get an access key for the free plan.
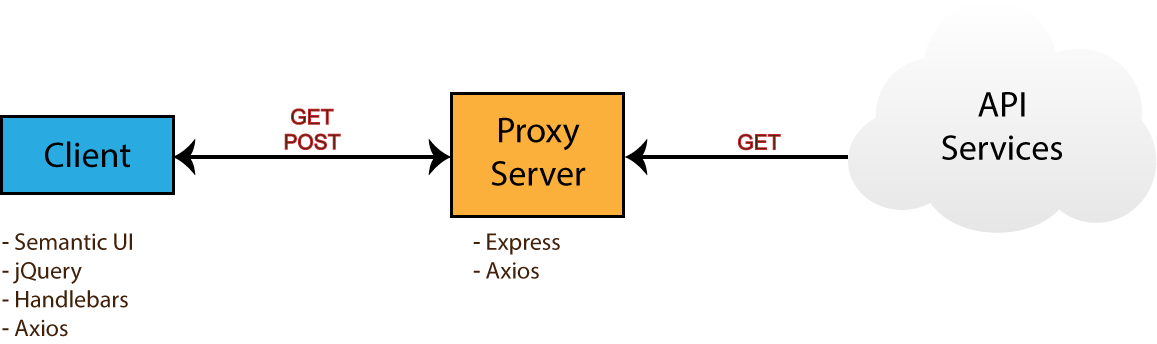
Ideally, we should be able to build the entire single-page application on the client side. However, since we’ll be dealing with sensitive information (our API key) it won’t be possible to store this in our client code. Doing so will leave our app vulnerable and open to any junior hacker to bypass the app and access data directly from our API endpoints. To protect such sensitive information, we need to put it in server code. So, we’ll set up an Express server to act as a proxy between the client code and the cloud services. By using a proxy, we can safely access this key, since server code is never exposed to the browser. Below is a diagram illustrating how our completed project will work.
Take note of the npm packages that will be used by each environment — i.e. browser (client) and server. Now that you know what we’ll be building, head over to the next section to start creating the project.
Head over to your workspace directory and create the folder single-page-application. Open the folder in VSCode or your favorite editor and create the following files and folders using the terminal:
touch .env .gitignore README.md server.js
mkdir public lib
mkdir public/js
touch public/index.html
touch public/js/app.js
Open .gitignore and add these lines:
node_modules
.env
Open README.md and add these lines:
# Single Page Application

This is a project demo that uses Vanilla JS to build a Single Page Application.
Next, create the package.json file by executing the following command inside the terminal:
npm init -y
You should get the following content generated for you:
{
  "name": "single-page-application",
  "version": "1.0.0",
  "description": "This is a project demo that uses Vanilla JS to build a Single Page Application.",
  "main": "server.js",
  "directories": {
    "lib": "lib"
  },
  "scripts": {
    "test": "echo \"Error: no test specified\" && exit 1",
    "start": "node server.js"
  },
  "keywords": [],
  "author": "",
  "license": "ISC"
}
See how convenient the npm command is? The content has been generated based on the project structure. Let’s now install the core dependencies needed by our project. Execute the following command in your terminal:
npm install jquery semantic-ui-css handlebars vanilla-router express dotenv axios
After the packages have finished installing, head over to the next section to start building the base of the application.
Before we start writing our front-end code, we need to implement a server–client base to work from. That means a basic HTML view being served from an Express server. For performance and reliability reasons, we’ll inject front-end dependencies straight from the node_modules folder. We’ll have to set up our Express server in a special way to make this work. Open server.js and add the following:
require('dotenv').config(); // read .env files
const express = require('express');

const app = express();
const port = process.env.PORT || 3000;

// Set public folder as root
app.use(express.static('public'));

// Allow front-end access to node_modules folder
app.use('/scripts', express.static(`${__dirname}/node_modules/`));

// Listen for HTTP requests on port 3000
app.listen(port, () => {
  console.log('listening on %d', port);
});
This gives us a basic Express server. I’ve commented the code, so hopefully this gives you a fairly good idea of what’s going on. Next, open public/index.html and enter:
<!DOCTYPE html>
<html lang="en">
<head>
  <meta charset="UTF-8">
  <meta name="viewport" content="width=device-width, initial-scale=1.0">
  <meta http-equiv="X-UA-Compatible" content="ie=edge">
  <link rel="stylesheet" href="scripts/semantic-ui-css/semantic.min.css">
  <title>SPA Demo</title>
</head>
<body>
  <div class="ui container">
    <!-- Navigation Menu -->
    <div class="ui four item inverted orange menu">
      <div class="header item">
        <i class="money bill alternate outline icon"></i>
        Single Page App
      </div>
      <a class="item" href="/">
        Currency Rates
      </a>
      <a class="item" href="/exchange">
        Exchange Rates
      </a>
      <a class="item" href="/historical">
        Historical Rates
      </a>
    </div>

    <!-- Application Root -->
    <div id="app"></div>
  </div>

  <!-- JS Library Dependencies -->
  <script src="scripts/jquery/dist/jquery.min.js"></script>
  <script src="scripts/semantic-ui-css/semantic.min.js"></script>
  <script src="scripts/axios/dist/axios.min.js"></script>
  <script src="scripts/handlebars/dist/handlebars.min.js"></script>
  <script src="scripts/vanilla-router/dist/vanilla-router.min.js"></script>
  <script src="js/app.js"></script>
</body>
</html>
We’re using Semantic UI for styling. Please refer to the Semantic UI Menu documentation to understand the code used for our navigation bar. Go to your terminal and start the server:
npm start
Open localhost:3000 in your browser. You should have a blank page with only the navigation bar showing:

Let’s now write some view templates for our app.
We’ll use Handlebars to write our templates. JavaScript will be used to render the templates based on the current URL. The first template we’ll create will be for displaying error messages such as 404 or server errors. Place this code in public/index.html right after the the navigation section:
<!-- Error Template -->
<script id="error-template" type="text/x-handlebars-template">
  <div class="ui  inverted segment" style="height:250px;">
    <br>
    <h2 class="ui center aligned icon header">
      <i class="exclamation triangle icon"></i>
      <div class="content">

        <div class="sub header"></div>
      </div>
    </h2>
  </div>
</script>
Next, add the following templates that will represent a view for each URL path we specified in the navigation bar:
<!-- Currency Rates Template -->
<script id="rates-template" type="text/x-handlebars-template">
  <h1 class="ui header">Currency Rates</h1>
  <hr>
</script>

<!-- Exchange Conversion Template -->
<script id="exchange-template" type="text/x-handlebars-template">
  <h1 class="ui header">Exchange Conversion</h1>
  <hr>
</script>

<!-- Historical Rates Template -->
<script id="historical-template" type="text/x-handlebars-template">
  <h1 class="ui header">Historical Rates</h1>
  <hr>
</script>
Next, let’s compile all theses templates in public/js/app.js. After compilation, we’ll render the rates-template and see what it looks like:
window.addEventListener('load', () => {
  const el = $('#app');

  // Compile Handlebar Templates
  const errorTemplate = Handlebars.compile($('#error-template').html());
  const ratesTemplate = Handlebars.compile($('#rates-template').html());
  const exchangeTemplate = Handlebars.compile($('#exchange-template').html());
  const historicalTemplate = Handlebars.compile($('#historical-template').html());

  const html = ratesTemplate();
  el.html(html);
});
Take note that we’re wrapping all JavaScript client code inside a load event. This is just to make sure that all dependencies have been loaded and that the DOM has completed loading. Refresh the page and see what we have:

We’re making progress. Now, if you click the other links, except Currency Rates, the browser will try to fetch a new page and end up with a message like this: Cannot GET /exchange.
We’re a building a single page application, which means all the action should happen in one page. We need a way to tell the browser to stop fetching new pages whenever the URL changes.
The post Build a JavaScript Single Page App Without a Framework appeared first on SitePoint.
This article was created in partnership with Mockplus. Thank you for supporting the partners who make SitePoint possible.
I’ve been a fan of science fiction for a long time, and sci-fi films have often been a crystal ball into the future of technology. Tricorders can easily be reimagined as cell phones, and wrist communication devices can easily be seen as paralleling the Apple Watch.
On the other hand, many technological wonders that we thought would have come to pass by now have yet to materialize -- things like hoverboards and flying cars.
But there’s one thing I’ve always really hoped I would not have to use: those complicated computer interfaces.
They looked clunky and too overwhelming to be used efficiently. I remember watching some of these movies, thinking to myself: "How would they know what anything is? All of the buttons and lights look the same." If you go back and watch some of your favorite sci-fi movies, you’ll see what I am talking about. One example, shown below, shows a bunch of colored blocks, with no labels or any other way of determining one from the other. There also don’t seem to be any controls on the screen, cluing you in on what to do with the content.

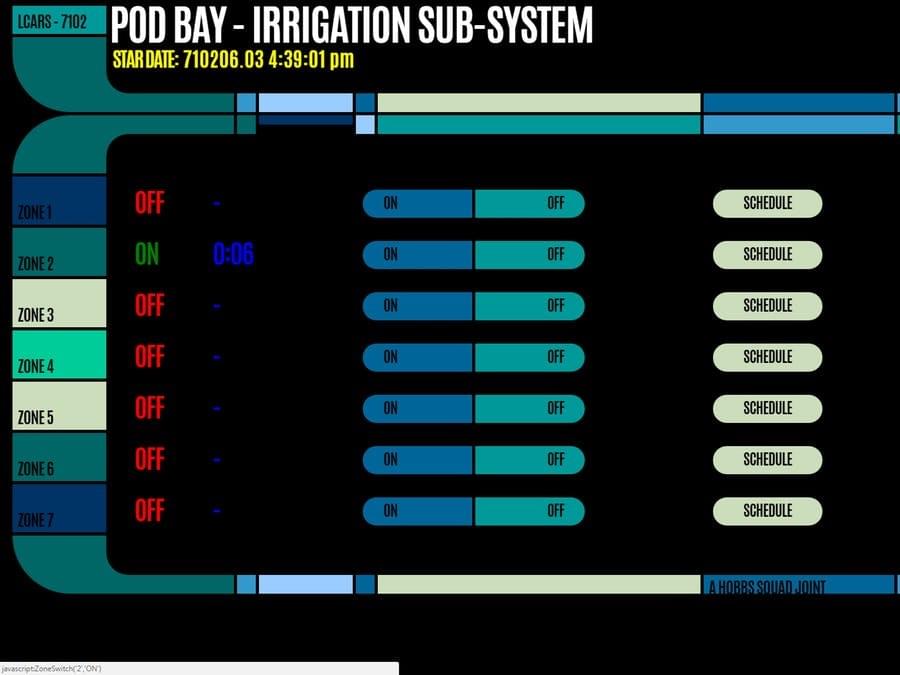
Another good example is the LCARS pod bay interface below, from Star Trek. There are a number of zones, on and off switches and schedule buttons. How would you know where each zone’s physical location is? It would make more sense to have a touch interface in the shape of the bay, where you could select the zone visually. The biggest problem I see with these interfaces is trying to do everything on one screen.
If the makers of the interfaces above would have had a tool like Mockplus, they could have foreseen the problems a user would have with this type of interface. Let’s take a look at how you can use Mockplus to create your own starship computer interface.
Let’s say I wanted to create a simple crew interface that showed the crew member’s photo, name, rank, and a short bio. The tools are intuitive, and I was able to create the simple layout for the first person in around 30 seconds. You’ll find align tools to select and align elements, and you have control over things like fonts, sizes, colors, etc. Mockplus also has a lot of templates to start you off with. If you’re using some common interface elements, you can find a lot of them in Mockplus’ template library. If you don’t want to create the design of the interface in Mockplus, you can import your designs and layouts from Sketch.
What really stands out with Mockplus is its automatic data fill feature, and the ability to turn objects into repeating elements. With the outlines of the person’s image, the heading where their name goes, their title, and a short bio, I was able to select all of those elements. Then, I right-clicked on them, and selected Convert to Repeater. Then, I could click for the number of times I wanted the object repeated vertically or horizontally.
What gets even better is that I can ungroup those elements, and select them. Then I click the paint bucket icon at the top, which allows me to populate each field with names, similar photos, and more. This makes dummy content more realistic, but also quick and easy to replicate.
One of the most important aspects of user interface design is the UI flow. That is how you flow from one screen to the next, and how you interact with the elements. In our futuristic design, we’ve created the crew area, but it’s just floating there in space. Mockplus allows you to decide how you get there, and what it leads to. You can create new pages, enabling you to create the different screens you would cycle through in your actual interface.
I decided I would create the main page that takes you into the crew page first. The main page will be made of a few buttons in a column, with different side buttons, colored coded in other areas on the page. To do this, I grabbed the rounded rectangle tool and drew out a single rectangle. I set the fill to none, the stroke to 2 and the color to a neon green.
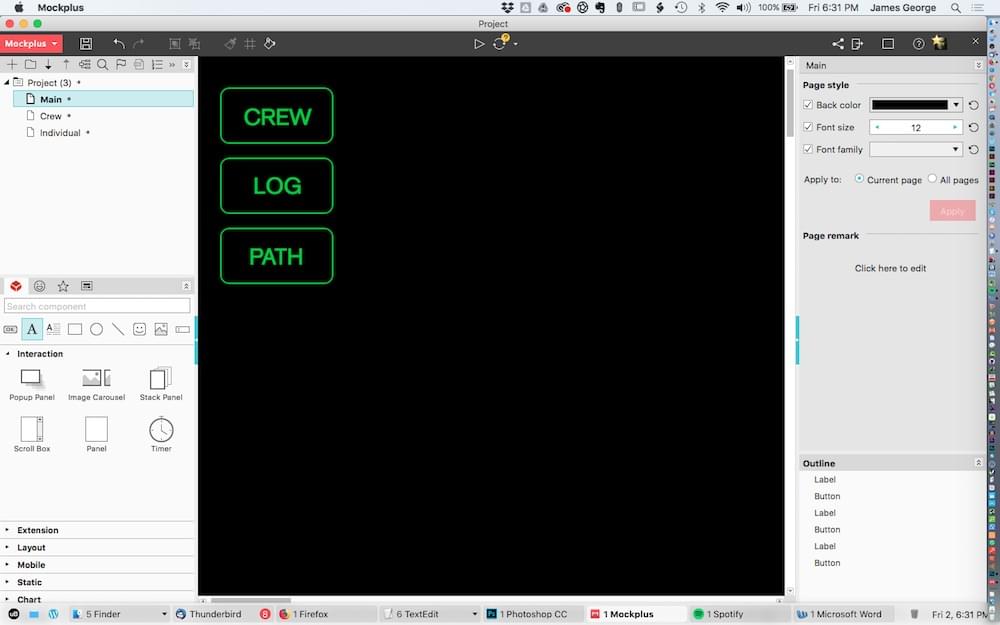
I double clicked each button to add text to it. I clicked "Convert to repeater." I then clicked the down arrow twice to create two copies. Then, I changed the text to other ship related terms. You can change the colors, fonts, borders and more in the right column. The great thing about the repeater function is that when you create the number of elements you want, they are automatically grouped, so you can adjust the spacing.
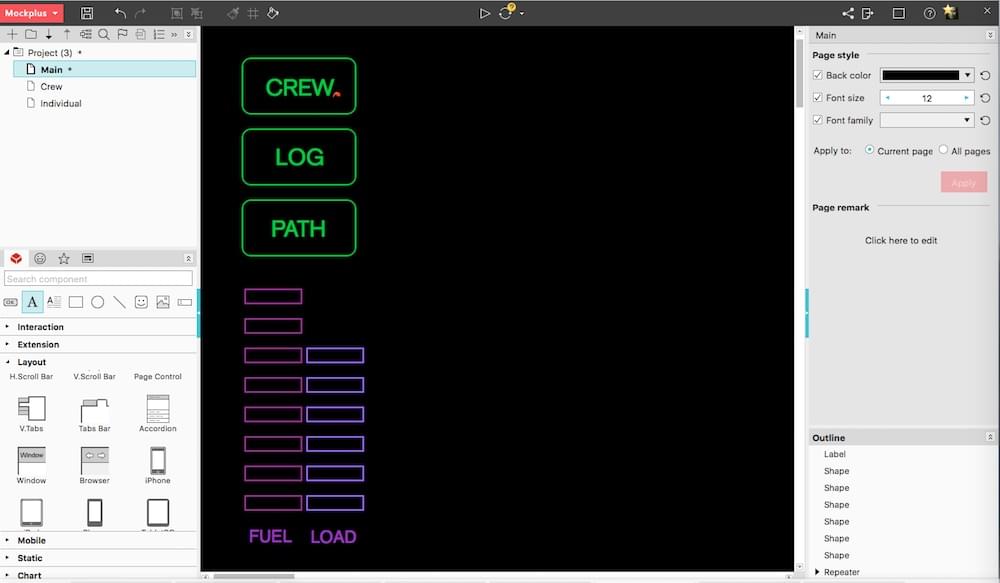
Next, I will add a couple of gauges, typical of a futuristic interface. They will show the ship’s fuel level, as well as the current load on the ship. It’s easy to create the bars and repeat them, the same way we did with the top buttons. I made them a pinkish color, for their importance. A simple text label at the bottom shows which is which.
The post How to Prototype a Starship Computer Interface with Mockplus appeared first on SitePoint.


