This article was originally published on OKTA Blog. Thank you for supporting the partners who make SitePoint possible.
React is a fast, and lightweight library, which has led to fast adoption across the SPA (single-page app) ecosystem. Preact is an even lighter-and-faster alternative to React, weighing in at a measly 3kb! For less complex applications, it can be a great choice.
In this tutorial, you’ll build a basic Preact application with a couple of pages and user authentication using the Okta Sign-In Widget.
Bootstrap Your App With PreactCLI
To get your project started, you’ll install the PreactCLI using NPM.
npm install -g preact-cli
Once you have the CLI installed, run the command to create a base Preact application:
preact create okta-preact-example
This command will chug along for a few minutes scaffolding a basic Preact app and installing all the dependencies. Once it’s done, you should see a bunch of information on the command line informing you of what you can do next.
Change into the application directory.
cd okta-preact-example
Then start the application, just to make sure everything worked as expected.
npm start
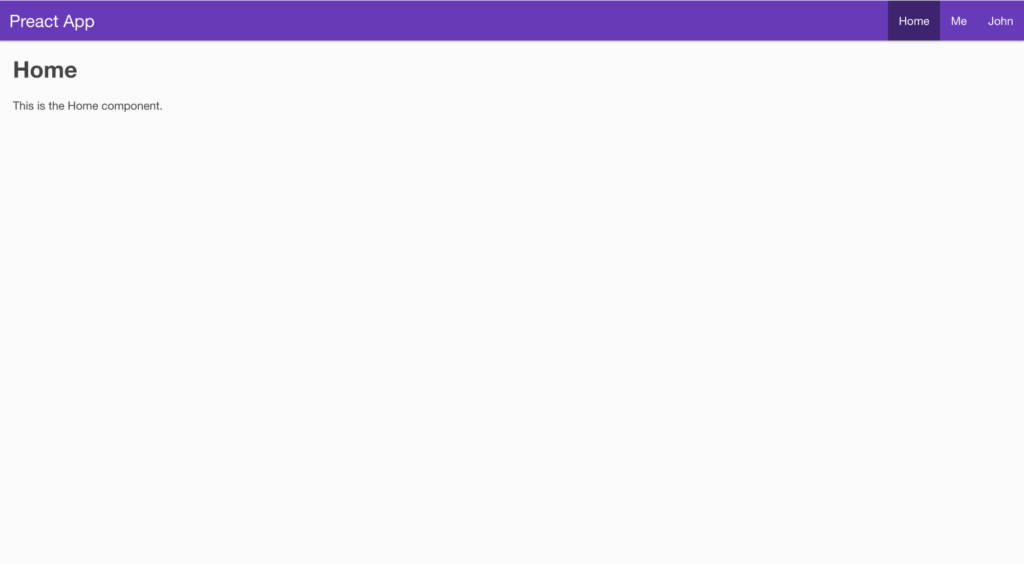
You should see a quick build run and the screen will clear and show you that the application is running at http://localhost:8080. When you open up that URL in your browser, you should see a page like this:
Some Things To Note About PreactCLI
Even though the PreactCLI-generated app looks a lot like a React app generated by create-react-app, and you can even use some of the React plugins (like React-Router) in your Preact application, there are some significant differences.
For instance, unlike the ReactCLI, there is no way to eject the Webpack configuration. Instead Preact encourages developers to customize Webpack by creating a file called preact.config.js, using Preact’s Webpack Config Helpers and exporting functions to change the way Webpack behaves.
Even though the PreactCLI says the application is running at http://0.0.0.0:8080, use http://localhost:8080. It’s the same thing and when you set up your application in the Okta dashboard, you’ll set http://localhost:8080 as your base URL and callback URL, so this just makes sure that you can call the Okta APIs.
Create Your Okta Application
Now that you have the basic shell of an application, it’s time to add user authentication. If you don’t already have one, create a free (forever) account at Okta.
Once you’ve created an account, go to the admin dashboard and click on “Applications” in the page menu. Then click the green “Add Application” button, then the green “Create New App” button, so that you see a modal window like:
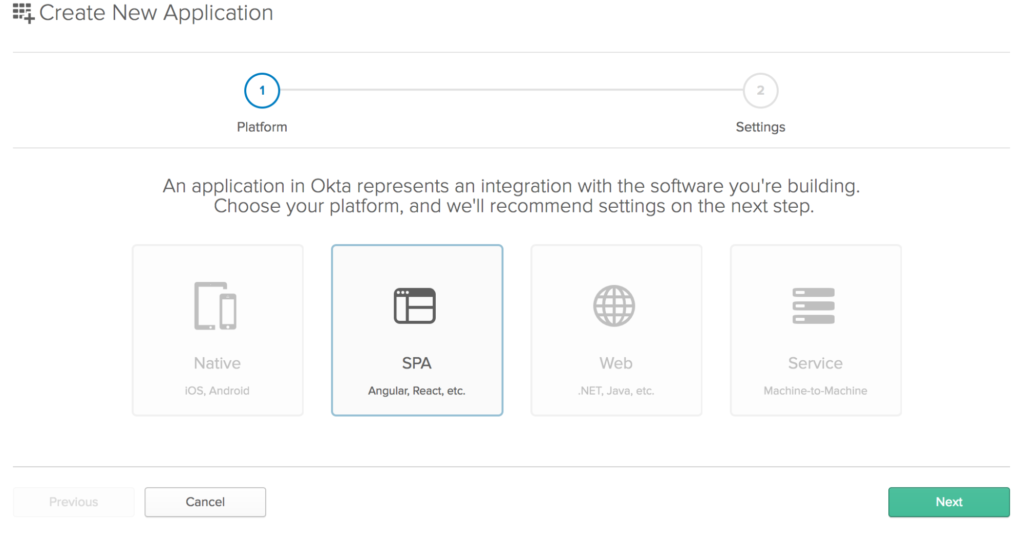
Choose “SPA” from the Platform buttons. Click the “Next” button to create your application.
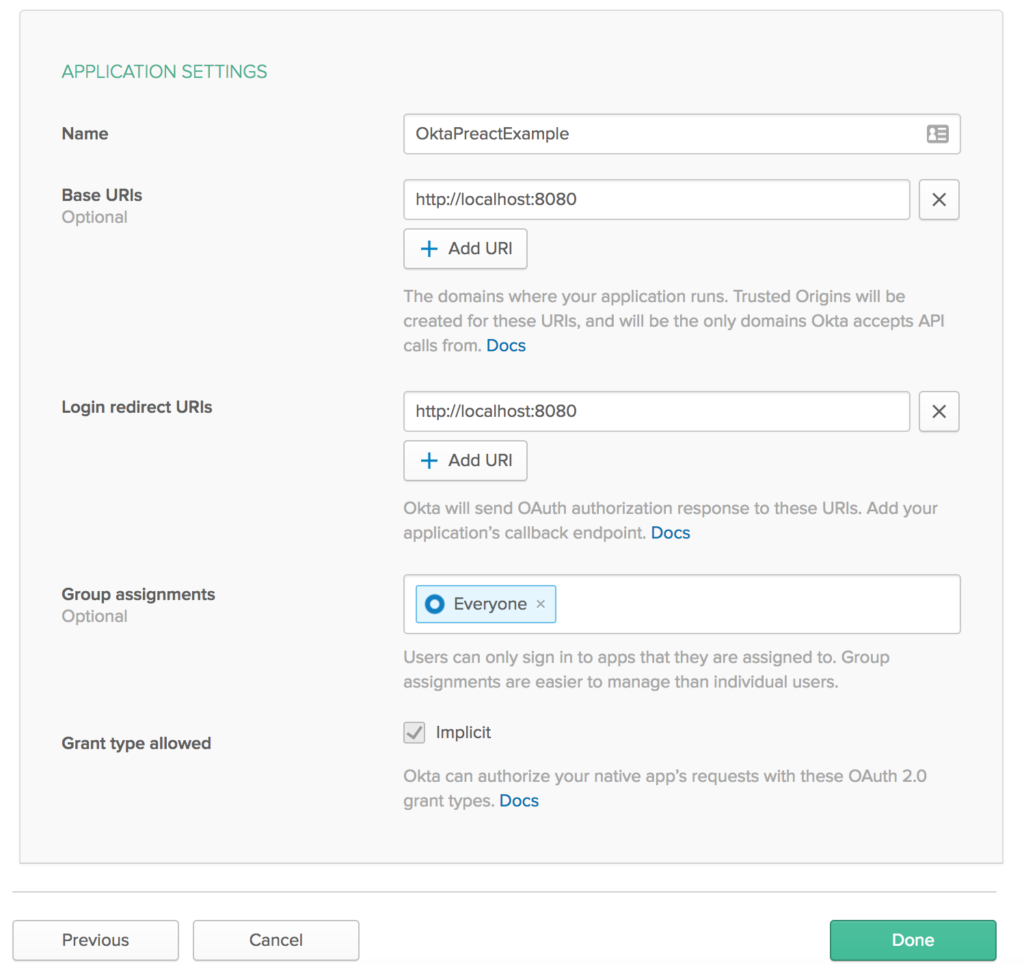
This will take you to a screen to “Application Settings” page of the Create Application wizard. Enter “OktaPreactExample” in the Application name field and add http://localhost:8080 as your base URI and as a login redirect URI. When you’re done, your form should look like this:
You’ll need to create a user (if you don’t already have one) and assign your new application to them as well. Or you can log in with the credentials you use to log in to your Okta account (the admin user).
Install the Okta Sign In Widget
The easiest way to get Okta’s authentication into your new Preact application will be to use Okta’s Sign-In Widget. You’ll install it with npm using:
npm install @okta/okta-signin-widget --save
You’ll also need to install preact-router with:
npm install preact-router --save
Add an Auth Higher-Order Component
With that done, you now need to add some Higher-Order Components to help with authentication.
Add a file called auth.js in the /src/lib folder and add the following code:
import {h} from 'preact';
import { route } from 'preact-router';
import OktaSignIn from '@okta/okta-signin-widget/dist/js/okta-sign-in.min.js';
import '@okta/okta-signin-widget/dist/css/okta-sign-in.min.css';
import '@okta/okta-signin-widget/dist/css/okta-theme.css';

class Auth {
  constructor() {
    this.login = this.login.bind(this);
    this.logout = this.logout.bind(this);
    this.isAuthenticated = this.isAuthenticated.bind(this);
    this.handleAuthentication = this.handleAuthentication.bind(this);

    this.widget = new OktaSignIn({
      baseUrl: 'https://{yourOktaDomain}.com/',
      clientId: '{clientId}',
      redirectUri: 'http://localhost:8080',
      authParams: {
        responseType: ['id_token', 'token'],
        scopes: ['openid', 'email', 'profile']
      }
    });
  }

  isAuthenticated() {
    // Checks if there is a current accessToken in the TokenManger.
    return !!this.widget.tokenManager.get('accessToken');
  }

  getCurrentUser(){
    return this.widget.tokenManager.get('idToken');
  }

  login() {
    // Redirect to the login page
    route('/login/');
  }

  async logout() {
    this.widget.tokenManager.clear();
    await this.widget.signOut();
    location = '/';
  }

  handleAuthentication(tokens) {
    for (let token of tokens) {
      if (token.idToken) {
        this.widget.tokenManager.add('idToken', token);
      } else if (token.accessToken) {
        this.widget.tokenManager.add('accessToken', token);
      }
    }
  }
}

// create a singleton
const auth = new Auth();
export const withAuth = WrappedComponent => props =>
  <WrappedComponent auth={auth} {...props} />;
In the first line of code, you can tell something’s different. The h module in Preact is what turns JSX into DOM elements. Normally, React would use the React library to generate React.createElement statements to make DOM elements from JSX. Preact uses the h library to make something like h('div', {class:'something'}, 'Content') statements to do that.
Next, you imported route from preact-router right below the h import. This is what is used by Preact to do the redirects in the login function. Notice that the Auth class is just a regular function and does not extend Component. In the constructor, the internal functions were bound with the this context from the Auth class.
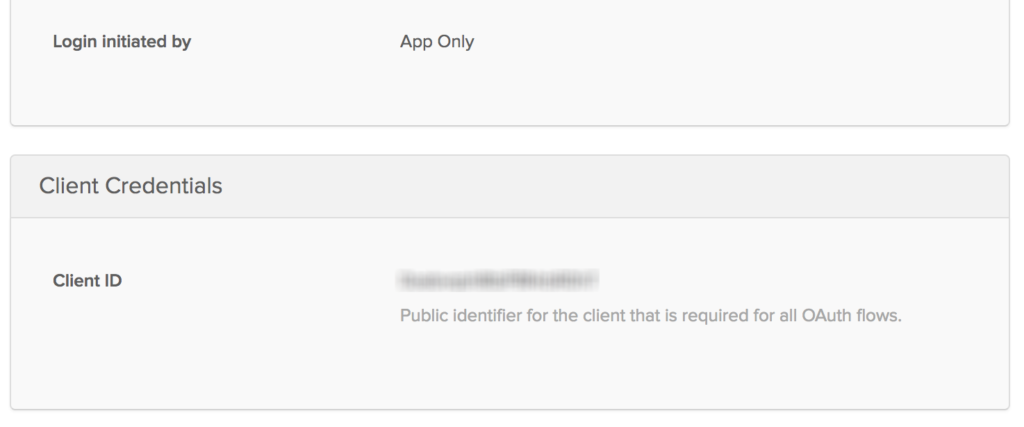
Then enter your Okta organization URL and client ID to the Okta Sign-In Widget configuration. Your Organization URL will be the URL you use when you log into your Okta account (e.g. http://ift.tt/2xubepC) and you can get your client ID from the application’s property page in the administrative dashboard on the “General” tab for your application (obviously, yours won’t be blurred out):
You’ll also want to change the redirectUri property to http://localhost:8080 because the Preact uses port 8080 instead of 3000 for normal React apps.
The login function simply routes the user to the login page, while the logout function clears the tokens saved in the widget’s token manager, calls signOut on the widget, and redirects the user to the root of the application.
Finally, a singleton of the Auth class is created to be shared by all the components, and is passed in as a prop called auth to any component that you wrap in withAuth.
Create a Widget Wrapper
Create a file in your /src/lib folder called OktaSignInWidget.js. Enter the code for this component:
Continue reading %Build a Preact App with Authentication%
by Lee Brandt via SitePoint
No comments:
Post a Comment