This article was originally published on the Okta developer blog. Thank you for supporting the partners who make SitePoint possible.
There are a lot of JavaScript frameworks out there today. It seems like I hear about a new one every month or so. They all have their advantages and are usually there to solve some sort of problem with an existing framework. My favorite to work with so far has been React. One of the best things about it is how many open source components and libraries there are in the React ecosystem, so you have a lot to choose from. This can be really difficult if you’re indecisive, but if you like the freedom to do things your way then React may be the best option for you.
In this tutorial, I’ll walk you through creating both a frontend web app in React and a backend REST API server in Node. The frontend will have a home page and a posts manager, with the posts manager hidden behind secure user authentication. As an added security measure, the backend will also not let you create or edit posts unless you’re properly authenticated.
The tutorial will use Okta’s OpenID Connect (OIDC) to handle authentication. On the frontend, the Okta React SDK will be used to request a token and provide it in requests to the server. On the backend, the Okta JWT Verifier will ensure that the user is properly authenticated, and throw an error otherwise.
The backend will be written with Express as a server, with Sequelize for modeling and storing data, and Epilogue for quickly creating a REST API without a lot of boilerplate.
Why React?
React has been one of the most popular JavaScript libraries for the past few years. One of the biggest concepts behind it, and what makes it so fast, is to use a virtual DOM (the Document Object Model, or DOM, is what describes the layout of a web page) and make small updates in batches to the real DOM. React isn’t the first library to do this, and there are quite a few now, but it certainly made the idea popular. The idea is that the DOM is slow, but JavaScript is fast, so you just say what you want the final output to look like and React will make those changes to the DOM behind the scenes. If no changes need to be made, then it doesn’t affect the DOM. If only a small text field changes, it will just patch that one element.
React is also most commonly associated with JSX, even though it’s possible to use React without JSX. JSX lets you mix HTML in with your JavaScript. Rather than using templates to define the HTML and binding those values to a view model, you can just write everything in JavaScript. Values can be plain JavaScript objects, instead of strings that need to be interpreted. You can also write reusable React components that then end up looking like any other HTML element in your code.
Here’s an example of some JSX code, that should be fairly simple to follow:
const Form = () => (
  <form>
    <label>
      Name
      <input value="Arthur Dent" />
    </label>
    <label>
      Answer to life, the universe, and everything
      <input type="number" value={42} />
    </label>
  </form>
);

const App = () => (
  <main>
    <h1>Welcome, Hitchhiker!</h1>
    <Form />
  </main>
);
…and here’s what the same code would look like if you wrote it in plain JavaScript, without using JSX:
const Form = () => React.createElement(
  "form",
  null,
  React.createElement(
    "label",
    null,
    "Name",
    React.createElement("input", { value: "Arthur Dent" })
  ),
  React.createElement(
    "label",
    null,
    "Answer to life, the universe, and everything",
    React.createElement("input", { type: "number", value: 42 })
  )
);

const App = () => React.createElement(
  "main",
  null,
  React.createElement(
    "h1",
    null,
    "Welcome, Hitchhiker!"
  ),
  React.createElement(Form, null)
);
I find the JSX form much easier to read, but that’s just like, you know, my opinion, man.
Create Your React App
The quickest way to get started with React is to use Create React App, a tool that generates a progressive web app (PWA) with all the scripts and boilerplate tucked away neatly behind something called react-scripts, so you can just focus on writing code. It has all kinds of nice dev features as well, like updating the code whenever you make changes, and scripts to compile it down for production. You can use npm or yarn, but I’ll be using yarn in this tutorial.
To install create-react-app and yarn, simply run:
npm i -g create-react-app@1.5.2 yarn@1.7.0
NOTE: I’ll be adding version numbers to help future-proof this post. In general though, you’d be fine leaving out the version numbers (e.g. npm i -g create-react-app).
Now bootstrap your application with the following commands:
create-react-app my-react-app
cd my-react-app
yarn start
The default app should now be running on port 3000. Check it out at http://localhost:3000.
Create a Basic Homepage in React with Material UI
To keep things looking nice without writing a lot of extra CSS, you can use a UI framework. Material UI is a great framework for React that implements Google’s Material Design principles.
Add the dependency with:
yarn add @material-ui/core@1.3.1
Material recommends the Roboto font. You can add it to your project by editing public/index.html and adding the following line inside the head tag:
<link rel="stylesheet" href="https://fonts.googleapis.com/css?family=Roboto:300,400,500">
You can separate components into separate files to help keep things organized. First, create a couple new folders in your src directory: components, and pages
mkdir src/components
mkdir src/pages
Now create an AppHeader component. This will serve as the navbar with links to pages, as well as show the title and whether you’re logged in.
src/components/AppHeader.js
import React from 'react';
import {
  AppBar,
  Toolbar,
  Typography,
} from '@material-ui/core';

const AppHeader = () => (
  <AppBar position="static">
    <Toolbar>
      <Typography variant="title" color="inherit">
        My React App
      </Typography>
    </Toolbar>
  </AppBar>
);

export default AppHeader;
Also create a homepage:
src/pages/Home.js
import React from 'react';
import {
  Typography,
} from '@material-ui/core';

export default () => (
  <Typography variant="display1">Welcome Home!</Typography>
);
Now go ahead and actually just gut the sample app, replacing src/App.js with the following:
src/App.js
import React, { Fragment } from 'react';
import {
  CssBaseline,
  withStyles,
} from '@material-ui/core';

import AppHeader from './components/AppHeader';
import Home from './pages/Home';

const styles = theme => ({
  main: {
    padding: 3 * theme.spacing.unit,
    [theme.breakpoints.down('xs')]: {
      padding: 2 * theme.spacing.unit,
    },
  },
});

const App = ({ classes }) => (
  <Fragment>
    <CssBaseline />
    <AppHeader />
    <main className={classes.main}>
      <Home />
    </main>
  </Fragment>
);

export default withStyles(styles)(App);
Material UI uses JSS (one of many flavors in the growingly popular trend of CSS in JavaScript), which is what withStyles provides.
The CssBaseline component will add some nice CSS defaults to the page (e.g. removing margins from the body), so we no longer need src/index.css. You can get rid of a couple other files too, now that we’ve gotten rid of most of the Hello World demo app.
rm src/index.css src/App.css src/logo.svg
In src/index.js, remove the reference to index.css (the line that says import './index.css';). While you’re at it, add the following as the very last line of src/index.js to turn on hot module reloading, which will make it so that changes you make automatically update in the app without needing to refresh the whole page:
if (module.hot) module.hot.accept();
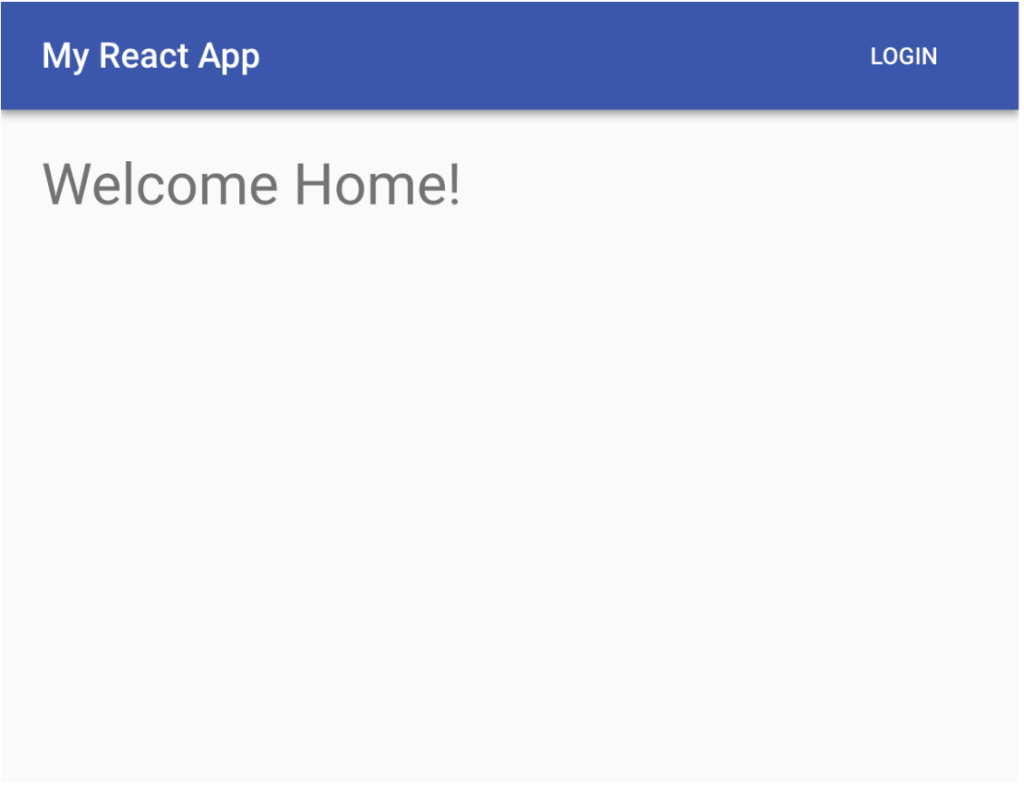
At this point, your app should look like this:

Add Authentication to Your Node + React App with Okta
You would never ship your new app out to the Internet without secure identity management, right? Well, Okta makes that a lot easier and more scalable than what you’re probably used to. Okta is a cloud service that allows developers to create, edit, and securely store user accounts and user account data, and connect them with one or multiple applications. Our API enables you to:
- Authenticate and authorize your users
- Store data about your users
- Perform password-based and social login
- Secure your application with multi-factor authentication
- And much more! Check out our product documentation
If you don’t already have one, sign up for a forever-free developer account. Log in to your developer console, navigate to Applications, then click Add Application. Select Single-Page App, then click Next.
Since Create React App runs on port 3000 by default, you should add that as a Base URI and Login Redirect URI. Your settings should look like the following:
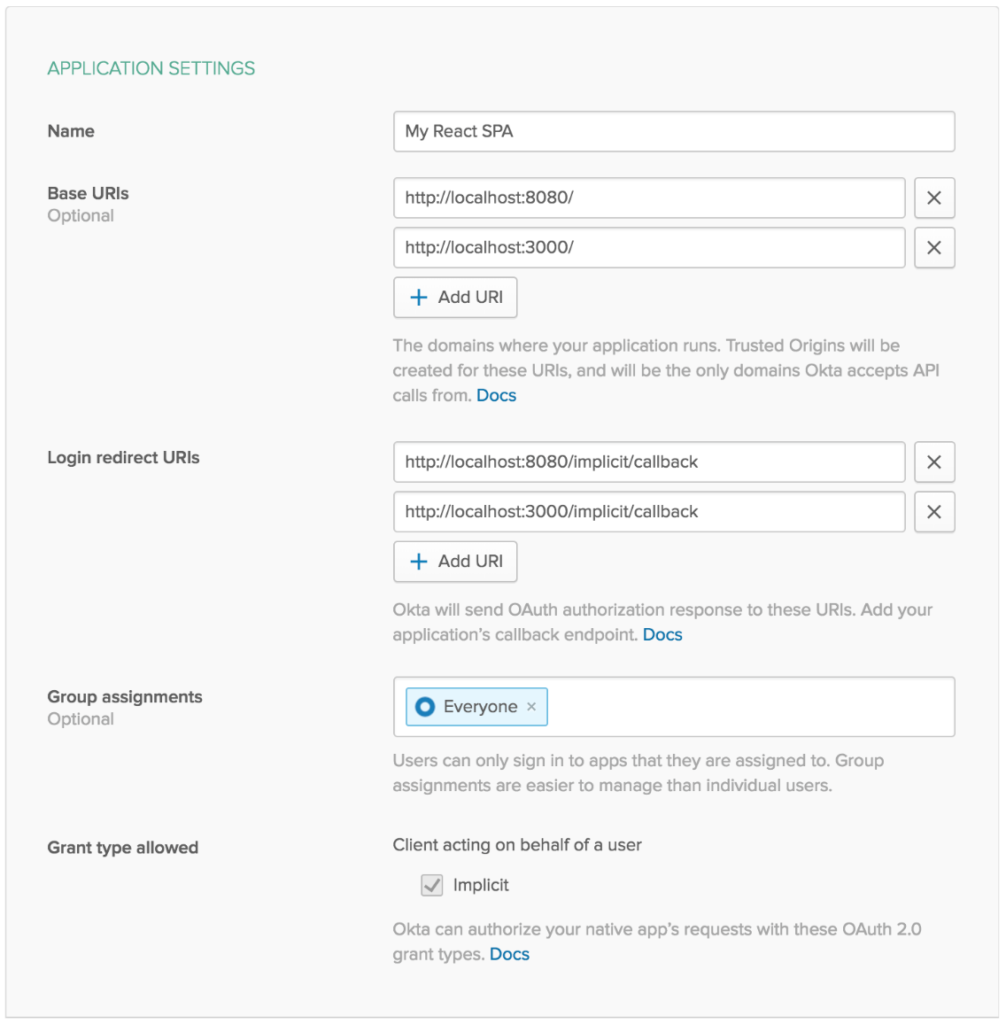
Click Done to save your app, then copy your Client ID and paste it as a variable into a file called .env.local in the root of your project. This will allow you to access the file in your code without needing to store credentials in source control. You’ll also need to add your organization URL (without the -admin suffix). Environment variables (other than NODE_ENV) need to start with REACT_APP_ in order for Create React App to read them, so the file should end up looking like this:
.env.local
REACT_APP_OKTA_CLIENT_ID={yourClientId}
REACT_APP_OKTA_ORG_URL=https://{yourOktaDomain}
The easiest way to add Authentication with Okta to a React app is to use Okta’s React SDK. You’ll also need to add routes, which can be done using React Router. I’ll also have you start adding icons to the app (for now as an avatar icon to show you’re logged in). Material UI provides Material Icons, but in another package, so you’ll need to add that too. Run the following command to add these new dependencies:
yarn add @okta/okta-react@1.0.2 react-router-dom@4.3.1 @material-ui/icons@1.1.0
For routes to work properly in React, you need to wrap your whole application in a Router. Similarly, to allow access to authentication anywhere in the app, you need to wrap the app in a Security component provided by Okta. Okta also needs access to the router, so the Security component should be nested inside the router. You should modify your src/index.js file to look like the following:
src/index.js
import React from 'react';
import ReactDOM from 'react-dom';
import { BrowserRouter } from 'react-router-dom';
import { Security } from '@okta/okta-react';

import App from './App';
import registerServiceWorker from './registerServiceWorker';

const oktaConfig = {
  issuer: `${process.env.REACT_APP_OKTA_ORG_URL}/oauth2/default`,
  redirect_uri: `${window.location.origin}/implicit/callback`,
  client_id: process.env.REACT_APP_OKTA_CLIENT_ID,
};

ReactDOM.render(
  <BrowserRouter>
    <Security {...oktaConfig}>
      <App />
    </Security>
  </BrowserRouter>,
  document.getElementById('root'),
);
registerServiceWorker();

if (module.hot) module.hot.accept();
Now in src/App.js you can use Routes. These tell the app to only render a certain component if the current URL matches the given path. Replace your Home component with a route that only renders the component when pointing at the root URL (/), and renders Okta’s ImplicitCallback component for the /implicit/callback path.
src/App.js
--- a/src/App.js
+++ b/src/App.js
@@ -1,4 +1,6 @@
 import React, { Fragment } from 'react';
+import { Route } from 'react-router-dom';
+import { ImplicitCallback } from '@okta/okta-react';
 import {
   CssBaseline,
   withStyles,
@@ -21,7 +23,8 @@ const App = ({ classes }) => (
     <CssBaseline />
     <AppHeader />
     <main className={classes.main}>
-      <Home />
+      <Route exact path="/" component={Home} />
+      <Route path="/implicit/callback" component={ImplicitCallback} />
     </main>
   </Fragment>
 );
Next, you need a login button. This file is a bit bigger because it contains some logic to check if the user is authenticated. I’ll show you the whole component first, then walk through what each section is doing:
src/components/LoginButton.js
import React, { Component } from 'react';
import {
  Button,
  IconButton,
  Menu,
  MenuItem,
  ListItemText,
} from '@material-ui/core';
import { AccountCircle } from '@material-ui/icons';
import { withAuth } from '@okta/okta-react';

class LoginButton extends Component {
  state = {
    authenticated: null,
    user: null,
    menuAnchorEl: null,
  };

  componentDidUpdate() {
    this.checkAuthentication();
  }

  componentDidMount() {
    this.checkAuthentication();
  }

  async checkAuthentication() {
    const authenticated = await this.props.auth.isAuthenticated();
    if (authenticated !== this.state.authenticated) {
      const user = await this.props.auth.getUser();
      this.setState({ authenticated, user });
    }
  }

  login = () => this.props.auth.login();
  logout = () => {
    this.handleMenuClose();
    this.props.auth.logout();
  };

  handleMenuOpen = event => this.setState({ menuAnchorEl: event.currentTarget });
  handleMenuClose = () => this.setState({ menuAnchorEl: null });

  render() {
    const { authenticated, user, menuAnchorEl } = this.state;

    if (authenticated == null) return null;
    if (!authenticated) return <Button color="inherit" onClick={this.login}>Login</Button>;

    const menuPosition = {
      vertical: 'top',
      horizontal: 'right',
    };

    return (
      <div>
        <IconButton onClick={this.handleMenuOpen} color="inherit">
          <AccountCircle />
        </IconButton>
        <Menu
          anchorEl={menuAnchorEl}
          anchorOrigin={menuPosition}
          transformOrigin={menuPosition}
          open={!!menuAnchorEl}
          onClose={this.handleMenuClose}
        >
          <MenuItem onClick={this.logout}>
            <ListItemText
              primary="Logout"
              secondary={user && user.name}
            />
          </MenuItem>
        </Menu>
      </div>
    );
  }
}

export default withAuth(LoginButton);
React components have a concept of state management. Each component can be passed props (in a component like <input type="number" value={3} />, type and number would be considered props). They can also maintain their own state, which has some initial values and can be changed with a function called setState. Any time the props or state changes, the component will rerender, and if changes need to be made to the DOM they will happen then. In a component, you can access these with this.props or this.state, respectively.
Here, you’re creating a new React component and setting the initial state values. Until you query the auth prop, you don’t know whether there’s a user or not, so you set authenticated and user to null. Material UI will use menuAnchorEl to know where to anchor the menu that lets you log the user out.
class LoginButton extends Component {
  state = {
    authenticated: null,
    user: null,
    menuAnchorEl: null,
  };

  // ...
}
React components also have their own lifecycle methods, which are hooks you can use to trigger actions at certain stages of the component lifecycle. Here, when the component is first mounted you’ll check to see whether or not the user has been authenticated, and if so get some more details about the user, such as their name and email address. You also want to rerun this check whenever the component updates, but you need to be careful to only update the state when something is different, otherwise you’ll get yourself into an infinite loop (the component updates, so you give the component new values, which updates the component, you give it new values, etc.). The withAuth function is a Higher Order Component (HOC) which wraps the original component and returns another one containing the auth prop.
class LoginButton extends Component {
  // ...

  componentDidUpdate() {
    this.checkAuthentication();
  }

  componentDidMount() {
    this.checkAuthentication();
  }

  async checkAuthentication() {
    const authenticated = await this.props.auth.isAuthenticated();
    if (authenticated !== this.state.authenticated) {
      const user = await this.props.auth.getUser();
      this.setState({ authenticated, user });
    }
  }

  // ...
}

export default withAuth(LoginButton);
The following functions are helper functions used later to log the user in or out, and open or close the menu. Writing the function as an arrow function ensures that this is referring to the instantiation of the component. Without this, if a function is called somewhere outside of the component (e.g. in an onClick event), you would lose access to the component and wouldn’t be able to execute functions on it or access props or state.
class LoginButton extends Component {
  // ...

  login = () => this.props.auth.login();
  logout = () => {
    this.handleMenuClose();
    this.props.auth.logout();
  };

  handleMenuOpen = event => this.setState({ menuAnchorEl: event.currentTarget });
}
All React components must have a render() function. This is what tells React what to display on the screen, even if it shouldn’t display anything (in which case you can return null).
When you’re not sure of the authentication state yet, you can just return null so the button isn’t rendered at all. Once Okta this.props.auth.isAuthenticated() returns, the value will either be true or false. If it’s false, you’ll want to provide a Login button. If the user is logged in, you can instead display an avatar icon that has a dropdown menu with a Logout button.
class LoginButton extends Component {
  // ...

  render() {
    const { authenticated, user, menuAnchorEl } = this.state;

    if (authenticated == null) return null;
    if (!authenticated) return <Button color="inherit" onClick={this.login}>Login</Button>;

    const menuPosition = {
      vertical: 'top',
      horizontal: 'right',
    };

    return (
      <div>
        <IconButton onClick={this.handleMenuOpen} color="inherit">
          <AccountCircle />
        </IconButton>
        <Menu
          anchorEl={menuAnchorEl}
          anchorOrigin={menuPosition}
          transformOrigin={menuPosition}
          open={!!menuAnchorEl}
          onClose={this.handleMenuClose}
        >
          <MenuItem onClick={this.logout}>
            <ListItemText
              primary="Logout"
              secondary={user && user.name}
            />
          </MenuItem>
        </Menu>
      </div>
    );
  }
}
The next piece of the puzzle is to add this LoginButton component to your header. In order to display it on the right-hand side of the page, you can put an empty spacer div that has a flex value of 1. Since the other objects aren’t told to flex, the spacer will take up as much space as it can. Modify your src/components/AppHeader.js file like so:
src/components/AppHeader.js
--- a/src/components/AppHeader.js
+++ b/src/components/AppHeader.js
@@ -3,16 +3,27 @@ import {
   AppBar,
   Toolbar,
   Typography,
+  withStyles,
 } from '@material-ui/core';

-const AppHeader = () => (
+import LoginButton from './LoginButton';
+
+const styles = {
+  flex: {
+    flex: 1,
+  },
+};
+
+const AppHeader = ({ classes }) => (
   <AppBar position="static">
     <Toolbar>
       <Typography variant="title" color="inherit">
         My React App
       </Typography>
+      <div className={classes.flex} />
+      <LoginButton />
     </Toolbar>
   </AppBar>
 );

-export default AppHeader;
+export default withStyles(styles)(AppHeader);
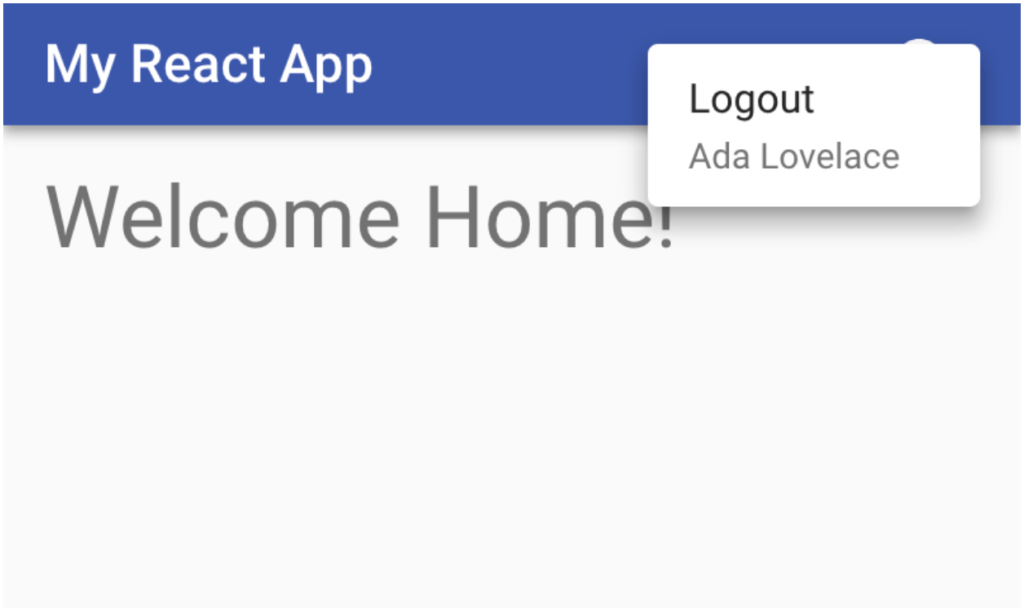
You should now be able to log in and out of your app using the button in the top right.
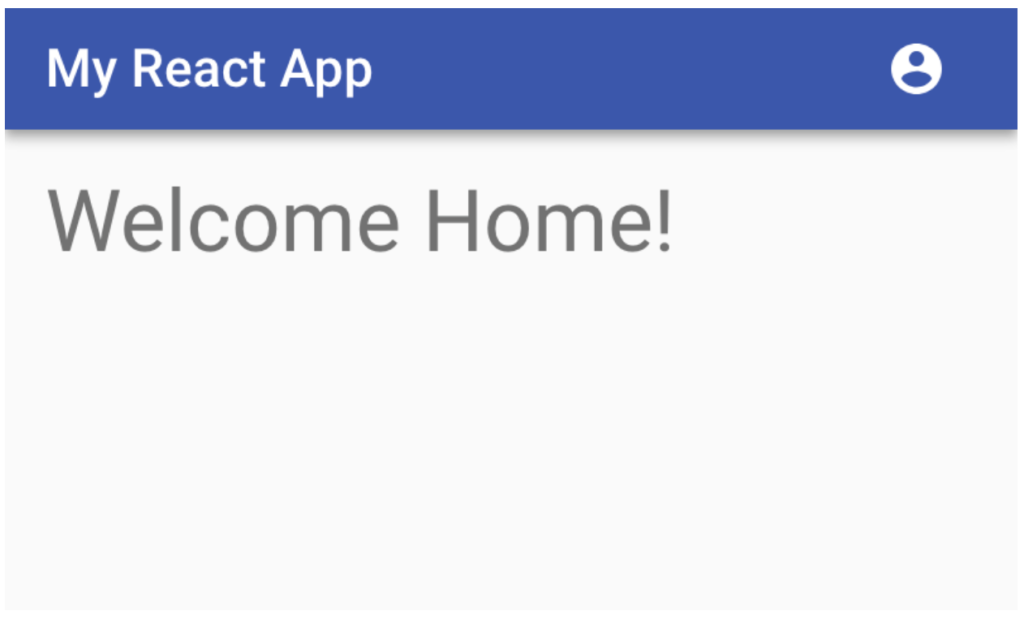
When you click the Login button, you’ll be redirected to your Okta organization URL to handle authentication. You can log in with the same credentials you use in your developer console.

Once successfully signed in, you’re returned back to your app and should now see an icon showing that you’re logged in. If you click on the icon, you’ll see your name in a logout button. Clicking the button keeps you on the homepage but logs you out again.
Add a Node REST API Server
Now that users can securely authenticate, you can build the REST API server to perform CRUD operations on a post model. You’ll need to add quite a few dependencies to your project at this point:
yarn add @okta/jwt-verifier@0.0.12 body-parser@1.18.3 cors@2.8.4 dotenv@6.0.0 epilogue@0.7.1 express @4.16.3 sequelize@4.38.0 sqlite@2.9.2
yarn add -D npm-run-all@4.1.3
Create a new folder for the server under the src directory:
mkdir src/server
Now create a new file src/server/index.js. To keep this simple we will just use a single file, but you could have a whole subtree of files in this folder. Keeping it in a separate folder lets you watch for changes just in this subdirectory and reload the server only when making changes to this file, instead of anytime any file in src changes. Again, I’ll post the whole file and then explain some key sections below.
src/server/index.js
require('dotenv').config({ path: '.env.local' });

const express = require('express');
const cors = require('cors');
const bodyParser = require('body-parser');
const Sequelize = require('sequelize');
const epilogue = require('epilogue');
const OktaJwtVerifier = require('@okta/jwt-verifier');

const oktaJwtVerifier = new OktaJwtVerifier({
  clientId: process.env.REACT_APP_OKTA_CLIENT_ID,
  issuer: `${process.env.REACT_APP_OKTA_ORG_URL}/oauth2/default`,
});

const app = express();
app.use(cors());
app.use(bodyParser.json());

app.use(async (req, res, next) => {
  try {
    if (!req.headers.authorization) throw new Error('Authorization header is required');

    const accessToken = req.headers.authorization.trim().split(' ')[1];
    await oktaJwtVerifier.verifyAccessToken(accessToken);
    next();
  } catch (error) {
    next(error.message);
  }
});

const database = new Sequelize({
  dialect: 'sqlite',
  storage: './test.sqlite',
});

const Post = database.define('posts', {
  title: Sequelize.STRING,
  body: Sequelize.TEXT,
});

epilogue.initialize({ app, sequelize: database });

epilogue.resource({
  model: Post,
  endpoints: ['/posts', '/posts/:id'],
});

const port = process.env.SERVER_PORT || 3001;

database.sync().then(() => {
  app.listen(port, () => {
    console.log(`Listening on port ${port}`);
  });
});
The following loads the environment variables we used in the React app. This way we can use the same env variables, and only have to set them in one place.
require('dotenv').config({ path: '.env.local' });
This sets up the HTTP server and adds some settings to allow for Cross-Origin Resource Sharing (CORS) and will automatically parse JSON.
const app = express();
app.use(cors());
app.use(bodyParser.json());
Here is where you check that a user is properly authenticated. First, throw an error if there is no Authorization header, which is how you will send the authorization token. The token will actually look like Bearer aLongBase64String. You want to pass the Base 64 string to the Okta JWT Verifier to check that the user is properly authenticated. The verifier will initially send a request to the issuer to get a list of valid signatures, and will then check locally that the token is valid. On subsequent requests, this can be done locally unless it finds a claim that it doesn’t have signatures for yet.
If everything looks good, the call to next() tells Express to go ahead and continue processing the request. If however, the claim is invalid, an error will be thrown. The error is then passed into next to tell Express that something went wrong. Express will then send an error back to the client instead of proceeding.
app.use(async (req, res, next) => {
  try {
    if (!req.headers.authorization) throw new Error('Authorization header is required');

    const accessToken = req.headers.authorization.trim().split(' ')[1];
    await oktaJwtVerifier.verifyAccessToken(accessToken);
    next();
  } catch (error) {
    next(error.message);
  }
});
Here is where you set up Sequelize. This is a quick way of creating database models. You can Sequelize with a wide variety of databases, but here you can just use SQLite to get up and running quickly without any other dependencies.
const database = new Sequelize({
  dialect: 'sqlite',
  storage: './test.sqlite',
});

const Post = database.define('posts', {
  title: Sequelize.STRING,
  body: Sequelize.TEXT,
});
Epilogue works well with Sequelize and Express. It binds the two together like glue, creating a set of CRUD endpoints with just a couple lines of code. First, you initialize Epilogue with the Express app and the Sequelize database model. Next, you tell it to create your endpoints for the Post model: one for a list of posts, which will have POST and GET methods; and one for individual posts, which will have GET, PUT, and DELETE methods.
epilogue.initialize({ app, sequelize: database });

epilogue.resource({
  model: Post,
  endpoints: ['/posts', '/posts/:id'],
});
The last part of the server is where you tell Express to start listening for HTTP requests. You need to tell sequelize to initialize the database, and when it’s done it’s OK for Express to start listening on the port you decide. By default, since the React app is using 3000, we’ll just add one to make it port 3001.
const port = process.env.SERVER_PORT || 3001;

database.sync().then(() => {
  app.listen(port, () => {
    console.log(`Listening on port ${port}`);
  });
});
Now you can make a couple small changes to package.json to make it easier to run both the frontend and backend at the same time. Replace the default start script and add a couple others, so your scripts section looks like this:
The post Build a Basic CRUD App with Node and React appeared first on SitePoint.
by Braden Kelley via SitePoint
No comments:
Post a Comment