A lot has been written about the benefits of achieving true Continuous Integration (CI) into production systems. This tutorial will demonstrate a simple workflow that achieves CI. We'll be using Feature Flags and Remote Config to avoid the need for feature branches in Git, as well as any sort of test or staging environments.
What We Mean by CI and Feature Flags
Continuous Integration is a method of development in which developers are able to constantly release their code. Developers push their new features as they finish development, at which point they are automatically tested and released immediately into a live environment.
Feature flags provide a way of gating these new features from a remote control panel allowing you to turn them off and on at will without making any changes to your code. This allows you to develop a feature, and release it into production without actually changing anything from a user's point of view.
Why CI Is So Powerful
Integrating code in smaller chunks and in a more frequent manner allows development teams to pick up issues a lot quicker, as well as getting new features to users as quickly as possible. CI also removes the need for any large releases where a team of engineers need to stay awake until the wee hours of the night to minimise disruption to their users.
How Feature Flags Aid Continuous Integration
Feature flags provide an additional layer of confidence when releasing new features. By wrapping new features in a feature flag, the developers and product team are able to quickly enable or disable their features as required. Let's say we introduce a new feature into production but we can immediately see that there's a bug in the new code, because of something specific in the production environment that wasn't evident in testing (let's face it, it's happened to everyone... more than once).
Previously, this would have meant a (probably) lengthy and (definitely) painful rollback procedure and a rescheduling of the release for another ungodly hour on another day when the bug has been fixed. Instead, with a toggle of a switch the feature can be turned off for all or a subset of users and the pain is gone. Once the bug is identified and fixed, a patch release can be deployed, and the feature can be re-enabled.
Outline of Our Sample Project
To demonstrate integrating feature flags and remote config, we're going to base our initial codebase on the de facto React JS tutorial of a tic-tac-toe game. This is a great tutorial for learning the basics of React, so be sure to check it out if you haven't already.
Don't worry if you don't know React or Javascript well. The concepts we'll be going over are all about the process and tooling, and not about the code.
Rather than repeat the tutorial from the start, we're going to start at a point where we've got a basic tic-tac-toe game up and running.
At this point we'll use feature flags and remote configuration to continuously configure, push and deploy new features. To take this concept to an extreme we'll continuously be pushing to master; no other branches will be used. We'll introduce a bug (intentionally of course!) and push the fix to master, to demonstrate how dealing with this scenario doesn't require a full rollback or additional branching.
If you wish to follow along writing code during this tutorial, you can fork the repository here.
Achieving CI
The most common method of automating continuous integration is to have the build process trigger when you push changes to your git repository. Different build tools achieve this in different ways.
We're going to use Netlify for our project. Netlify lets you connect a Git repository and automatically deploy builds every time you push to a branch.
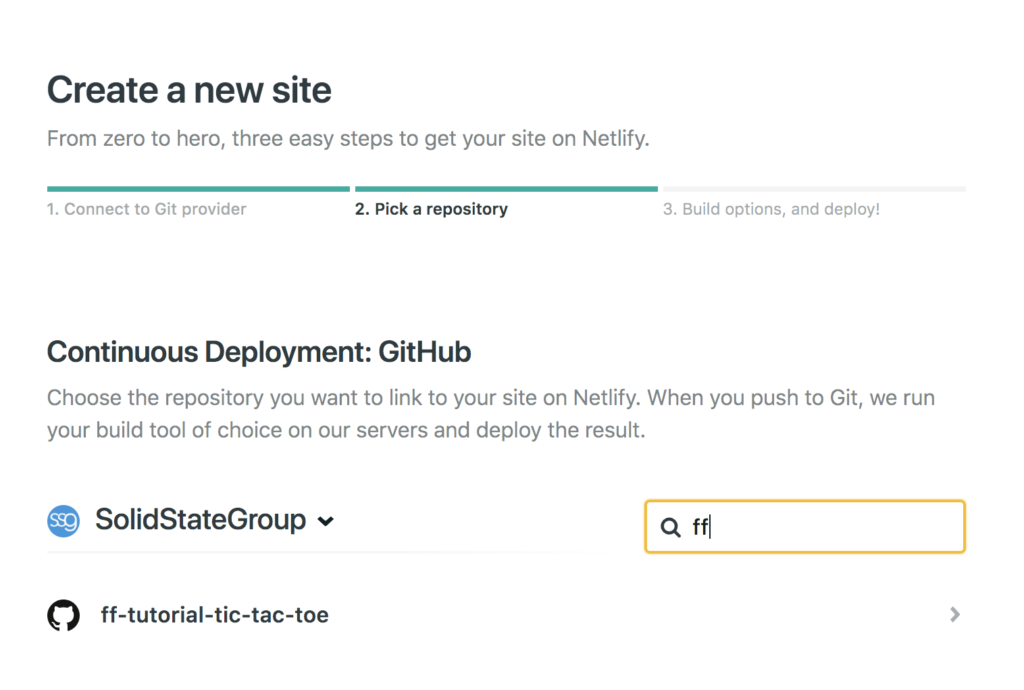
To use Netlify, simply sign up for a free account and select the 'New site from Git' option in the top right of the dashboard. Once you've connected your GitHub account (or otherwise, if you want to use Bitbucket or GitLab) you should then be presented with the options shown below.
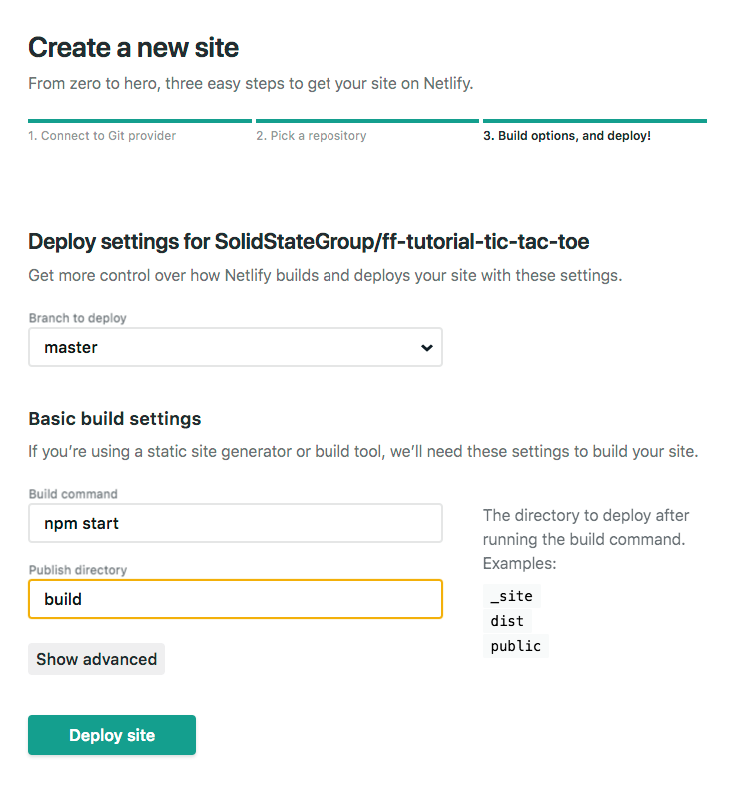
In the next step, configure Netlify to run the application as follows.
Netlify will now go ahead and build your application for you. It will take a few minutes, but once it's done you should see something like the following:
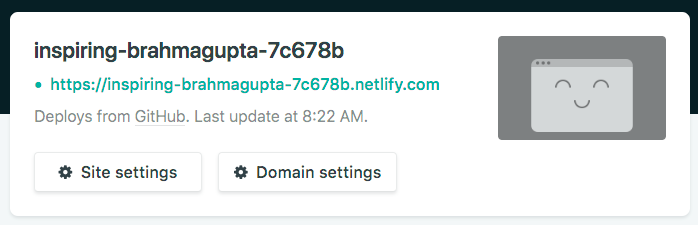
Browsing to that URL should show your Tic Tac Toe game in all its glory.
Setting Up Feature Flags for Our Project
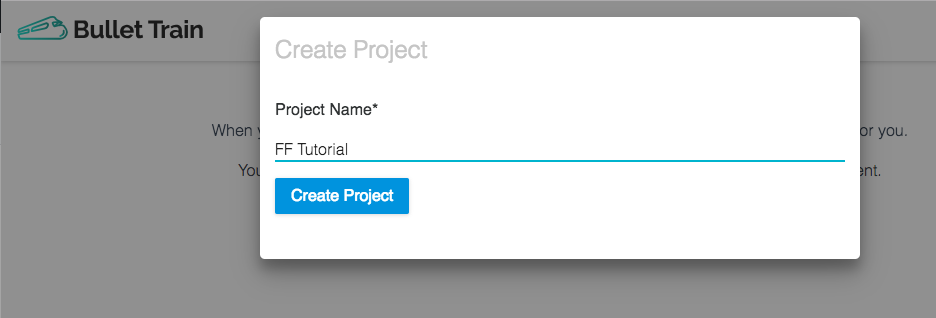
We're going to use feature flags to control the declaration of a winner in the tic-tac-toe game. To create and manage our feature flags, we're going to use Bullet Train as it's currently free, but there are many other feature flag products. We'll let you pick the one you feel is right.
To continue with us, go ahead and create a free account on Bullet Train. Click on the 'Create Project' button and create your project. We named ours FF Tutorial.
Next, we need to create a new feature for declaring a winner.
Click on the 'Create your first Feature' button at the bottom of the next screen to bring up the following form and add in the details.
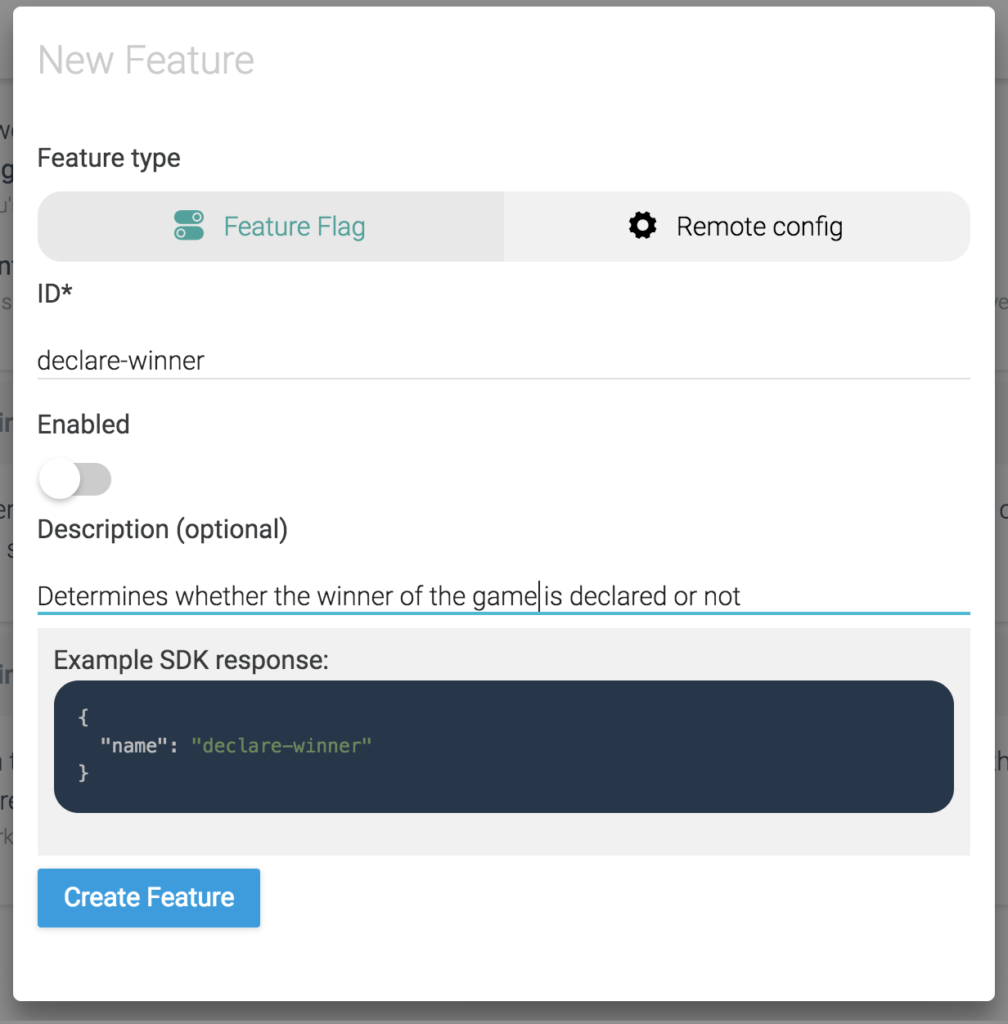
Note that we've kept the feature disabled to begin with.
Take note of the two code snippets available beneath the feature, which will help us in the next step.
Implement the Feature Flag
Firstly, let's get this project running in our development environment. From the command line, navigate to the project folder and run the command npm i to install the necessary dependencies.
Next run npm run dev and head to http://localhost:8080 in your browser. You should see the same tic-tac-toe game that you saw on the Netlify URL.
We are now going to implement our new feature flag into the existing code. Let's start by installing the Bullet Train client for JavaScript, by opening up another command line and running the following in the project directory:
npm i bullet-train-client --save
Open up the project in your preferred editor and edit ./web/App.js.
Find the calculateWinner(squares) function. This function determines whether there has been a winner or not, based on whether it can find a line of the same shape or not. We are going to have this function return null based on the value of our feature flag so that we can test filling up the board without it declaring a winner.
At the very top of App.js, add the following line:
var declareWinner = true;
Now, let's initialise our Bullet Train client that we installed earlier. Copy all of code example 2 from the Features page in the Bullet Train interface and paste it just beneath the line you just added.
The environment ID in your code snippet will be the correct environment ID associated with the Development environment in your Bullet Train project. You can check this by browsing to the 'Environment Settings' page if you want.
We now need to edit the onChange() function in the bulletTrain.init() function in the code we just pasted in to suit our needs. Replace all of the code in there with one line:
declareWinner = bulletTrain.hasFeature("declare-winner");
You should now have this at the top of your App.js
var declareWinner = true;
import bulletTrain from "bullet-train-client"; //Add this line if you're using bulletTrain via npm

bulletTrain.init({
    environmentID:"<your-environment-id>",
    onChange: (oldFlags,params)=>{ //Occurs whenever flags are changed
        declareWinner = bulletTrain.hasFeature("declare-winner");
    }
});
Scroll down to the calculateWinner(squares) function and at the top, just above the declaration of the lines constant, let's add the line:
if (!declareWinner) return null;
And that's it! Our feature flag will now determine whether or not the winner is calculated or not on every render of the game. Refresh your browser and play the game. You can no longer win and instead the entire board can now be filled with Xs and Os.
Go back to the Bullet Train admin and toggle the feature using the switch on the right.
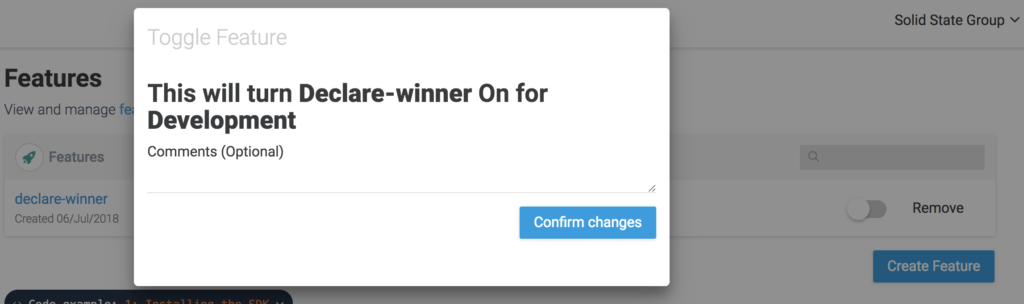
Refresh your browser and the game becomes winnable again. Check out the code for the end of this part here.
Commit and push your code (yes, all on master) and Netlify will automatically deploy your code. Browse to your assigned Netlify URL again and toggle the feature flag to see it working in a production environment. Sweet!
Work on a Bug
We are now going to purposefully introduce a bug into the tic-tac-toe game and show how feature flags can be used to drop a feature that is causing issues.
The feature we're going to add is selection of who goes first at the start of the game. For that we will add a couple of buttons that only appear at the beginning of the game and prevent clicks on the board from adding a shape.
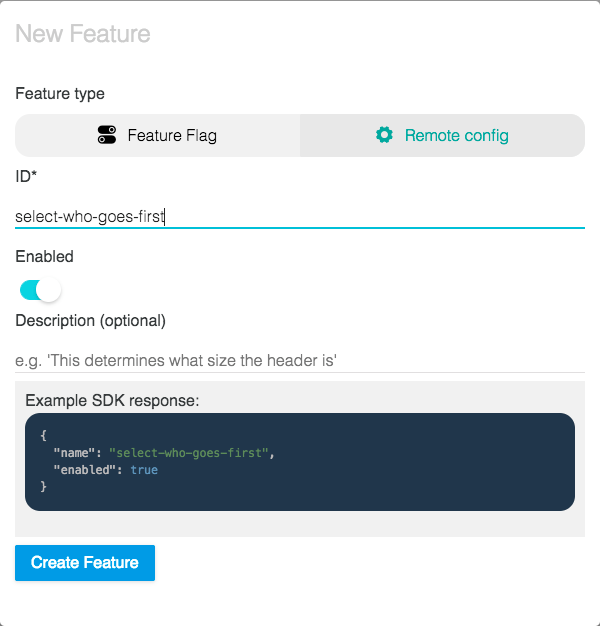
Firstly, let's set up our feature flag to wrap the new feature. In your Bullet Train project, create a new feature called select-who-goes-first as follows. Let's leave it disabled to begin with.
Now, let's add our new feature. In the render() function we're going to render the buttons, instead of the status, if the game hasn't started yet. At the top of the return of the render() function, replace the line:
<div className="status">{status}</div>
... with the following code:
{!this.state.selected ? (
    <div>
        Who goes first?
        <button onClick={() => this.setState({selected: true})}>X</button>
        <button onClick={() => this.setState({selected: true, xIsNext: false})}>O</button>
    </div>
) : (
    <div className="status">{status}</div>
)}
Now we want to write the code to control our new feature with the feature flag we created. As before, this needs to go in the bulletTrain.init({...}) function.
First, let's add the lifecycle function componentDidMount() to the Board component and then move the entire bulletTrain.init({...}) function inside of it, so that we can update the state of the component after the flag is retrieved:
The post How to Use Feature Flags in Continuous Integration appeared first on SitePoint.
by Ben Rometsch via SitePoint
No comments:
Post a Comment