Webpack is a module bundler
Webpack has become one of the most important tools for modern web development. Primarily it's a module bundler for your JavaScript but it can be taught to transform all of your front-end assets like HTML and CSS, even images. It can give you more control over the number of HTTP requests your app is making and allows you to use other flavors of those assets (Jade, Sass & ES6 for example). Webpack also allows you to easily consume packages from npm.
This article is aimed at those who are new to webpack and will cover initial setup and configuration, modules, loaders, plugins, code splitting and hot module replacement. If you find video tutorials helpful I can highly recommend Glen Maddern's Webpack from First Principles as a starting point to understand what it is that makes webpack special.
To follow along at home you'll need to have Node.js installed. You can also download the demo app from our Github repo.
Setup
Let's initialize a new project with npm and install webpack:
mkdir webpack-demo
cd webpack-demo
npm init -y
npm install webpack@beta --save-dev
mkdir src
touch index.html src/app.js webpack.config.js
Edit these files:
<!-- index.html -->
<!DOCTYPE html>
<html lang="en">
  <head>
    <meta charset="utf-8">
    <title>Hello webpack</title>
  </head>
  <body>
    <div id="root"></div>
    <script src="dist/bundle.js"></script>
  </body>
</html>
// src/app.js
const root = document.querySelector('#root')
root.innerHTML = `<p>Hello webpack.</p>`
// webpack.config.js
const path = require('path')

const config = {
  context: path.resolve(__dirname, 'src'),
  entry: './app.js',
  output: {
    path: path.resolve(__dirname, 'dist'),
    filename: 'bundle.js'
  },
  module: {
    rules: [{
      test: /\.js$/,
      include: path.resolve(__dirname, 'src'),
      use: [{
        loader: 'babel-loader',
        options: {
          presets: [
            ['es2015', { modules: false }]
          ]
        }
      }]
    }]
  }
}

module.exports = config
The config above is a common starting point, it instructs webpack to compile our entry point src/app.js into our output /dist/bundle.js and all .js files will be transpiled from ES2015 to ES5 with Babel.
To get this running we're going to need to install three packages, babel-core, the webpack loader babel-loader and the preset babel-preset-es2015 for the flavor of JavaScript we want to write. { modules: false } enables Tree Shaking to remove unused exports from your bundle to bring down the file size.
npm install babel-core babel-loader babel-preset-es2015 --save-dev
Lastly, replace the scripts section of package.json with the following:
"scripts": {
  "start": "webpack --watch",
  "build": "webpack -p"
},
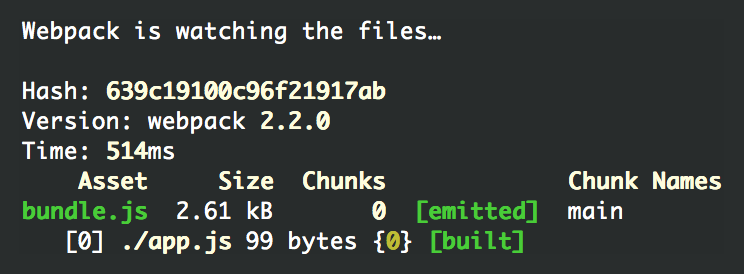
Running npm start from the command line will start webpack in watch mode which will recompile our bundle whenever a .js file is changed in our src directory. The output in the console tells us about the bundles being being created, it's important to keep an eye on the number of bundles and the size.

You should now be able to load index.html in your browser and be greeted with "Hello webpack.".
open index.html
Open up dist/bundle.js to see what webpack has done, at the top is webpack's module bootstrapping code and right at the bottom is our module. You may not be colored impressed just yet but if you've come this far you can now start authoring ES6 modules and webpack will be able to produce a bundle for production that will work in all browsers.
Stop webpack with Ctrl + C and run npm run build to compile our bundle in production mode.
Notice that the bundle size has come down from 2.61 kB to 585 bytes.
Take another look at dist/bundle.js and you'll see a big ugly mess of code, our bundle has been minified with UglifyJS, the code will run exactly the same but it's done with the fewest characters needed.
Modules
Out of the box webpack knows how to consume JavaScript modules in a variety of formats, the most notable two are:
- ES2015
importstatements - CommonJS
require()statements
We can test this out by installing lodash and importing it from app.js
npm install lodash --save
// src/app.js
import {groupBy} from 'lodash/collection'

const people = [{
  manager: 'Jen',
  name: 'Bob'
}, {
  manager: 'Jen',
  name: 'Sue'
}, {
  manager: 'Bob',
  name: 'Shirley'
}, {
  manager: 'Bob',
  name: 'Terrence'
}]
const managerGroups = groupBy(people, 'manager')

const root = document.querySelector('#root')
root.innerHTML = `<pre>${JSON.stringify(managerGroups, null, 2)}</pre>`
Run npm start to start webpack and refresh index.html, you should see an array of people grouped by manager.
Let's move the array of people into its own module people.js
// src/people.js
const people = [{
  manager: 'Jen',
  name: 'Bob'
}, {
  manager: 'Jen',
  name: 'Sue'
}, {
  manager: 'Bob',
  name: 'Shirley'
}, {
  manager: 'Bob',
  name: 'Terrence'
}]

export default people
We can simply import it from app.js with a relative path.
// src/app.js
import {groupBy} from 'lodash/collection'
import people from './people'

const managerGroups = groupBy(people, 'manager')

const root = document.querySelector('#root')
root.innerHTML = `<pre>${JSON.stringify(managerGroups, null, 2)}</pre>`
Note: Imports without a relative path like 'lodash/collection' are modules from npm installed to /node_modules, your own modules will always need a relative path like './people', this is how you can tell them apart.
Loaders
We've already been introduced to babel-loader, one of many loaders that you can configure to tell webpack what to do when it encounters imports for different file types. You can chain loaders together into a series of transforms, a good way to see how this works is by importing Sass from our JavaScript.
Continue reading %A Beginner’s Guide to Webpack 4 and Module Bundling%
by Mark Brown via SitePoint
No comments:
Post a Comment