"Mr Branding" is a blog based on RSS for everything related to website branding and website design, it collects its posts from many sites in order to facilitate the updating to the latest technology.
To suggest any source, please contact me: Taha.baba@consultant.com
Thursday, May 3, 2018
Deploy Fault Tolerant, Load Balanced Web Apps on Alibaba Cloud
This article was originally published on Alibaba Cloud. Thank you for supporting the partners who make SitePoint possible.
High Availability (HA), Fault Tolerance (FT), and Horizontal Scale Friendly (HSF) are equally important to functionality for web applications to run and succeed today. Existing or new web applications should be designed and provisioned with such underlying architecture. Fortunately, you can easily and promptly deploy the aforementioned architecture in the Cloud era today (compared to the on-premises bare-metal machine era)!
However, this flexibility comes with a caveat – how do you choose the right cloud provider? We are spoiled for choice and it can be really challenging (and hectic!) when evaluating and choosing the right one.
This post is intended to discuss and provide a walkthrough on deploying web applications on Alibaba Cloud from the ground up, including HA, FT, and HSF. Throughout this post, I will briefly introduce several services and tools provided in Alibaba Cloud. Yes, briefly! If you wish to learn more about particular services or tools, please visit the Documentation Center. In addition, this post will highlight the concerns and considerations when deploying such services.
WordPress is used as the demo web application that would be deployed on Alibaba Cloud in this post. The same deploying principle shall apply to many other web applications. This post is not intended to discuss on WordPress configuration at all. It shall not (and not able to) serves as reference for WordPress configuration. There are tons and tons of good resources out there regarding best practices on WordPress administrative.
1. High-level Architecture
Like many other web applications, the demo web application consists of an application layer (WordPress) and a database layer (MySQL).
Goal: Ultimately, we want an always-on web application (WordPress)!
In order to achieve such a “simple” goal, the demo web application must be deployed with the following minimum requirements:
- A single main site.
- A minimum of two physically separate WordPress instances on each site for redundancy and load balancing purposes.
- Auto-spawning the other WordPress instance when the existing instance stops or experiences a failure.
- The database instance (MySQL) must also be running in redundancy mode. It should automatically failover to the active standby instance when necessary.
- Centralized dataspace. Shared resources must be accessible and available to all running WordPress instances. For example, a document uploaded by a user via WordPress should be synced across all running WordPress instances.
Fortunately, Alibaba Cloud provides a list of services and tools for us to fulfil these requirements. In this post specifically, we'll utilize Cloud DNS (DNS), Auto Scaling Group (ASG), Server Load Balancer (SLB), Elastic Compute Service (ECS), Relational Database System (RDS), Object Storage Service (OSS), and Object Storage File System (OSSFS) tools to achieve our goal. The high-level architecture diagram for the deployed WordPress would be as following:
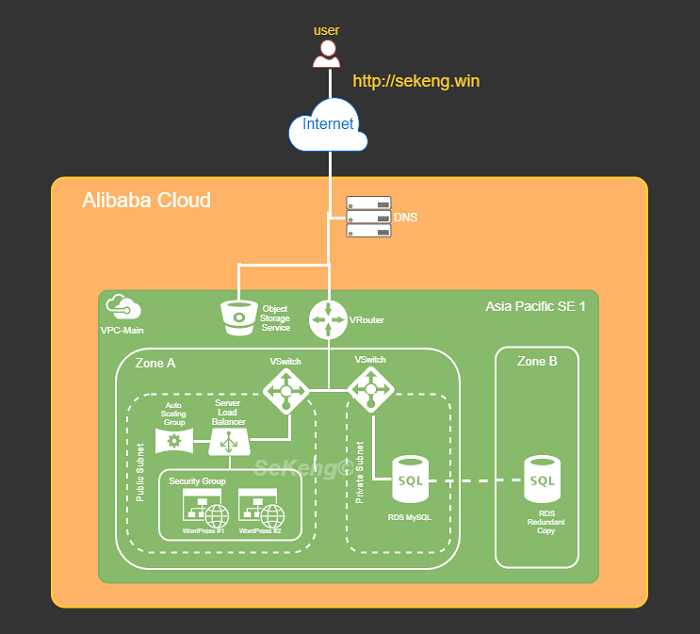
2. Deployment Procedures
We’ll briefly introduce the components shown in Figure 1.0 before diving into each individual configuration. As stated earlier, you would have to refer to other sources such as Alibaba Cloud online documentation for detailed explanation. The following table summarizes the description and usage of such components according to our deployment context:
Table 1: Cloud Components in Demo Deployments
| Site / Region | Geographical area of the data center | 1. Site for deployments |
| Zone | Physically isolated data center within a region | 2. Used for redundancy purpose for Database |
| Cloud DNS | Domain name resolution and management service | 3. Purchase new Domain Name4. Route traffic to WordPress instance |
| VPC (Virtual Private Cloud) | Virtual isolated network built for private usage | 5. To group and separate resources6. To setup security control7. Assign network IP range |
| VRouter | Virtual routing table | 8. To configure network route for provisioned resources |
| VSwitch | Segment virtual networks into subnets | 9. To separate resources into group within specify Zone via subnet |
| Server Load Balancer | Distribute traffic to instances according to configured profile | 10. To load balance (round robin) request among provisioned WordPress instances |
| Auto Scaling Group | Automatically adjust computing resources based on scaling configuration | 11. Serves as watchdog to maintain the defined healthy running WordPress instances |
| Elastics Computing Service (WordPress instance) | Compute and process unit provided by Alibaba Cloud | 12. To install and run WordPress. This is the application layer of demo deployment |
| Relational Database Service (MySQL) | On-demand managed database service | 13. The DB for WordPress application |
| Object Storage Service | High availability and fault tolerance object storage | 14. Centralized storage for files/objects uploaded by user via WordPress application |
The workflow below describes the general steps involved in deploying a web application on Alibaba Cloud.
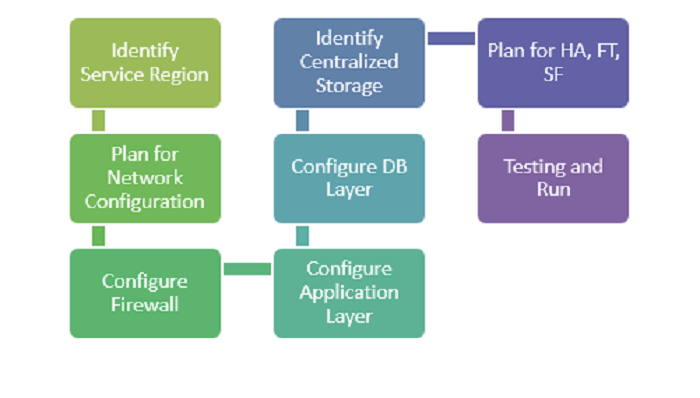
2.1. Identify Service Region
It’s important to decide on the region where an application should be deployed. The general considerations shall include the following:
- Cost: The mother of all considerations. Yes, the cost may vary according region.
- Service availability in the region? It’s not uncommon that some regions provide additional services that aren't available in another region — you have to test to find out!
- Main target users’ geographical location. It’s definitely better for user experience if the application is physically closer to the customer, resulting in shorter latency.
- Rules & Regulations. Is it legally OK for the application to be hosted in the selected region?
- Number of Availability Zonez. Occasionally, we need to improve application availability by deploying redundant applications in a different zone. Since I’m based in Southeast Asia, I will be looking at the Singapore and Kuala Lumpur data centers. At the time of writing, “Asia Pacific SE 3 (Kuala Lumpur)” has only a single zone while “Asia Pacific SE 1 (Singapore)” has dual zones.
After consideration, we’ve decided “Asia Pacific SE 1 (Singapore)” will be the main region for our demo deployment.`
2.2. Plan for Network Configuration
I. VPC
We have to consider the number of nodes that might potentially be running in the deployment. Each running node is subject to one private IP, and we don’t want to end up running out of private IPs for nodes in the future!
There are three type of CIDR blocks allowed by Alibaba Cloud for a VPC: 10.0.0.0/8, 172.16.0.0/12, 192.168.0.0/16. According to Alibaba Cloud documentation, the first & last three IPs of CIDR block would be reserved by system usage, and hence the maximum number of private IPs for each CIDR block are:
- 10.0.0.0/8 = 16777212 (16777216 - 4)
- 172.16.0.0/12 1048572 (1048576 - 4)
- 192.168.0.0/16 = 65532 (65536 - 4)
You may also wonder, why don’t we just use the biggest CIDR block allowed to avoid potentially running out of private IP in future? The following might help you to reconsider that thought:
- Bigger CIDR block may increase the complexity when dealing with IP-related configuration, such as subnet creation, route configuration, security group configuration, and etc.
- If the above is not a valid show-stopper for you, then consider this: “VPC peering (interconnect)” with other VPCs doesn’t allow overlapping CIDR block. In other words, it’s not possible to peer with other VPC once you using 10.0.0.0/8 as CIDR block!
After consideration, we’ll use “192.168.0.0/16” for our demo deployment as there will only be a few running nodes within the VPC.
II. Subnet
In Alibaba Cloud, VSwitch could be used to further segment the VPC CIDR block into a subnet with a smaller CIDR block. The general consideration for segmenting subnets includes the following:
- Logical grouping of instances according to functionality. E.g. grouping the application in one group and RDS in another group for easier maintainability. For example, disabling a group of instances by deleting VSwitch attached to the group.
- Simplify security group profile configuration. Security rules based on the subnet CIDR block level rather than the individual instance’s IP are cleaner.
- Enable Auto-scaling and Server Load Balancer monitoring and actions on a specific subnet.
- Redundancy on resources. It’s possible to seamlessly failover to a different subnet that's based in a different zone when the existing subnet’s zone encounters failure.
After consideration, we’re grouping WordPress in one subnet (192.168.1.0/24) and the RDS instance in another subnet (192.168.2.0/24).
2.3. Configure Firewall (Security Group)
Network access at the instance level could be limited via Security Group in Alibaba Cloud. The Security Group Rule configuration could be very granular, up to the per-protocol, per-port, per-client IP level. Hence, to avoid unauthorized access to the instance, we need to consider the following:
- Always comply with least privilege practice. Restrict access to the required client only.
- Intranet or/and internet connectivity. You can use Security Group to create a “private subnet” (no internet usage) by only allowing access for inbound intranet. In addition, a NAT gateway could be used to allow the instance in the private network to access outbound internet services.
Since we are running WordPress on Linux instances, we would at least allow an inbound rule for Port 80 (HTTP) and 22 (SSH) in Security Group. Besides that, all outbound traffic would be allowed since there's no specific requirement on that.
2.4. Configure the Application Layer
This could be the trickiest and most uncertain decision we have to make when deploying web applications. As stated earlier, this post will not discuss an application’s capacity requirements and hence, choosing a proper instance type is out of scope of this post. Anyhow, the following considerations may assist in deciding on an instance type generally:
- Always start with the Pay-As-You-Go model if you have no idea on the instance type performance nor the actual capacity requirement. This pricing model allows you to experiment with different instance types freely without a lock-in period.
- You have to understand the nature of the to-be deployed application’s constraint. Is the application CPU-bound or IO-bound? You have to answer that in order to determine a proper instance type with the best cost efficiency.
- Deploy with one step down instance whenever possible. If an application's capacity requirement could be satisfied with a ‘X’ instance of a instance family type Y, it might be better if we deploy the application with two one step down instances (e.g. X/2) from the same family type for the same amount of workload. This will increase the availability of the application. For example, we can still process 50% of the workload if any the X/2 instance goes down compared with 100% downtime if the X instance is down. Of course, this approach is subject to the design and usage of the application.
- Decide on other usage parameters e.g. network type, network bandwidth, operating system image, and etc. accordingly.
Since this is a demo deployment without any real production usage, we’ll go for the lowest (cheapest) ECS instance configuration. For example: General Type n1: 1-core, 1GB, Ubuntu 16.04 OS, Ultra Cloud Disk 40GB, and 1Mbps network bandwidth.
2.5. Configure the Database Layer
Generally, we have to decide between using self-managed DB instances (self-install DB at ECS instance) like what we usually do for on-premises solutions, or using fully managed RDS DB services like ApsaraDB. Again, it's out of this post's scope in comparing or benchmarking the two variants of database services. These guidelines may assist in choosing database variants generally:
- Do you have available resources for managing and operating database instances? The management and operational tasks may include backing up data files, OS/DB patching, access control on the host machine, etc. If the answer is no, then maybe a fully managed RDS DB is preferable.
- Do you need a dedicated database instance? If your database is small and the workload is minimal and able to co-exist with the application (e.g. in the development environment), perhaps the self-managed variant is preferable due to cost efficiency.
- Do you need access to the underlying host for the database instance? For example, if you need to perform specific OS/DB configuration for performance-tuning purposes, then the self-managed variant shall be employed.
- Does the fully-managed database service provide the DB type that you required? If no, then the answer is straightforward, go for a self-managed DB variant.
- If you are concerned about possible cloud vendor lock-in, then you might want to avoid the fully-managed variant as some RDS implementations could be cloud vendor specific.
Since there is neither manpower to maintain the demo database nor any specify DB configuration, we'll deploy the demo DB with ApsaraDB RDS – MySQL. In addition, this variant allows us to make a redundancy (active standby) database easily (with just a click!).
2.6. Identify Centralized Storage
Eventually, there could be multiple concurrent WordPress applications running on physically separate ECS instances. Each instance might generate and store certain files/image/media resulting from users’ operations. Obviously, objects that are generated by any instance would have to be synchronized across all other running application instances. One of the approaches to achieve this mentioned synchronization is through centralized storage. Objects generated shall be synchronzied to centralized storage and followed by synchronization between centralized objects and other running instances. Additionally, the centralized storage must always be available and any failure of any instance shouldn’t impact the availability and durability of centralized storage.
Alibaba Cloud provides a couple of fully managed services which could serve as centralized storage:
- Object Storage Service for objects: It’s ideal as centralized object storage due to the guaranteed high availability (99.9%), scalability, and fully-managed nature. Specifically to this demo deployment, each running WordPress instance shall sync with a dedicated common Object Storage Service’s bucket. By employing such a syncing mechanism, all the running WordPress instances would have an identical set of created objects.
- ApsaraDB Redis for application state: Sharing state (e.g. shared value, parameter) among running instances is possible via fully-managed ApsaraDB Redis.
A dedicated bucket in Object Storage Service would be created and used to store objects created as a result of user operations. All running WordPress instances shall sync with the relevant bucket for the list of created objects.
2.7. Plan for HA, FT, and HSF
To achieve HA, FT, and HSF in Alibaba Cloud, a web application shall be fundamentally designed as stateless and horizontally scalable. Any dependent application’s state or data shall be decoupled from the web application and migrated to centralized storage as discussed in the earlier section.
Services listed below could be employed for deploying a HA, FT, and HSF web application:
- Cloud DNS: It’s possible to configure ‘A’ record types for instances hosted in different regions. It’s really useful during failover scenarios whereby an ‘A’ record of a standby instance could be enabled with one click, resulting in network traffic diversion to the standby instance.
- Auto Scaling: It can be used to auto-spawn instances in a desired Zone when running instances go down or become unhealthy.
- Server Load Balancer: This service would provide a health check on configured instances and report their status to the Auto Scaling service for further action. Besides that, this service would also load balance workload among running instances.
- ApsaraDB RDS: RDS MySQL provides the multi-zone availability feature with just a click. It will really ease the effort required to provide HA and FT for the database.
The demo deployment will utilize DNS to route traffic to WordPress instances, Auto Scaling to ensure a minimum of two running instances in each region, and Server Load Balancer to provide a health check as well as to load balance workload. Last but not least, the Multi-Zone availability feature on RDS MySQL is enabled to provide HA and FT for the database.
2.8. Testing and Run
To test the HA and FT behavior, we may stop a running ECS manually and observe the action triggers by the auto-scaling service. If the auto-scaling has been configured properly, a new instance would be spawned automatically. Besides that, we may also manually turn off the RDS DB instance to observe the Multi-Zone redundancy failover happening. The best thing is that these actions are automatically handled by the respective services without any manual intervention. Shown below is our deployed WordPress:
Continue reading %Deploy Fault Tolerant, Load Balanced Web Apps on Alibaba Cloud%
by Ngoi Se Keng via SitePoint
Weekend Creative Agency
As this Dutch creative agency celebrates seven days of weekend a week, every day of the week has its own homepage with dedicated content within an alternative navigation structure.
by csreladm via CSSREEL | CSS Website Awards | World best websites | website design awards | CSS Gallery
Helder Corporate Identities
Helder is a design agency focused on research, strategy as a basis for corporate identities, logo design, content development, web design and brand spaces. Helder is based in Berlin, Germany.
by csreladm via CSSREEL | CSS Website Awards | World best websites | website design awards | CSS Gallery
Web Effectual
Web Effectual is a collective of talented creatives, builders and strategists located throughout the US. Together we work with forward-thinking brands to help realize, organize, architect & craft awesome digital experiences.
by csreladm via CSSREEL | CSS Website Awards | World best websites | website design awards | CSS Gallery
Customizing Bootstrap jQuery Plugins
Bootstrap comes packed with tons of ready-to-use jQuery-powered plugins. The beauty of Bootstrap’s plugins is that you can slot them into your project, write the appropriate markup using data- attributes, and the JavaScript kicks in automatically. No need to write any JavaScript code.
There may be times when you’d like to add your own customizations to Bootstrap’s plugins to fit your project’s requirements.
If this is you, read on. I’m going to show you one way in which you can do just that.
How to Customize Bootstrap a Plugin’s Appearance
You can customize Bootstrap plugins’ look and feel by working with CSS. On the other hand, if you’d like to modify the plugin’s functionality, you’ll need to write some JavaScript code.
Customizing Bootstrap CSS should be done in your own custom file, whether you’re working with the Sass source code or with the compiled version.
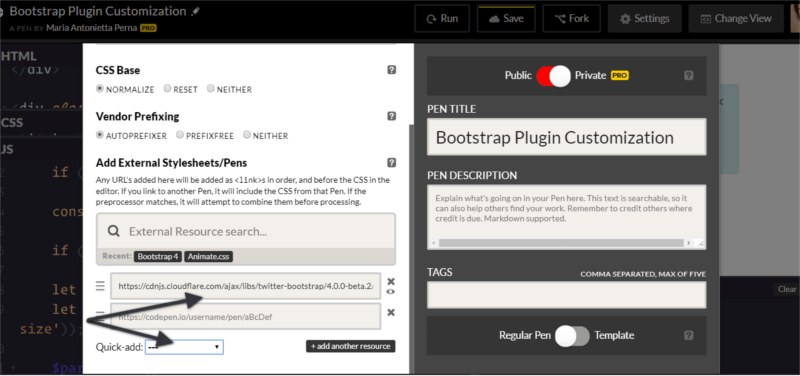
To keep things simple and CodePen-friendly, pull the precompiled Bootstrap package from the CDN.
This includes both the stylesheet …
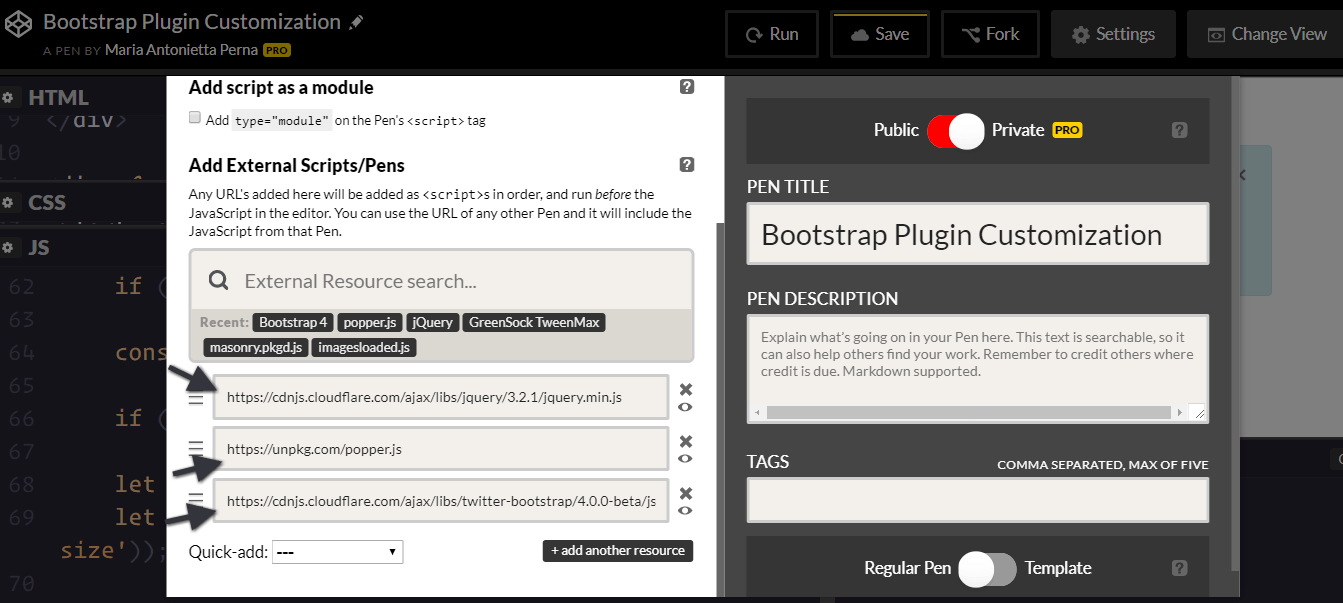
… and the JavaScript file. Also, don’t forget to include jQuery and, if you plan to use dropdowns, Popper.js too:
To make it even easier to modify CSS code, the developers behind Bootstrap have included a list of CSS variables for colors and breakpoints inside the :root element at the top of the stylesheet.
For example, the variable for the green success color is --success: #28a745;
To change this into a different shade of green, replace the variable’s color value in your own stylesheet and add this code to your chosen selector:
selector {
  background-color: var(--success);
}
To change the look and feel of a specific plugin, the easiest way is to find the Bootstrap styles using your browser’s devtools and overriding them with your own styles.
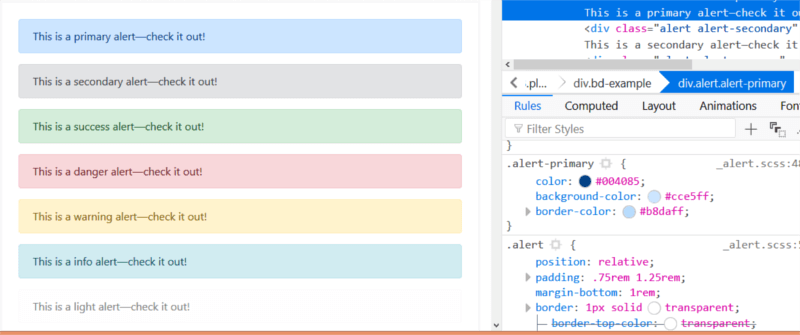
Let’s focus on the simple alert component in this article.
For instance, try changing the alert’s original values for the padding, margin-bottom, and border-radius in your custom CSS document:
.alert {
  padding: 2rem 1.50rem;
  margin-bottom: 1.5rem;
  border-radius: 50rem;
}
Now, all elements with the .alert class will look like this:
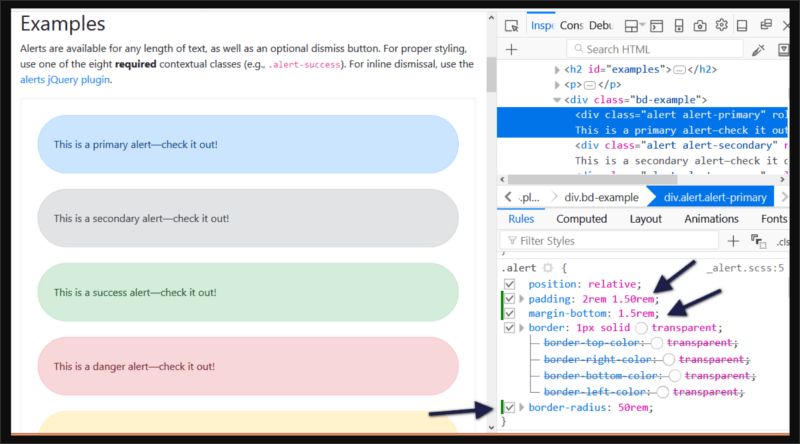
Next, let’s move on to extending the Bootstrap alert’s functionality.
Customizing a Bootstrap Plugin’s Functionality
Modifying Bootstrap plugins’ functionality often involves working both with the CSS and JavaScript document.
Most dynamic effects are produced by adding and removing CSS classes, and overall the functionality is quite simple.
In this article, I’m going to add some extra functionality to the Alert component.
Alerts display a piece of information and users can remove them from the page at the click of a button.
I’m going to add zoom in and zoom out buttons to the alert, which enable users to make the alert bigger or smaller respectively. I’m also going to include a high contrast button to allow users to view the alert contents in high contrast mode, i.e., inverting the background color and the text color.
Let’s get to work!
The Alert’s Structure
To follow along, start by adding the markup for the alert:
<div class="alert alert-info alert-zoom-in-out">
  <a href="#" class="close" data-dismiss="alert" aria-label="close">×</a>
  <a href="alert" class="close zoomIn" data-zoomIn="alert" aria-label="zoom in">+</a>
  <a href="alert" class="close zoomOut" data-zoomOut="alert" aria-label="zoom out">-</a>
  <a href="alert" class="close high-contrast" data-highContrast="alert" aria-label="high contrast mode"><i class="fa fa-adjust"></i></a>
  <p><strong>New Bootstrap Alert</strong></p>
  <p>Zoom in and out, or enable contrast mode.</p>
</div>
Above is a simple alert box with three links: the first one is a native Bootstrap dismiss alert link. This serves as template for the custom three links you’re going to create. The - link lets users shrink the size and contents of the alert box, while the + link does the exact opposite — that is, enlarge the alert box and the text inside it.
The contrast link enables high contrast mode on the alert.
Notice the data-zoomIn, data-zoomOut, and data-highContrast on each custom link’s markup. These are our hooks for the click event: a button with those custom data types will be responsible for triggering the actions on the alert box.
Modifying the CSS
The next step is to create your own custom CSS file for the alert plugin and add the following code:
.alert-zoom-in-out {
  font-size: 16px;
  height: auto;
  top: 20px;
  color: rgb(12, 84, 96);
  background-color: rgb(209, 236, 241);
}

.high-contrast-on,
.high-contrast-on a,
.high-contrast-on i {
  background-color: rgb(12, 84, 96);
  color: rgb(209, 236, 241);
}
alert-zoom-in-out is the class I’ve chosen for the alert box. Because the functionality you’re building includes modifying the size and color combination of the alert box, you need to set those for the alert-zoom-in-out class.
The high-contrast-on class on the alert box will be added and removed dynamically using JavaScript. When added, color and background-color values are inverted. When removed, the alert box will get back to its default appearance.
Continue reading %Customizing Bootstrap jQuery Plugins%
by Maria Antonietta Perna via SitePoint
How to Build an Indoor Office Map with WRLD
This article was created in partnership with WRLD. Thank you for supporting the partners who make SitePoint possible.
We’re just about wrapping up our series on the WRLD platform. So far, we’ve looked at how to use WRLD with outside maps. In this tutorial, we’re going to design and use an indoor map (also known as a floorplan, if you're going to be pedantic about it like a Dwight Schrute). As you might be able to tell, I think The Office would be a good theme for this one. Let us start off with a quote:
Would I ever leave this company? Look, I’m all about loyalty. In fact, I feel like part of what I’m being paid for here is my loyalty. But if there were somewhere else that valued loyalty more highly… I’m going wherever they value loyalty the most. – Dwight K. Schrute
In this tutorial, we’re going to cover the following topics:
- Creating an indoor map
- Importing the map into WRLD
- Highlighting specific rooms
- Creating a schedule and looping through it
The code for this tutorial has been tested with a modern version of Chrome.
Creating Indoor Maps
We’re going to try and re-create the office, from The Office. I think it’s going to be a bit of a fun challenge. We’ll start by installing some software. I’m on a Mac, so these are the instructions for how to do it on a Mac. Apparently, it’s a lot simpler on Windows…
The first bit of software we need is called QGIS. You can download it directly from their site, but the Mac link goes off-site to a rather dodgy looking place. I’m a bit more trusting with software I can install through Homebrew, because I can see what it’s doing at each step of the way. If you are on a Mac, and you haven’t already got Homebrew, I suggest you install it. Once that’s done, you can start the QGIS installation via some Python packages:
brew install gdal
brew install python
When I tried installing
python, Homebrew told me I already had Python installed. However, thepipcommand was missing. I had to reinstallpython, usingbrew reinstall python; and then I had to re-link it, usingbrew unlink python && brew link python. After this, I had thepipcommand.
You can follow this up with:
pip install matplotlib
pip install psycopg2
brew tap osgeo/osgeo4mac
brew install qgis2
All of this works, at the time of writing. That’s no guarantee that it’ll work by the time you read this. You may have to resort to the seemly official, yet utterly dodgy-looking QGIS download site I mentioned earlier.
I learned of this process from a tutorial, about installing QGIS through Homebrew.
After all that, you should be able to run the qgis2 command…
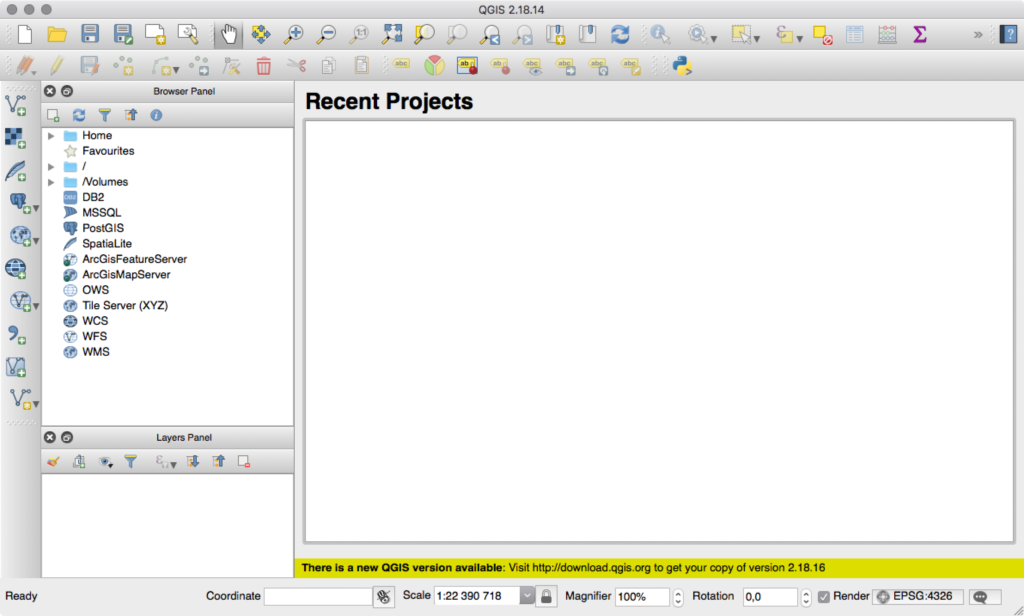
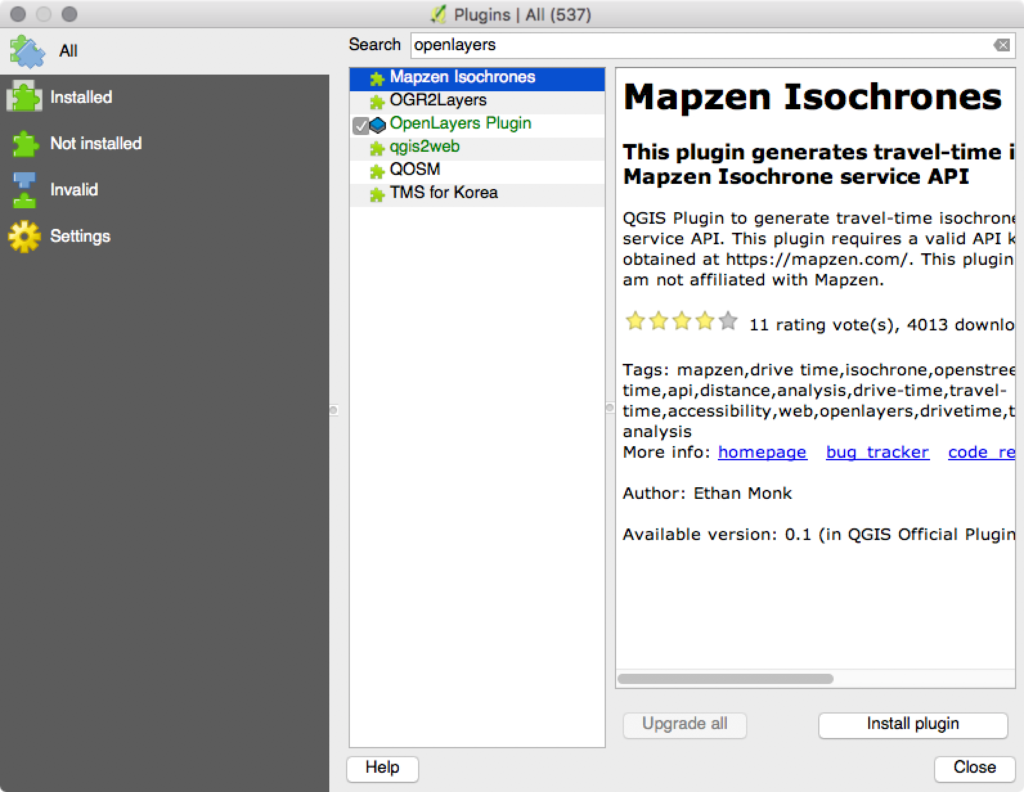
You will also need to install a few plugins. Go to Plugins → Manage and Install Plugins. Install the OpenLayers plugin and the Lat Lon Tools plugin.
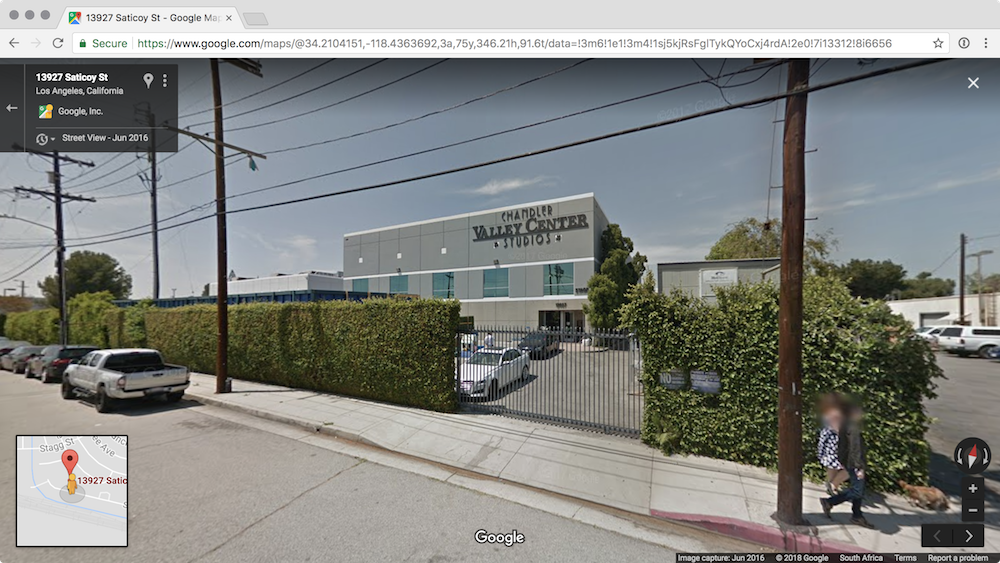
Next, we need to figure out where it is. In the show, it's said that the office is located at 1725 Slough Avenue in Scranton, PA. The actual location of the building is really at 13927 Saticoy Street in Panorama City, CA.
The easiest way to confirm a map location (if you remember how the place looks) is to search for the address in something like Google Maps, which provides a street view mode. Just to prove that the Panorama City location is the right one, I searched for that address in street view, and got this:
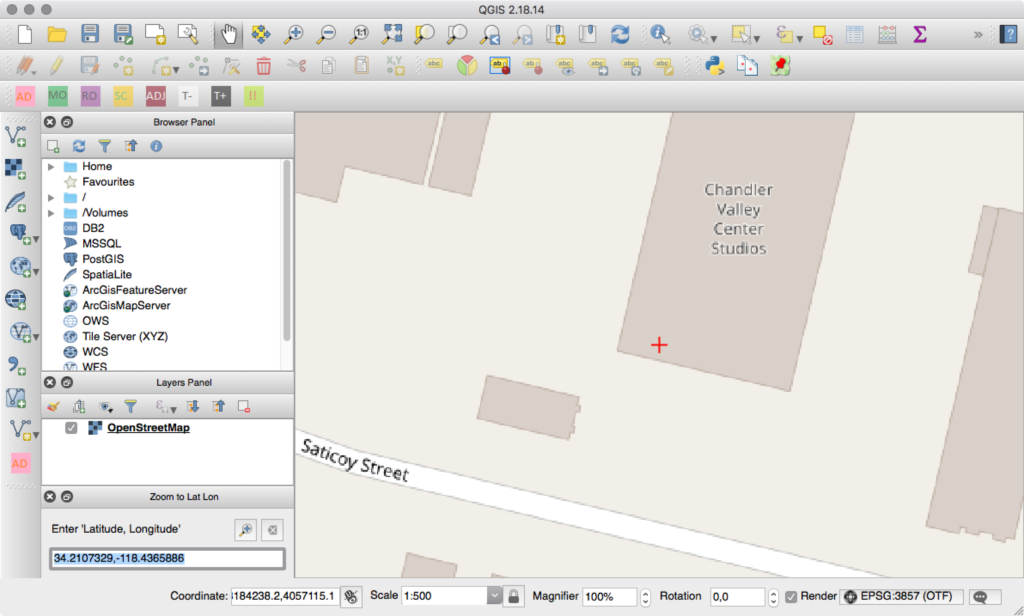
Now, it’s time to start creating the map. Add a new OpenStreetMap layer by going to Web → OpenLayers plugin → OpenStreetMap → OpenStreetMap. You should see a zoomed-out map of the world. Go to Plugins → Lat Lon Tools → Zoom To Latitude, Longitude and enter in the coordinates you want (in this case: 34.2107329,-118.4365886). You can change the scale to 1:500 for a closer look.
Next, click Raster → Georeferencer → Georeferencer. That’ll pop up a new, empty window. Click File → Open Raster to select the floor plan. “What floor plan?”, you ask. The very same you can download by searching for “The Office floor plan”.
I should mention that you’ll be asked what kind of Coordinate Reference System (CRS or SRS) you need. Select “WGS 84 / Pseudo Mercator”. I don’t really understand why, but it was the default and it seems to have worked well for me! The floor plan should then be displayed in the editor.
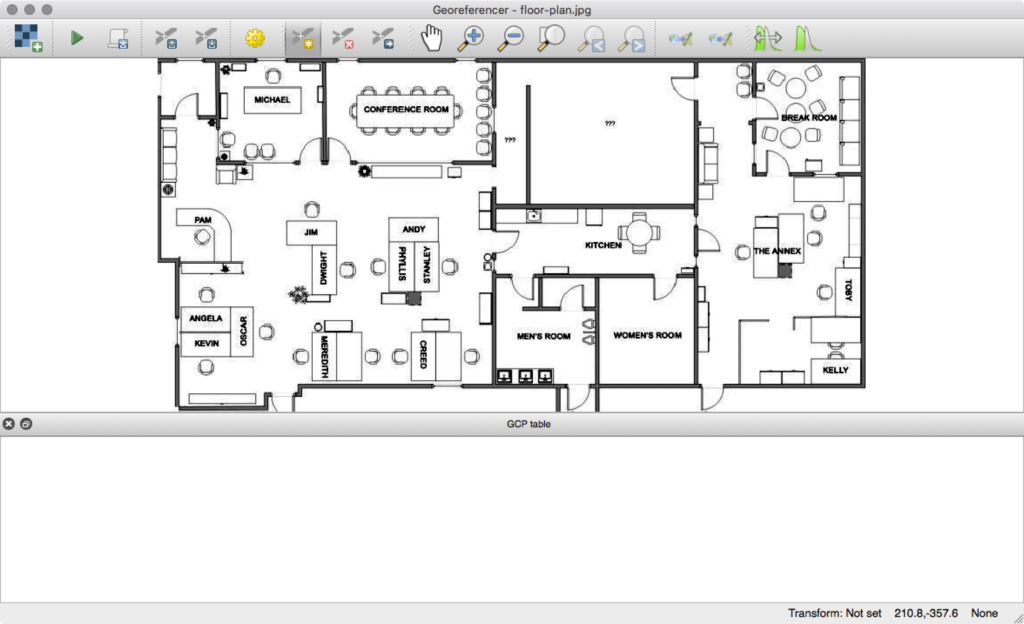
We need to link the indoor map to the outdoor map. Click Add Point (in the Georeferencer window) and click on a perimeter point (like the corner of the building). Then click From map canvas and select the corresponding point from the outdoor map.
Repeat this a few times. I know it’s probably technically not accurate to match the indoor map 1:1 with the outdoor building shape but that’s what I’ve done for now. Feel free to do the same. Try to be as accurate as possible.
When you’re happy with the points you’ve mapped, click Settings → Transformation Settings and make the settings look similar to this:
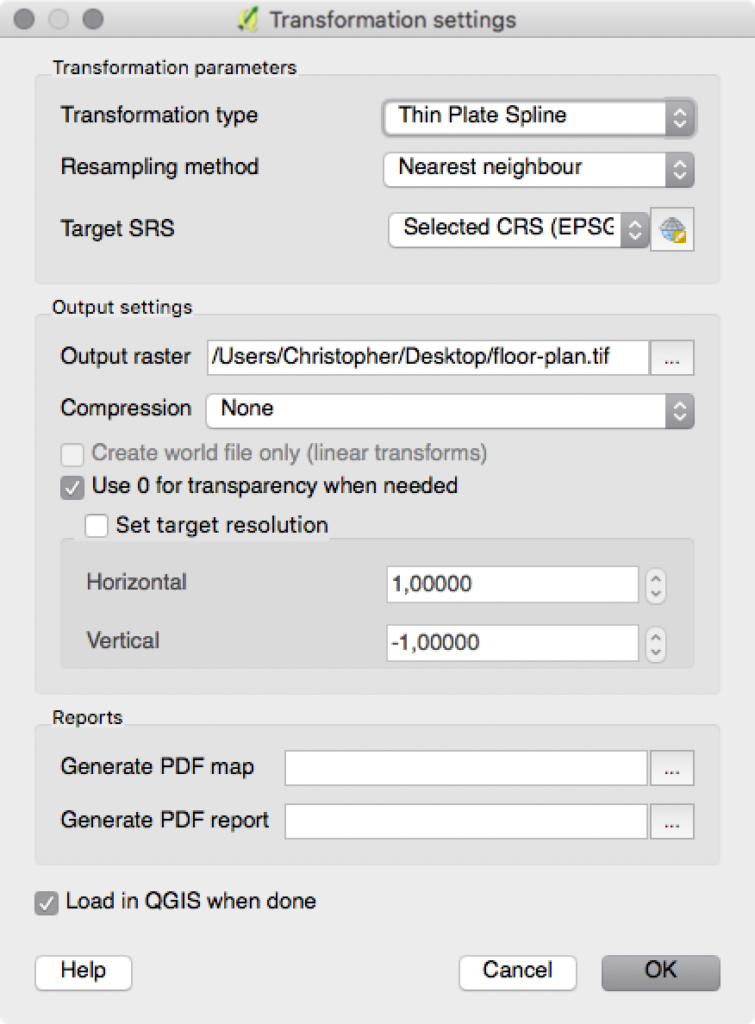
Most of that is default, but the Target SRS should be EPSG:3857. Click on. Then click the green play button (which is the Start Georeferencing button). This will take you back to the main QGIS window, except now the floor plan will overlay the outdoor map. You can right-click on the floor plan, in the layers panel, and click Properties. There, you can adjust the blend mode to something a little less jarring. I like the Lighten blend mode.
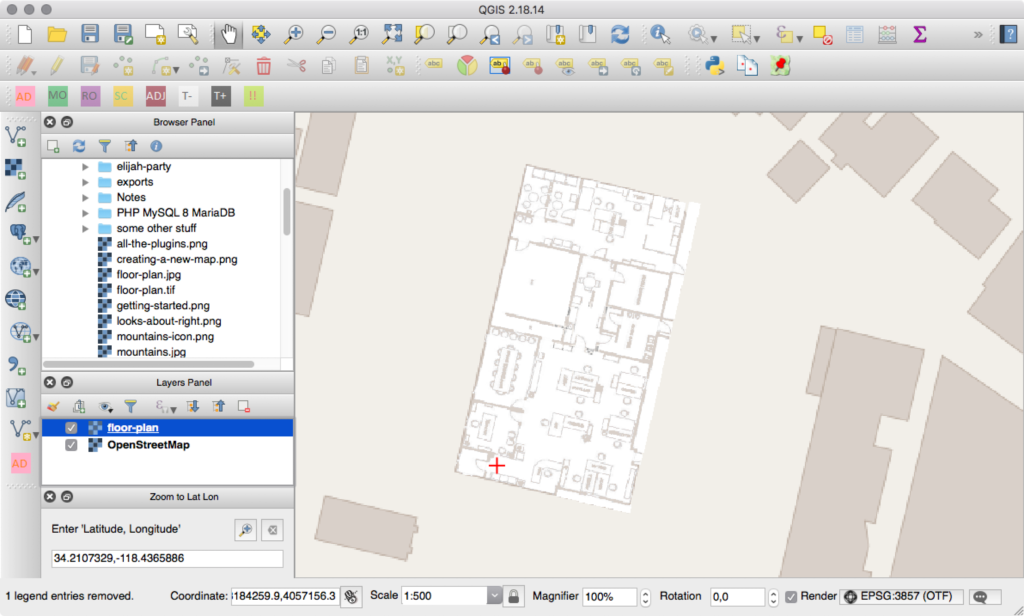
Now, we need to start drawing features on the floor plan. Click Layer → Create Layer → New Shapefile Layer. Set the Type to Polygon, pick the same SRS of EPSG:3857, and add type and name attributes to the attributes list. The defaults of “Text data” and “80” are fine. Click Ok and give the shape file a name.
When you see it in the layer panel, double-click it and set the transparency to 50% so that you can still see the map underneath. The shapes layer needs to be the top layer, so drag it if it’s not there already. Next, click the Toggle Editing button (the pencil) and then click the Add Features button (which looks like a green blog with a yellow icon over it).
Trace the boundary of the floor plan. When you’ve done that, right-click on the shape you’ve made and give it a type of building_outline. This is the boundary for how WRLD will render the indoor map. Click the Add Features button again, and begin to trace things like walls, windows, doors, and rooms. These shouldn’t overlap. When you’ve traced a segment, give it the corresponding type, like wall, window, door, or room. You can usually leave the “name” field empty, but if you specify a room name then WRLD will display it.
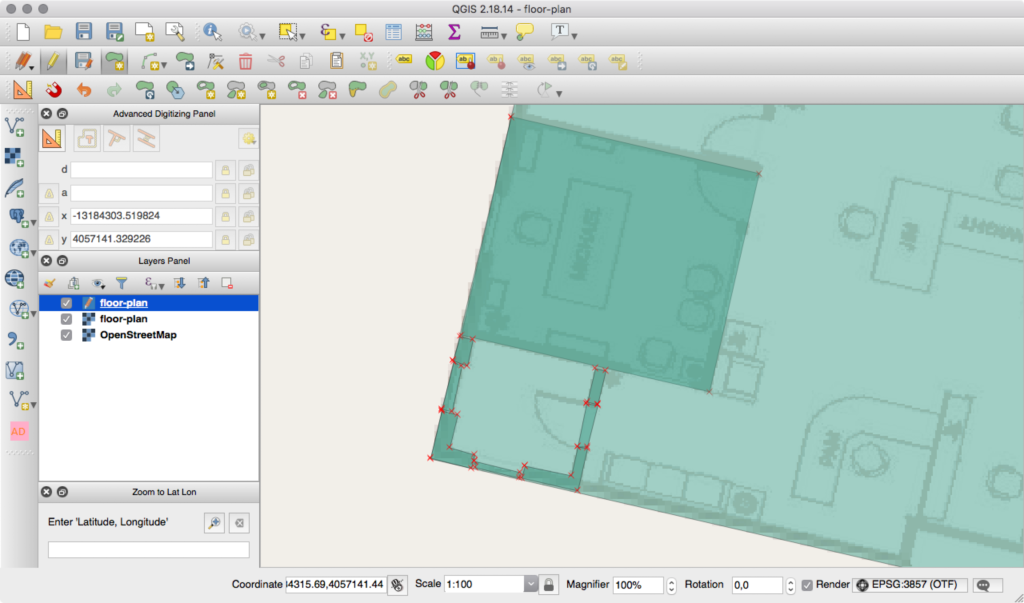
It’s a little less chaotic if you draw rooms instead of the walls, windows, and doors that make them up. There’s a full list of elements you can trace (and their types) here. Keep tracing features until you’ve got as much detail as you need.
Before we can import the map into WRLD, we need to make sure the feature IDs are unique. If you’ve been giving unique IDs then you’re all set. Otherwise, open the list of features by clicking Layer → Open Attribute Table and give each feature an ID. The order doesn’t matter.
Right-click on the shape layer and click Save As. Save the file somewhere, and open your text editor to the same folder you saved the shape layer file into. Create a new JSON file, called main.json:
{
    "id": "the-office",
    "name": "The Office",
    "owner": "Dunder Mifflin",
    "location": {
        "type": "Point",
        "coordinates": [-118.4365886, 34.2107329]
    },
    "levels": [
        {
            "id": "the-office-1",
            "name": "1",
            "readable_name": "First floor",
            "z_order": 0,
            "filename": "floor-plan.geojson"
        }
    ]
}
This is from main.js
The id field is just something for you to recognize the map by. You can put anything there. Name is the human-readable name of the map. Owner is the name of your company (or the company claiming the building on WRLD). Location is the point on the map where the indoor map lives. That array is [longitude, latitude].
Then, there’s an array of levels. You can have multiple floors per building. We’ve only designed one, so that’s the one we’ve defined in the array. Put these two files in a folder and create a ZIP file from the folder. Then, head over to https://mapdesigner.wrld3d.com/indoormap/latest and start to create a map!
Click New Indoor Map, and name it. Then, search for the appropriate building, using latitude and longitude. When you see the building you want, click on it and click Claim Buildings. Make sure you take the option to Download Floor Plan, as this'll make tracing it in QGIS easier in a moment. Next, skip to the Upload Map step and upload the ZIP file you created. It’ll take a few moments to process. Once successful, you should see a button on the map to click on. Clicking on it will take you inside the building…
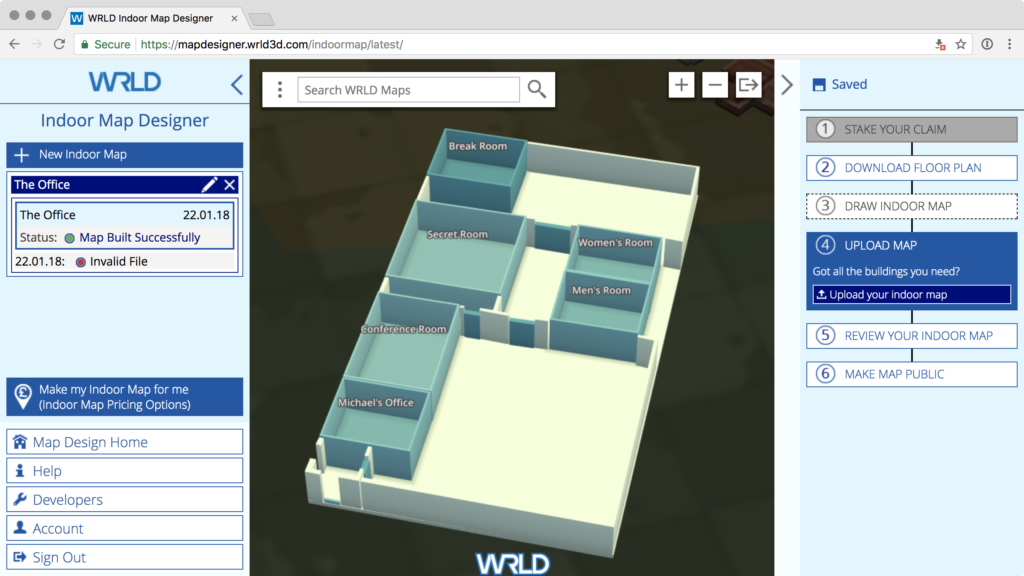
As you can see, I took a while to figure out that the location coordinates were “longitude, latitude” instead of “latitude, longitude”. When you’re happy with the indoor map, click Make map public.
There’s a longer, more detailed guide to creating these maps here. I found parts of it unhelpful, but your mileage may vary…
Interacting with Indoor Maps
It may take some time for your map to be approved. In the meantime, let’s look at how we can interact with indoor maps.
For this part of the tutorial, we’re going to work with code hosted on CodePen. The CodePens are demonstrative and best results will be achieved using the code extracts and steps in the article. If you’d like a local setup, look for details of how to set that up in the previous tutorial.
Let’s begin by creating a map and entering a pre-made building:
const map = L.Wrld.map("map", "f24b71dd92ab9e38cf4aa53806ab813d", {
    center: [56.459801, -2.977928],
    zoom: 15,
    indoorsEnabled: true,
})

map.indoors.on("indoormapenter", () => {
    map.indoors.setFloor(2)
    map.setView([56.459984, -2.978238], 20)
})

map.on("initialstreamingcomplete", () => {
    map.indoors.enter("westport_house")
})
This is from CodePen
In this example, we’re moving to the coordinates of the WRLD offices. Once the map has finished loading (via initialstreamingcomplete) then we ask the map to “go indoors”. On the indoormapenter event, we set the selected floor to 2 and zoom the map in further.
That’s going to work with the maps you’ve submitted, as well, once they’ve been approved.
We can interact with features by listening for a click event:
map.indoors.on("indoorentityclick", (event) => {
    map.indoors.clearEntityHighlights()
    map.indoors.setEntityHighlights(event.ids[0], [255, 0, 0, 128])
})
This is from CodePen
The indoorentityclick receives an event which holds the ID of the feature that we’re clicking on. We can use the clearEntityHighlights and setEntityHighlights events to toggle any custom colours on the features we want to highlight.
It’s probably time for another quote…
I saw Wedding Crashers accidentally. I bought a ticket for “Grizzly Man” and went into the wrong theater. After an hour, I figured I was in the wrong theater, but I kept waiting. Cuz that’s the thing about bear attacks… they come when you least expect it. – Dwight… again
Creating a Repeatable Highlight Pattern
Let’s try an experiment. Let’s make a “record” button that records clicks we make on the map; and then replays them all back to us. We’d need a record and play button, as well as an array of clicks…
<button id="record">record</button>
<button id="play">play</button>
This is from CodePen
Now, let’s connect to these buttons with click events:
Continue reading %How to Build an Indoor Office Map with WRLD%
by Christopher Pitt via SitePoint