Monday, February 5, 2018

Forms, File Uploads and Security with Node.js and Express

If you’re building a web application, you’re likely to encounter the need to build HTML forms on day one. They’re a big part of the web experience, and they can be complicated.

Typically the form handling process involves:

  • displaying an empty HTML form in response to an initial GET request
  • user submitting the form with data in a POST request
  • validation on both the client and the server
  • re-displaying the form populated with escaped data and error messages if invalid
  • doing something with the sanitized data on the server if it’s all valid
  • redirecting the user or showing a success message after data is processed.

Handling form data also comes with extra security considerations.

We’ll go through all of these and explain how to build them with Node.js and Express — the most popular web framework for Node. First, we’ll build a simple contact form where people can send a message and email address securely and then take a look what’s involved in processing file uploads.
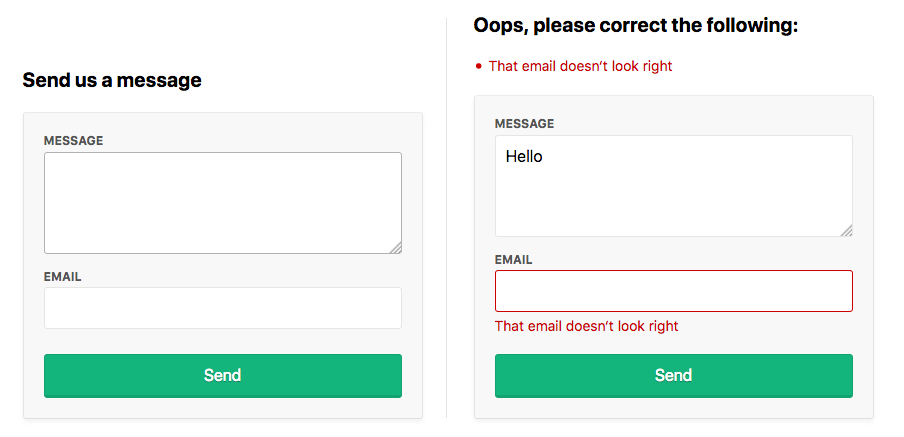
A contact form with email and message with validation errors

Setup

Make sure you’ve got a recent version of Node.js installed; node -v should return 8.9.0 or higher.

Download the starting code from here with git:

git clone https://github.com/sitepoint-editors/node-forms.git
cd node-forms
npm install
npm start

There’s not too much code in there. It’s just a bare-bones Express setup with EJS templates and error handlers:

// server.js
const path = require('path')
const express = require('express')
const layout = require('express-layout')
const routes = require('./routes')
const app = express()

app.set('views', path.join(__dirname, 'views'))
app.set('view engine', 'ejs')

const middleware = [
  layout(),
  express.static(path.join(__dirname, 'public')),
]
app.use(middleware)

app.use('/', routes)

app.use((req, res, next) => {
  res.status(404).send("Sorry can't find that!")
})

app.use((err, req, res, next) => {
  console.error(err.stack)
  res.status(500).send('Something broke!')
})

app.listen(3000, () => {
  console.log(`App running at http://localhost:3000`)
})

The root url / simply renders the index.ejs view.

// routes.js
const express = require('express')
const router = express.Router()

router.get('/', (req, res) => {
  res.render('index')
})

module.exports = router

Displaying the Form

When people make a GET request to /contact, we want to render a new view contact.ejs:

// routes.js
router.get('/contact', (req, res) => {
  res.render('contact')
})

The contact form will let them send us a message and their email address:

<!-- views/contact.ejs -->
<div class="form-header">
  <h2>Send us a message</h2>
</div>
<form method="post" action="/contact" novalidate>
  <div class="form-field">
    <label for="message">Message</label>
    <textarea class="input" id="message" name="message" rows="4" autofocus></textarea>
  </div>
  <div class="form-field">
    <label for="email">Email</label>
    <input class="input" id="email" name="email" type="email" value="" />
  </div>
  <div class="form-actions">
    <button class="btn" type="submit">Send</button>
  </div>
</form>

See what it looks like at http://localhost:3000/contact.

Form Submission

To receive POST values in Express, you first need to include the body-parser middleware, which exposes submitted form values on req.body in your route handlers. Add it to the end of the middlewares array:

// server.js
const bodyParser = require('body-parser')

const middlewares = [
  // ...
  bodyParser.urlencoded()
]

It’s a common convention for forms to POST data back to the same URL as was used in the initial GET request. Let’s do that here and handle POST /contact to process the user input.

Let’s look at the invalid submission first. If invalid, we need to pass back the submitted values to the view so they don’t need to re-enter them along with any error messages we want to display:

router.get('/contact', (req, res) => {
  res.render('contact', {
    data: {},
    errors: {}
  })
})

router.post('/contact', (req, res) => {
  res.render('contact', {
    data: req.body, // { message, email }
    errors: {
      message: {
        msg: 'A message is required'
      },
      email: {
        msg: 'That email doesn‘t look right'
      }
    }
  })
})

If there are any validation errors, we’ll do the following:

  • display the errors at the top of the form
  • set the input values to what was submitted to the server
  • display inline errors below the inputs
  • add a form-field-invalid class to the fields with errors.
<!-- views/contact.ejs -->
<div class="form-header">
  <% if (Object.keys(errors).length === 0) { %>
    <h2>Send us a message</h2>
  <% } else { %>
    <h2 class="errors-heading">Oops, please correct the following:</h2>
    <ul class="errors-list">
      <% Object.values(errors).forEach(error => { %>
        <li><%= error.msg %></li>
      <% }) %>
    </ul>
  <% } %>
</div>

<form method="post" action="/contact" novalidate>
  <div class="form-field <%= errors.message ? 'form-field-invalid' : '' %>">
    <label for="message">Message</label>
    <textarea class="input" id="message" name="message" rows="4" autofocus><%= data.message %></textarea>
    <% if (errors.message) { %>
      <div class="error"><%= errors.message.msg %></div>
    <% } %>
  </div>
  <div class="form-field <%= errors.email ? 'form-field-invalid' : '' %>">
    <label for="email">Email</label>
    <input class="input" id="email" name="email" type="email" value="<%= data.email %>" />
    <% if (errors.email) { %>
      <div class="error"><%= errors.email.msg %></div>
    <% } %>
  </div>
  <div class="form-actions">
    <button class="btn" type="submit">Send</button>
  </div>
</form>

Submit the form at http://localhost:3000/contact to see this in action. That’s everything we need on the view side.

Continue reading %Forms, File Uploads and Security with Node.js and Express%


by Mark Brown via SitePoint
How to Survive as Your Company’s Solo UXer

Landing a job as a company’s only user experience pro is an amazing opportunity. It means having the ability to shape and guide the design of an entire organisation. As a UX team of one, you’re part of a small group of pros at the coal face of an entire organisation’s design strategy.

Leading an organisation from this role is also a major challenge. It’s hard work implementing a UX focus in a company where none exists. There will be battles against corporate biases, conflicting business needs, and results-driven culture.

In such a difficult position, how can a UXer go about creating a culture of great user experience?

It’s imperative to establish a baseline process, socialise the benefits of great UX, and prepare for the long road ahead.

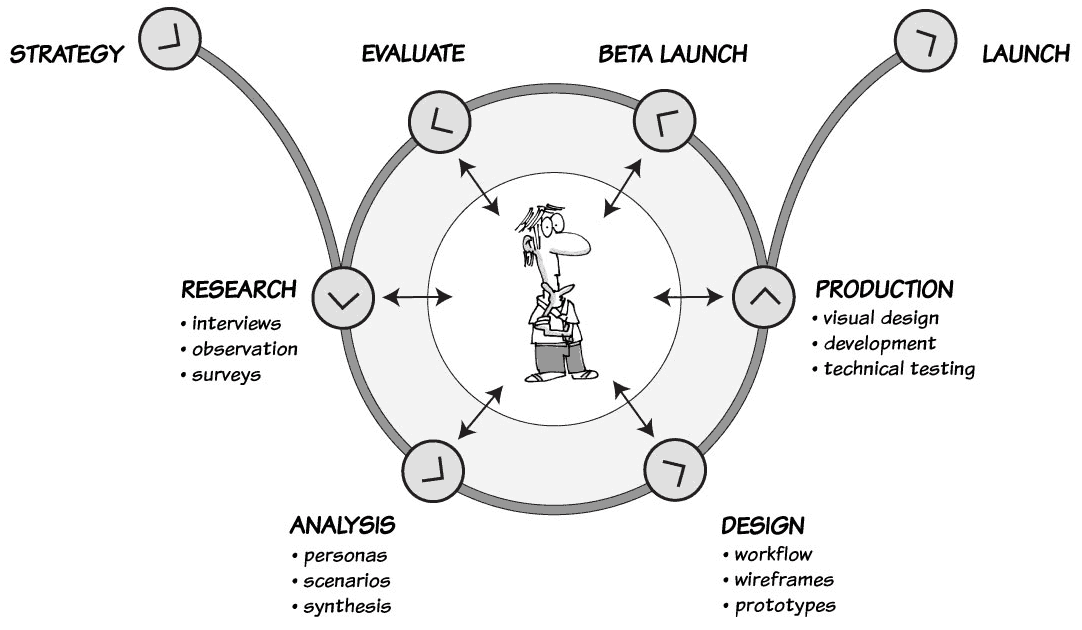
Above all else, establish a process

When starting a culture of user experience focus, the first step is to establish a clear UX process. 

UX process is a cornerstone of UX design, it’s a make-it-or-break-it aspect of UX design,” writes veteran UX professional Nick Babich in his blog for Adobe.

Without a solid UX design process, a designer could be completely moving in the dark. A clear and concise UX process, on the other hand, makes it possible to craft amazing experiences for users.”

Every UX professional should have a favoured baseline process. In fact, you’d expect this to be the first question in any UX interview. Part of any quality answer to this question should be to acknowledge the importance of context. No two companies or products are the same. Processes should differ depending on organisational needs, technology stacks, and delivery speed.

Every solo UXer needs a baseline process to tailor to your organisation.

No process is bound to be the perfect fit. An initial process’s existence is more important than its perfection. Install a process to address the largest problems and work to resolve the kinks later.

Whatever process you choose, tailor it to your organisation’s needs. This will help you with the second facet of gaining UX buy-in: socialising UX benefits among stakeholders.

Socialise the benefits of UX among stakeholders

In his Forbes piece Good UX is Good Business, Andrew Kucheriavy, founder and CEO Intechnic, lays out the argument for the business benefits of an improved focus on user experience.

“Good user experience is clearly good for business,” he writes. “ Studies show that companies that invest in UX see a lower cost of customer acquisition, lower support cost, increased customer retention and increased market share.”

While the benefits are clear, you must be able to explain why the UX process is beneficial to your stakeholders. 

UX success hinges on the cooperation and participation of the business as a whole. While you are the engine propelling the car, the whole machine must move forward together. It’s often difficult for internal stakeholders to see the progress and impact of UX focus. By clearly explaining the benefits, you’ll bring your company one step closer to fully embracing a culture of great user experience.

I’ve written previously on how big of a part UX professionals play in facilitating internal communication. We sit at the epicentre of our business. We speak with our business partners to understand project requirements. We work with our technical teams to understand what’s viable, and to support development efforts. We talk with customers to understand their wants, needs, and expectations. An established process allows UX pros to speak about the project pipeline and its direct impact to any stakeholder.

If we are successful as UX professionals, the benefits we add to our organisations should be clear. Our business partners should have a better understanding of our customers’ needs through UX testing. Our technical teams will receive projects that are both practical and well-defined through iteration and revision with our business partners. And, most importantly, our customers receive a product that exceeds their expectations.

Be aggressive in explaining your expected benefits. Take advantage of your team’s rituals and culture to discuss your roll and how your process will benefit specific projects and initiatives. This gives UX pros excellent opportunities to speak on how and why our process benefits the company as a whole, and gain allies in promoting usability throughout the company.

Cindy McCracken, a UX professional with more than 10 years of experience working for the likes of Fidelity Investments, agrees.

The more you work with co-workers such as support, sales and development and show them the value of UX, the more support you will have within the organisation,” she writes in her article Proven Strategies to Win Over Stakeholders for Your UX Project. “These in-the-trenches supporters will see the value of your work and the successes with customers first hand, and that will go a long way toward impacting workplace culture and filtering up to senior level support of UX.”

There are a few ways UX professionals can quickly integrate themselves into the rhythms of the business.

Attend development standups. Listen for blockers and speak about how your UX process will ease these issues in the future. Pay attention for upcoming work, and ask for inclusion where practical. 

“In planning meetings, be alert for extensive development work planned to go work with interfaces that clearly need to be redesigned,” writes McCracken. “Rather than just let them proceed, bring potential design problems and ideas for improvements to the team.”

Set meetings with your business partners. Work to understand their underlying problems. Explain UX’s role in fixing those issues. Find the low hanging fruit to get some quick wins on the board. 

Take part in retrospectives. Retrospectives are a great platform to show the type of value you can provide for your new team. 

Listen for issues on previous releases. Present your UX process after discussing these issues. Prepare to speak on your process, and how that will affect any issues raised. After your first couple of releases, plan on asking for feedback to adjust your basic process.

Get in front of your customers. Some would argue that it’s not UX unless you’re getting in touch with your users. This is where great UX starts and ends. Working with your clients shows your engaged in their needs. It allows you to talk about projects that are in development. And it allows you to understand wants, needs, and pain points. We take all this back to our business partners to help create a better product.

According to McCracken, a great way to do this early in the game is to test early iterations of projects with your clients.

“[Use] an online first-click test to see if participants go where you expect when asked to perform tasks,” She writes. “You can even ask what people notice first on a page. Better yet, run one study with an image of your current design, and one with an image of the new design to see how user performance compares. If you have a clear winner, it should be easy to get buy-in to improve conversions, which would be a great return on investment.

Prepare for the long road ahead

The road to establishing UX as a team of one can be difficult and lonely at times. Larger teams, for starters, can divide and conquer work.

A team of one, however, does not have that luxury.

When you’re a solo UXer, watch out for the trap of overextension. Photo by Mia Baker on Unsplash.

As solo teams, it’s important to take some steps to avoid over-extension. With no one to pick up the slack, whiffing on an objective or project can have major consequences. What’s more, the stress of working alone can be intimidating. 

So how can you make life as a solo UXer easier on yourself?

Work with your higher-ups to set reasonable goals and benchmarks. Talk about when you’d like to have processes installed and how you’d like to go about its implementation. Make sure that everyone is clear on mutual expectations and goals. Review your progress and blockers regularly. 

Engage with the larger UX community. One mind rarely surprises itself. In larger teams, UXers have comrades to give feedback. In solo teams, isolation can inhibit creative solutions and stunt professional development. Go to UX meetups. Follow industry leaders on Twitter. Start a blog. Ask and answer questions on Stack Overflow. Join an online UX group like the wonderful UXMastery Community. Whatever you do, get involved with the UX world as a whole in some way. Your conscious and career will thank you.

Conclusion

Working as the solitary UX professional in your organisation is not an easy job, but it can be tremendously rewarding.

In Leah Buley’s The User Experience Team of One: A Research and Survival Guide, she makes the best case I’ve yet seen for the allure of working as a UX team of one. The team of one’s work is as close as one can get to the fundamental values of the UX community as a whole.

“UX is a force for good,” she writes. “[As a team of one,] you help spread the growth of a new and exciting field, one person, team, and company at a time.”

What do you think are the greatest challenges for the solo UXer? Share your thoughts in the comments, or join the conversation in our friendly forums.

The post How to Survive as Your Company’s Solo UXer appeared first on UX Mastery.


by Doug Collins via UX Mastery

Web Design Weekly #306

Headlines

Sketching in the Browser

Mark Dalgleish shares some great insight into the search for the perfect design system. If you happen to be struggling in finding a good workflow within your team, make sure you read this. (medium.com)

Hard and Soft Skills in Tech (newco.co)

Sponsor Web Design Weekly and reach over 27,636 passionate designers and developers

Articles

A Field Guide for Better Build Performance

If you use Webpack and are having a few issues with build performance this article by Rowan Oulton explains what the Slack engineering team learnt during some recent optimisations. (slack.engineering)

CSS Paint API

The CSS Paint API (also known as “CSS Custom Paint” or “Houdini’s paint worklet”) is about to be enabled by default in Chrome Stable. What is it? What can you do with it? And how does it work? Das Surma explains. (google.com)

Where Style Guides Fit Into Process

Chris Coyier shares a few thoughts about the different approaches you can take when integrating a style guide into your project. (css-tricks.com)

The Mosaic web browser just turned 25 years old (zdnet.com)

Tools / Resources

Stimulus 1.0

Stimulus is a JavaScript framework with modest ambitions. It doesn’t seek to take over your entire front-end—in fact, it’s not concerned with rendering HTML at all. Instead, it’s designed to augment your HTML with just enough behavior to make it shine. (signalvnoise.com)

Gain new skills to boost your career – Learn CSS with Treehouse

Add to your creative tool box. You can push pixels, but can you build a responsive web design? Start your path to becoming a front-end web developer, or brush up on your skills with our CSS course. We’ll walk through everything you need to know to build web pages. Claim your free trial. (teamtreehouse.com)

Outline

Outline is a wiki and knowledge base built for growing teams. Oh yeah and it is open source. (getoutline.com)

Purgecss

A tool to remove unused CSS. It can be used as part of your development workflow. Purgecss comes with a JavaScript API, a CLI and plugins for popular build tools. (purgecss.com)

Jest WebDriver Integration – Connect Jest tests to Selenium WebDriver. (github.com)

An “Awesome” list of code review resources – articles, papers, tools, etc (github.com)

Glow – Pretty-printed, code highlighted type errors (github.com)

Track the changes you make in Chrome’s developer tools (mikerogers.io)

Greenlet – move an async function into its own thread (github.com)

Inspiration

Designing beautiful mobile apps from scratch (freecodecamp.org)

Syntax Snack Pack – Episode 30 (syntax.fm)

Jobs

Senior Node/React Developer at Humanitix

Looking to work on an amazing platform that has a purpose? Come help disrupt the events industry! Are you a passionate developer who has delivered amazing projects using Node and/or React? then this is great opportunity to work with a fun team on an important problem. (humanitix.com)

Front-End Developer at Gravity Works

Love semantic HTML, powerful CSS, and elegant JavaScript? Gravity Works is looking for a front-end developer to join our team. If you have a stellar web portfolio, are excited to learn new technologies, and thrive in a fast-paced environment, let us know. (gravityworksdesign.com)

Need to find passionate developers or designers? Why not advertise in the next newsletter

Last but not least…

I Turned Slack Off for a Week. Here’s What Happened. (buffer.com)

The post Web Design Weekly #306 appeared first on Web Design Weekly.


by Jake Bresnehan via Web Design Weekly

VanillaMasker – Pure Javascript Input Masker

VanillaMasker is a simple and pure javascript library to mask your input elements. It's a cross-browser and cross-device library.


by via jQuery-Plugins.net RSS Feed

Local Authentication Using Passport in Node.js

In Passport Authentication for Node.js Applications, we talked about authentication using Passport as it relates to social login (Google, Facebook, GitHub, etc.). In this article, we’ll see how we can use Passport for local authentication with a MongoDB back end.

All of the code from this article is available for download on GitHub.

Prerequisites

  • Node.js — Download and install Node.js.
  • MongoDB — Download and install MongoDB Community Server. Follow the instructions for your OS. Note, if you’re using Ubuntu, this guide can help you get Mongo up and running.

Creating the Project

Once all of the prerequisite software is set up, we can get started.

We’ll begin by creating the folder for our app and then accessing that folder on the terminal:

mkdir AuthApp
cd AuthApp

To create the node app, we’ll use the following command:

npm init

You’ll be prompted to provide some information for Node’s package.json. Just hit enter until the end to leave the default configuration.

HTML

Next, we’ll need a form with username and password inputs as well as a Submit button. Let’s do that! Create a file called auth.html in the root folder of your app, with the following contents:

<html>
  <body>
    <form action="/" method="post">
      <div>
        <label>Username:</label>
        <input type="text" name="username" />
        <br/>
      </div>
      <div>
        <label>Password:</label>
        <input type="password" name="password" />
      </div>
      <div>
        <input type="submit" value="Submit" />
      </div>
    </form>
  </body>
</html>

That will do just fine.

Setting up Express

Now we need to install Express, of course. Go to the terminal and write this command:

npm install express --save

We’ll also need to install the body-parser middleware which is used to parse the request body that Passport uses to authenticate the user.

Let’s do that. Run the following command:

npm install body-parser --save

When that’s done, create a file index.js in the root folder of your app and add the following content to it:

/*  EXPRESS SETUP  */

const express = require('express');
const app = express();

const bodyParser = require('body-parser');
app.use(bodyParser.urlencoded({ extended: true }));

app.get('/', (req, res) => res.sendFile('auth.html', { root : __dirname}));

const port = process.env.PORT || 3000;
app.listen(port , () => console.log('App listening on port ' + port));

We’re doing almost the same as in the previous tutorial. First we require Express and create our Express app by calling [express()](http://expressjs.com/en/api.html#express). The next line is the only difference with our previous Express setup. We’ll need the body-parser middleware this time, in order for authentication to work correctly. Then we declare the route for the home page of our app. There we send the HTML file we created to the client accessing that route. Then, we use process.env.PORT to set the port to the environment port variable if it exists. Otherwise, we’ll default to 3000, which is the port we’ll be using locally. This gives you enough flexibility to switch from development, directly to a production environment where the port might be set by a service provider like, for instance, Heroku. Right below we called [app.listen()](http://expressjs.com/en/api.html#app.listen) with the port variable we set up and a simple log to let us know that it’s all working fine and on which port is the app listening.

That’s all for the Express setup. Now we have to set up Passport, exactly as we did the last time. I’ll show you how to do that in case you didn’t read the previous tutorial.

Setting up Passport

First, we install passport with the following command:

npm install passport --save

Then, add the following lines at the bottom of your index.js file:

/*  PASSPORT SETUP  */

const passport = require('passport');
app.use(passport.initialize());
app.use(passport.session());

app.get('/success', (req, res) => res.send("Welcome "+req.query.username+"!!"));
app.get('/error', (req, res) => res.send("error logging in"));

passport.serializeUser(function(user, cb) {
  cb(null, user.id);
});

passport.deserializeUser(function(id, cb) {
  User.findById(id, function(err, user) {
    cb(err, user);
  });
});

Here, we require passport and initialize it along with its session authentication middleware, directly inside our Express app. Then, we set up the '/success' and '/error' routes which will render a message telling us how the authentication went. If it succeeds, we’re going to show the username parameter, which we’ll pass to the request. We’re using the same syntax for our last route, only this time instead of using [res.SendFile()](http://expressjs.com/en/api.html#res.sendFile) we’re using [res.send()](http://expressjs.com/en/api.html#res.send), which will render the given string as text/html on the browser. Then we’re using serializeUser and deserializeUser callbacks. The first one will be invoked on authentication, and its job is to serialize the user instance with the information we pass to it (the user ID in this case) and store it in the session via a cookie. The second one will be invoked every subsequent request to deserialize the instance, providing it the unique cookie identifier as a “credential”. You can read more about that in the Passprot documentation.

As a side note, this very simple sample app of ours will work just fine without deserializeUser, but it kills the purpose of keeping a session, which is by all means something you’ll need in every app that requires login.

Continue reading %Local Authentication Using Passport in Node.js%


by Paul Orac via SitePoint

Google AMP & WordPress: Everything You Need to Know

This article was created in partnership with Elevation Marketing. Thank you for supporting the partners who make SitePoint possible.

Just about a year ago, Google introduced a technology that rocked mobile SEO called AMP.

If you’re unfamiliar with the term, AMP stands for Accelerated Mobile Project. With AMP technology, Google wants to drive faster mobile page loading, especially for those users still stuck on 3G speeds. Google uses AMP to ensure that they’re still able to view the content they’re searching for as fast as possible.

Why AMP Matters

Naturally, when Google releases updates like this, the end goal is to ensure that the maximum number of websites possible are using the technology. Otherwise it would be a waste to spend millions in research and development to develop the overall functionality.

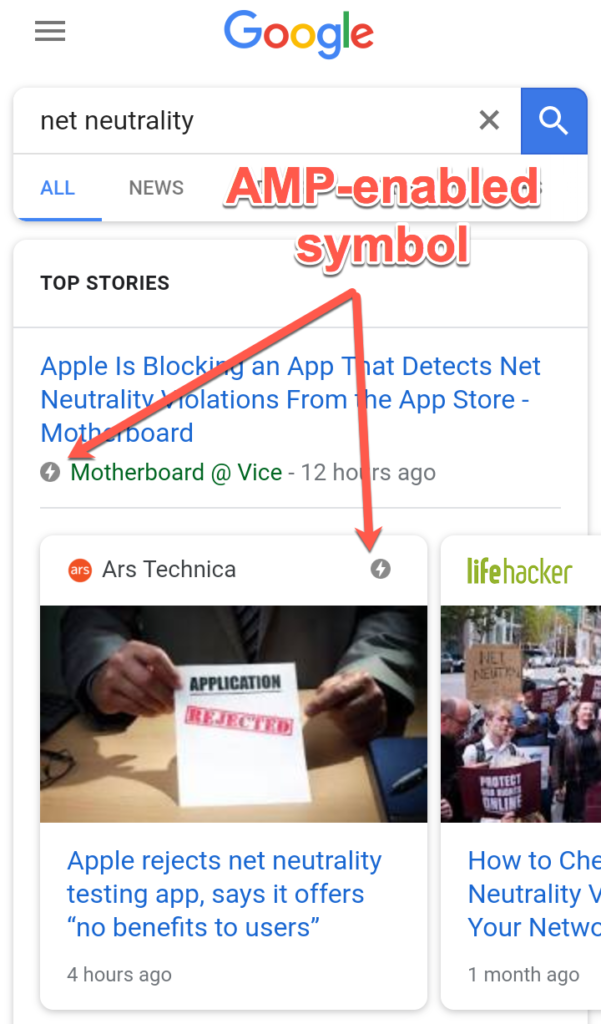
The way Google encourages AMP use is by reserving premium real estate in the search results for AMP-enabled websites — particularly for any searches related to news or blog-type pieces. Take a look at the screenshots below as an example:

As you can see in the screenshot, these card-like results are all AMP-enabled sites. Your site will not show up in this section of the results unless it is AMP optimized. If you’re trying to rank for any keywords where these card snippets are used in the SERPs, you’re missing out if you don’t use AMP. The cards are given premium real estate in the mobile internet world.

Even for those searches that don’t use AMP-optimized card snippets, whether or not you’re using accelerated mobile pages is still a factor. In fact, the lightning AMP symbol pointed out in the screenshot above will still appear next to the links.

Does AMP Affect Search Engine Optimization?

AMP’s effect on SEO strategy is still unclear. At the Search Engine Journal Summit in mid-2016, Gary Illyes, who holds the title of Webmaster Trends Analyst at Google, announced that "currently, AMP is not a ranking signal."

Of course, given Google’s constant evolution of their search algorithm and Gary’s use of the word "currently," it’s hard to bank on the idea that Google hasn’t yet incorporated it into the search algorithm. When you consider that a significant percentage of the websites that make it to the first page of results are AMP enabled, you have to wonder about the strong correlation.

However, even if AMP isn’t a ranking signal, it’s still a signal to users who search on mobile. When they see that little lightning icon next to your link, they recognize that the page will load near-instantaneously, and may decide to head to your website rather than clicking on a higher-ranking link that doesn’t use AMP.

So regardless of whether or not AMP affects SEO, it will still net you a positive effect in the SERPs.

How to Add Google AMP to Your WordPress Website

With WordPress websites, setting up support for Google AMP is a smooth and easy process. There’s virtually zero backend work or coding that you have to do on your own. The process is in fact so easy that the balance vs. results is too far in your favor for you to ignore.

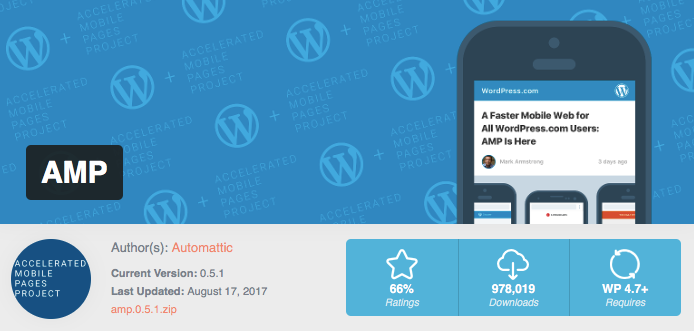
Automattic, the team behind WordPress, has developed a plugin for this process named simply AMP.

However, this plugin has received poor ratings for errant functionality and frequent issues, despite having come from the big boss of WordPress. Instead, most marketing professionals, myself included, would recommend AMP for WP. It was created by an independent developer, but is far more popular with its users and has received much better ratings.

Continue reading %Google AMP & WordPress: Everything You Need to Know%


by Ryan Gould via SitePoint

Passport Authentication for Node.js Applications

In this tutorial, we'll be implementing authentication via Facebook and GitHub in a Node.js web application. For this, we'll be using Passport, an authentication middleware for Node.js. Passport supports authentication with OpenId/OAuth providers.

Express Web App

Before getting started, make sure you have Node.js installed on your machine.

We'll begin by creating the folder for our app and then accessing that folder on the terminal:

mkdir AuthApp
cd AuthApp

To create the node app we'll use the following command:

npm init

You'll be prompted to provide some information for Node's package.json. Just hit enter until the end to leave the default configuration.

Next, we'll need an HTML file to send to the client. Create a file called auth.html in the root folder of your app, with the following contents:

&lt;html&gt;
  &lt;head&gt;
    &lt;title&gt;Node.js OAuth&lt;/title&gt;
  &lt;/head&gt;
  &lt;body&gt;
    &lt;a href=auth/facebook&gt;Sign in with Facebook&lt;/a&gt;
    &lt;br&gt;&lt;/br&gt;
    &lt;a href=auth/github&gt;Sign in with Github&lt;/a&gt;
  &lt;/body&gt;
&lt;/html&gt;

That's all the HTML we'll need for this tutorial.

You’ll also require Express, a framework for building web apps that’s inspired by Ruby's Sinatra. In order to install Express, from the terminal type the following command:

npm install express --save

Once you’ve done that, it's time to write some code.

Create a file index.js in the root folder of your app and add the following content to it:

/*  EXPRESS SETUP  */

const express = require('express');
const app = express();

app.get('/', (req, res) =&gt; res.sendFile('auth.html', { root : __dirname}));

const port = process.env.PORT || 3000;
app.listen(port , () =&gt; console.log('App listening on port ' + port));

In the code above, we require Express and create our Express app by calling express(). Then we declare the route for the home page of our app. There we send the HTML file we’ve created to the client accessing that route. Then, we use process.env.PORT to set the port to the environment port variable if it exists. Otherwise, we'll default to 3000, which is the port we'll be using locally. This gives you enough flexibility to switch from development, directly to a production environment where the port might be set by a service provider like, for instance, Heroku. Right below, we call app.listen() with the port variable we set up, and a simple log to let us know that it's all working fine, and on which port is the app listening.

Now we should start our app to make sure all is working correctly. Simply write the following command on the terminal:

node index.js

You should see the message: App listening on port 3000. If that’s not the case, you probably missed a step. Go back and try again.

Moving on, let's see if our page is being served to the client. Go to your web browser and navigate to http://localhost:3000.

If you can see the page we created in auth.html, we're good to go.

Head back to the terminal and stop the app with ctrl + c. So remember, when I say start the app, you write node index.js, and when I say stop the app, you do ctrl + c. Clear? Good, you've just been programmed :-)

Setting up Passport

As you'll soon come to realize, Passport makes it a breeze to provide authentication for our users. Let's install Passport with the following command:

npm install passport --save

Now we have to set up Passport. Add the following code at the bottom of the index.js file:

/*  PASSPORT SETUP  */

const passport = require('passport');
app.use(passport.initialize());
app.use(passport.session());

app.get('/success', (req, res) =&gt; res.send("You have successfully logged in"));
app.get('/error', (req, res) =&gt; res.send("error logging in"));

passport.serializeUser(function(user, cb) {
  cb(null, user);
});

passport.deserializeUser(function(obj, cb) {
  cb(null, obj);
});

Here we require Passport and initialize it along with its session authentication middleware, directly inside our Express app. Then, we set up the '/success' and '/error' routes, which will render a message telling us how the authentication went. It’s the same syntax for our last route, only this time instead of using [res.SendFile()](http://expressjs.com/en/api.html#res.sendFile) we're using [res.send()](http://expressjs.com/en/api.html#res.send), which will render the given string as text/html in the browser. Then we're using serializeUser and deserializeUser callbacks. The first one will be invoked on authentication and its job is to serialize the user instance and store it in the session via a cookie. The second one will be invoked every subsequent request to deserialize the instance, providing it the unique cookie identifier as a “credential”. You can read more about that in the Passport documentation.

As a side note, this very simple sample app of ours will work just fine without deserializeUser, but it kills the purpose of keeping a session, which is something you'll need in every app that requires login.

That's all for the actual Passport setup. Now we can finally get onto business.

Continue reading %Passport Authentication for Node.js Applications%


by Paul Orac via SitePoint