
by via Awwwards - Sites of the day
"Mr Branding" is a blog based on RSS for everything related to website branding and website design, it collects its posts from many sites in order to facilitate the updating to the latest technology.
To suggest any source, please contact me: Taha.baba@consultant.com

Simple button checks is a simple plugin for transform checkbox inputs into html buttons for css customize. High performance, keyboard support and preserve original input click/change events.
The post Simple Button Checks with jQuery appeared first on Best jQuery.
Amazing animated color bars parallax effect on black & white image while page scrolling.In parallaxColorBars you can now add settings using the data-parallax-color-bar attribute. You still need to call $(element).parallaxColorBars() to initialize parallaxColorBars on the element.
The post Parallax Color Bars with JavaScript appeared first on Best jQuery.
Once upon a time, having an online business was about just having a website. But now, online businesses are growing larger, moving faster, and becoming more complex by the day. What was once a way to say “this is who we are and this is what we do”, is now an opportunity for a variety of different business models — subscriptions, services, products and so on.
In order to attain these conversions, you need to be using the right tools for your business — tools that allow you identify where your website is falling short in terms of UX, and then correct it with a viable solution. Heatmap and A/B testing tools are essential for this, and they help you to understand your users, scale your business, and make UX better.
Heatmaps tell a story about your website. A heatmap will track the activity of the users on your site much like Google Analytics will, but its focus will be on the movement of your visitors through their mouse clicks and scroll activity via screen recording. Where Google Analytics can tell you what’s happening, heatmaps can show you why.
A/B testing tools allow you to try out different variations of your website (or even individual elements), to see which converts best. While heatmaps can identify where and why users are getting confused, A/B testing can then help you play with some solutions. That’s why having both of these features in a single app is a winning idea. Enter Crazy Egg.
Once you’ve created your Crazy Egg account, head here to acquire your tracking code. This tracking code records your users’ activity, and represents this data with analytics, heatmaps and screen recordings. The JavaScript snippet that Crazy Egg creates for you needs to be inserted into the <head> section of your websites’ code. After that, we can read the data.
Crazy Egg creates three different types of heatmaps.
You can find these maps by clicking on Snapshots from the sidebar.
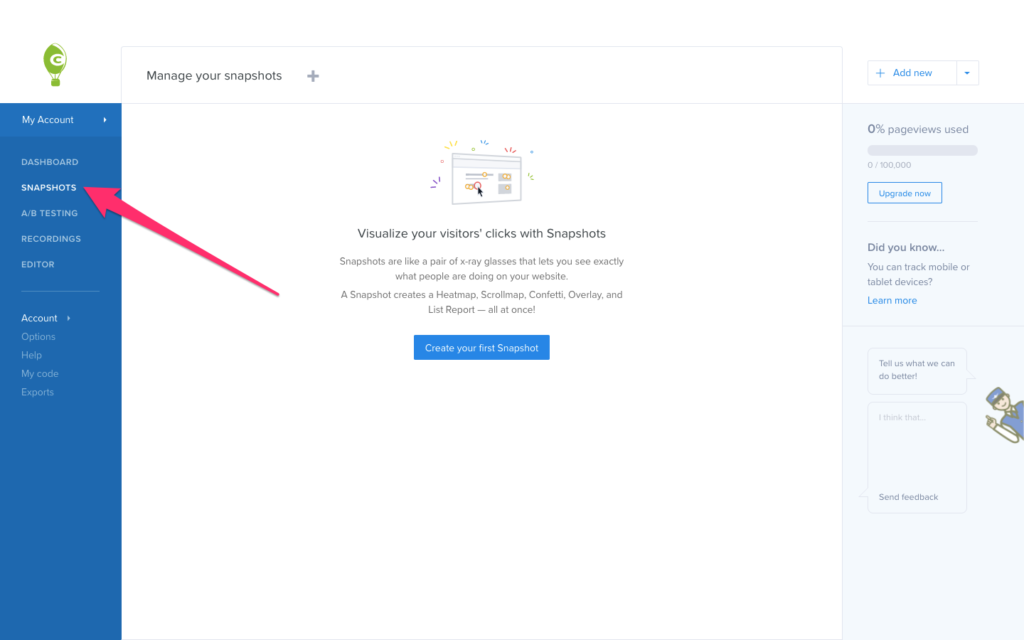
Clickmaps are the kind of heatmap that will show you which areas of a web page are being clicked. This could indicate an issue with your CTA, which obviously isn’t desirable, but it also indicates areas of your UI (such as categories) that users are interested in, much to your surprise.
Consider this scenario as well: a user is trying to click on an image (let’s assume that it’s a product photo), expecting it to zoom in/expand. From this behavior, you can then decide to implement image-zooming.
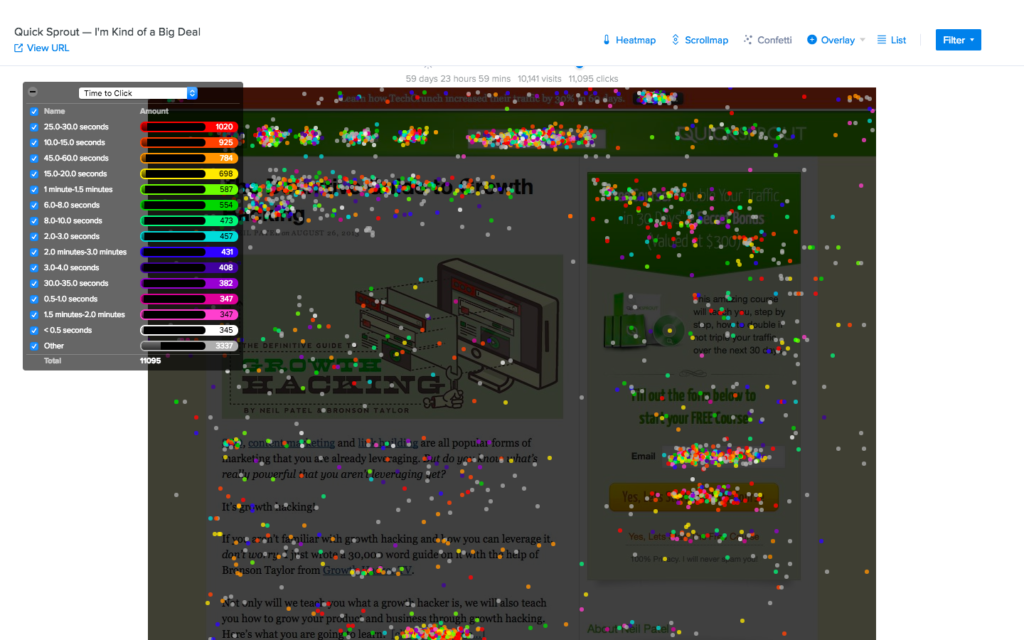
You can pair these clicks with metrics such as Time to Click.
Hovermaps, better known as heatmaps, identify those areas of the screen that users hover over the most with their actual cursor. Heatmaps will help you to understand which areas users find the most interesting, highlighting what the user intent was, even if they didn’t click in that area.
For example, let’s say that users are hovering over your navigation and expecting a third level (e.g. Mens → Smart → Shirts, where Shirts is the level that’s missing), but they aren’t clicking since your navigation only has two levels. You can then make changes based on this information.
You might also find that users are navigating between two pricing models, indicating that a cost "somewhere in the middle" might be more suitable.

Scrollmaps will show you how far your visitors are scrolling on a web page, and in which sections they’re spending most of their time.
Scrollmaps will display this with Popularity and Impressions. This could help you to fine-tune your catalog on your ecommerce site, or rearrange the sections on your landing page, based on what sections the user is scrolling to. It could be that the most valuable content is sunk at the bottom, while the above-the-fold content isn’t getting as much attention as you originally thought. The "hot" sections will be warmer (red/orange), while the less important sections will be colder (blue/green). Generally speaking, you don’t want to make the user scroll to find your best content!

Can you zoom in to specific users? Yes.
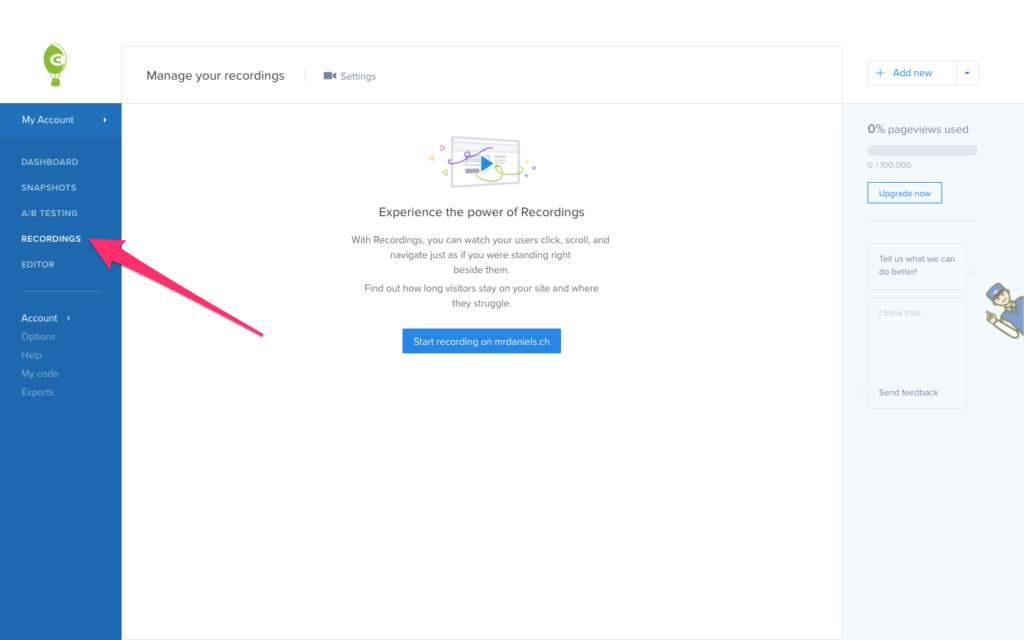
Once the tracking code has been live for 30 minutes, and assuming that you’ve had website visitors in that time, navigate to Recordings from the sidebar to see every recorded version of your users’ behavior on the site. From there you can see a specific user’s Confetti, heatmap and scrollmap. Crazy Egg will record the session of every user by default.
The post How to Analyze Heatmaps and Create A/B Tests with Crazy Egg appeared first on SitePoint.
ES6 introduced classes to JavaScript, but they’re too simplistic for complex applications. Class fields (also referred to as class properties) aim to deliver simpler constructors with private and static members. The proposal is currently at TC39 stage 3: candidate and could appear in ES2019 (ES10).
A quick recap of ES6 classes is useful before we examine class fields in more detail.
JavaScript’s prototypal inheritance model can appear confusing to developers with an understanding of the classical inheritance used in languages such as C++, C#, Java and PHP. JavaScript classes are primarily syntactical sugar, but they offer more familiar object-oriented programming concepts.
A class is a template which defines how objects of that type behave. The following Animal class defines generic animals (classes are normally denoted with an initial capital to distinguish them from objects and other types):
class Animal {

  constructor(name = 'anonymous', legs = 4, noise = 'nothing') {

    this.type = 'animal';
    this.name = name;
    this.legs = legs;
    this.noise = noise;

  }

  speak() {
    console.log(`${this.name} says "${this.noise}"`);
  }

  walk() {
    console.log(`${this.name} walks on ${this.legs} legs`);
  }

}
Class declarations execute in strict mode; there’s no need to add 'use strict'.
A constructor method is run when an object of this type is created, and it typically defines initial properties. speak() and walk() are methods which add further functionality.
An object can now be created from this class with the new keyword:
const rex = new Animal('Rex', 4, 'woof');
rex.speak();          // Rex says "woof"
rex.noise = 'growl';
rex.speak();          // Rex says "growl"
Setters are special methods used to define values only. Similarly, Getters are special methods used to return a value only. For example:
class Animal {

  constructor(name = 'anonymous', legs = 4, noise = 'nothing') {

    this.type = 'animal';
    this.name = name;
    this.legs = legs;
    this.noise = noise;

  }

  speak() {
    console.log(`${this.name} says "${this.noise}"`);
  }

  walk() {
    console.log(`${this.name} walks on ${this.legs} legs`);
  }

  // setter
  set eats(food) {
    this.food = food;
  }

  // getter
  get dinner() {
    return `${this.name} eats ${this.food || 'nothing'} for dinner.`;
  }

}


const rex = new Animal('Rex', 4, 'woof');
rex.eats = 'anything';
console.log( rex.dinner );  // Rex eats anything for dinner.
It’s often practical to use one class as the base for another. If we’re mostly creating dog objects, Animal is too generic, and we must specify the same 4-leg and “woof” noise defaults every time.
A Dog class can inherit all the properties and methods from the Animal class using extends. Dog-specific properties and methods can be added or removed as necessary:
class Dog extends Animal {

  constructor(name) {

    // call the Animal constructor
    super(name, 4, 'woof');
    this.type = 'dog';

  }

  // override Animal.speak
  speak(to) {

    super.speak();
    if (to) console.log(`to ${to}`);

  }

}
super refers to the parent class and is usually called in the constructor. In this example, the Dog speak() method overrides the one defined in Animal.
Object instances of Dog can now be created:
const rex = new Dog('Rex');
rex.speak('everyone');      // Rex says "woof" to everyone

rex.eats = 'anything';
console.log( rex.dinner );  // Rex eats anything for dinner.
The post JavaScript’s New Private Class Fields, and How to Use Them appeared first on SitePoint.
This article was created in partnership with iOlite. Thank you for supporting the partners who make SitePoint possible.
Solidity is a fairly new language and as no code is perfect, it contains issues related to the code and what you want to accomplish with it. This article will guide you through the best practices and pitfalls when using a random number as input for your Ethereum smart contract.
Solidity is not capable of creating random numbers. Actually, every algorithm for creating random numbers is pseudorandom — no language is capable of creating completely random numbers. The problem with Solidity is that complex algorithms cost too much, so more basic solutions are used. Besides that, Solidity code should be deterministic, as it will run on multiple nodes. We need an algorithm that is able to generate a random number once, and use it on multiple nodes. Things like a clock time are not available for generating random numbers, so we have to look at other options. As a developer, you should be aware of this problem because an attacker is able to predict the result in some specific cases.
One of the most commonly used algorithms is ‘linear congruential generator’ (LCG). It’s one of the oldest algorithms, fast, and easy to understand. LCG is a good option for embedded systems as they have a limited amount of memory. However, it is not well-suited for cryptographically secure applications. Although, this is still being used in smart contracts as a fast algorithm is much cheaper to implement in terms of gas costs.
The algorithm itself performs these steps:
Let’s explore the different ways of creating random numbers using a Lottery smart contract example. Users are able to join the Lottery by sending 0.1 Ether to the contract together with an integer between 0 and 250.
A block.timestamp is assigned by the miner whenever he confirms the transaction. No player of our Lottery contract is able to control it. Let’s take a look at this piece of code for creating a random number.
function random() private view returns (uint8) {
       return uint8(uint256(keccak256(block.timestamp, block.difficulty))%251);
   }
This piece of code first hashes a block timestamp and difficulty. Next, we convert the hash to an integer and divide it by 251 to get an integer between 0 and 250. However, the problem with this piece of code is that we shouldn’t trust a miner for picking a winner.
We need more arbitrary data for picking our winner. We can use the addresses of the players that have entered our lottery smart contract, but we have to hide it from other players as they can abuse it. Hiding this information is not possible as it’s all recorded on the blockchain.
The numbers submitted to our lottery smart contract can be used. Users have to hash the number they pick together with their Ethereum address. This gives us a pretty random number.
The post Solidity Pitfalls: Random Number Generation for Ethereum appeared first on SitePoint.
Remix is a Solidity IDE that’s used to write, compile and debug Solidity code. Solidity is a high-level, contract-oriented programming language for writing smart contracts. It was influenced by popular languages such as C++, Python and JavaScript.
IDE stands for Integrated Development Environment and is an application with a set of tools designed to help programmers execute different tasks related to software development such as writing, compiling, executing and debugging code.
Before you begin using Remix to develop smart contracts, make sure you’re familiar with some basic concepts. In particular, give these articles about blockchain and Ethereum a read.
A smart contract is a trust-less agreement between two parties that makes use of blockchain technology, to enforce the parties to adhere to the terms, rather than relying on the traditional ways such as trusting a middleman or using laws to handle disputes.
Using the Ethereum blockchain, you can create smart contracts with the Solidity language (among others). Ethereum is not the only platform that can be used to create smart contacts, but it’s the most popular choice, as it was designed from the start to support building them.
Dapp stands for decentralized application and is a web3 application that can have a front-end written in traditional languages such as JavaScript, HTML, CSS and a smart contract (as back-end code) which runs on the blockchain. So you can simply think of a Dapp as the front end plus the associated blockchain smart contract(s).
Unlike the smart contract deployed on the blockchain itself, the front end of a Dapp can be either hosted on a centralized server like a CDN or on decentralized storage like Swarm.
You can access the Remix IDE in different ways: online, via a web browser like Chrome, from a locally installed copy, or from Mist (the Ethereum Dapp browser).
You can access the Remix IDE from your web browser without any special installation. Visit https://remix.ethereum.org/ and you’ll be presented with a complete IDE with a code editor and various panels for compiling, running and debugging your smart contracts. You’ll have a default example Ballot contract that you can play with.
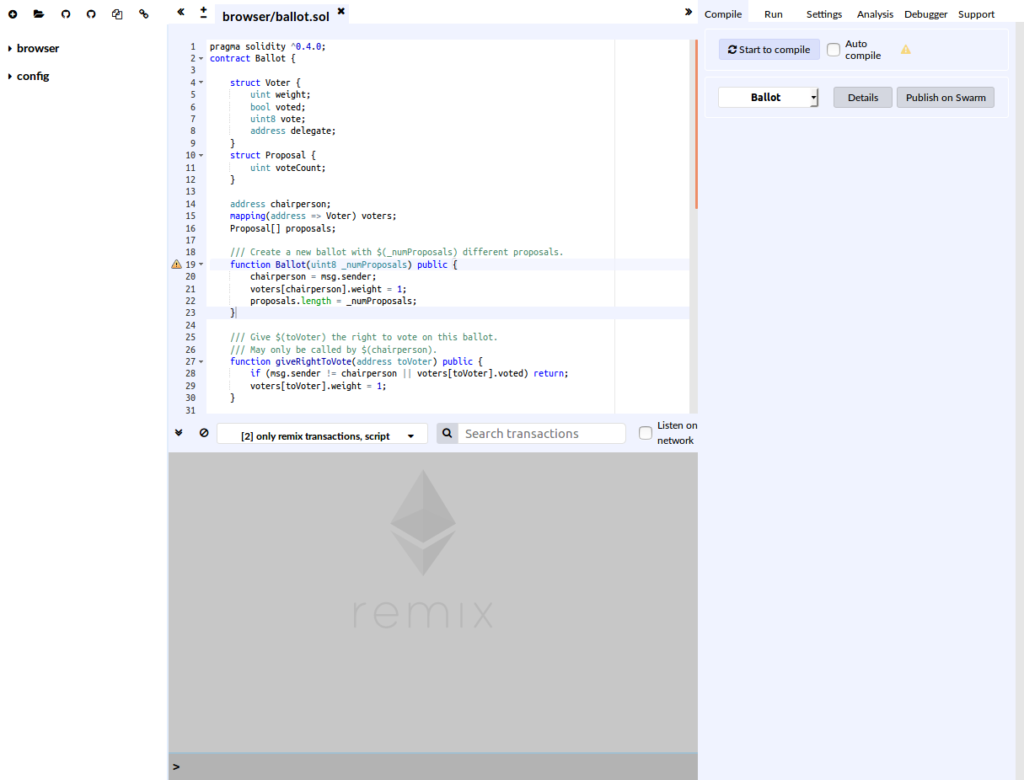
You can start the Remix IDE from Mist by clicking on Develop, then Open Remix IDE. Remix will be opened in a new window. If this is your first time running the IDE, you’ll be presented with a simple example Ballot contract.
To get familiar with Mist, please see this article.
You can also run your own copy of Remix IDE by executing the following commands:
npm install remix-ide -g
remix-ide
You need to have Node.js and npm installed. Check this GitHub repository for more information.
After seeing how to open the Remix IDE, let’s now see the various panels composing the IDE.
The file explorer provides a view with the created files stored in the browser’s storage. You can rename or delete any file by right-clicking on it, then choosing the right operation from the context menu.
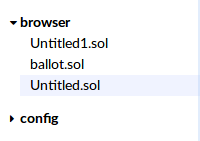
Please note that the file explorer uses the browser’s local storage by default, which means you can lose all your files if you clear or the operating system automatically clears the storage. For advanced work, it’s recommended to use Remixd — a Node.js tool (available from npm npm install -g remixd) which allows the Remix IDE to access your computer’s file system.
Now let’s see the different actions that you can perform using the buttons at the top of the explorer.
![]()
You can create a new file in the browser local storage using the first button with the + icon on the top left. You can then provide a name in the opened dialog and press OK.
Using the second button from top left, you can open an existing Solidity file from your computer file system into the Remix IDE. The file will also be stored in the browser’s local storage.
Using the third and fourth buttons from top left, you can publish files from the IDE as a public GitHub gist.
Using the fifth button from top left, you can copy files from the local storage to another instance of Remix by providing the URL of the instance.
The last button can be used to connect the Remix IDE to your local file system if you’re running the Remixd tool.
The Solidity code editor provides the interface where you can write your code with many features such as syntax highlighting, auto-recompling, auto-saving etc. You can open multiple tabs and also increase/decrease the font size using the +/- button in the top-left corner.
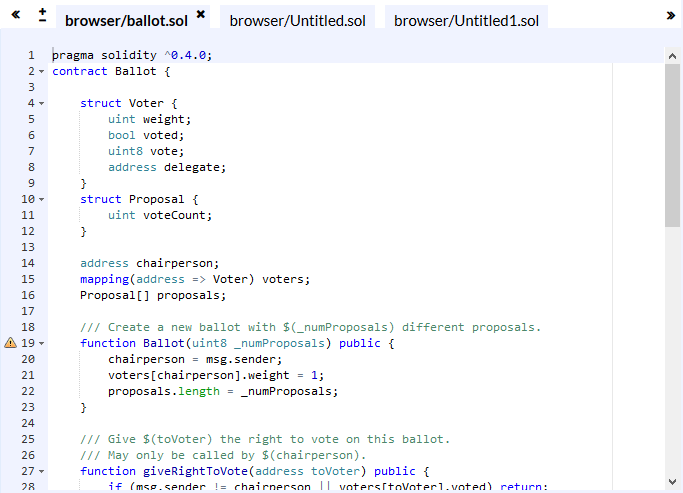
The terminal window below the editor integrates a JavaScript interpreter and the web3 object. You can execute JavaScript code in the current context, visualize the actions performed from the IDE, visualize all network transactions or transactions created from the Remix IDE etc. You can also search for data in the terminal and clear the logs.

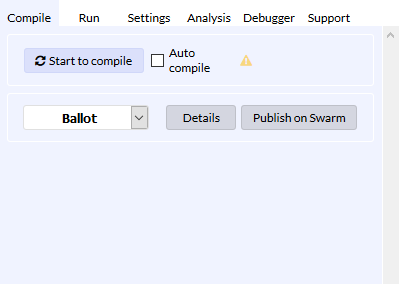
The Tabs panel provides many tabs for working with the IDE:
the Compile tab: used for compiling a smart contract and publishing on Swarm
the Run tab: used for sending transactions to the configured environment
the Settings tab: used for updating settings like the compiler version and many general settings for the editor
the Debugger tab: used for debugging transactions
the Analysis tab: used for getting information about the latest compilation
the Support tab: used for connecting with the Remix community.
The post Remix: Develop Smart Contracts for the Ethereum Blockchain appeared first on SitePoint.